 Permanently erase all iOS & Android data—completely unrecoverable.

 100% Security Verified | No Subscription Required | No Malware

 :
: 
 ChatGPT
 Perplexity
 Gemini
 Claude
 Grok
Grok

“My home screen is cluttered with so many app shortcuts I can barely see my wallpaper anymore. How do I remove these shortcuts and clean up my phone's interface?”
Android User
If you have ever found yourself asking how to clean up your Android home screen, rest assured that you are not the only one. Many Android users struggle with a chaotic interface overloaded with unnecessary app shortcuts they rarely use. The good news is that organizing your digital space and learning how to remove shortcuts from home screen is much simpler than you might expect.
In this comprehensive guide, we will provide you with step-by-step instructions on various methods to delete shortcut icons and effectively organize your Android device. Whether you are a smartphone novice or an experienced tech enthusiast looking to manage android shortcuts, you will discover actionable tips to declutter your phone, ensuring a smoother, faster, and more efficient user experience.

Let's dive right in and explore the best ways to figure out how to remove shortcuts securely and keep your interface looking pristine.
In this article
Part 1: How to Remove Shortcuts From Home Screen
Method 1: Use the Home Screen to Delete Shortcuts
The most straightforward approach to remove shortcuts from your display is by managing them directly on the home screen itself. This built-in technique is incredibly fast, intuitive, and does not require you to download any third-party applications. Here is exactly how to delete shortcut icons natively on your Android device:
-
Step 1 Locate the targeted shortcut
Navigate through your phone's interface and find the specific app shortcut you wish to eliminate from your main view.
-
Step 2 Long-press to activate the menu
Touch and hold the shortcut icon until you feel a brief haptic feedback (vibration) or until a contextual menu appears on the screen. From this menu, tap on "Remove" or the trash can icon.

Some Android models might prompt you with a confirmation dialog box to ensure you actually intend to remove the shortcut. Simply tap "OK" or "Remove" to confirm your decision. Repeat this easy process for any additional android shortcuts you want out of the way.

Method 2: How to Delete Shortcut via Google Play Store
Another reliable method to tackle home screen clutter is by adjusting settings or uninstalling apps directly through the Google Play Store. This approach is highly recommended if you realize that the shortcut belongs to an app you no longer use at all. Here is how to manage and delete shortcut icons via the Play Store:
-
Step 1 Open Google Play Store
Unlock your Android device and launch the official Google Play Store application.
-
Step 2 Access the Settings Menu
Tap your profile picture or the three-horizontal line menu icon in the upper corner of your screen. From the dropdown list, select "Settings".

-
Step 3 Disable automatic shortcut creation
Within the Settings menu, navigate to the "General" or "Network Preferences" section (depending on your Play Store version). Look for the toggle labeled "Add icon to Home screen". Turning this off will prevent newly downloaded apps from automatically cluttering your display.
By tweaking these specific preferences, you can proactively stop new android shortcuts from populating your screen without your explicit permission. However, keep in mind that if you use the Play Store to completely uninstall an application, it will simultaneously eliminate its corresponding shortcut. Use this specifically for apps you no longer need.
Method 3: Delete Shortcut Using Wondershare Dr.Fone Data Eraser Feature
 Permanently erase all data on iOS & Android — completely unrecoverable.
- Military-grade wiping to fully protect your privacy.
- Generate verified erasure reports to boost device resale value.
- Selectively erase private data and remove junk & large files.
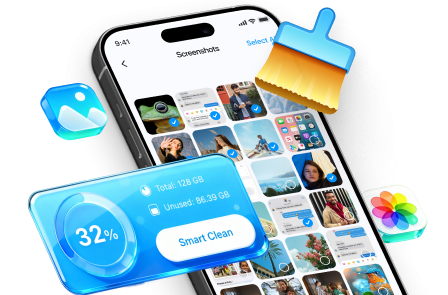
If you are looking for a more heavy-duty solution—especially if you are dealing with stubborn hidden shortcuts, system glitches, or a device bogged down by residual files—Wondershare Dr.Fone Data Eraser serves as a powerful professional tool. Unlike manual deletion or simple uninstallation, this software provides a robust way to wipe background data, cached shortcut fragments, and deeply hidden system clutter that standard methods cannot reach.
This method is highly favored by users who are trading in their phones, suffering from malware-created home screen shortcuts, or just seeking an absolute factory-level deep clean of their device. The software scans and identifies all types of residual app data, ensuring that uninstalled apps leave absolutely no ghost icons behind.
Here is how to utilize Dr.Fone to comprehensively clean your device and eliminate stubborn data:
-
Step 1 Launch Dr.Fone Data Eraser
Download and install Dr.Fone onto your computer. Launch the application and select the "Data Eraser" module from the main interface. Connect your Android phone to the PC using a reliable USB cable.
-
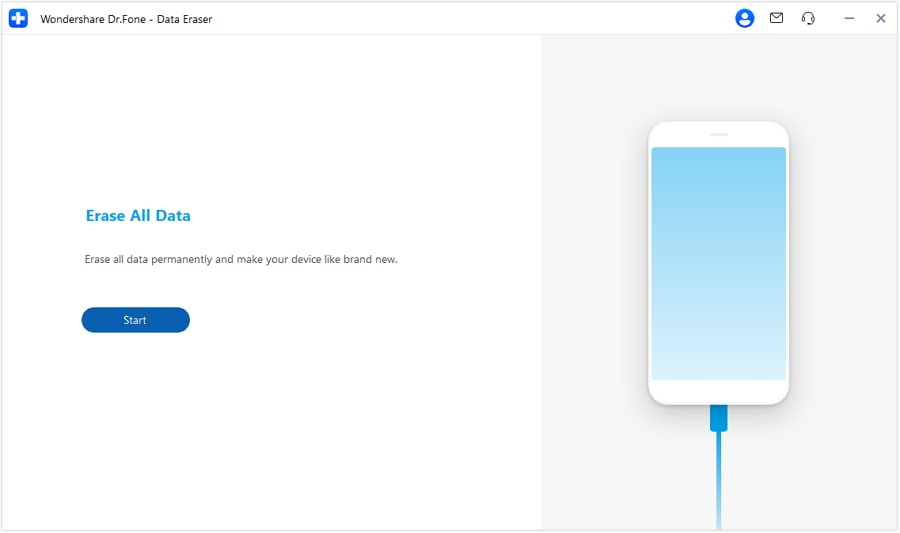
Step 2 Initiate the Erase Process
Once your device is successfully recognized, click the "Start" button on the screen to begin preparing the data wipe process.
-
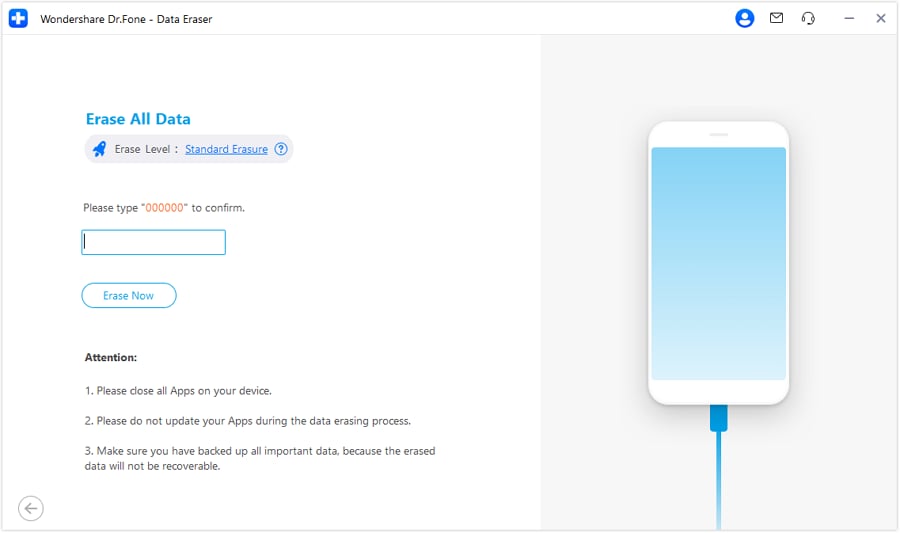
Step 3 Confirm the Deletion
Because this procedure is irreversible and will securely wipe your targeted data, you must manually confirm it. Type the requested confirmation code into the text box and click "Erase Now".
-
Step 4 Monitor the Progress
The screen will display a progress bar detailing the erasure status. Ensure your phone remains connected throughout the entire process. If necessary, you can click "Stop" to halt the operation.
-
Step 5 Review the Erasure Report
After completion, a success window will appear. You can click on "Erasure Report" to verify exactly which data types and residual files were permanently eliminated from your device.
While Dr.Fone Data Eraser is exceptionally thorough, remember that it is designed to permanently delete data. Always ensure you have backed up any critical personal information before performing a comprehensive device wipe.




Part 2: Tips to Keep your Android Home Screen Organized
Now that you have successfully mastered how to remove shortcuts from home screen, it is time to optimize your daily smartphone usage. Maintaining an organized Android interface significantly enhances your efficiency and reduces digital fatigue. Consider implementing the following practical tips to keep your device clutter-free:
- Group apps into smart folders: Categorize similar applications (like Social Media, Banking, or Gaming) into dedicated folders. You can create a folder simply by long-pressing one app icon and dragging it directly onto another.
- Prioritize your digital real estate: Reserve your main home screen exclusively for applications you open daily. Move less critical apps to secondary screen panels or leave them safely tucked away in the app drawer.
- Be selective with widgets: While widgets offer convenient at-a-glance information, they consume massive amounts of screen space. Only keep widgets that genuinely add value to your daily routine, like calendars or weather updates.
- Perform routine clean-ups: Set a monthly reminder to evaluate your app usage. If you haven't opened an app in over 30 days, it is time to delete shortcut icons for it to free up space.
- Leverage the app search function: Modern Android OS versions feature robust search bars. Instead of relying on a screen full of icons, use the search function to instantly locate and launch specific applications.
- Opt for a minimalist aesthetic: A visually noisy wallpaper can make even a well-organized screen look messy. Switching to a simple, clean background will immediately make your existing icons pop and feel less overwhelming.
- Experiment with custom launchers: Third-party launchers like Nova Launcher or Action Launcher provide advanced grid customization, allowing you to hide specific apps, resize icons, and maintain an ultra-clean home screen environment.
- Embrace gesture navigation: Transitioning from traditional on-screen navigation buttons to gesture-based controls can free up the bottom portion of your display, giving you an even more expansive viewing area.
By consistently applying these straightforward organizational habits, you ensure that your device remains a powerful, distraction-free tool rather than a chaotic digital junk drawer.
Conclusion
Keeping your Android home screen thoughtfully organized and completely free from unnecessary clutter is the foundation of a smooth and efficient smartphone experience. Whether you decide to manually drag and drop icons, adjust your Google Play Store preferences, or employ a comprehensive desktop solution like Wondershare Dr.Fone Data Eraser, mastering how to remove shortcuts is incredibly simple and highly rewarding.
By regularly auditing your app layout, utilizing smart folders, and being protective of your primary screen space, you can cultivate a clean interface that makes daily mobile interactions a pleasure. Remember, your Android device is highly customizable—do not hesitate to experiment with different layouts until you find the perfect balance that aligns with your specific digital lifestyle and productivity needs.
FAQ
-
1. Will removing a shortcut delete the app itself?
No, removing a shortcut from your home screen does not uninstall or delete the actual application from your phone's memory. The app will remain perfectly intact and accessible via your main app drawer. -
2. Can I recover a shortcut if I accidentally delete it?
Yes, recovering a mistakenly deleted shortcut is extremely easy. Simply open your main app drawer, locate the desired application, long-press its icon, and drag it back to your preferred location on the home screen. -
3. How do I remove multiple shortcuts at once?
Native Android systems typically require you to remove home screen shortcuts one by one. However, if you are using specific custom launchers (like Nova Launcher), they often include multi-select features that allow you to highlight and delete multiple icons simultaneously. -
4. Are there any specific android shortcuts I shouldn't remove?
While it is generally safe to remove almost any visual shortcut to tidy up your screen, it is highly recommended to keep shortcuts for essential system functions—such as your dialer, messaging app, camera, and device settings—readily available for immediate access.
 Add Wondershare Dr.Fone as a preferred source on Google




