 Permanently erase all iOS & Android data—completely unrecoverable.

 100% Security Verified | No Subscription Required | No Malware

 :
: 
 ChatGPT
 Perplexity
 Gemini
 Claude
 Grok
Grok

In today's highly connected digital landscape, understanding how to wipe a phone is a critical privacy measure for every smartphone user. Whether you are preparing to sell your device, passing it along to a family member, or simply looking for a fresh, bug-free start, safeguarding your personal data should always be your top priority. Simply deleting files manually is never enough, as modern forensic tools can easily retrieve surface-level deletions. This comprehensive guide will walk you through exact protocols to securely and permanently eradicate your private information from your Android ecosystem.
The most foolproof method to erase all contents and settings and completely delete data on Android is to utilize specialized data destruction software like Wondershare Dr.Fone - Data Eraser. This class of software physically overwrites the storage sectors on your device, ensuring zero possibility of recovery. Alternatively, if you prefer built-in tools, navigating the native Android factory reset options combined with a manual cache partition wipe can also yield effective results. Before proceeding with any of these methods, always ensure your essential files are safely backed up to a secure cloud or secondary hard drive.
In this article
Part 1. What Data Resides on an Android Partition?
Your Android smartphone acts as a digital vault, storing vast amounts of sensitive information across various isolated partitions. Before learning how to wipe an Android phone, it is vital to understand exactly what you are erasing. Here is a breakdown of the typical data stored deep within your system:
- System Files: The core Android operating system, pre-installed bloatware, and basic hardware configuration settings.
- Personal Identification Data: Downloaded applications, hidden app caches (such as saved game progression or offline content), and your linked accounts and plaintext passwords.
- Temporary Files: Backend logs that help applications load faster, saved web browser cookies, and image thumbnails.
- Media Storage: Your personal camera roll, recorded videos, offline music tracks, podcasts, downloaded PDFs, and tax documents.
- External/Expandable Storage: If your phone supports an SD card, this includes legacy backups, transferred APKs, and external app data.
- Hidden System Areas: Dedicated recovery partitions containing files for emergency system fixes and Over-The-Air (OTA) update packages.
Why This Matters for Your Privacy
Understanding the architecture of your phone's storage helps you realize the sheer volume of data that needs to be scrubbed. When you want to completely wipe an Android phone, you must clear all these deeply embedded areas to ensure absolutely none of your personal identity is left exposed. While some data is readily visible in your file manager, much of it is hidden in system-level directories that demand specific wiping procedures.

Part 2. How to Completely Wipe an Android Phone
Now that we have established the critical nature of what resides on your device, let us dive into the actual erasure protocols. Below are two highly effective approaches to scrub your device. We will begin with the most secure, software-driven method before covering the native OS process.
Method 1: Use Wondershare Dr.Fone Data Eraser (Recommended)
 Permanently erase all data on iOS & Android — completely unrecoverable.
- Military-grade wiping to fully protect your privacy.
- Generate verified erasure reports to boost device resale value.
- Selectively erase private data and remove junk & large files.
When looking to execute a complete data sweep, a standard factory reset might leave underlying bits of data susceptible to advanced digital forensics. Wondershare Dr.Fone - Data Eraser provides a military-grade, comprehensive wiping solution that physically overwrites the storage sectors on your Android device multiple times. This approach is strongly advised for maximum security.
By bypassing basic OS-level deletion and writing arbitrary data over your storage blocks, it ensures that your private media, banking details, and cached passwords are permanently obliterated. Additionally, it offers a detailed summary report so you have concrete proof of the wipe. Here is how to navigate the procedure:
-
Step 1 Download and Launch the Software
To begin, navigate to the official website and download the Dr.Fone software compatible with your PC's operating system. Install the suite, open it, and connect your Android smartphone using a reliable USB cable. From the primary dashboard, select the Data Eraser module.

-
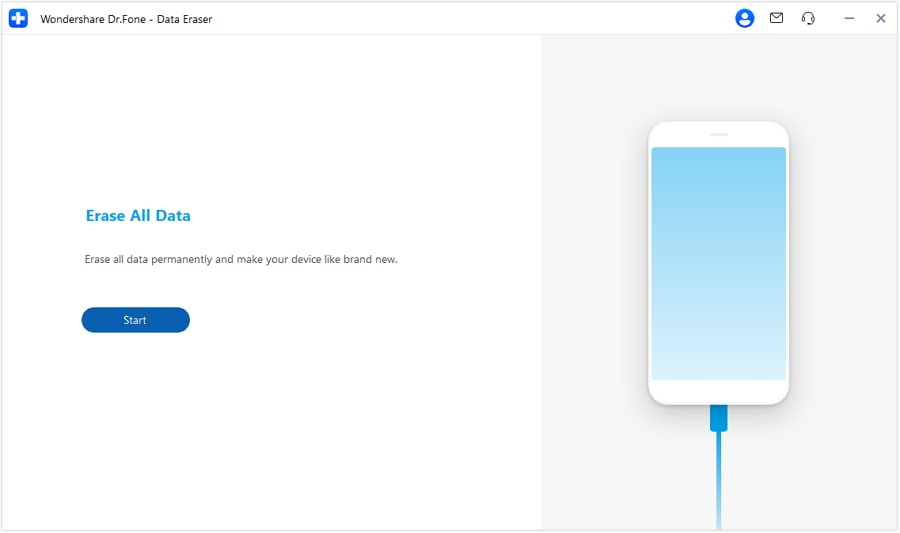
Step 2 Initiate the Erase Process
Once the dedicated Data Eraser window opens and properly recognizes your connected mobile device, click the Start button to allow the software to scan and prepare the storage partitions for a complete wipe.
-
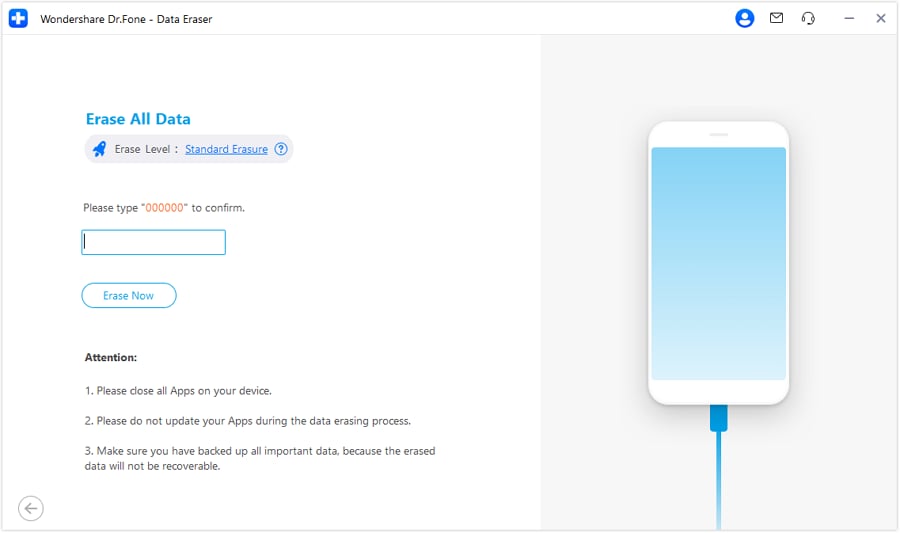
Step 3 Confirm the Permanent Deletion
Given the irreversible nature of this operation, the software enforces a security check. You will be prompted to type a specific security code into the text box. Enter the code exactly as shown, then click Erase Now to authorize the system to proceed.
-
Step 4 Monitor the Wiping Status
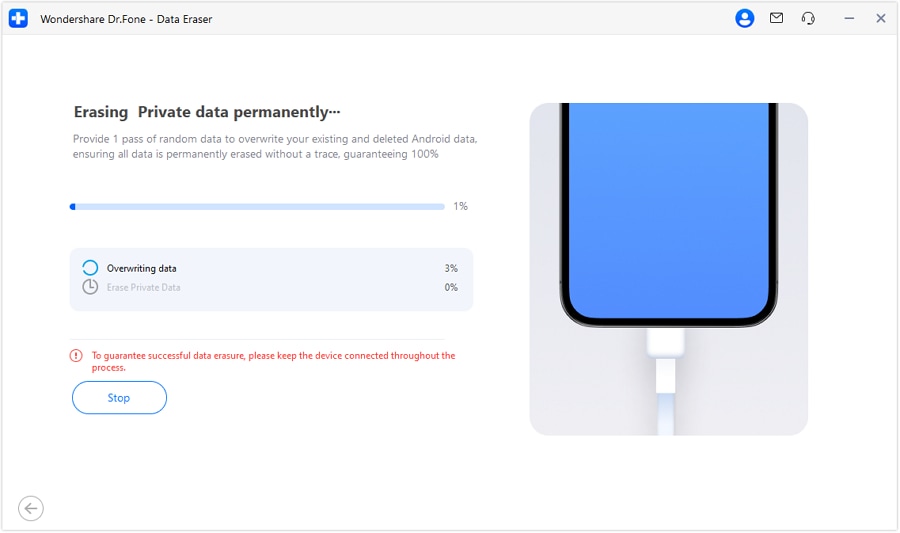
A live progress screen will appear, detailing exactly which files and sectors are currently being destroyed. Ensure your phone remains tethered to the computer without interruption until the bar reaches 100%. If necessary, you can click Stop to halt the process, though this is not recommended mid-wipe.
-
Step 5 Review the Erasure Report
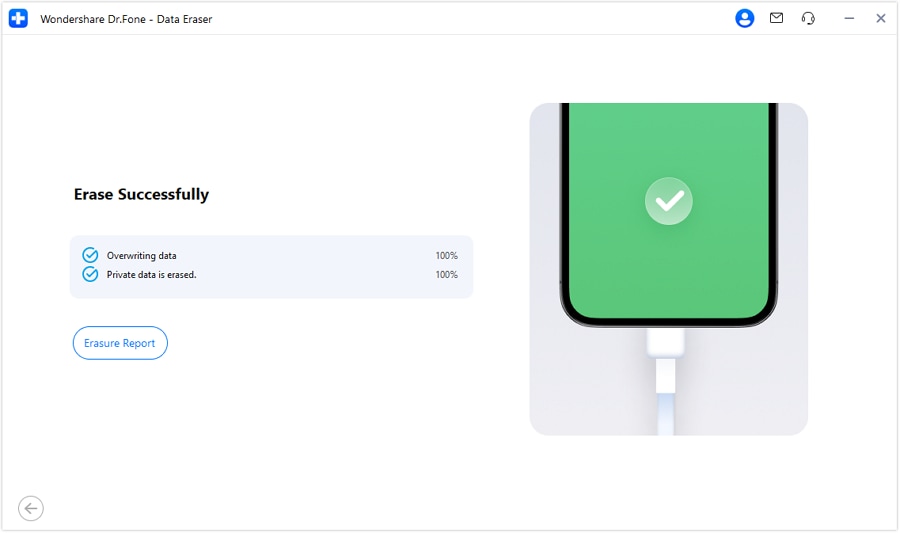
Once the overwriting cycle finishes, a success message will appear on your screen. You can click Erasure Report to access a detailed log of every data type that was permanently purged, confirming your Android device is safely wiped.




2-2. Method 2: Delete Data on Android via Settings App
If utilizing a third-party desktop application is not an option for you, the native Android operating system provides a direct pathway to delete data on Android. While this method does not physically overwrite the deeper storage sectors like specialized software does, it is adequate for general use and fast device hand-offs.
-
Step 1 Access System Settings
Unlock your smartphone and launch the main Settings application. Scroll down toward the bottom of the list and tap on System. From the expanded menu, select Backup and Reset (or "Reset options" depending on your specific Android version).

-
Step 2 Initiate Factory Data Reset
Within the reset options menu, locate and tap on Factory data reset. This option is specifically designed to clear user data and return the system registry to its original state.
-
Step 3 Review Warnings and Confirm
Your screen will populate with a detailed list of the accounts, apps, and media files that are about to be erased. After reviewing the information, tap the Reset Device or "Erase all data" button at the bottom.

-
Step 4 Authenticate and Reboot
The system will prompt you for your device PIN, unlock pattern, or biometric password to authorize the action. Enter it successfully, and your phone will immediately restart to begin the wipe. Allow the phone several minutes to boot back up to the initial setup screen.
Part 3. How to Erase All Contents and Settings Including Cache
While the standard settings reset handles the bulk of your active data, orphaned system files and outdated logs can still linger in the device's cache partition. To perform a genuinely comprehensive wipe and erase all contents and settings to factory perfection, you must manually clear the recovery cache prior to resetting.
-
Step 1 Enter Recovery Mode
Power off your Android device completely. Once the screen is black, press and hold the Power button and the Volume Down button simultaneously (button combinations may vary slightly by manufacturer). Hold them until the specialized Android recovery mode screen appears.
-
Step 2 Navigate to Wipe Cache
The touch screen is typically disabled in recovery mode. Use your physical volume up/down keys to navigate the text menu. Scroll down until you highlight Wipe cache partition, then press the power button once to select it.

-
Step 3 Confirm the Wipe
You may be asked to confirm this action on the next screen. Select "Yes" and wait a few moments as the system formats the cache volume.
-
Step 4 Reboot the System
Once you are returned to the main recovery menu, highlight Reboot system now and press the power button. This guarantees that all hidden temporary files are permanently destroyed, leaving absolutely no trace of your usage footprint.
Conclusion
Mastering how to wipe a phone completely is an indispensable skill in modern device management. Whether you are transitioning to a newer flagship model, donating your old hardware, or seeking a security reset, maintaining strict control over your digital footprint prevents identity theft and data leaks. Adhering to the detailed protocols in this guide guarantees that your sensitive credentials, media, and browsing histories remain private.
For individuals seeking absolute certainty, deploying robust software like Wondershare Dr.Fone - Data Eraser stands out as the ultimate method. It circumvents the shortcomings of standard resets by aggressively overwriting storage partitions. Nonetheless, pairing Android's native factory reset with a manual cache wipe provides a solid alternative for rapid deployment.
Whichever route you select, never forget to thoroughly back up your irreplaceable files to an external drive or cloud service before you erase all contents and settings. With the right preparation and tools, you can confidently let go of your old device, knowing your personal life will not follow it into the hands of a stranger.
FAQ
-
1. How long does it typically take to wipe an Android phone completely?
The duration depends heavily on the chosen method and the total storage capacity of your device. A standard built-in factory reset usually takes around 10 to 20 minutes from authentication to the final reboot. However, utilizing a comprehensive digital shredder like Dr.Fone Data Eraser can take upwards of an hour, as the software physically overwrites every gigabyte of storage multiple times for maximum security. -
2. Is it possible for someone to recover data after wiping an Android phone?
If you solely rely on an older device's standard factory reset without encryption, highly advanced forensic recovery software might salvage fragments of data. Conversely, if you use a dedicated data destruction application like Dr.Fone Data Eraser, the original data sectors are completely overwritten with arbitrary code, rendering data recovery virtually impossible even for professionals. -
3. Do I need to remove my SIM card and SD card before wiping my phone?
Absolutely. A factory reset exclusively targets your phone's internal storage drive. It will not wipe your connected SIM card or external MicroSD card. To ensure complete privacy and prevent unauthorized access to your mobile network, manually remove both cards before executing any data-wiping procedures. You can format the SD card separately using a computer if you plan to sell it alongside the phone. -
4. How do I empty the trash or recycle bin on an Android device?
Unlike desktop operating systems, Android does not feature a universal, system-wide "Trash" folder. Instead, individual applications manage their own deleted items. For instance, in Google Photos or your default Gallery app, you must navigate to the "Recently Deleted" or "Trash" folder and manually select "Empty Trash." For comprehensive file cleanup across the entire device, utilizing the default Google Files app or a reputable third-party file manager is highly recommended.
 Add Wondershare Dr.Fone as a preferred source on Google




