Large Storage on iOS 15? Here's How to Empty the Other Storage After iOS 15 Update
iPhone Problems
- iPhone Hardware Problems
- iPhone Home Button Problems
- iPhone Keyboard Problems
- iPhone Headphone Problems
- iPhone Touch ID Not Working
- iPhone Overheating
- iPhone Flashlight Not Working
- iPhone Silent Switch Not Working
- iPhone Sim Not Supported
- iPhone Call Volume Low
- iPhone Software Problems
- iPhone Passcode Not Working
- Google Maps Not Working
- iPhone Screenshot Not Working
- iPhone Vibrate Not Working
- Apps Disappeared From iPhone
- iPhone Emergency Alerts Not Working
- iPhone Battery Percentage Not Showing
- iPhone App Not Updating
- Google Calendar not Syncing
- Health App Not Tracking Steps
- iPhone Auto Lock Not Working
- iPhone Screen Recorder No Sound
- Find My iPhone Not Sharing Location
- iPhone Battery Problems
- iPhone Media Problems
- iPhone Echo Problem
- iPhone Camera Black
- iPhone Won't Play Music
- iOS Video Bug
- iPhone Calling Problem
- iPhone Ringer Problem
- iPhone Camera Problem
- iPhone Front Camera Problem
- iPhone Not Ringing
- iPhone Not Sound
- iPhone Mail Problems
- Reset Voicemail Password
- iPhone Email Problems
- iPhone Email Disappeared
- iPhone Voicemail Not Working
- iPhone Can't get Mail connection
- Gmail Not Working
- Yahoo Mail Not Working
- iPhone Update Problems
- iPhone Stuck at the Apple Logo
- Software Update Failed
- iPhone Verifying Update
- Software Update Server Couldn't Be Contacted
- iOS update Problem
- iPhone Won't Update
- iPhone Connection/Network Problems

Jul 12, 2024 • Filed to: Mobile Repair Solutions • Proven solutions
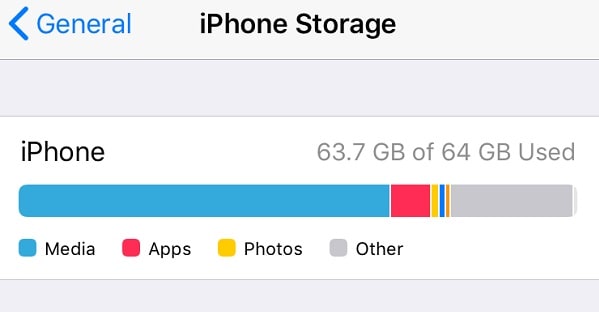
Whenever a new iOS version is released, iPhone users often update their device to experience all the amazing features it brings. Though, sometimes after updating to a new firmware version, you might encounter storage-related issues on your device. The same goes for iOS 15, which has recently been released. A lot of users are complaining of large storage on iOS 15 after updating their devices. Well, to help you fix this and clear the other storage on your iPhone, I have come up with this guide. Without much ado, let’s fix the large storage on the iOS 15 issue.
Part 1: How to Fix the Large Storage on iOS 15 Issue?
Since there could be different reasons for the accumulation of the “Other” storage on your iOS device, you can consider following these suggestions:
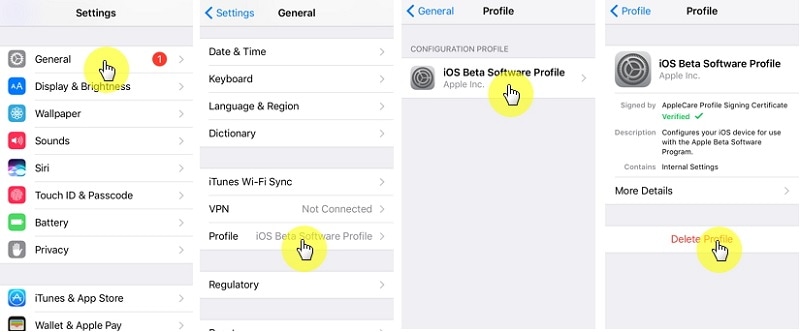
Fix 1: Delete the iOS 15 profile
One of the major reasons for large storage on iOS 15 is the firmware file that might not be deleted from the device. This issue is pretty common when we update our device to a beta version of iOS. You can just go to your iPhone’s Settings > General > Profile and select the existing software profile to fix this. Just tap on the “Delete Profile” button and confirm your choice by entering your device's passcode.
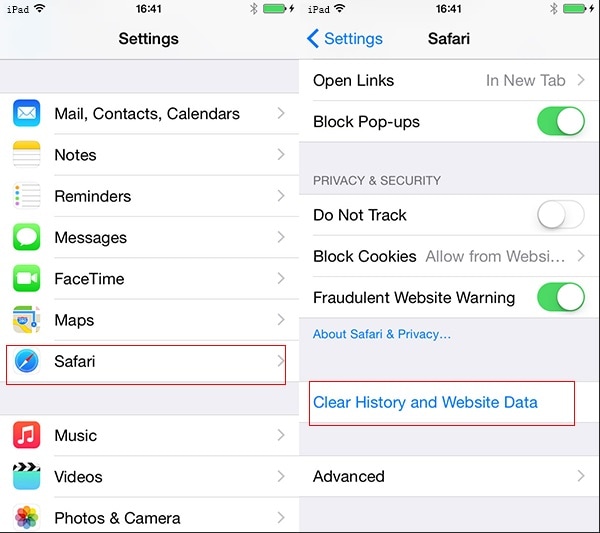
Fix 2: Clear Safari Data
You might already know that Safari data can accumulate a lot of space on our device categorized under the “Other” section. To fix this, you can go to your phone’s Settings > Safari and tap on the “Clear History and Website Data” option. Please note that this will erase Safari’s saved passwords, website history, cache, and other temp files.
Fix 3: Delete any linked account.
As you know, we can link third-party accounts like Yahoo! or Google to our iPhone. Sometimes, these accounts can accumulate large storage on iOS 15 that you can easily get rid of. For this, go to your iPhone’s Mail Settings, select the third-party account, and remove it from your iOS device.

Fix 4: Delete unwanted mails.
If you have configured your emails so that they are stored on your iPhone, they can also cause large storage on iOS 15. To fix this, you can go to the default mail app on your device and remove unwanted emails from it.

Fix 5: Factory Reset your Device
Lastly, if nothing else seems to fix the large storage on iOS 15, you can factory reset your device. This will erase all the existing data and saved settings from your device and delete the other storage. You can go to your iPhone’s Settings > General > Reset and select the “Erase all Content and Settings” option. You would have to enter the passcode of your iPhone to confirm your choice as your device resets.

Part 2: Back up iPhone Data Before Updating to iOS 15
If you plan to update your device to iOS 15, make sure you take its backup in advance. This is because the updating process can be stopped in between to cause an unwanted loss of your data. To take a backup of your iPhone, you can use a reliable application like Dr.Fone – Phone Backup (iOS).
Using it, you can take an extensive backup of your iPhone data like photos, videos, audios, contacts, messages, call logs, etc. to your computer. Later, you can restore an existing backup to the same or any other iOS device of your choice. The Dr.Fone application can also be used to restore your iTunes or iCloud backup to your device without any data loss.
Step 1: Connect your iPhone.
Firstly, connect your iPhone to your computer and select the “Phone Backup” feature from the home screen of Dr.Fone toolkit.

Step 2: Backup your iPhone
From the provided options, choose to “Backup” your iPhone. As you can see, the application can also be used to restore a backup to your device.

On the next screen, you will get a view of various data types that you can save. You can either select all or choose specific types of data to backup. You can also select a location to save your backup and click on the “Backup” button when you are ready.
Step 3: Backup completed!
That’s it! You can wait for a while as Dr.Fone will take a backup of your data and let you know when the process is completed. You can now view the backup history or go to its location to view your backup files.

Part 3: How to Downgrade from iOS 15 to a Stable Version?
Since the stable version of iOS 15 is not yet out, the beta release can cause unwanted issues on your device. For instance, having large storage on iOS 15 is one of the many issues users encounter after the update. The easiest way to fix this would be downgrading your device to a previous stable iOS version.
To downgrade your iPhone, you can take Dr.Fone's assistance – System Repair (iOS). The application can fix all kinds of minor or major issues with iOS devices and downgrade them without any unwanted data loss. Besides that, you can also repair any critical issue with your iPhone using it. You can follow these steps to downgrade your device and fix the large storage on the iOS 15 issue.
Step 1: Connect your iPhone and launch the tool
To begin with, you can launch the Dr.Fone toolkit on your computer and connect your iPhone to it using a working cable. From the welcome screen of the toolkit, you can select the “System Repair” module.
Furthermore, you can go to the iOS Repair section of the interface and select the Standard Mode as it won’t erase your iPhone data. If there is a severe issue with your iPhone, you can select the Advanced Mode (which will erase its data).

Step 2: Download the iOS firmware.
You can enter details about your device on the next screen, like its model and the iOS version you wish to downgrade to.

Afterward, click on the “Start” button and wait as the application would download the iOS update for the provided version. It will also verify your device to make sure there won’t be any compatibility issues later on.

Step 3: Downgrade your iOS device
In the end, when the application has downloaded the iOS update, it will notify you. Now, click on the “Fix Now” button and wait as your device will be downgraded.

Once the process is over, the application will be restarted in the normal mode. You can safely remove your device and use it without encountering any issues.

This brings us to the end of this extensive post on fixing the large storage on the iOS 15 issue. As you can see, I have listed various methods that you can implement to minimize the other storage on iPhone. Besides that, I have also included a smart way to downgrade your device from iOS 15 to a stable version. The application is extremely easy to use and can fix all kinds of other iOS-related issues on your device without any data loss or harming it.


Alice MJ
staff Editor