iPhone Screen Recording No Sound? 7 Ways to Fix!

Jul 12, 2024 • Filed to: Mobile Repair Solutions • Proven solutions
Are you an avid iPhone user who loves capturing screen recordings? Imagine the frustration of recording an important tutorial or capturing a memorable gaming moment only to discover that the audio is missing. It's undoubtedly a perplexing issue that many iPhone users encounter. But worry not, as this article aims to provide effective solutions to fix this iPhone screen recorder no sound problem.
We'll walk you through step-by-step solutions to restore sound to your screen recordings. By the end, you'll be equipped with the knowledge and tools necessary to tackle this issue. Afterward, you can get back to recording your iPhone screen with crystal-clear audio.
- Part 1: How To Record iPhone Screen With Sound
- Part 2: 6 Common Fixes to iPhone Screen Recorder No Sound Issue
- Part 3: The Advanced Way to Fix iPhone Screen Recorder No Sound

- Part 4: FAQs About Screen Recording
- Bonus Tip: How to Export Screen Recording Videos from iPhone to Computer?
You can watch the video below to fix iPhone screen recorder no sound!
Part 1: How To Record iPhone Screen With Sound
Capturing your iPhone screen along with the sound can be incredibly useful. You can use it for creating tutorials, sharing gameplay, or preserving memorable moments. Figuring out how to record your iPhone screen with sound may seem like a hassle, but it is not, even if you are new to the world of iOS screen recording. Use the following steps to record your iPhone screen with sound:
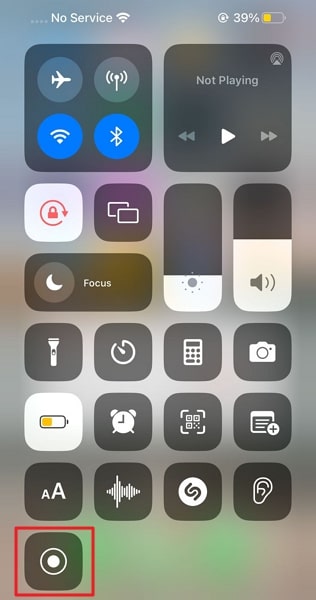
Step 1: Access your iPhone’s “Control Center” by swiping downwards from the top right corner. Here find and long-press the screen recording button.

Step 2: After long-pressing the button, you will see a small menu. Here, enable the microphone option to record your voice along with screen recordings.
Part 2: 6 Common Fixes to iPhone Screen Recorder No Sound Issue
Encountering the frustrating problem of iPhone screen recordings is not a great experience. However, luckily for you, it is a complex issue to resolve. You can fix this issue through common fixes with any data loss. Explained below are the 6 most common solutions to resolve my screen recording has no sound:
Fix 1: Turn on the Microphone
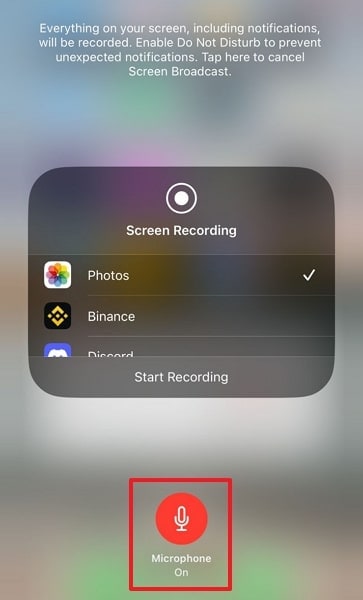
A common reason behind screen recording iPhone no sound is the microphone being turned off. By default, iOS disables the microphone when you start screen recording. It does that to avoid capturing unwanted audio. However, if you intend to record screen activity along with sound, you need to enable the microphone. To enable the microphone during your screen recording, you need to follow these steps:
Step 1: Swipe down from the top-right corner of the iPhone to open the Control Center. Here, you'll find the screen recording button. Tap and hold the screen recording button to reveal more options.
Step 2: You need to ensure the microphone icon is highlighted. It turns red when enabled. It indicates that the microphone will capture audio during screen recording.

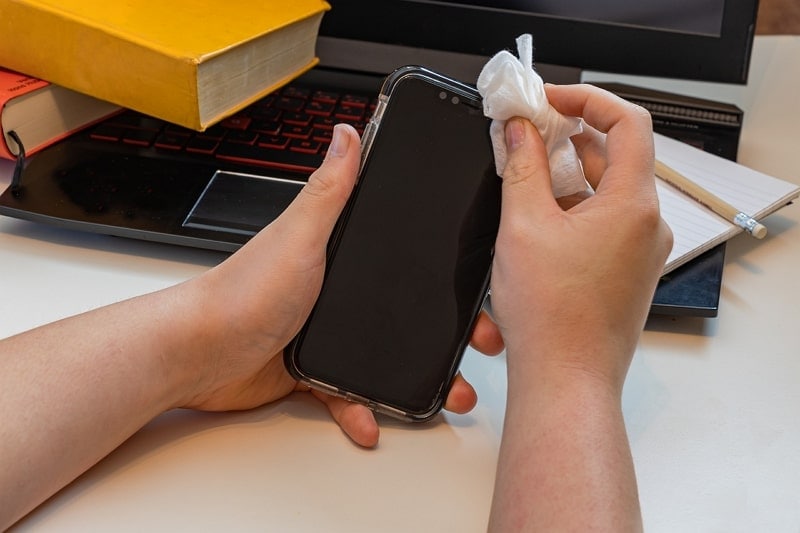
Fix 2: Clean the Microphones on iPhone
Experiencing a screen recording audio not working issue? It is possible that the microphones on your device are obstructed by dirt, dust, or debris. Over time, these particles can accumulate and affect the audio quality. Generally, you'll find microphones at the top, bottom, and back of the device, near the front camera, back camera, and speakers.
Take a soft-bristled brush and gently clean the microphone openings. Be careful when brushing away any visible dirt or debris. Moreover, make sure not to apply excessive pressure.
Fix 3: Disconnect the Bluetooth Devices
It is possible that a connected Bluetooth device is causing the screen recording to have no sound problem. Bluetooth devices, such as headphones or speakers, can sometimes interfere with the audio settings. It results in the absence of sound during screen recordings. You can disable the Bluetooth device by removing them or turning off Bluetooth one by one.
To disable Bluetooth, access Control Center and tap the “Bluetooth” icon. Ensure it is no longer highlighted in a blue color. Once you have removed all Bluetooth devices, check if the problem is gone.

Fix 4: Restart the iPhone
Encountering issues with your iPhone, including the Facetime recording with no sound problem, is not a fun experience. A simple and effective solution in such situations is to restart the device. Restarting can help resolve temporary software glitches or conflicts. It also refreshes all processes, which clears out all the problematic factors. Here is how you can restart your iPhone to resolve this issue:
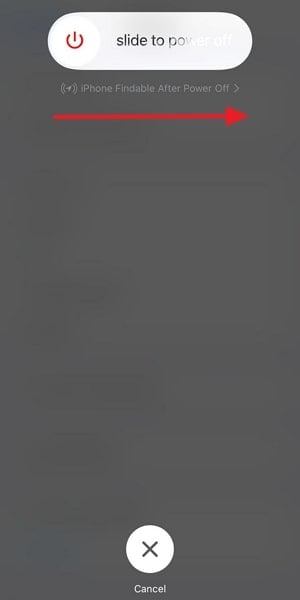
Step 1: Launch the Settings app on your iPhone and access the "General" tab. Now you have to go to the last option in the list referred to as "Shut Down," and tap it.
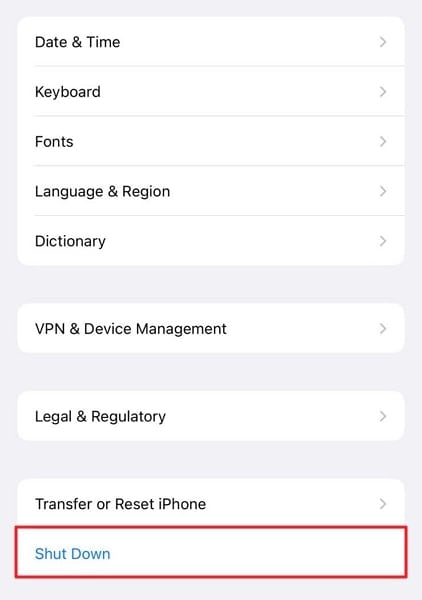
Step 2: As soon as you tap "Shut Down," a power slider will appear on the screen. Now slide it to the right side to turn off your iPhone. After a while, use the "Side" button to restart it.
Fix 5: Update the iOS Version
Outdated software can often lead to various issues on your iPhone. One example of such issues is problems with screen recording doesn’t have sound. Apple regularly releases updates to iOS, the device’s operating system. These include bug fixes and improvements that address such issues. Following is the procedure to update your iPhone's iOS version:
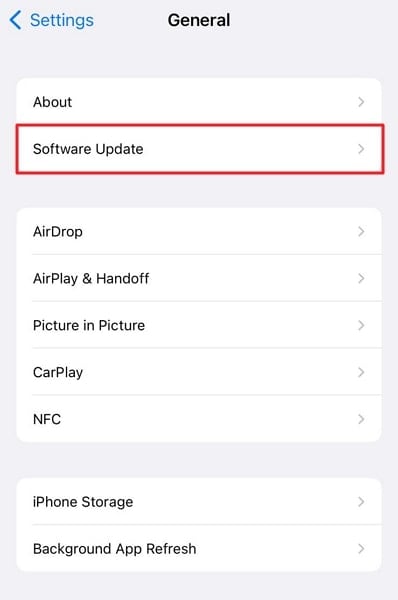
Step 1: Go to your iPhone's Settings app and tap "General." You need to select "Software Update" from there. This feature will check if any firmware updates are available for your device.
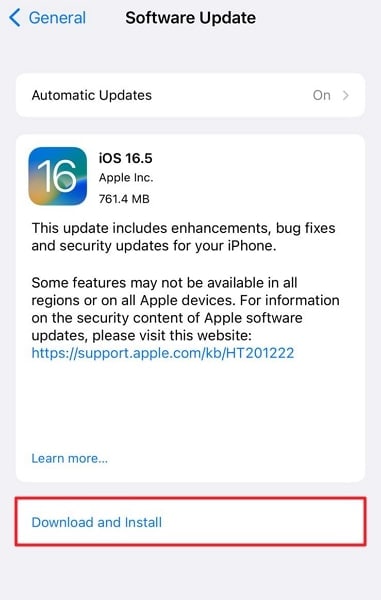
Step 2: If an update is available, tap on "Download and Install" to start the update process. Make sure your iPhone is connected to a stable and fast Wi-Fi network and has more than 50% battery life.
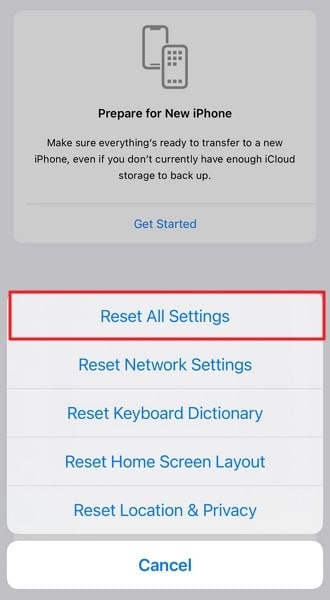
Fix 6: Reset All Settings
Resetting all settings will revert your iPhone's settings to their default configurations. It is a handy solution to problems such as iPhone recording no sound. Moreover, it is especially useful where the underlying cause is conflicting settings. You won't lose any data when resetting the iPhone settings. However, you will lose all the customized settings. Listed below are the detailed steps to reset your iPhone settings:
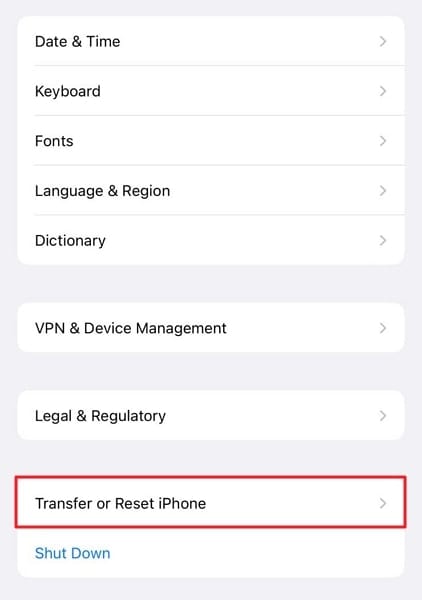
Step 1: Open the Settings app on your iPhone, scroll down, and tap "General." Here in the general settings options, find and tap "Transfer or Reset iPhone."
Step 2: On the following screen, tap on "Reset." Select "Reset All Settings" from the available options. You may need to enter your passcode. To confirm the action, tap on "Reset All Settings," and your iPhone settings will be like a new device.
Part 3: The Advanced Way to Fix iPhone Screen Recorder No Sound
If you've tried the previous fixes and are still experiencing the issue, you need a system repair tool. What you need is a tool that is capable of resolving such issues without causing data loss. Thus, the tool you are looking for is Wondershare Dr.Fone - System Repair(iOS). It offers a comprehensive iOS system repair feature that can solve 150+ issues with ease.
It has the capability to resolve most iOS system issues without affecting your data. The issues it can resolve include my screen recording doesn't t have sound, a frozen iPhone, etc.
Main Features of Wondershare Dr.Fone
- Wondershare Dr.Fone offers two powerful modes for system repair, Standard Repair, and Advanced Repair.
- The Advanced Repair mode has the capability to handle most complex iOS issues.
- With this software, you can upgrade or downgrade the iOS version of your device without jailbreak.
Steps To Fix iPhone Screen Recorder No Sound With Wondershare Dr.Fone
For Wondershare Dr.Fone, resolving most of the iOS system issues is a breeze. Here is how you can fix the no sound on screen recording iPhone issue within minutes:
Step 1: Launch Wondershare Dr.Fone and Choose System Repair
Use the official website to download and install Wondershare Dr.Fone on your computer. Afterward, launch the program and "System Repair" from the "Toolbox" tab. Now connect your iPhone to the computer and choose "iOS."

Step 2: Choose Standard Repair As the Fix Mode
In the system repair menu of iOS devices, click "iOS Repair." Now choose "Standard Repair" as your repair mode to protect your data. The next step is to enable Recovery Mode on your device. You can do this by following on-screen instructions.

Step 3: Download and Install the Correct Firmware
With Recovery Mode enabled, Wondershare Dr.Fone will detect the device model. It will provide relative firmware options. Choose the right one by clicking "Download" and wait for it to download and install.

Step 4: Resolve the No Sound in the Screen Recording Issue
You can proceed once the firmware has been verified and installed on your device. To resolve all issues, including no sound in the screen recording, click "Repair Now." The process will take some time to complete.

Part 4: FAQs About Screen Recording
It is understandable if you have more questions regarding screen recording on iPhone devices. Below we have answered some of these FAQs to help you:
- Why is my screen recording not recording sound?
There can be several reasons why your screen recording is not capturing sound. The microphone might be disabled during screen recording. If you have a Bluetooth device connected to your iPhone, it may interfere with the audio settings. Your iPhone's software might have encountered a glitch or bug. Moreover, dirt and debris in the microphone openings can affect the audio capture.
- Does Apple screen recording record audio on Zoom?
No, it is not possible to record audio on Zoom using the in-built screen recorder on your iPhone. The main reason behind it is that Zoom doesn't allow the native application on both Android and iOS to capture audio. If you want to record a Zoom meeting, you need to do it using Zoom's internal feature. That feature is also restricted to hosts and co-hosts.
Bonus Tip: How to Export Screen Recording Videos from iPhone to Computer?
Regarding the question of exporting the screen recordings from the iPhone to the computer, Export All Data provides the perfect source for its users in transferring their data from the iPhone to the computer. The tool can act as the most appropriate option available in the market. However, this is associated with multiple key features that display the platform's impressive structure for handling the iOS device's data.
- Helps users in transferring all kinds of content, including contacts, SMS, photos, music, and videos from the iOS device.
- It supports the latest version of iOS, which makes it a compatible option in the market.
- It covers multiple functions such as transferring, managing, deleting, and converting data across its platform.
- It is very easy to use for people who do not have much knowledge of such platforms.
To know how you can export the screen recording from the iPhone to the computer with Wondershare Dr.Fone in detail:
Step 1: Choose the Export All Data
Launch Dr.Fone on your computer and proceed to the "Export all data" section on the homepage. Then, connect your iPhone to the computer through a cabled connection.

Step 2: Choose the Data Type to Export
You will see a list of data types, check the "Videos" and other data types you want to export and click "Export".

Step 3: Wait for the export to complete
The program will start to export the data you select. Wait patiently to complete the export process.

Export Video Now Export Video Now
Conclusion
To summarize, encountering no audio in screen recording issues can be frustrating. However, there are several effective solutions available to address this issue. To fix iPhone screen recording issues, one recommended choice is Wondershare Dr.Fone. It is a comprehensive iOS toolkit that offers a wide range of powerful features. Using the system repair capabilities of Wondershare Dr.Fone, you can resolve all system issues.


iPhone Issues
- iPhone Storage Full
- 1. Stuck on Apple Logo Storage Full
- 2. Erase Content Settings not Working
- 3. iPhone Lagging
- 4. iPhone Running Slow
- iPhone Update Problems
- 1. Stuck on Updating iCloud Settings
- 2. iPhone Frozen During iOS Update
- 3. iPhone Checking for Update Stuck
- 4. iPhone Cellular Update Failed
- 5. iPhone Software Update Failed
- 6. iPhone Stuck on Update Requested
- 7. iPhone Update Error 1110
- 8. iPhone Stuck On Verifying Update
- 9. iPhone Won't Update
- 10. Update Server Couldn't Be Contacted
- 8. iPhone & iPad Security Updates
- 9. Update iPhone with/without iTunes
- 10. Can't Download or Update Apps
- iPhone Media Problems
- 1. Apple Music Song Not Available
- 2. iPhone Not Ringing
- 3. iPhone Echo Problem
- 4. iPhone Ringer Problems
- 5. iPhone Plays Music by Itself
- 6. Ringer Volume Changes by Itself
- 7. Music Won't Play on iPhone
- 8. Blurry Photos & Videos on iPhone
- 9. iPhone Volume Problems
- iPhone Sound Problems
- 1. YouTube no Sound
- 2. iPhone Microphone Problem
- 3. Test iPhone Microphone
- 4. Headphones No Sound from iPhone
- 5. No Sound on iPhone Game
- 6. iPhone Sound Not Working
- 7. iPhone Screen Recording no Sound
- iPhone Calling Problems
- 1. iPhone No Sound on Calls
- 2. Screen Goes Black During Call
- 3. iPhone Recent Calls Not Showing
- 4. iPhone Dropping Calls Issue
- 5. iPhone Calling Problem
- iPhone Camera Problems
- 1. iPhone Camera Black
- 2. iPhone Camera Blurry
- 3. iPhone Camera Not Working
- 4. iPhone Front Camera Not Working
- 5. TrueDepth Camera Not Working
- 6.Out-of-Focus Photos on iPhone 15
- iPhone Network Problems
- 1. Airpods Won't Connect to iPhone
- 2. iPhone Disabled Connect to iTunes
- 3. iPhone Not Syncing Problems
- 4. iPhone Internet Not Working
- 5. iPhone Keep Disconnecting from Wifi
- 6. iPhone WIFI Not Working
- 7. PC Not Recognizing iPhone
- 8. iPhone Stuck on Connect to iTunes
- 9. iPhone Not Showing up in iTunes
- 10. iTunes Not Detecting Your iPhone
- 11. iPhone Bluetooth Disconnect
- 12.Apple CarPlay Keeps Disconnecting
- Other iPhone Problems
Daisy Raines
staff Editor
Generally rated4.5(105participated)