Backup Your iPhone Like a Pro: Simple Backup Techniques With or Without iTunes
iPhone Backup
- iPhone Data Backup
- 1. Back up iPhone in Recovery Mode
- 2. Back Up iPhone With/Without iTunes
- 3. Back up iPhone to Mac
- 4. Back up iPhone/iPad to Computer
- 5. Back up iPhone to Mac Catalina
- 6. Back up Jailbreak Apps And Restore
- 7. iPhone Backup Software
- 8. Back up iPhone/iPad Easily
- 9. Back up iPhone/iPad in DFU Mode
- 10. Back up iPhone Apps and App Data
- 11. Back up Notes on iPhone and iPad
- 12. Back up iOS to External Hard Drive
- 13. Export Notes from iPhone to PC/Mac
- 14.Back up iPhone Photos to Google Photos
- 15. Back Up Your iPhone Voicemails
- 16. Back Up to External Drive
- 17.How to Back Up to NAS
- 18.Back Up iPhone With Broken Screen
- 19.Back Up iPhone to Google Drive
- 20.Buy Used iPhones
- 21.Sell Used Phone for Cash
- 22.Sell Used iPhone for Dollar
- 23.How Much is My iPhone Worth
- iPhone Data Recovery
- 1. Recover iPhone Data Without Backup
- 2. Restore Calendar on iPhone
- 3. Recover Call History on iPhone
- 4. Recover iPhone Lost Data
- 5. Restore iPhone in Recovery Mode
- 6. Undelete iPhone Backup Files
- 7. Recover Deleted iPhone Messages
- iPhone Data Restore
- 1. Restore iPhone from iTunes Backup
- 2. Restore iPhone after Downgrade
- 3. Restore iPhone from Backup
- 4. Restore iPhone from iPad Backup
- 5. Restore iPhone from DFU Mode
- 6. Restore iPhone Deleted Text Message
- iPhone Backup Problems
- 1. Find iPhone Backup Location on Mac
- 2. iPhone Backup Password Never Set
- 3. iPhone Backup Password Forget
- 4. iCloud Backup Taking Forever
- 5. iPhone Won't Backup to iCloud
- 6. iTunes Won't Backup iPhone
- iPhone Restore Problems
- 1. iTunes Stuck on Verifying iPhone
- 2. Not Space to Restore iPhone Backup
- 3. iTunes Backup Not Restoring
- 4. iPhone Won't Restore
- WhatsApp Backup & Restore
- 1. WhatsApp from Google Drive to iOS
- 2. Restore Old WhatsApp Backup
- 3. Restore WhatsApp Chat on iPhone
- 4. Retrieve WhatsApp Chat History
- 5. See Deleted Messages on WhatsApp
- 6. Restore WhatsApp Stuck on iPhone
- 7. iPhone WhatsApp to Google Drive
- 8. Back Up WhatsApp on iPhone
- 9. Backup WhatsApp Data before Changing Number
- iPhone Backup Tips
- 1. Extract Data From iPhone
- 2. Encrypt iPhone Backup
- 3. Reset iPhone Backup Password
- 4. Extract iPhone Backup in Win 10
- 5. How Long take iPhone to Backup
- 6. Find iPhone Backup Location
- 7. iPhone Backup Password
- 8. View iPhone Backup on Computer
- 9. iPhone Backup with iTunes/iCloud
- 10.Check Last Backup on iPhone
- 11. How To Backup Foldable iPhone
- 12. Best Backup Chargers for iPhone
- 13. Speed Up Your iPhone Backups
- 14. Save Data When iPhone Disabled
- ● Manage/transfer/recover data
- ● Unlock screen/activate/FRP lock
- ● Fix most iOS and Android issues
- Free Download Free Download Free Download

May 18, 2026 • Filed to: Backup & Restore Solutions • Proven solutions
 TL;DR:
Backing up an iPhone locally to a computer requires iTunes for Windows and older Macs, or Finder for macOS 10.15 and later, both of which create a full device backup that can only be restored by overwriting all existing data on the device.
● Native iTunes and Finder backups cannot be previewed directly without third-party software, will completely erase your device's current data upon restoration, and automatically exclude Touch ID, Apple Pay, Health activity, and any iMessages or media already synced to iCloud.
● If an iTunes backup fails due to disconnection or compatibility errors, necessary troubleshooting steps include turning off Background App Refresh on the iPhone, switching the device to Airplane mode, or temporarily disabling Windows firewall and anti-malware software.
● Users who need to preview backup contents, perform automatic Wi-Fi backups over a local network, or selectively restore specific files without overwriting their entire device must use third-party tools like Wondershare Dr.Fone, which requires a paid subscription for full feature access.
Ask AI for a summary
 ChatGPT
 Perplexity
 Gemini
 Claude
 Grok
Grok
Dr.Fone Basic:
Better Control for Your Phone
Manage, transfer, back up, restore, and mirror your device
iPhones have become more than just phones; they store users' memories, contacts, and vital information. Suddenly losing such files can be frustrating. Knowing how to back up your iPhone to iTunes is crucial. A reliable backup of your iPhone is essential in case of any data loss or device damage.
Safeguard your iPhone data with ease using our expert guide on simple backup techniques, both with and without iTunes. Learn how to protect your valuable information and enjoy the peace of mind that comes with knowing your data is securely backed up and ready to be restored at a moment's notice, ensuring your cherished memories and critical data remain safe and easily recoverable.
Part 1. How To Backup iPhone to iTunes
Backing up your iPhone to iTunes is a reliable and straightforward method to ensure the safety of your valuable data. Follow this step-by-step guide to create a backup using iTunes:
- Step 1: Connect your iPhone to your computer using a lightning cable, then launch iTunes on your computer. You can download it from the Apple website if you don't have iTunes installed.
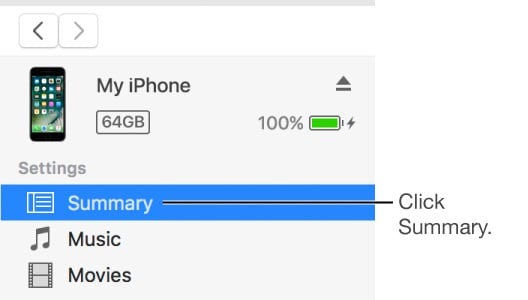
- Step 2: Once iTunes is open, click the "small iPhone" icon to access your device's Summary page. On the Summary page, you will find various options and settings for your iPhone.
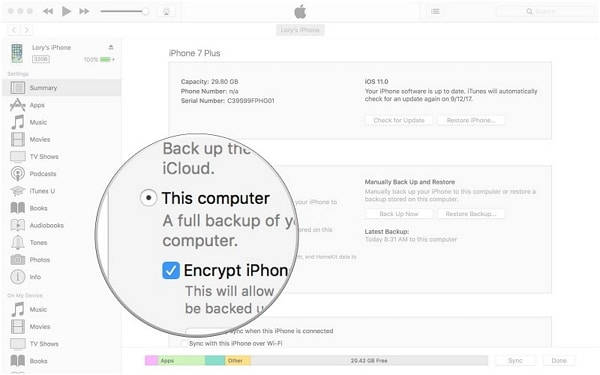
- Step 3: Under the Backups section, you have two options: iCloud and This Computer . Choose This Computer to create a backup on your computer via iTunes.
- Step 4: Select the data you want to include in the backup. You can back up your iPhone's settings, contacts, messages, photos, videos, and more.
Tip: You can also choose to encrypt your backup for added security, which will require a password to restore the backup later.
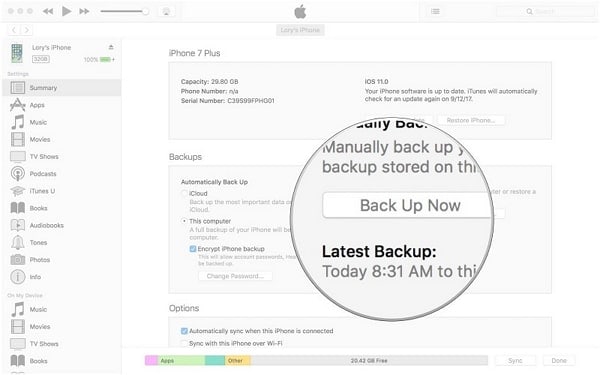
- Step 5: Once you have selected the backup options, click the Back Up Now button. iTunes will start the backup process, and you can monitor the progress in the top center of the iTunes window.
Advantages of iTunes Backup
- Ability to create comprehensive backups of your entire device, including app data and settings
- Allows for easy restoration of your iPhone from the backup
- Can be encrypted for enhanced security
Disadvantages of iTunes Backup
- Backup is stored on your computer, so you may need sufficient disk space
- Cannot be accessed directly to view or extract specific files without using third-party tools
- May not be compatible with different iOS versions, requiring you to update iTunes or restore to a compatible device
Part 2. Troubleshooting Common iTunes Backup Issues
Encountering errors during the backing up iPhone to iTunes process can be frustrating. Here are some common issues and their solutions:
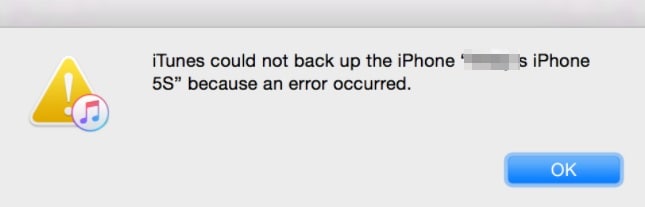
Issue #1: iTunes Could Not Backup the iPhone Because an Error Occurred
Encountering issues while backing up your iPhone to iTunes? The dreaded prompt may be caused by a compatibility mismatch between iTunes and your iPhone, or even a network security configuration gone awry. Don't worry, we've got you covered - discover the simple solutions to resolve this common error.
Solution 1: Restart your computer after closing iTunes. Relaunch it and see if you still get this issue.
Solution 2: If you haven't updated iTunes in a while, you may see this problem. Navigate to the iTunes menu and check for updates. This will assist you in updating iTunes to the most recent stable version.
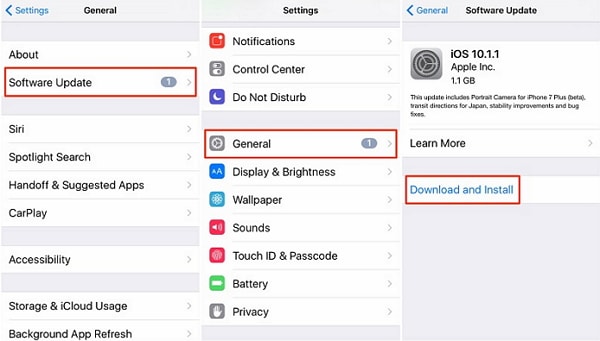
Solution 3: Similar to iTunes, there could be an issue with the iOS version on your device. You can upgrade your iPhone or iPad to the newest iOS version by going to Settings > General > Software Update .
Solution 4: A firewall setting on your PC may also interfere with iTunes. Simply disable your firewall or disable any third-party anti-malware software and attempt to back up your device again.
Issue # 2: iTunes Could Not Backup the iPhone Because the iPhone Got Disconnected
This issue usually occurs when there's a communication problem between your device and the OS (or iTunes).
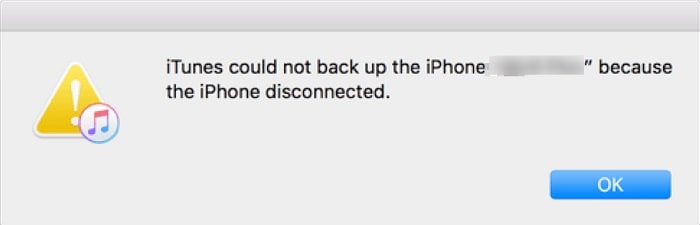
Solution 1: First, look for any hardware problems. Ensure you're connecting your device using the original Apple lightning cable and that it's in good working order. Check the USB ports on your iOS device and the system to ensure there is no hardware malfunction.
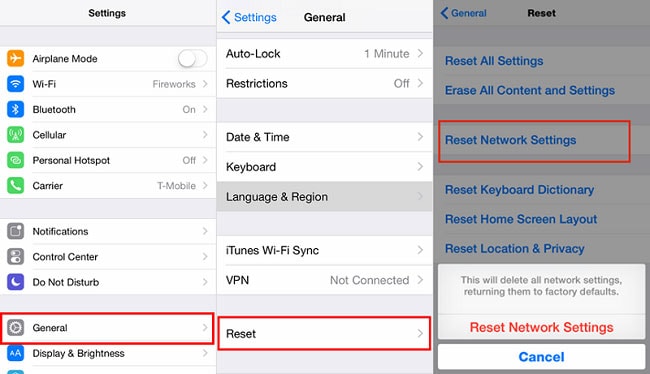
Solution 2: Your iOS device may also be experiencing a network issue. To resolve this, navigate to Settings > General > Reset and select Reset Network Settings .
Solution 3: Go to your device's Settings and make sure the Background App Refresh option is turned off. It is usually caused by a program running in the background.
Solution 4: Unplug your phone, put it in Airplane mode, and reconnect it to iTunes.
Issue #3: Corrupted iTunes Backup
In this scenario, your backup is most likely corrupted and cannot be recovered in any way. Nonetheless, you can attempt some of these methods to repair it.
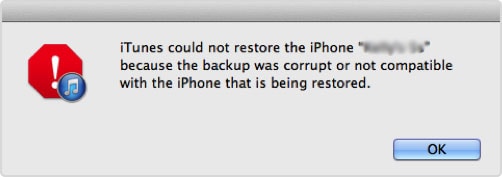
Solution 1: Delete any prior undesired iTunes backup files. Select and remove the files that are no longer required. After that, restart iTunes and attempt to restore the backup.
Solution 2: If you don't want to erase an existing backup file, you may rename it or relocate it to another location.
Solution 3: Make sure your iOS device has enough free space. Otherwise, the backup file's content cannot be restored.
Solution 4: Using a dedicated third-party program to extract the iTunes backup file is the best approach to tackle this issue. You can accomplish the same using Wondershare Dr.Fone . Load an iTunes backup into the application to restore its content to your device.
Part 3. How To Backup iPhone Without iTunes
Because of its restrictions, many users seek alternatives to iTunes for backing up their iPhones. This section will introduce several alternatives providing the steps on how to back up iPhones without iTunes .
Method 1: Using Dr.Fone – Phone Backup Feature
Ditch the hassle of iTunes and discover a seamless alternative with Dr.Fone, a user-friendly program that enables effortless backup and restoration of your iPhone data with just one click. Renowned for its reliability and efficiency, Dr.Fone is a top-rated iOS backup and restore solution that will exceed your expectations.

Key Features
This powerful tool offers a range of features to simplify the backup process and provide a comprehensive backup solution for iPhone users.
- Full Device Backup: Fone - Phone Backup feature allows you to create a complete backup of your iPhone, including contacts, messages, photos, videos, app data, and more. It ensures that all your important data is securely stored.
- Easy Restoration: If you need to restore your iPhone from a backup, Dr.Fone - Phone Backup simplifies the process. You can easily select the desired backup and restore it to your device with a few clicks.
Pros
- User-Friendly Interface: Fone - Phone Backup provides a simple and intuitive user interface, making it easy for users of all levels to navigate and perform backup operations.
- Encryption for Enhanced Security: The option to encrypt backups provides an extra layer of security, ensuring your sensitive data remains protected.
Cons
- While Dr.Fone - Phone Backup offers a free trial, access to its full range of features may require a subscription, which may be a limitation for some users.
Step-by-Step Guide on How To Back Up iPhone using Dr.Fone - Phone Backup
Dr.Fone provides an option to back up devices automatically. The steps on how to achieve this are stated below:
- Step 1: Launch the Dr.Fone application. Navigate to the My Backup section on the screen's left side, then click Backup Preferences to bring up the menu with backup choices in a new window.
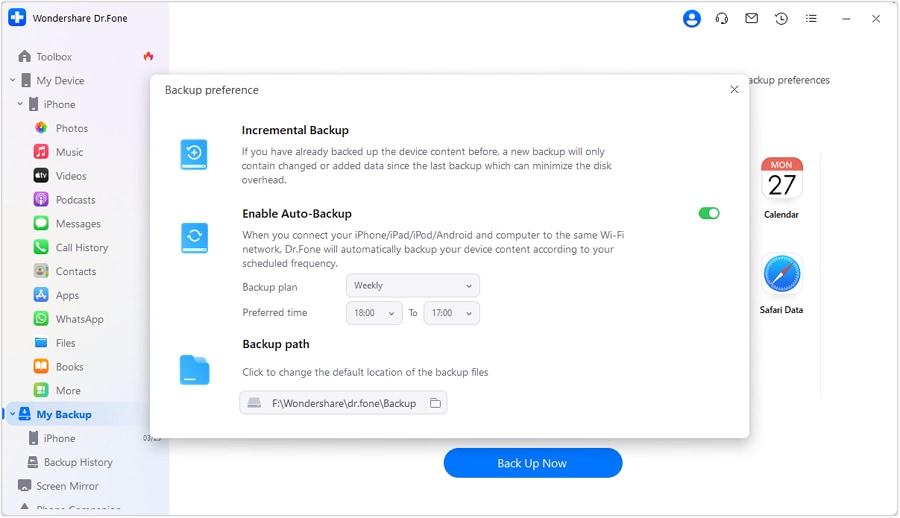
- Step 2: Confirm that your phone and computer are connected to the same network when you turn on the Enable Auto-Backup toggle. If they are, your device will back up the defined Backup Plan and Preferred Time automatically.
- Step 3: Dr.Fone will now back up your phone. To see every backup of your iOS device has ever made, select Backup History . To preview the backup's contents in each category, choose View from the menu.

Step-by-Step Guide on How to Restore iPhone Backup using Dr.Fone
You can use Dr.Fone to back up your data and restore it to an iOS or Android device. Below are the steps on how to do this:
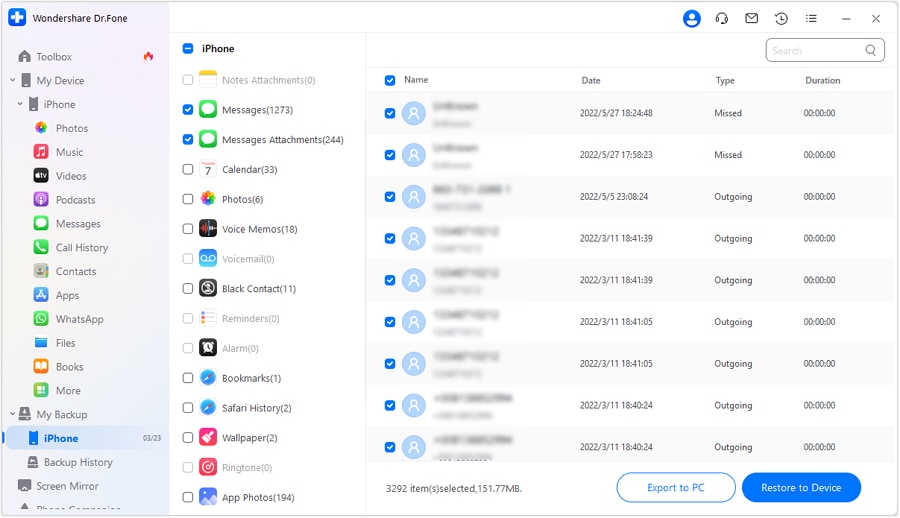
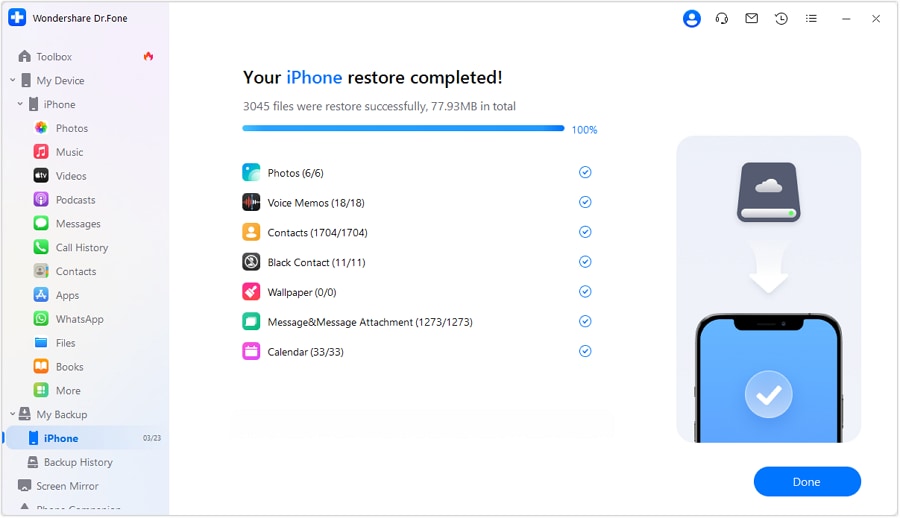
- Step 1: After the backup is complete, the software will list every type of saved file. The Backup History tab is also available on the left side of the screen. The list of available backups will appear. To restore your iOS backup file, tap any backup and View .

- Step 2: When you select a specific file category, such as Call History , you can see all the information stored in that folder and flag the items you want to restore. When you're ready, click the Restore to Device button.
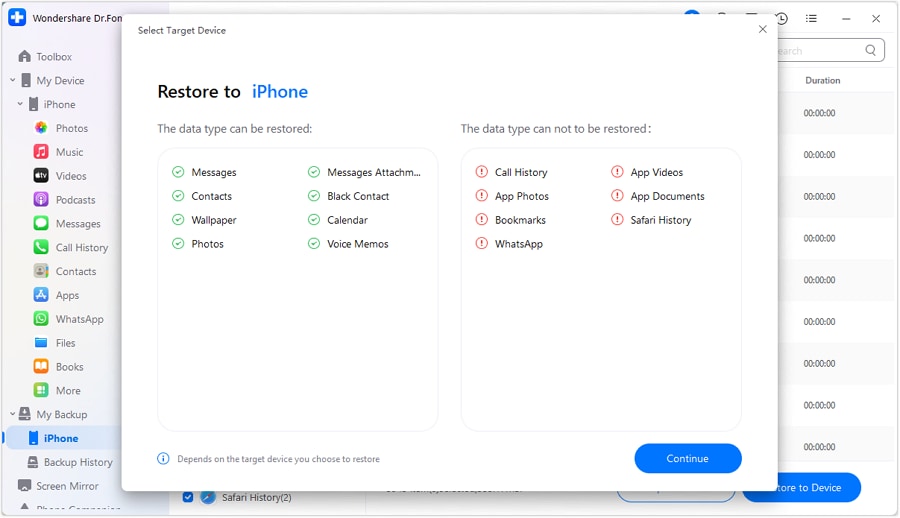
- Step 3: In a new tab or window, you'll see a rundown of what kinds of files can and can't be used for device restoration. Check the information, then select Continue to start the restoration process.
- Step 4: As the repair process starts, a progress bar will be shown. You can abort the backup restoration process by clicking the Cancel button at the bottom of the screen.
- Step 5: When this new screen appears, restoration is complete. The names and contents of every file that was retrieved will be shown. The final step is to click the Done button.
Method 2: iCloud Backup
To back up your iPhone using iCloud, follow the steps given below:
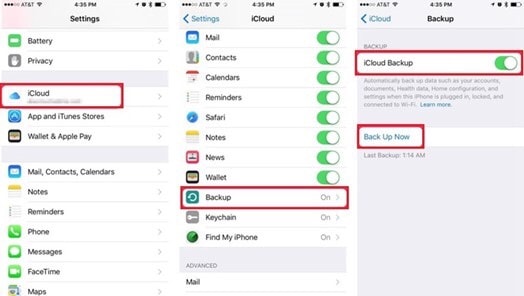
- Step 1: Go to Settings > [your name] > iCloud > iCloud Backup to get started.
- Step 2: Enable iCloud Backup . When your iPhone is turned on, locked, and connected to Wi-Fi, iCloud automatically backs up your data.
Note: If your iPhone model supports 5G, your carrier may allow you to back up your iPhone using your cellular network. Simply toggle Backup Over Cellular on or off from the iCloud Backup settings.
- Step 3: Tap Back Up Now to proceed with the manual backup.
Method 3: Using Mac via Finder
The steps for backing up iPhone using Mac via Finder are stated below:
- Step 1: Connect your iPhone to your PC using a cable.
- Step 2: Select your iPhone from the Finder sidebar on your Mac.
Note: To use the Finder to back up your iPhone, you must have a macOS 10.15 or later. Use iTunes to back up iPhone on earlier versions of macOS.
- Step 3: Click General at the top of the Finder window, then choose Back up all of the data on your iPhone to this Mac .
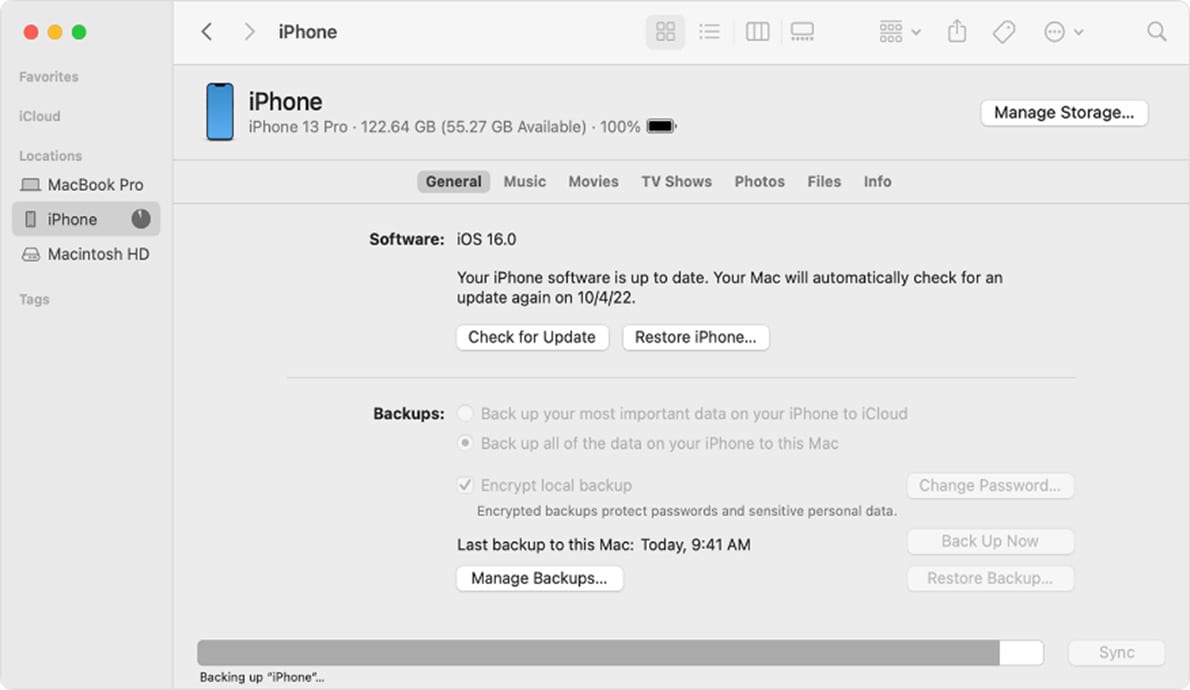
- Step 4: Select Encrypt local backup to encrypt and password-protect your backup data.
- Step 5: Click Back Up Now to initiate the process.
Note: You can also wirelessly connect your iPhone to your computer if you enable Wi-Fi syncing.
Method 4: Using Windows PC Via Google Drive
Safeguard your iPhone data with Google Drive, a cloud-based storage solution that seamlessly syncs files across all devices connected to the same Google account. To create a secure backup of your iPhone on your computer, simply upload your files to Google Drive and access them from anywhere, at any time.
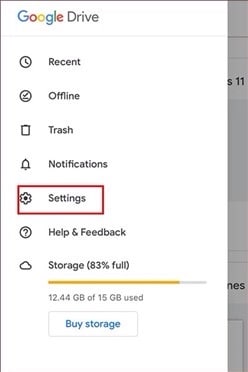
- Step 1: Open Google Drive on your phone, then tap the hamburger menu on the top left corner of the screen.
- Step 2: Go to Settings , then Backup . Select and toggle each option for Calendar events, Contacts, Photos & videos.
- Step 3: Tap on START BACKUP .
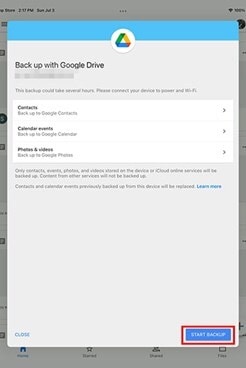
- Step 4: Once the backup is completed, go to your Windows PC. On your browser, navigate to www.drive.google.com . Choose the folders or files you wish to download, then click "Shift + D" to download.
Part 4. iTunes Facts You Should Know
Below are some facts that you should know about iTunes.
Which Files Are Not Included in iTunes Backup?
Ideally, you should be aware of the types of data that are not included in an iTunes backup. What your iTunes backup will not contain:
- iMessage and SMS messages already saved in your iCloud account
- Photos, movies, music, and so on that have already been synchronized with iCloud
- Books and audiobooks that have already been added to iBooks
- Touch ID settings and information regarding Apple Pay
- Health activity
Where Are iTunes Backups Restored?
iTunes backups are typically restored using iTunes on a computer. The exact location where iTunes backups are restored depends on the operating system you are using:
For Windows 7, 8, and 10:
- Go to the directory where Windows is installed and open the file explorer. The C: drive is usually the location.
- Navigate to Users\
\AppData\Roaming\Apple Computer\MobileSync\Backup. - Alternatively, you can navigate the Users folder and search for "%appdata%" in the search bar.
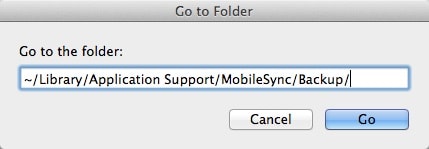
For Mac devices: Method 1
- The iTunes backup is saved at ~/Library/Application Support/MobileSync/Backup/.
- The Finder can be used to launch the Go to Folder Enter the location of the iTunes backup folder and press Go to proceed. Ensure you type "" because it represents the Mac's Home folder.
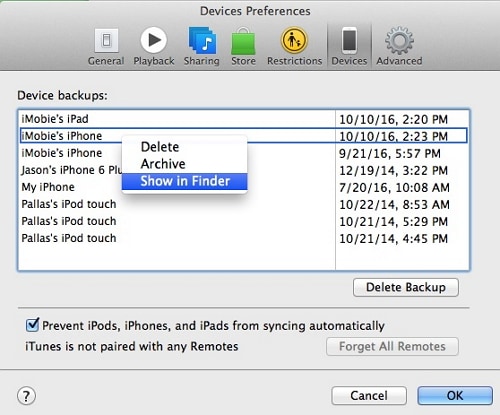
For Mac devices: Method 2
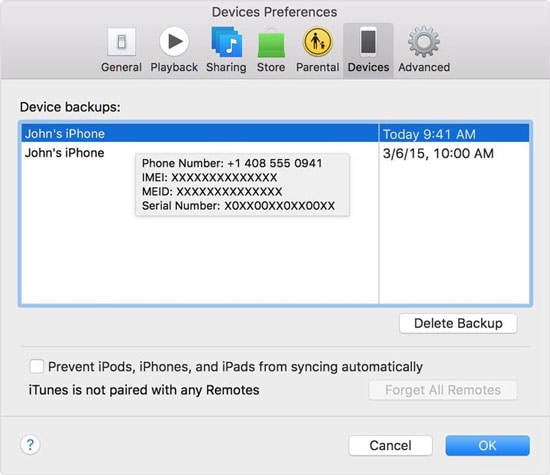
- You can access it using iTunes. Launch iTunes and navigate to the Preferences
- To get a list of all the saved backup files, go to Device Preferences . Select Show in Finder by clicking the backup while holding the "Ctrl" key.
How To Preview the Details in iTunes Backup?
You cannot preview the contents of an iTunes backup after determining its location. To do this, you need to use a third-party app like Dr.Fone.
How To Restore iPhone/iPad from iTunes Backup?
You can restore your data after you've learned how to back up iPhones to iTunes . The only catch is that restoring an iTunes backup would erase any existing data on your device. You can use these steps to restore an iTunes backup:
- Step 1: Connect your iOS device to your computer and run iTunes.
- Step 2: Once your device has been recognized, choose it, then navigate to the Summary tab in iTunes.
- Step 3: Click the Restore Backup... button under the Backups option.
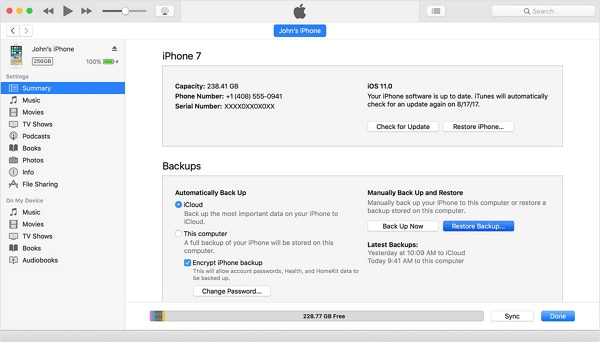
- Step 4: A pop-up window listing the compatible backup files will appear. Click the R estore option after selecting the relevant iTunes backup file.
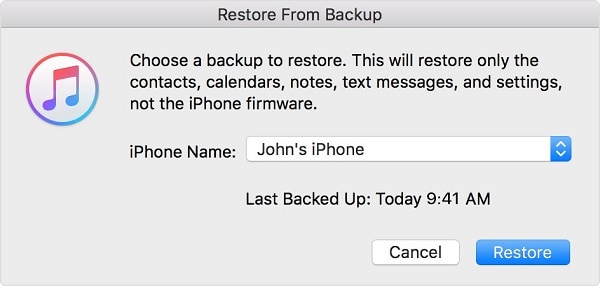
- Step 5: While the backup is being restored, wait with your device connected to the system. Once finish the process, your iOS device will restart.
You May Also Like:
Top 10 Android and iPhone Contacts Backup Apps
5 Best iPhone Backup Software in 2023 (Must Read)
Conclusion
Backing up your iPhone is essential to safeguard your valuable data. Whether you back up your device using iTunes or explore alternative methods, having a reliable backup is important. This article has provided step-by-step guides on how to back up your iPhone to iTunes and introduced Dr.Fone as a recommended third-party solution.
With its user-friendly interface, selective backup options, and encryption capabilities, Dr.Fone emerges as a top choice for iPhone backup needs. Don't risk losing your important data - take the necessary steps to back up your iPhone like a pro.
Dr.Fone Basic:
Better Control for Your Phone
Manage, transfer, back up, restore, and mirror your device


Alice MJ
staff Editor