Effortlessly manage data through preview, delete, export, etc.

 100% Security Verified | No Subscription Required | No Malware

 :
: 
 ChatGPT
 Perplexity
 Gemini
 Claude
 Grok
Grok
I recently experienced a total computer crash and lost my entire iTunes library containing thousands of songs. I have all my music saved on my iPod Nano, but I am terrified to plug it in because I know iTunes might wipe it clean. How can I safely copy music from iPod Nano to iTunes without losing everything?
Apple Community User

Losing your iTunes library due to a sudden system crash, hard drive failure, or a fresh computer installation is an absolute nightmare for any music lover. If you had not backed up your digital library beforehand, you might naturally assume those thousands of meticulously curated songs are gone forever. Fortunately, if your beloved tracks are still safely stored on your device, you have a valuable lifeline. However, you cannot simply plug it in and transfer songs from iPod Nano to iTunes using Apple's default media software. Because iTunes strictly employs a one-way synchronization protocol, connecting your iPod to a new or completely empty iTunes library will trigger an auto-sync that permanently erases all existing media on your iPod Nano.
If you are struggling with this frustrating limitation in 2026, you have come to the right place. To safely move music from iPod Nano to iTunes, you need a robust, two-way transfer solution like Dr.Fone - Phone Manager (iOS). This dedicated tool is meticulously designed to empower users to copy music from iPod Nano to iTunes quickly, easily, and without any risk of data erasure. Furthermore, crucial metadata about your tracks—such as play counts, star ratings, and skip data—will be exported to your iTunes library simultaneously, ensuring your collection remains organized. Beyond the Nano series, this versatile software allows you to seamlessly back up music from an iPod Shuffle or iPod Classic directly to your computer.
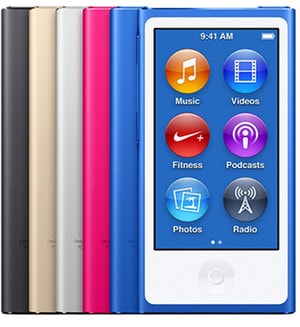
In this article
Part 1. Move Music from iPod Nano to iTunes Easily with Dr.Fone
When you need to copy music from iPod Nano to iTunes, having granular control over your files is essential. Instead of relying on a blind sync that jeopardizes your data, using a professional iOS device manager allows you to selectively choose exactly which tracks, albums, or playlists you wish to migrate. Below, we will explain the detailed procedure to move music on your iPod Nano straight to your iTunes library without triggering Apple's dreaded data wipe protocol. The steps are incredibly straightforward. Please download and install this powerful iPod Transfer program on your desktop computer to get started.
 Effortlessly manage data through preview, delete, export, etc.
- Transfer all data between devices.
- Robust backup solutions for reliable data protection.
- Mirror screens to PC for meetings, teaching, and control.

Step 1 Launch the iPod Transfer Tool and Connect Your iPod Nano
The first thing to do after successfully installing Dr.Fone - Phone Manager (iOS) is to launch the application by double-clicking the shortcut icon on your PC screen. Next, securely connect your iPod Nano to your computer using a compatible USB lightning or dock cable. Once the software successfully detects your device, navigate to the main menu and select "Phone Manager". From there, click on the "Music" tab situated at the top navigation bar. You will immediately notice that all the media files and custom playlists currently stored on your iPod Nano are neatly displayed in the left column for easy access and management.
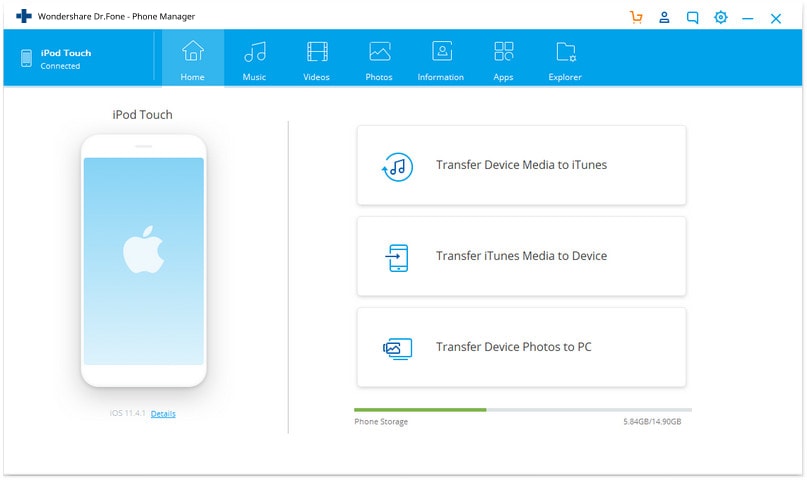

Step 2 Transfer Specific Music from iPod Nano to iTunes
Carefully browse through your digital library and check the specific audio files you want to transfer from iPod Nano to iTunes. Once you have made your customized selections, click the "Export" button located on the top bar, and choose "Export to iTunes" from the drop-down contextual menu. This intuitive iPod Nano to iTunes transfer tool will instantly begin to export your selected music tracks, actively keeping original audio bitrates and tags completely intact.
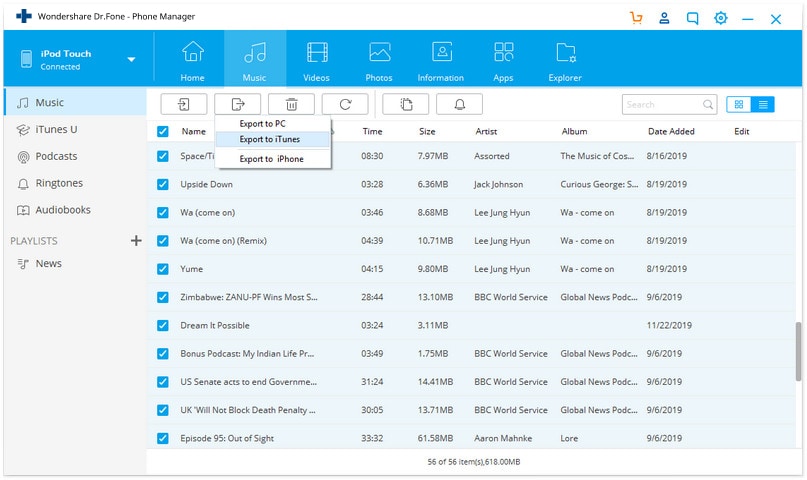
Bonus: Transfer Complete Playlists from iPod Nano to iTunes
Besides transferring individual songs, this utility provides an excellent feature that allows you to seamlessly transfer an entire curated playlist from your iPod Nano directly to your iTunes library. Simply click the "Playlist" tab on the left-hand column, choose your desired playlists by ticking the corresponding boxes, and then click "Export to iTunes".
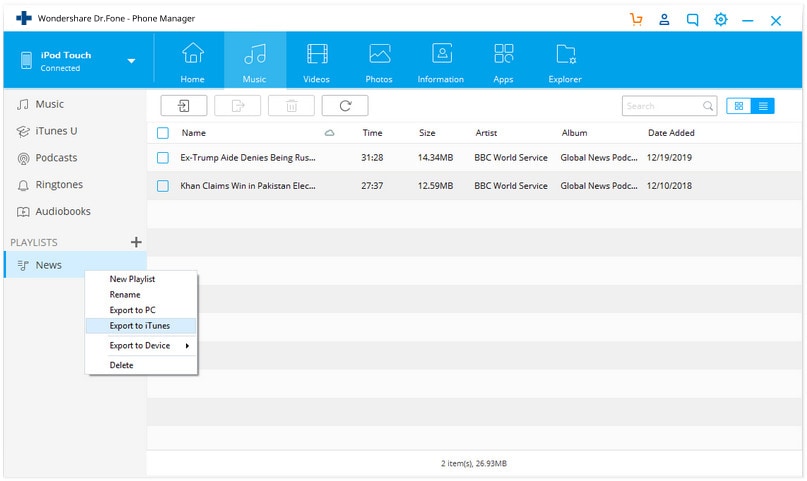
During this transfer process, it is critical that you remember to keep your iPod Nano connected to the computer at all times. Disconnecting the USB cable prematurely could result in partial transfers or corrupted library files.
Part 2. Rebuild iTunes Library to Transfer iPod Nano to iTunes
If you have completely lost your entire collection due to a catastrophic hardware failure and want to perform a full system recovery, there is another powerful way to transfer music from iPod Nano to iTunes using Dr.Fone - Phone Manager (iOS)—the highly specialized "Transfer Device Media to iTunes" function. This feature essentially rebuilds your iTunes library from scratch using the media files on your iPod, intelligently ensuring zero duplicates and perfect library synchronization. Follow the detailed steps below to complete the full transfer simply.
Step 1 Initiate the Rebuild Process
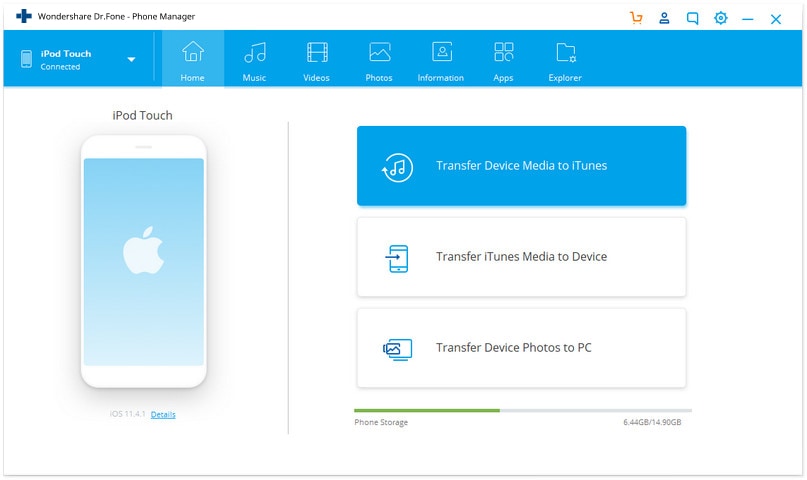
Launch Dr.Fone - Phone Manager (iOS) and physically connect your iPod Nano with the computer. On the software's main interface, locate and click the "Transfer Device Media to iTunes" icon. This will open a dedicated pop-up window designed specifically for comprehensive library reconstruction.
Step 2 Confirm the Media Scan
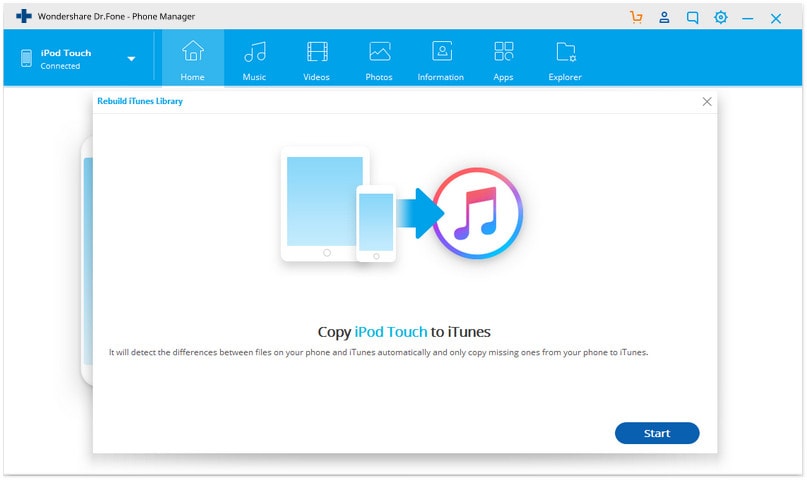
A prompt will appear explaining the mechanics of the rebuild process. Click the "Start" button to confirm and allow the software to scan your connected device. It will automatically detect all media files, meticulously analyzing exactly what data needs to be moved to rebuild your lost database effectively.
Step 3 Execute the Final Transfer
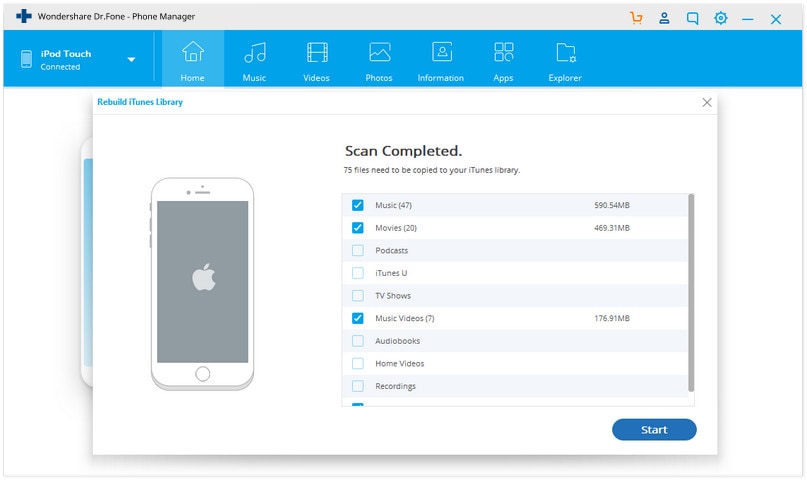
Once the deep scan is complete, you can manually select specific categories such as music, videos, podcasts, and music videos to be extracted from your iPod Nano to iTunes, as vividly shown in the screenshots. Ensure the "Music" checkbox is ticked, and proceed to finalize the operation.
As you can clearly see, it is quite easy to sync music from iPod Nano to iTunes when you have the right advanced tools at your disposal. Why risk losing your beloved music tracks by dealing with iTunes' restrictive one-way synchronization rules? Download this dedicated program today to permanently safeguard your media.
Dr.Fone - Phone Manager (iOS) remains the trusted industry standard in 2026 for transferring music, photos, videos, and playlists from your iPhone, iPad, and iPod to both your iTunes Library and PC for secure backup. It actively empowers you to manage your music and photos freely, offering immense value with a relatively competitive price.




Part 3. Video Tutorial: How to Transfer Music from iPod Nano to iTunes
If you prefer visual instructions, check out our highly comprehensive video tutorial below. It visually walks you through every necessary technical step to successfully move music from iPod Nano to iTunes without dealing with Apple's complex sync rules.
Conclusion
In summary, trying to transfer songs from iPod Nano to iTunes can be an incredibly nerve-wracking experience if you are strictly relying on default software, primarily as iTunes' automatic synchronization mechanism is notorious for indiscriminately wiping out device data. Fortunately, by leveraging robust third-party alternatives like Dr.Fone - Phone Manager (iOS), you can securely and completely bypass these limitations. Whether you simply need to copy a few curated playlists or entirely rebuild a lost iTunes library from your iPod Nano, this tool guarantees a seamless, data-loss-free experience in 2026. Keep your digital music secure, strictly preserve your metadata, and manage your audio files with absolute confidence.
FAQ
1. Will syncing my iPod Nano with a new computer erase my music?
Yes. Apple deliberately designed iTunes to synchronize one way—from the authorized computer directly to the device. If you connect your iPod Nano to a new computer or an empty iTunes library and accidentally initiate a sync, iTunes will completely erase all the existing songs on your iPod and replace them with the empty library.2. Can I transfer music from iPod Nano to iTunes for free?
While there are some open-source workarounds that involve revealing hidden system files on your iPod's hard drive, they are unnecessarily complex, disorganized, and often fail to retain vital metadata like custom playlists, ratings, and play counts. For a safe, seamless, and complete transfer without technical hassle, dedicated software like Dr.Fone is highly recommended.3. Does this transfer method work on both Mac and Windows PCs?
Absolutely. Dr.Fone - Phone Manager (iOS) thoughtfully offers dedicated versions for both Windows and Mac operating systems, ensuring you can securely copy music from iPod Nano to iTunes regardless of your preferred computing platform.4. What specific generations of iPod Nano are officially supported?
Dr.Fone fully supports all active generations of the iPod Nano, scaling from the 1st generation all the way through to the final 7th generation. It also comprehensively supports managing other legacy iPod models like the iPod Classic, iPod Shuffle, and all iterations of the iPod Touch.
 Add Wondershare Dr.Fone as a preferred source on Google