How to Transfer Non-Purchased Music from iPod to iTunes Easily

May 18, 2026 • Filed to: Device Data Management • Proven solutions
 TL;DR:
To transfer non-purchased music from an iPod or iPhone to iTunes, you can use Dr.Fone - Phone Manager (iOS) for an automated sync or manually copy the hidden iPod_Control folder via Windows Explorer.
● Dr.Fone - Phone Manager (iOS) is available for Windows and Mac, providing an automated way to export either specific non-purchased tracks or the entire music library directly to iTunes.
● The free manual transfer requires a Windows PC to reveal hidden files, copy the Music directory from the iPod_Control folder, and import it using the iTunes Add Folder to Library function.
● The manual method exposes critical system folders during the process and causes iTunes to display music randomly unless the Keep iTunes Media Folder Organized option is enabled in advanced preferences.
Ask AI for a summary
 ChatGPT
 Perplexity
 Gemini
 Claude
 Grok
Grok
Dr.Fone Basic:
Better Control for Your Phone
Manage, transfer, back up, restore, and mirror your device
Many of us have grown accustomed to syncing and accessing files on our iPod through iTunes over the years since iPod first entered the market many years ago. iTunes is the default program for accessing and transferring music, photos, and other files for Apple devices. Like other Apple devices, iPod relies on iTunes for its file transferring and backup as the default. However, Apple doesn't allow us to transfer non-purchased music from iPod to iTunes library or iPhone to iTunes due to Apple's concerns of copyright infringement issue and their ability to generate profit from music and songs purchased from iTunes.
So if we stuff our iPods with songs we like and, more importantly, for free, we will face the problem of getting non-purchased songs from iPod to iTunes. Many people, like me, have asked the following question - How to get non-purchased songs from iPod to iTunes?

Well, there are two solutions for the music transfer. With our Dr.Fone - Phone Manager (iOS) iPod/iPhone Transfer, you can now easily transfer non-purchased music from your iPod/iPhone to iTunes.
Solution 1. Transfer Non-Purchased Music from iPod to iTunes with Dr.Fone - Phone Manager (iOS) iPod Transfer
Dr.Fone - Phone Manager (iOS) iPod Transfer is a perfect solution for the users who want to transfer non-purchased music from iPod to iTunes, and it enables users to finish the task in seconds. You can transfer iPod Shuffle, iPod Nano, iPod Classic, and iPod Touch to iTunes fast.
Dr.Fone - Phone Manager (iOS)
Transfer Music from iPod/iPhone to iTunes Easily
- Transfer, manage, export/import your music, photos, videos, contacts, SMS, Apps, etc.
- Back up your music, photos, videos, contacts, SMS, Apps, etc., to the computer and restore them easily.
- Transfer music, photos, videos, contacts, messages, etc., from one smartphone to another.
- Transfer media files between iOS devices and iTunes.
- Support all iPhone, iPad, and iPod touch models with any iOS versions.


How to Transfer Music from iPod to iTunes
Step 1 To transfer music from iPod to iTunes, download and install Dr.Fone - Phone Manager (iOS) iPod Transfer tool. Then connect Your iPod to your computer to transfer music. This iPod Transfer tool will automatically detect your iPod.
Here are two methods available: if you want to transfer all the music, we can choose both of the methods, but method 1 will be quicker; if you want to preview and transfer only part of music to iTunes, then we choose method 2
Method 1: Transfer All the Music from iPod to iTunes
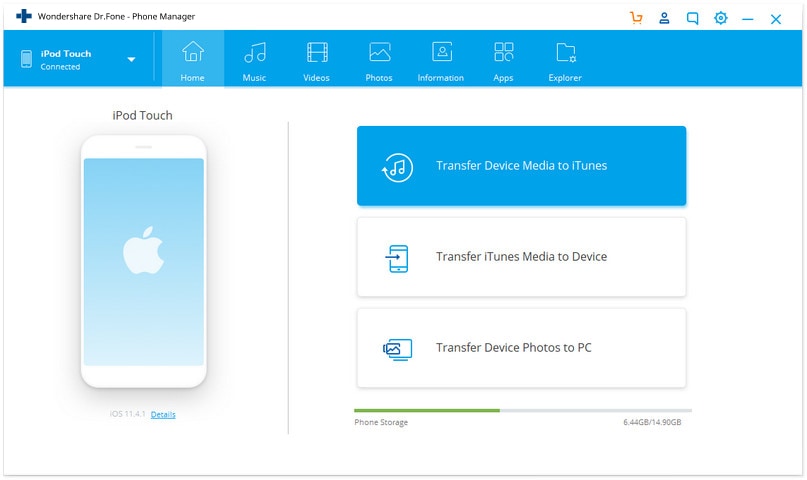
Step 2 Click the "Transfer Device Media to iTunes" icon on the main interface.
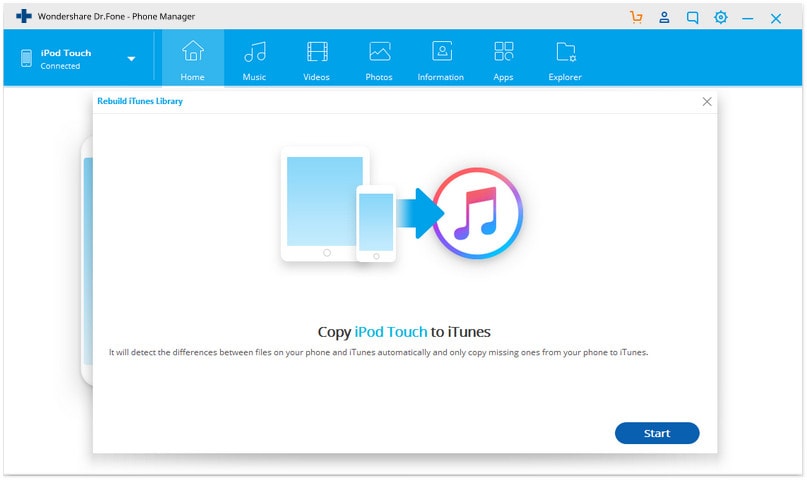
Step 3 Transfer Non-Purchased Music from iPod to iTunes
Then click "Start" on the next page to transfer music from iPod to iTunes.
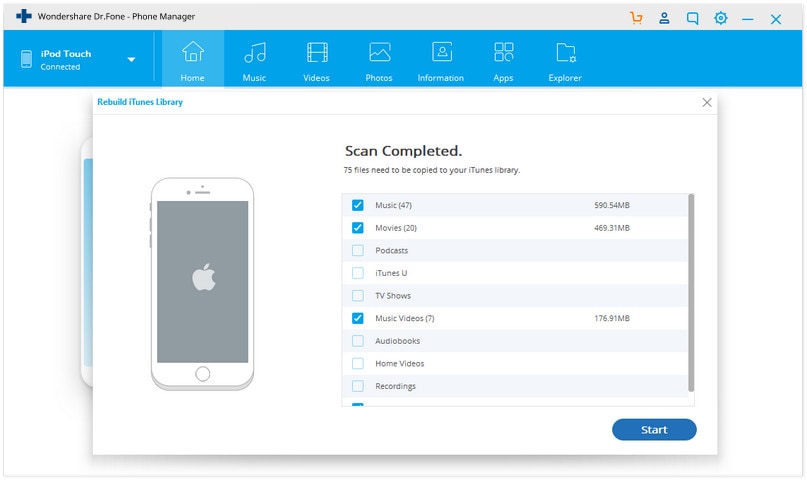
All the device files will be scanned and visible under different categories like Music, Movies, Podcasts, and others. By default, all types of files will be checked. To only transfer the music files, uncheck the other items and then click “Start.” Files will be successfully transferred to iTunes.
Method 2: Transfer Part of Music from iPod to iTunes
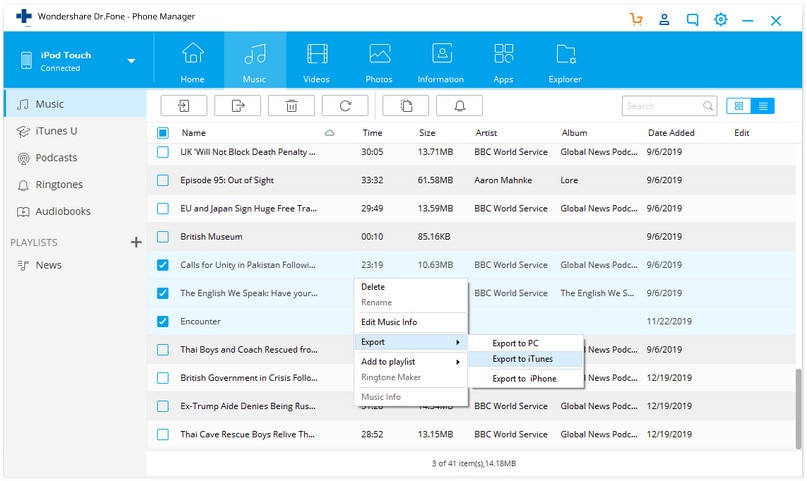
Click the “Music” tab, and then check the square beside the songs to select the non-purchased songs you want to transfer, or you can transfer the whole music library from iPod to iTunes by checking the square beside Name. Then you can right-click the selected files and choose “Export to > Export to iTunes.”
Additional Features of Dr.Fone - Phone Manager (iOS) iPod Transfer
- Transfer your Music from your iOS Device You can now transfer your music from your iPhone, iPad, or iPod back into your iTunes. Whether you lost your computer data or were given a device with preloaded music, Dr.Fone - Phone Manager (iOS) can move your music from your iOS device back into your iTunes library on your computer.
- Clean your Entire Music Library Dr.Fone - Phone Manager (iOS) automatically analyzes and cleans up your music library with one click. You can also manually tag your music, change album cover art, delete duplicates, or remove missing tracks. Your music collection is now beautifully organized.
- Manage iOS Devices without iTunes Manage, discover, and share your music with Dr.Fone - Phone Manager (iOS). No more sync of iTunes. Dr.Fone - Phone Manager (iOS) frees your music, doing what iTunes can't.
- Use iTunes with Android iTunes and Android – together at last! Dr.Fone - Phone Manager (iOS) breaks down the barriers of iTunes and lets Androiders use iTunes just like an iOS device. Sync and transfer your iTunes library to your Android device easily with Dr.Fone - Phone Manager (iOS).
Solution 2. Manually Transfer Non-Purchased Music from iPod to iTunes
This is one of the methods that can help you to transfer non-purchased music from iPod to iTunes, and you only need your iPod, and iPod USB cable, and your computer to finish the task. Still, this method is a little complicated, which is suitable for the technical guys.
Step 1 Connect Your iPod to Your Computer.
Connect your iPod to the computer with the USB cable. Your iPod should be able to show under the ‘My Computer’ window, as is shown below.

Step 2 Show Hidden Files and Folders
Click Tools in the menu bar of Windows Explorer, and select Folder Option > View, then check "Show hidden files and folders."

Step 3 Open iPod Folder
Double-click the iPod icon in My Computer to open it. Find the "iPod_Control" folder and open it.

Step 4 Copy Music Files
Find the Music folder after opening the iPod_Control folder. Then copy the whole folder to the computer.

Step 5 Add Music Files to iTunes Library.
Start iTunes and click File > Add Folder to Library to add the music folder to your iTunes Music Library.

Step 6 Keep iTunes Media Folder Organized.
After adding the music files to the iTunes library, click Edit > Preferences > Advanced, and check "Keep iTunes Media Folder Organized."

Advantages:
- It is free.
- It does not require additional software packages or applications.
- It is easy to follow when you have a basic understanding of IT.
Disadvantages:
- iTunes displays music randomly in the library if you use this method.
- The process of showing your hidden files may leave your important system folder exposed.
- The process is complicated for someone who has no basic understanding of IT.
Dr.Fone Basic:
Better Control for Your Phone
Manage, transfer, back up, restore, and mirror your device


iPod Transfer
- Transfer from iPod
- 1. Transfer Your Photos from iPod
- 2. Transfer Music to Computer
- 3. Transfer Music to Computer or Mac
- 4. Transfer Music from iPod Classic
- 5. Transfer Music from iPod (Touch)
- 6. Transfer Music from Formatted iPod
- 7. Transfer Music from iPod to Mac
- 8. Sync iPod to New Computer
- 9. Transfer Music Without Losing Data
- 10. Transfer Pod to iTunes or Computer
- 11.Transfer Music to Hard Drive
- 12.Transfer iPod Music to MP3 Player
- 13.Transfer Music to USB Flash Drive
- 14.Transfer Music from Android to iPod
- 15.Upload iPod Music to Google Music
- 16.Transfer Music from iPod to iPad
- 17.Transfer Music to Samsung Galaxy
- Transfer to iPod
- 1. Transfer Music from iPod to iTunes
- 2. Transfer Music from iPod Classic
- 3. Transfer Music from iPod Nano
- 4. Transfer Music from iPod shuffle
- 5.Transfer Music from iTunes
- 6. Put music on iPod shuffle
- 7. Transfer Audiobooks to iPod
- 8. Transfer MP3 to iPod
- 9. Transfer Music From Window
- 10. Add Videos to iPod nano
- 11.Transfer Music from Hard Drive
- 12.Transfer Music from iMac
- 13.Transfer Music from Computer
- 14.Transfer Photos from Computer
- 15.Transfer Music from iPad
- 16.Transfer Music from iPod
- 17.Transfer Music from iPhone
- iPod Useful Tips
- ● Manage/transfer/recover data
- ● Unlock screen/activate/FRP lock
- ● Fix most iOS and Android issues
- Start Transfer Start Transfer Start Transfer


Daisy Raines
staff Editor