 Effortlessly manage data through preview, delete, export, etc.

 100% Security Verified | No Subscription Required | No Malware

 :
: 
 ChatGPT
 Perplexity
 Gemini
 Claude
 Grok
Grok

I just found my old iPod Shuffle and want to update my playlist. However, every time I connect it to iTunes, it threatens to erase all my existing songs. What is the best way to put music on iPod shuffle without wiping it clean in 2026?
Reddit User
Adding music to your iPod Shuffle can seem like a breeze, but the traditional method of syncing through iTunes often results in a frustrating scenario: the loss of your existing songs. Because Apple ties iPods to a single iTunes library, connecting your device to a new or updated computer usually triggers an automatic wipe. If you want to successfully put music on iPod shuffle while retaining your old favorites, you need alternative strategies.
To help you avoid losing your original music, we have rounded up the top 4 ways to easily and safely transfer your tracks. Whether you are searching for music for ipod shuffle to update your workout playlist or you simply want to preserve your classic tunes, our expert solutions will guide you. From intelligent third-party software to manual iTunes workarounds, we will show you exactly how to put music on ipod shuffle without the headache of erasing files.
1. Use a Third-Party Transfer Tool
The safest method to add tracks without iTunes erasing your existing device library. It automatically converts incompatible formats to MP3.
2. iTunes Automatic Syncing
The traditional Apple method. Best if your iPod is already synced to your current computer, but risky if you've switched PCs.
3. iTunes Manual Drag-and-Drop
A safer iTunes alternative that lets you manually drag specific songs over without triggering a full library overwrite.
4. Direct Downloads
Using online music downloaders to curate tracks before moving them to your portable player.
In this article
Part 1. Best Way to Put Music on iPod Shuffle (Without Erasing Data)
For users wondering how to add music to ipod shuff-le securely, Wondershare Dr.Fone - Phone Manager (iOS) stands out as the best way to bypass Apple's restrictive sync protocols. With just a few clicks, you can completely manage your device's files easily and quickly.
If you previously synced your iPod Shuffle with iTunes on an old computer that has since crashed, connecting it to a new PC would normally wipe it. Dr.Fone completely eliminates this issue. It enables you to effortlessly add music to ipod shuffle, delete unwanted tracks, and even transfer existing iPod files back to your computer to rebuild your library. Furthermore, if your music files aren't natively supported, this intelligent program automatically converts them to MP3 during the transfer process.
 Effortlessly manage data through preview, delete, export, etc.
- Transfer all data between devices.
- Robust backup solutions for reliable data protection.
- Mirror screens to PC for meetings, teaching, and control.

Below is a quick guide explaining how you can seamlessly music to ipod shuffle transfers using this powerful software:
-
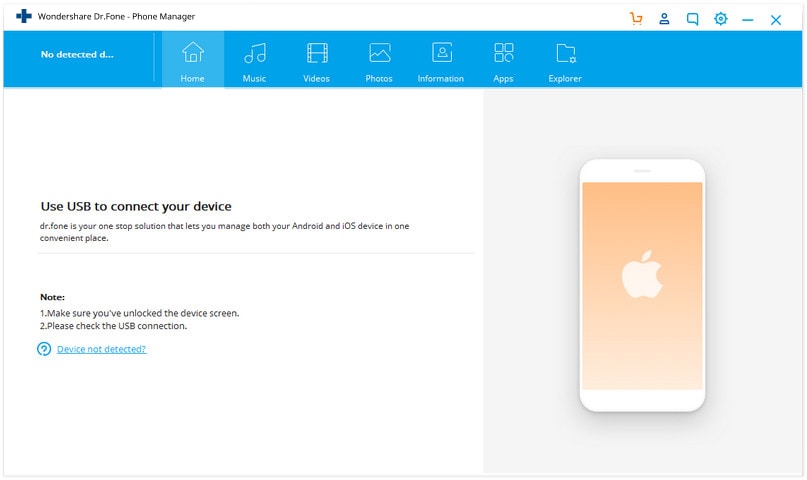
Step 1 Download and install the program
First, download the correct version for your Windows or Mac computer. After downloading it, run the installer and launch the application on your computer.
-
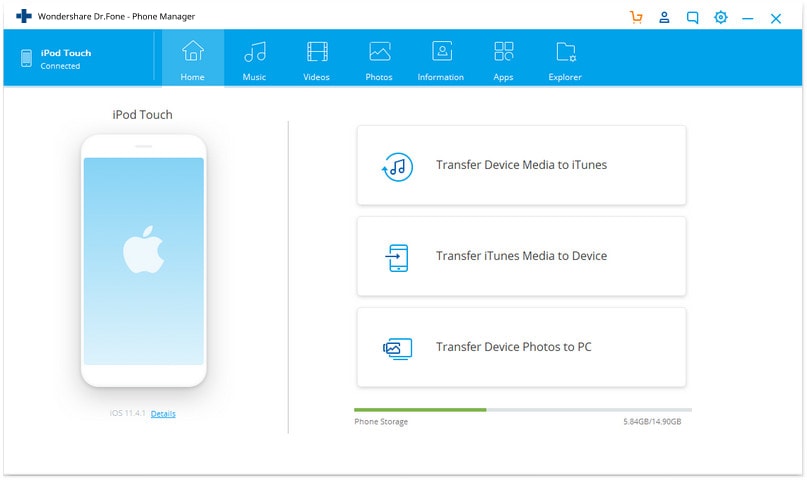
Step 2 Connect your iPod shuffle
Connect your iPod Shuffle to the computer using its original USB cable. Let the software automatically detect your device. Once it is recognized, you will see a main interface similar to the picture below.
-
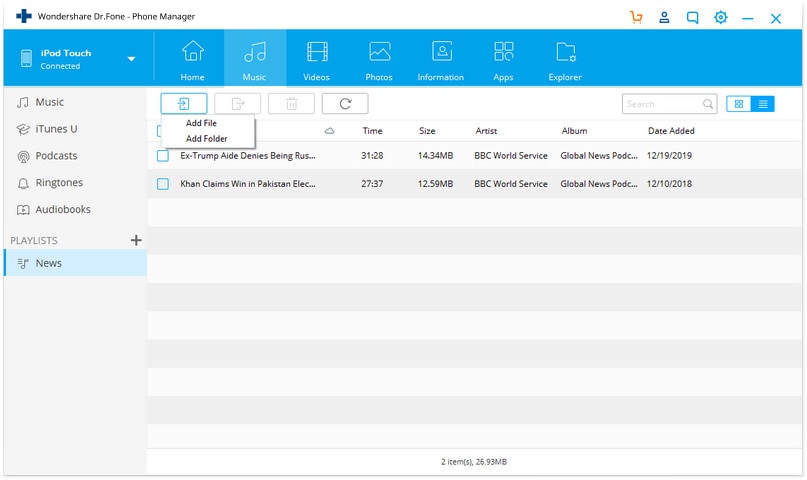
Step 3 Add music to your iPod
Navigate to the "Music" tab at the top. The program will load and display any previously available tracks currently on your device. Next, click on the "Add" icon and choose either "Add File" or "Add Folder" depending on how your library is organized.
Browse your local hard drive, locate the specific tracks you want to transfer, and click "Open". The software will immediately begin importing your favorite tunes directly to the device.
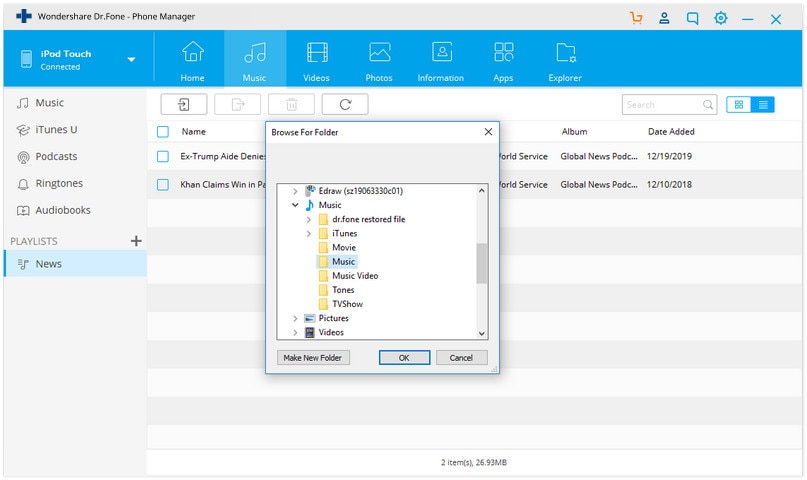
If a chosen audio file is not in a supported format natively recognized by Apple hardware, the tool will convert it automatically before transferring. You don’t need to do any manual encoding.




Part 2. Put Music on iPod Shuffle by Syncing Automatically
If you prefer the official ecosystem, you can sync music to your iPod Shuffle using iTunes. However, you'll need to first ensure that your files are added to the iTunes library and are already in a supported format (such as MP3, AAC, or WAV), as iTunes won't automatically convert incompatible files for you.
Once imported, you can instruct iTunes to automatically sync your library to your device. Be extremely cautious: if your iPod was previously synced to another computer, this automatic process will erase all old tracks and replace them with the library on your current PC.
-
Step 1 Launch iTunes and connect
Install the latest version of iTunes on your computer. After installing, launch it and connect your device using its USB cable. You will soon see a small device icon appear near the top left corner.

-
Step 2 Access the File menu
On the top menu bar of the iTunes interface, click on File, then move your cursor down to Add File to Library. Alternatively, you can use the keyboard shortcut CTRL+O.

-
Step 3 Locate your audio files
A browsing window will pop up. Navigate to the folder containing the tracks you want to import. Select them, and click the "Open" button to pull them into the software.

-
Step 4 Verify library addition
The files are now officially added to your iTunes database. You can confirm this by clicking the "Music" category in the left sidebar and finding your newly added songs.

-
Step 5 Sync your device
Because the songs are only in iTunes so far, you must sync your device. Click your device icon to open the Summary page. Go to the Music tab, check "Sync Music", and click "Apply" or "Sync" at the bottom right. The files will now transfer.

Part 3. How to Put Music from Computer to iPod Shuffle with iTunes
Besides automatic syncing, iTunes also offers a slightly safer manual approach using an intuitive "drag and drop" method. By adjusting a specific setting in iTunes, you can disable the automatic overwrite feature and manually select exactly which songs get pushed to your device.
- Prevents iTunes from wiping your entire existing playlist.
- Gives you precise control over which tracks take up storage.
- Allows dragging files straight from your computer folders.
- Still requires iTunes to be installed and updated.
- Does not automatically convert unsupported audio files.
- Can be tedious if transferring hundreds of songs at once.
Here is the step-by-step process for this manual setup:
-
Step 1 Connect and launch
Plug in your Shuffle using its dedicated USB sync cable and launch iTunes. Your device will populate under the 'Devices' list.

-
Step 2 Enable manual management
Click on the device icon at the top of the interface to enter the Summary panel. Scroll down to the Options section, check the box that says “Manually manage music and videos”, and hit the Apply button in the bottom right corner.

-
Step 3 Prepare your computer folder
Open your computer's File Explorer (or Finder on Mac) and navigate to the folder where your target tracks are stored. Highlight the songs you want to transfer.

-
Step 4 Drag and drop into iTunes
Click and hold your selected audio files, drag your cursor over to the open iTunes window, and drop them directly into the "Music" section under your device name in the left sidebar.

-
Step 5 Finish the transfer
Once you drop the files, iTunes will immediately begin copying them over. Disconnect safely, and you can now enjoy your fresh files on your portable player!

Part 4. How to Put Downloaded Music to iPod Shuffle
If the local music available on your hard drive isn't enough to build the ultimate playlist, you can expand your library by downloading tracks directly from the internet. Finding high-quality, royalty-free audio or converting your favorite podcasts to MP3 can give you endless listening options on your commute.
While there are many modern downloaders today, historically, powerful software like Keepvid Music allowed users to grab music from over 10,000 online sites and add those records seamlessly. These types of versatile download managers let you curate massive offline collections without relying heavily on paid streaming subscriptions. If you come across a video in MP4 format, many downloaders and transfer tools will allow you to convert it to MP3 in just one click, making it easy to enjoy purely audio versions on the go.

Conclusion
Figuring out how to put music on ipod shuffle doesn't have to end in frustration or lost data. While iTunes auto-syncing works well for brand-new devices tied to a single computer, using manual drag-and-drop settings or an intelligent third-party manager like Dr.Fone provides the safety net you need to preserve your old tracks. By choosing the method that best aligns with your technical comfort and library setup, you can keep your vintage hardware alive and packed with fresh audio for years to come.
FAQ
-
1. Can I put Spotify music on my iPod Shuffle?
Directly syncing downloaded Spotify tracks to an iPod Shuffle is not natively supported, as Spotify's offline files are encrypted (Ogg Vorbis format) and protected by DRM. To play these songs, they must first be converted into an MP3 or AAC format using a third-party audio converter, then transferred via iTunes or Dr.Fone. -
2. What audio formats does the iPod Shuffle support?
The device primarily supports standard audio formats such as MP3, AAC, WAV, Apple Lossless, and AIFF. It does not support WMA, FLAC, or DRM-protected files from external streaming platforms. If your files are unsupported, a tool like Dr.Fone will convert them to MP3 during the transfer. -
3. Why is iTunes trying to erase my iPod when I connect it?
Apple's ecosystem is designed so that an iPod can only be synced with one iTunes library at a time. If you connect your device to a different computer (or a newly formatted computer), iTunes will prompt you to "Erase and Sync," which deletes all existing content to match the new, empty library. -
4. How do I reset my iPod Shuffle if it freezes during a transfer?
If your device freezes or stops responding while transferring files, disconnect it from the computer, turn it off using the slider switch (so no green is visible), wait at least 10 seconds, and then turn it back on. Reconnect it to your PC to resume management.
 Add Wondershare Dr.Fone as a preferred source on Google



