Exploring How to Transfer Music From iPod to iPhone 15

May 22, 2026 • Filed to: Data Transfer Solutions • Proven solutions
 TL;DR:
You can transfer music from an old iPod to an iPhone 15 by manually moving local files through a computer's iTunes library, syncing an active Apple Music account, redownloading iTunes Store purchases, or using a direct transfer tool like Wondershare Dr.Fone.
● For local files without cloud subscriptions, you must connect the iPod to a PC, unhide system items to copy the internal iPod_Control folder to local storage, add those files to the computer's iTunes library, and manually drag them to the connected iPhone 15.
● Wireless transfers strictly require both devices to use the same Apple ID, allowing you to either toggle on the Sync Library option within Apple Music or download past official purchases via the Purchased menu in the iPhone 15 iTunes Store app.
● Wondershare Dr.Fone functions as a direct wired alternative that requires connecting both the iPod and iPhone 15 to a computer simultaneously to migrate the music category, bypassing the need to manually extract hidden folders or sync through iTunes.
Ask AI for a summary
 ChatGPT
 Perplexity
 Gemini
 Claude
 Grok
Grok
Listening to music from an iPod is doubtlessly a great experience like no other. Why so? The simplest explanation is that the audio output it produces comes in pristine clarity and incomparable quality. That’s why this amazing entertainment device remains very useful to many people despite its product discontinuation. Don’t worry. It’s totally fine to keep using the iPod for as long as you want. But as a preventive measure, it’s best to copy your music files somewhere else.
There’s no doubt that the advanced features of the iPhone 15 series can certainly replicate the audio quality of iPods. Hence, it definitely fits as the new home of your dearly cherished playlist in case you’re looking for one. There are many tutorials available on how to transfer music from iPod to iPhone 15. Just select the best method that works pretty well with your situation.
In this article, we’ll provide a guide on how to transfer music from an old iPod to the iTunes library. We’ll also walk you through the steps on how to transfer music from iPod to iPhone 15. Continue reading below to learn more.
- How to Transfer Music From Old iPod to iTunes Library
- How to Transfer Music From iPod to iPhone 15 in Easy Steps?

- EXTRA TIP: How to Download Music From iPod to Computer using Wondershare Dr.Fone?
How to Transfer Music From Old iPod to iTunes Library
As previously stated, Apple has discontinued the production of iPods in 2022. That means the tech giant has literally stopped developing new iPod models. Aside from that, the said discontinuation also implies that the existing iPods will likely receive fewer firmware updates going forward. There’s nothing wrong with that. You can still use your iPod the same way as before. But somehow, expect that its functionality is going to deteriorate over time without any technical support from the developers.
That’s why it’s highly recommended to safeguard your iPod music playlist to another platform. Your iPhone 15 is indeed a wise choice in this regard. You can continue playing your favorite jam from there and savor the same listening experience. But to make the file exchange a lot easier, try to sync your old iPod first to iTunes. Don’t worry. The process is very simple. Check out the guide below on how to transfer music from an old iPod to the iTunes library.
Transfer Music From an iPod to the Computer
Before anything else, you first need to move your music files to the local storage of your computer. Don’t sweat it. It’s indeed a piece of cake. Here’s how to download songs from your iPod to the computer.
- Step 1: Assuming that your iTunes is set to not sync the iOS device automatically, connect your iPod to the computer using a data cable.
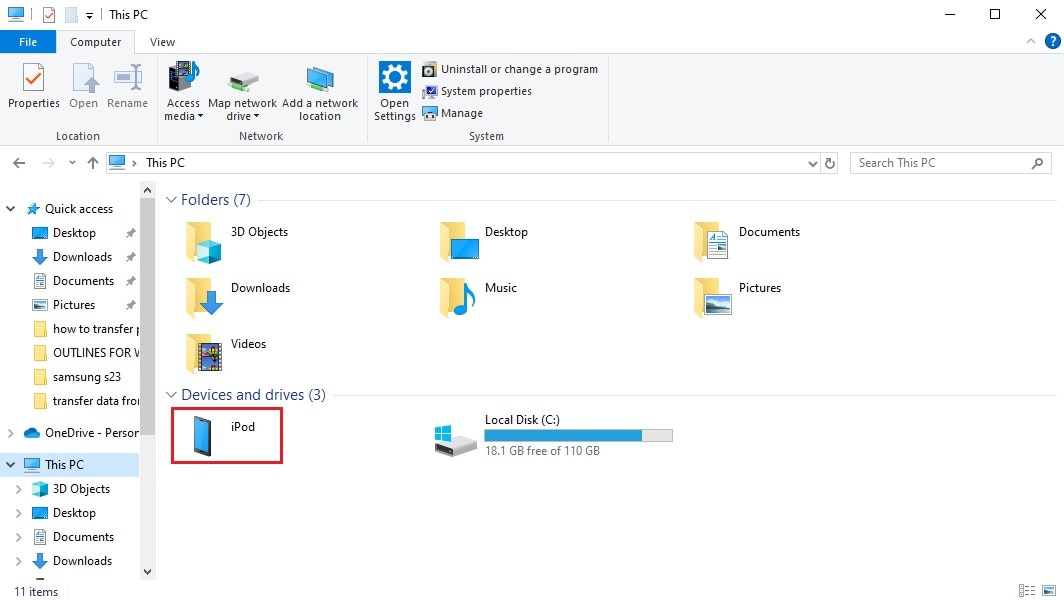
- Step 2: Open the File Explore on your desktop. Right after, access the left-side panel and then click This PC.
- Step 3: Find and click your iPod under the Devices and Drives section.
- Step 4: If your iPod doesn’t show any files, click the View button on the top menu bar.
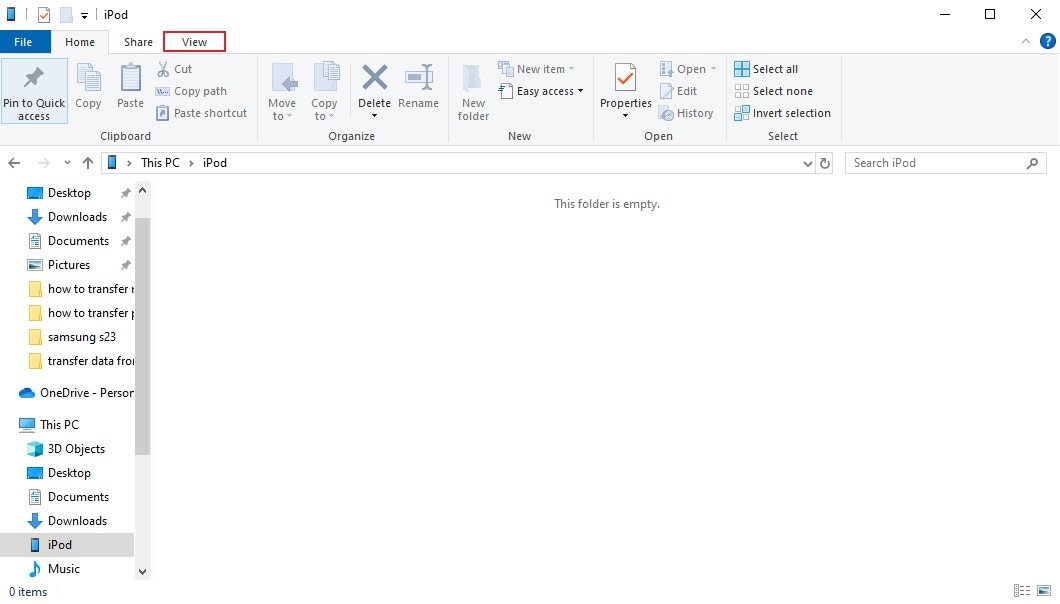
- Step 5: Find the Show/Hide section below the top menu bar. From there, check the tickbox next to Hidden Items. At this point, the folders on your iPod should now be available for viewing.

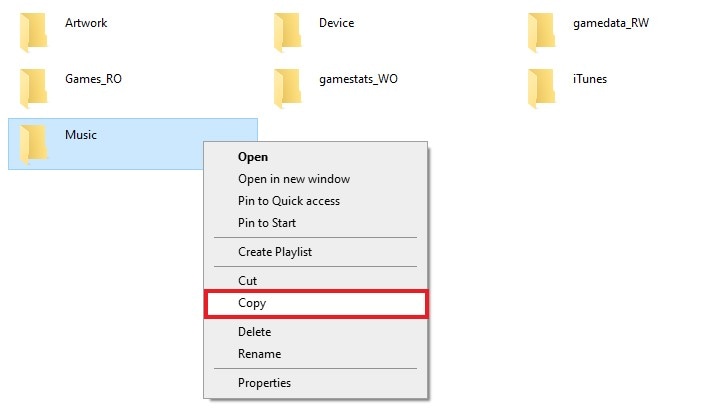
- Step 6: Click the folder with the name iPod_Control.

- Step 7: Right-click on the Music folder and then tap Copy.
- Step 8: Paste the folder somewhere in the local storage of your computer.
Add iPod Music to iTunes Library
Let’s say the music files on your old iPod have been successfully copied to your computer. That’s a huge leap. Now, it’s time to add them to your iTunes library. Check out the provided tutorial below on how to transfer music from an old iPod to the iTunes library.
- Step 1: Open the iTunes application on your computer.
- Step 2: Click File on the top menu bar.
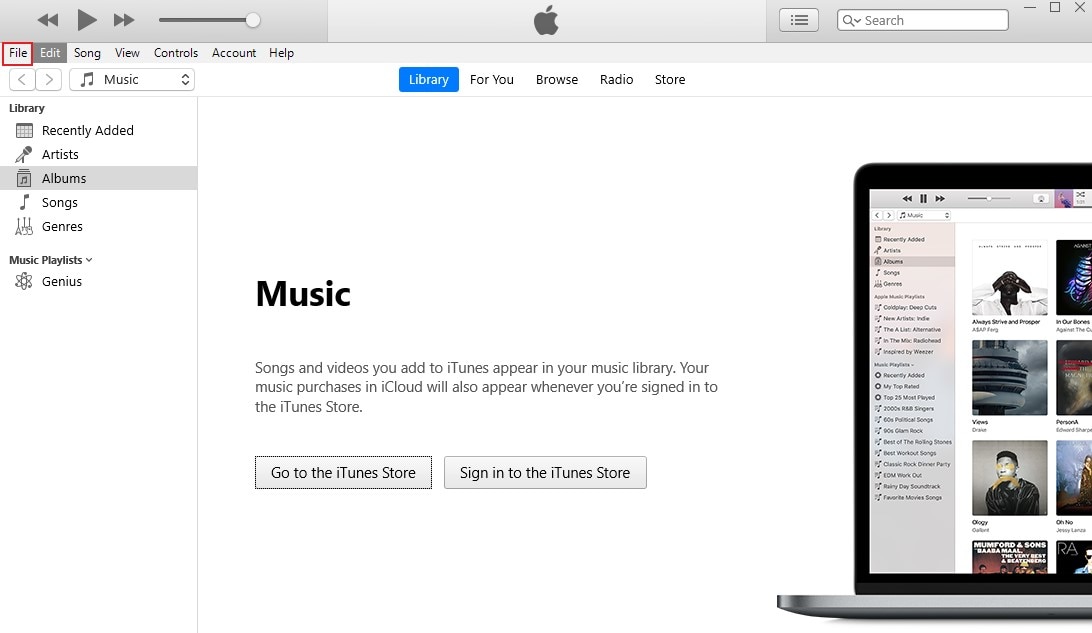
- Step 3: Since the music files imported from your old iPod are already compiled in a folder, select Add Folder to Library.
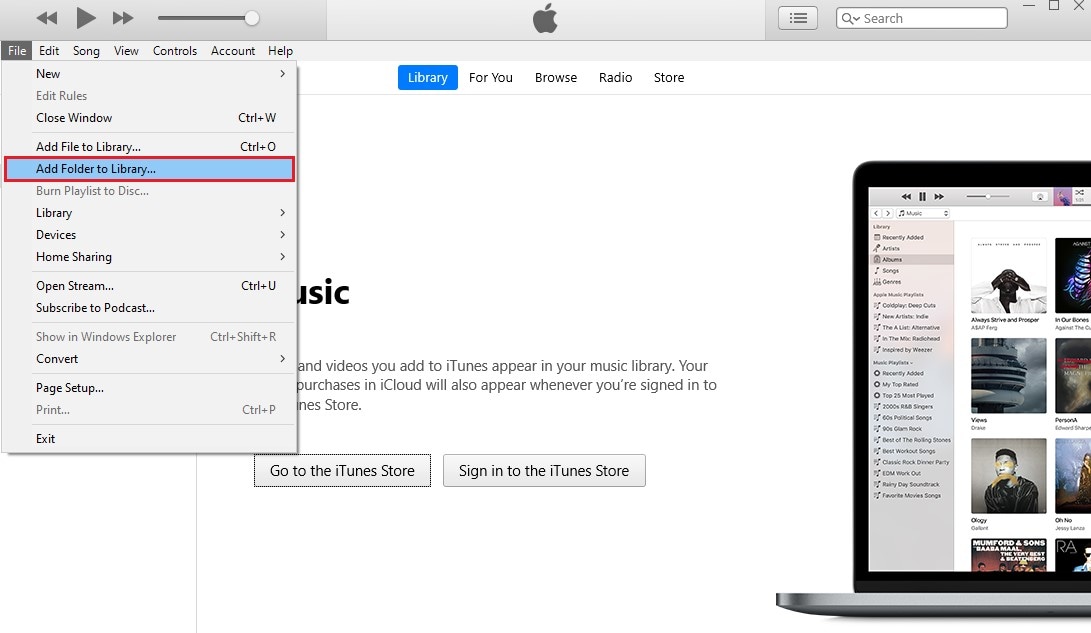
- Step 4: Choose the specific folder containing the music files you want to add. Then, click Select Folder.
- Step 5: Click Library below the top menu bar or the Albums button on the left-side panel to view the recently added music files.
How to Transfer Music From iPod to iPhone 15 in Easy Steps?
There are many data migration methods that can help you transfer music from your old iPod to your iPhone 15. Don’t worry. Most of them are very easy to follow. In fact, you can literally finish the entire process within a few minutes. Just be mindful when selecting the method you’re going to initiate. Settle on the choice that suits your current situation. Below is a list of tutorials on how to transfer music from your iPod to your iPhone 15.
Method 1: Transfer music from iPod to iPhone 15 via iTunes library.
Since you’ve already imported the files to your iTunes library, transferring them to your iPhone 15 will be much easier. All you have to do now is copy the files from iTunes library to your iPhone 15. Don’t sweat it. It’s a very simple procedure. Here’s how to transfer music from iPod to iPhone 15 via iTunes library.
- Step 1: Launch the iTunes application on your computer. Right after, connect your iPhone 15 to the computer using a data cable.
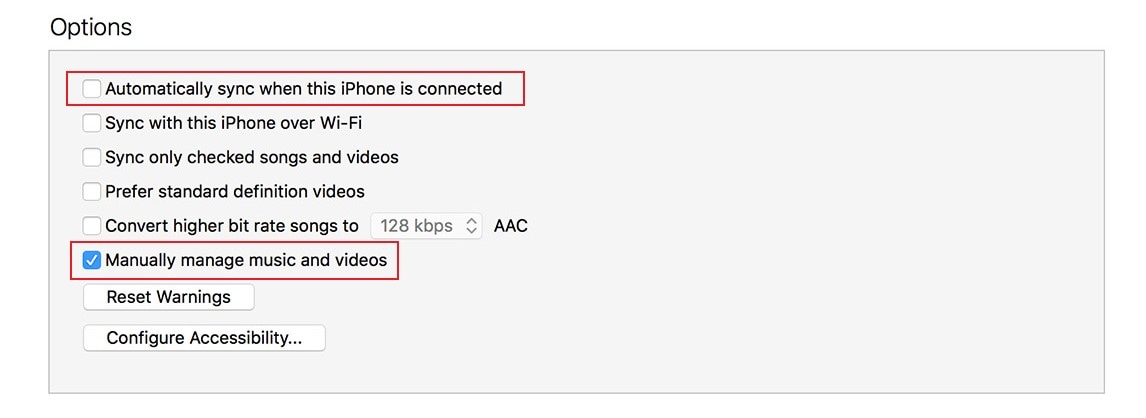
- Step 2: Go to the left-side panel and then click Summary below your device name. Scroll down until you reach the Options section.
- Step 3: Uncheck the tickbox next to Automatically Sync When This iPhone is Connected. On the one hand, check the tickbox beside Manually Manage Music and Videos.
- Step 4: After that, click Sync.
- Step 5: Now, it’s time to transfer the music files manually. Go to the Library.
- Step 6: Select the music files you want to transfer. From there, drag them toward the On My Device section on the left-side panel. Wait until the transfer is completed.
Method 2: Transfer music from iPod to iPhone 15 by enabling Sync Library.
Are you using Apple Music on your old iPod? If so, you can instantly transfer your music to your iPhone 15 by simply syncing them together. Just make sure you’re using the same account for both devices. Here’s how to transfer music from your iPod to iPhone 15 by syncing them through Apple Music.
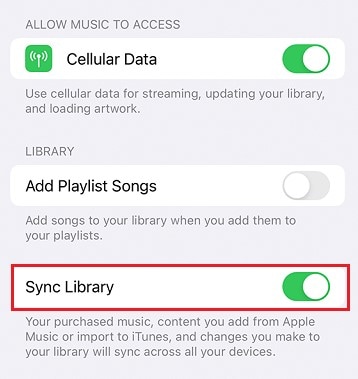
- Step 1: On your iPod, go to Settings.
- Step 2: Click Music.
- Step 3: Scroll down and find the Sync Library option. Toggle on the radio button next to it.
- Step 4: Open the Music application on your iPhone 15 and find the newly synced files from your old iPod.
Method 3: Transfer music from iPod to iPhone 15 via iTunes Store.
Take note that the iTunes Store is keeping a record of your purchases. Hence, you can easily download your purchased media files through it. Just make sure to log in to the same Apple ID you’re using for your purchases. Here’s how to transfer music from iPod to iPhone 15 via iTunes Store.
- Step 1: Launch the iTunes Store application on your iPhone 15.
- Step 2: Click More at the bottom-right corner of your screen.
- Step 3: Tap Purchased and then select Music. From there, go to the Not on This iPhone section.
- Step 4: Find the music files you want to restore on your iPhone 15. Simply click the Download icon next to it or tap Download All if you want all the files listed.
- Step 5: Open the email on the other iPhone. Then, download the photos sent as email attachments.
Method 4: Transfer music from iPod to iPhone 15 using Wondershare Dr.Fone.
It’s true to say that data migration is a very technical procedure. In the process, you have to follow each step very carefully and make no mistakes while executing them. But it’s a lot different if you’re going to use a phone transfer tool like Wondershare Dr.Fone. All you need to do is connect the two devices and choose the files you want to move. It’s as simple as that. To get you started, here’s how to transfer music from iPod to iPhone 15 using Wondershare Dr.Fone.
- Step 1: Download Wondershare Dr.Fone from its official website. Then, install it on your computer.
- Step 2: Open the newly installed Wondershare Dr.Fone on your desktop. After a few minutes, connect your iPod and iPhone 15 using a data cable.
- Step 3: Access the left-side panel and then click Toolbox. On the main dashboard, click Phone Transfer.

- Step 4: Nominate your iPod as the Source and your iPhone 15 as the Target. Alternatively, modify the transfer path by simply tapping the Flip button.

- Step 5: Choose Music as the category. From there, click Start Transfer to commence the procedure.

- Step 6: Wait while Wondershare Dr.Fone is facilitating the transfer. If you wish to terminate the progress, simply click Cancel.

- Step 7: After completing the process, click OK to wrap it up.

EXTRA TIP: How to Download Music From iPod to Computer using Wondershare Dr.Fone. ?
How to download music from your iPod to the computer? The tutorial above that uses iTunes as the transfer platform is safe and effective. You can refer to that if you wish to. However, it’s important to note that iTunes is not the only software that can help you with that. Wondershare Dr.Fone is also capable of facilitating such procedures in very convenient steps. Here’s a short guide for you.
- Step 1: Launch the Wondershare Dr.Fone application on your computer. Right after, connect your iPod using a data cable.
- Step 2: Go to the left-side panel and then click My Backup. After that, click Back Up Now on the main dashboard.

- Step 3: Wait while the backup process is ongoing. Refrain from using your device or your computer to avoid unwanted interruptions.

- Step 4: After completing the process, click Open in Folder or View Backups to locate the files on your computer.

Conclusion
The iPod is one of the best entertainment devices ever invented. It gives us a very unique experience when listening to music. However, the discontinuation of iPod production is a huge turn of events we should not brush off. Let’s consider it our cue to preserve the music files on our dearly cherished iPod. Refer to the four tutorials provided above. One of them can certainly give you the right steps on how to transfer music from iPod to iPhone 15. If you prefer a simpler approach, you should opt for Wondershare Dr.Fone. It has a potent phone transfer feature that can surely give you a helping hand in this kind of procedure. Download the application for free and make the most of its amazing features.


iPhone Music
- Download Music to iOS
- 1. Download Music to iPhone
- 2. Download Songs on iPhone/iPad/iPod
- 3. Download Free Music on iPhone
- 4. Download on iPhone without iTunes
- Make iPhone Ringtones
- 1. Set Voice Memo a Ringtone on iPhone
- 2. Ringtone Apps to Download Ringtones
- 3. Add Custom Ringtones to iPhone
- 4. iPhone Ringtone Apps
- 5. Ringtone Maker Apps for iPhone
- 6. Change iPhone Alarm Volume
- 7. Set A Ringtone on iPhone
- 8. Set MP3 As Ringtone iPhone
- 9. Set Ringtone iPhone
- 10. Make Custom Text Tones for iPhone
- 11. Websites for Free iPhone Ringtones
- 12. Move Ringtone from iPhone to Android
- 13. Popular iPhone Ringtone Remix
- Transfer Audio Media to iPhone
- 1. Send Ringtone from iPhone to iPhone
- 2. Transfer MP3 to iPhone
- 3. Transfer Audiobook from PC to iPhone
- 4. Transfer Songs from CD to iPhone
- 5. Put Ringtones on iPhone
- Transfer Music from iPhone
- 1. Transfer Music from iPhone to computer
- 2. Transfer Music from iPhone to iCloud
- 3. Transfer Music from iPhone to Android
- 4. Transfer Music from iPhone to iPod
- 5. Put Music on iPhone from Computer
- 6. Add Music to iPhone from Computer
- 7. Sync Apple Music Library
- Transfer Music from iTunes
- 1. Transfer Music from iTunes to iPhone
- 2. Transfer Music from Mac to iPhone
- 3. Transfer Music from Laptop to iPhone
- Transfer Music to iPhone
- 1. Transfer Music from Computer to iPhone
- 2. Transfer Music from Mac to iPhone
- 3. Transfer Music from Mac to iPhone
- 4. Music from PC to iPhone
- 5. Music from PC to iPhone without iTunes
- 6. Transfer Music from Android to iPhone
- 7. Transfer Music from iPad to iPhone
- 8. Transfer Music from iPod/iPhone
- 9. Transfer Music from iPhone to iPhone
- 10. Transfer Music from External Hard Drive
- 11. Transfer to iPhone without iTunes
- 12. Transfer Music to Jailbroken iPhone
- 13. Transfer Music to iPhone
- Transfer Music to iTunes/PC
- 1. Transfer Music from iPhone to iTunes
- 2. Transfer Music from iPhone to PC
- 3. Transfer Music from iPhone to Mac
- 4. Transfer Music between PC and iPhone
- 5. Transfer Music from to PC without iTunes
- iPhone Music Problems
- 1. Song Missing After iOS Update
- 2. Music Won't Play on iPhone
- 3. iPhone Plays Music by Itself
- 4. Apple Music Song Is Not Available
- 5.Fix Apple Music Library Not Syncing
- iPhone Music Tips
- ● Manage/transfer/recover data
- ● Unlock screen/activate/FRP lock
- ● Fix most iOS and Android issues
- Free Download Free Download Free Download

Alice MJ
staff Editor