Best Ways to Transfer Music from iPod to Mac Easily
Oct 24, 2025 • Filed to: Device Data Management • Proven solutions
Dr.Fone Basic:
Better Control for Your Phone
Manage, transfer, back up, restore, and mirror your device
If you like to learn how to transfer music from iPod to Mac, then this would be the last guide that you will read. It doesn’t matter which version of iPod you have, you can easily transfer music from iPod to Mac. This can be done by using iTunes or any other dedicated tool. In this guide, we will discuss different ways to transfer purchased as well as non-purchased music from iPod to Mac. Lets’ get it started and learn how to transfer music from iPod to Mac.
Part 1: Transfer music from iPod to Mac using iTunes
Most of the users take the assistance of iTunes to transfer music from iPod to Mac. Since it is a native solution developed by Apple, you can use it to copy music from iPod to Mac and vice versa. Even though iTunes is not that user-friendly, you can follow these two approaches to learn how to transfer music from iPhone to Mac.
1.1Transfer purchased music from iPod to Mac
If you have purchased the music on iPod through iTunes or Apple Music store, then you won’t face any issue to copy music from iPod to Mac. All you need to do is follow these steps:
Step 1. Connect your iPod to Mac and launch an updated version of iTunes.
Step 2. Select your iPod from the list of connected devices.

Step 3. Go to the options and select Devices > Transfer purchases from my iPod.

This will automatically transfer the purchased music from iPod to Mac.
1.2 Transfer non-purchased music
To transfer music from iPod to Mac that has not been purchased from an authentic source, you might need to walk an extra mile. Ideally, this technique will help you copy music from iPod to Mac manually.
Step 1. Firstly, connect your iTunes to your Mac and launch iTunes. Select your iPod from the list of devices and go to its Summary.
Step 2. From its options, check the “Enable disk use” and apply your changes.

Step 3. Launch Macintosh HD and select the connected iPod. You can also use a third-party browser to access the iPod files as well. Copy the music files and save it to any other location.
Step 4. Now, to transfer music from iPod to Mac (via iTunes), launch iTunes and go to the “Add files to library” option from its menu.

Step 5. Go to the location where your music is saved and load it in order to add it to your iTunes library.
Part 2: Transfer music from iPod to Mac without iTunes
If you wish to copy music from iPod to Mac without the hassle of using iTunes, then give Dr.Fone - Phone Manager (iOS) a try. This user-friendly tool will let you manage your iPod’s data without using iTunes. You can transfer files between your computer and iPod, any other smartphone and iPod, or even iTunes and iPod. Compatible with every leading iPod generation, it can rebuild your entire iTunes library or can selectively transfer music from iPod to Mac.

Dr.Fone - Phone Manager (iOS)
Transfer iPhone/iPad/iPod Music to Mac without iTunes
- Transfer, manage, export/import your music, photos, videos, contacts, SMS, Apps etc.
- Backup your music, photos, videos, contacts, SMS, Apps etc. to computer and restore them easily.
- Transfer music, photos, videos, contacts, messages, etc from one smartphone to another.
- Transfer media files between iOS devices and iTunes.
- Fully compatible with all iPhone, iPad, and iPod touch models.
2.1 Transfer iPod music to iTunes
If you wish to copy all the iPod music to iTunes in one go using Dr.Fone - Phone Manager (iOS), then follow these steps:
Step 1. Launch Dr.Fone toolkit and visit the "Phone Manager" section. Also, connect your iPod to Mac and let it be detected automatically.
Step 2. On the homepage, you can view various options. Just click on “Transfer Device Media to iTunes” to copy music from iPod to Mac (via iTunes).

Step 3. This will generate the following pop-up message. Just click on the “Start” button to initiate the process.
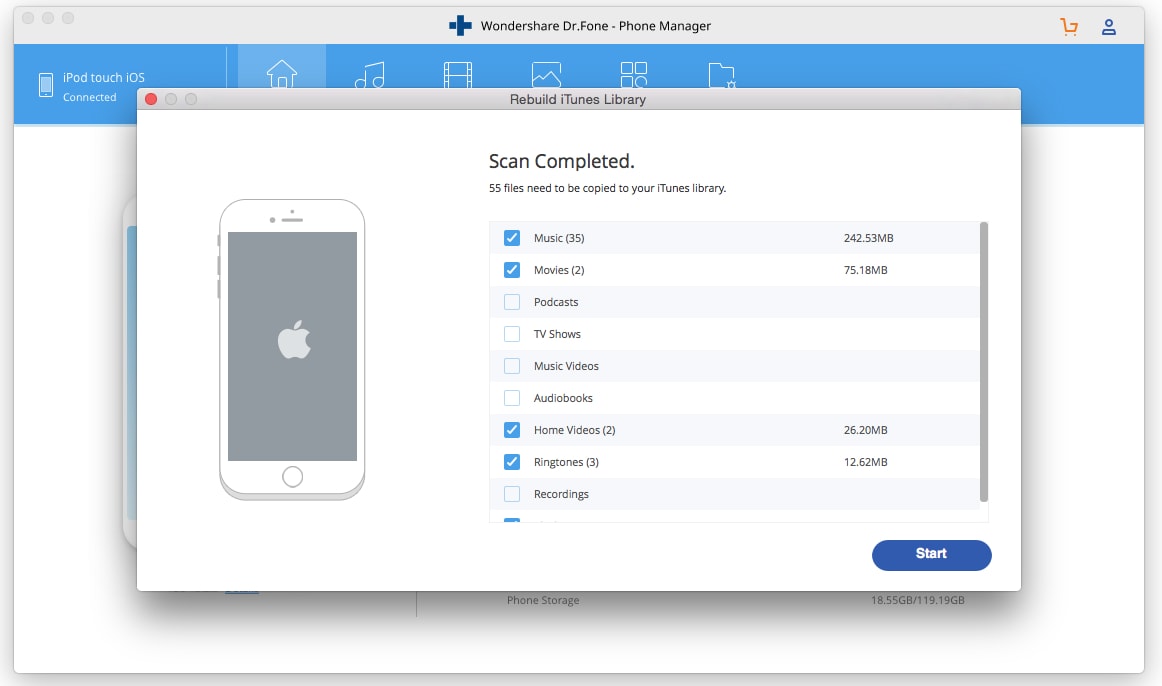
Step 4. The application will scan your iOS device and let you know the kind of media files you can transfer. Make your selection and click on the “Copy to iTunes” button to transfer your music to iTunes library directly.

2.2 Transfer selective music from iPod to Mac
Since Dr.Fone - Phone Manager (iOS) is a complete device manager, it can be used to copy music from iPod to Mac and vice versa. To learn how to transfer music from iPod to Mac selectively, follow these steps:
Step 1. Launch Dr.Fone - Phone Manager (iOS) and connect your iPod to it. Once it is detected, the interface will provide its snapshot.

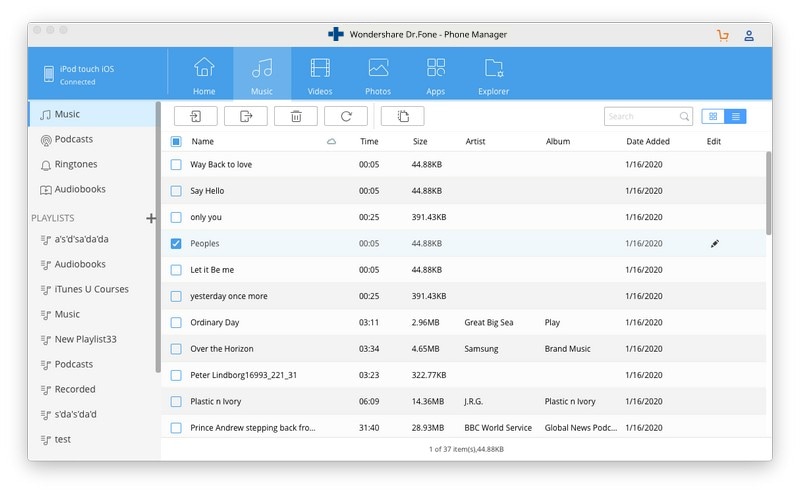
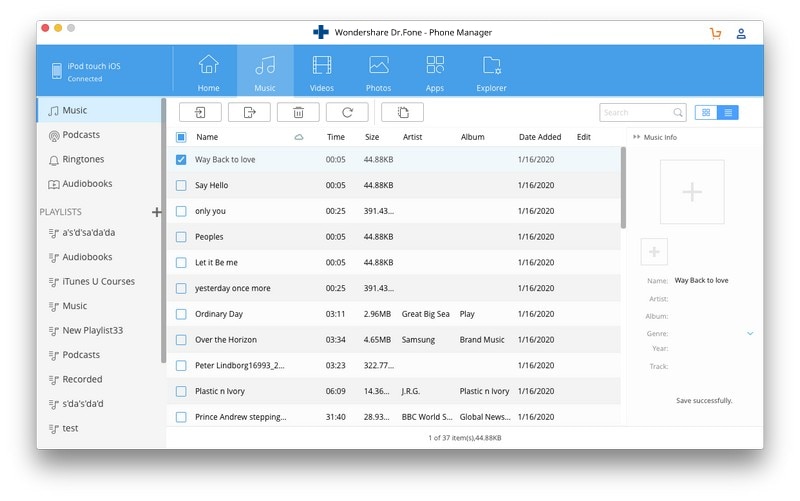
Step 2. Now, go to the Music tab. This will list all the music files that are stored on your iPod. You can switch between different categories (like songs, podcasts, audiobooks) from the left panel.
Step 3. Select the songs that you wish to move and click on the export icon on the toolbar. You can also right-click on the interface and choose the “Export to Mac” option.

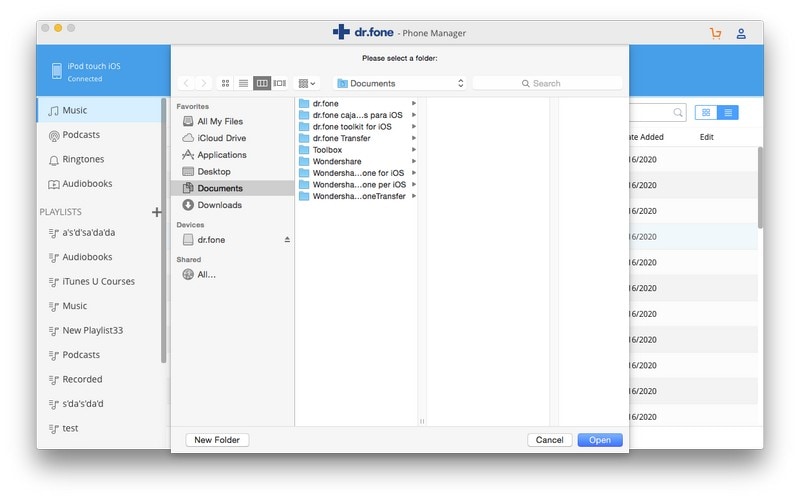
Step 4. This will open a browser where you can select the location for the selected music to be saved. Just click on the “Save” button and let the application move music from iPod to Mac automatically.

Part 3: Tips for managing iPod music on Mac
In order to manage music on your iPod, you can simply implement the following tips:
1. Add or delete your music easily
By taking the assistance of Dr.Fone - Phone Manager (iOS), you can manage your iPod music in one place. To delete tracks, simply select them, and click on the delete (trash) icon on the toolbar. If you want, you can also add music to iPod from Mac as well. Just click on the import icon > Add. Locate the music files and load them to your iPod.

2. Fix iTunes errors by updating it
A lot of users are not able to move music from iPod to Mac via iTunes as their iOS device face compatibility issues with iTunes. To avoid this, you can update iTunes by visiting its menu and selecting the “Check for updates” option. It will automatically check for the latest available update for iTunes.

3. Sync your iPod with iTunes
If you wish to keep your iPod data in sync with your Mac, then you can follow this suggestion. After connecting it with iTunes, go to its Music tab and turn on the “Sync Music” option. In this way, you can also transfer your favorite songs from iTunes to iPod as well.

We are sure that after following this tutorial, you can learn how to transfer music from iPod to Mac easily. We recommend taking the assistance of Dr.Fone - Phone Manager (iOS) to copy music from iPod to Mac (or vice versa) directly. It is a complete iOS device manager and works with all the leading iPod models as well. Download it on your Mac right away and always keep your music organized.
Dr.Fone Basic:
Better Control for Your Phone
Manage, transfer, back up, restore, and mirror your device
iPod Transfer
- Transfer from iPod
- 1. Transfer Your Photos from iPod
- 2. Transfer Music to Computer
- 3. Transfer Music to Computer or Mac
- 4. Transfer Music from iPod Classic
- 5. Transfer Music from iPod (Touch)
- 6. Transfer Music from Formatted iPod
- 7. Transfer Music from iPod to Mac
- 8. Sync iPod to New Computer
- 9. Transfer Music Without Losing Data
- 10. Transfer Pod to iTunes or Computer
- 11.Transfer Music to Hard Drive
- 12.Transfer iPod Music to MP3 Player
- 13.Transfer Music to USB Flash Drive
- 14.Transfer Music from Android to iPod
- 15.Upload iPod Music to Google Music
- 16.Transfer Music from iPod to iPad
- 17.Transfer Music to Samsung Galaxy
- Transfer to iPod
- 1. Transfer Music from iPod to iTunes
- 2. Transfer Music from iPod Classic
- 3. Transfer Music from iPod Nano
- 4. Transfer Music from iPod shuffle
- 5.Transfer Music from iTunes
- 6. Put music on iPod shuffle
- 7. Transfer Audiobooks to iPod
- 8. Transfer MP3 to iPod
- 9. Transfer Music From Window
- 10. Add Videos to iPod nano
- 11.Transfer Music from Hard Drive
- 12.Transfer Music from iMac
- 13.Transfer Music from Computer
- 14.Transfer Photos from Computer
- 15.Transfer Music from iPad
- 16.Transfer Music from iPod
- 17.Transfer Music from iPhone
- iPod Useful Tips
- ● Manage/transfer/recover data
- ● Unlock screen/activate/FRP lock
- ● Fix most iOS and Android issues
- Start Transfer Start Transfer Start Transfer


James Davis
staff Editor