

 100% Security Verified | No Subscription Required | No Malware

 :
: 
 ChatGPT
 Perplexity
 Gemini
 Claude
 Grok
Grok

Hello, I need help putting videos from my home computer onto my iPod nano. It’s a 5th generation one. The movies are .avi and .wmv formats but my iTunes library doesn't recognize them. Is there a single type of movie extension that iPods will take or can you put any kind on them? Or is it that the iPod will only play videos purchased through iTunes?
Even though the iPod nano is a classic device, many users still enjoy its portability for music and videos. However, a common challenge is figuring out how to add videos to an iPod nano, especially when dealing with formats like AVI or WMV that aren't natively supported. While the iPod is primarily a music player, models from the 3rd generation onward support video playback.
The good news is you are not limited to videos purchased from iTunes. You can transfer your own video files from your computer. This guide will walk you through three effective methods to put movies on your iPod nano, including a solution that automatically converts incompatible video formats for you.
In this article
Part 1. The Easiest Way to Add Videos to iPod Nano Without iTunes
The most straightforward method to put videos on your iPod nano is by using a dedicated file transfer tool. Wondershare Dr.Fone - Phone Manager (iOS) simplifies this process by handling all the complexities for you. Unlike iTunes, it can automatically detect incompatible video formats (like AVI, FLV, WMV) and convert them to the iPod-friendly MP4 format during the transfer.
A significant advantage of this method is that it adds new videos without deleting any existing files on your device. This makes it a safe and efficient choice for managing your iPod's library. It's the best available alternative to iTunes, offering more flexibility and control over your media.
 Effortlessly manage data through preview, delete, export, etc.
- Transfer all data between devices.
- Robust backup solutions for reliable data protection.
- Mirror screens to PC for meetings, teaching, and control.

How to Add Videos to iPod Nano Effortlessly with Dr.Fone
-
Step 1 Launch Dr.Fone and Connect Your iPod
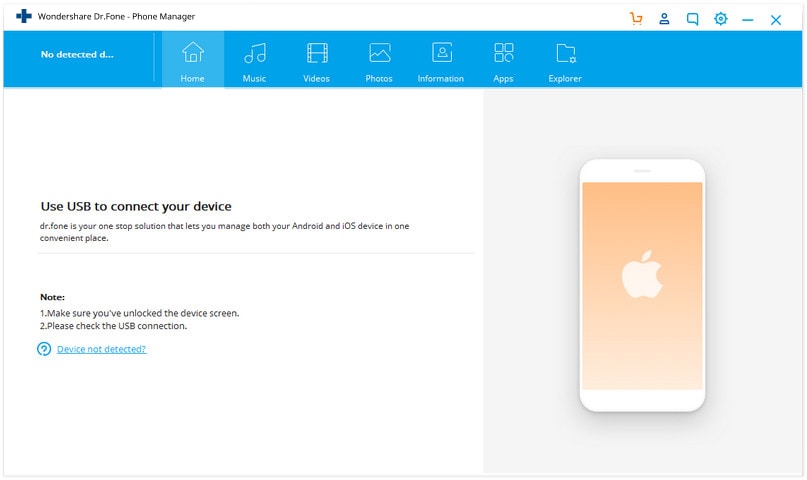
Start by downloading and installing Wondershare Dr.Fone on your computer. Launch the application to see its main interface. Then, connect your iPod nano to the computer using its USB cable.
-
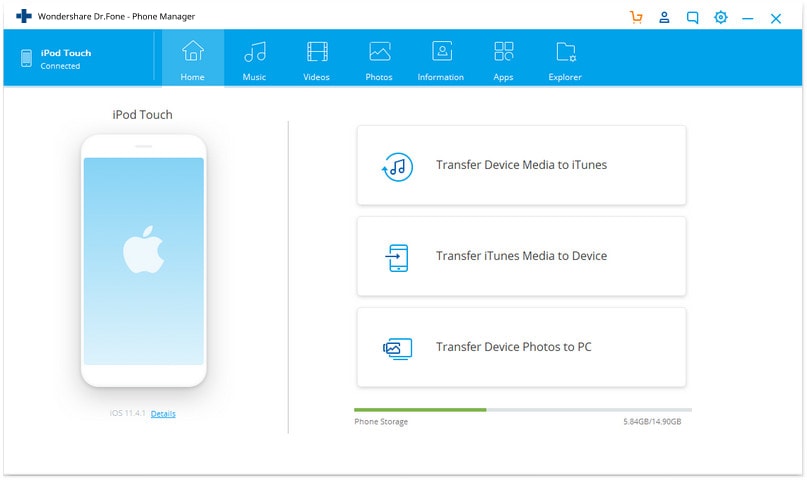
Step 2 Wait for Device Recognition
Dr.Fone will automatically detect and display your connected iPod nano on the screen, as shown in the image below.
-
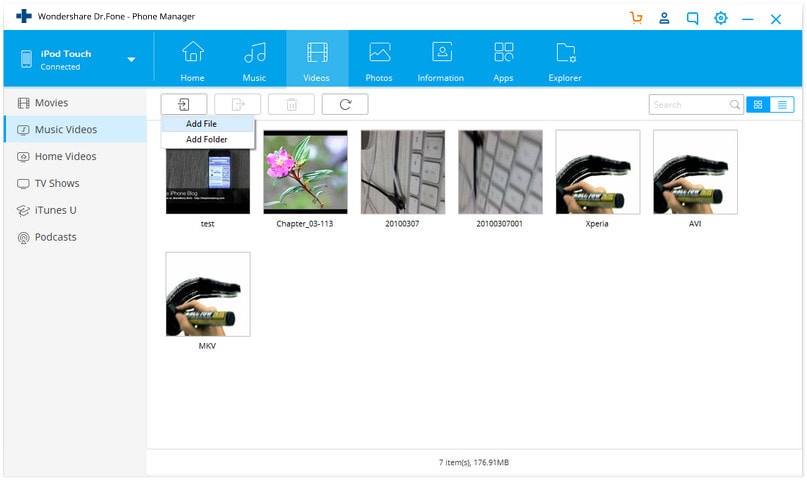
Step 3 Navigate to the Videos Section
Once your iPod is connected, click on the 'Videos' tab at the top of the interface. In the left sidebar, select a category like 'Movies' or 'Music Videos'. To add new files, click the 'Add' button and choose either 'Add File' or 'Add Folder' from the dropdown menu.
-
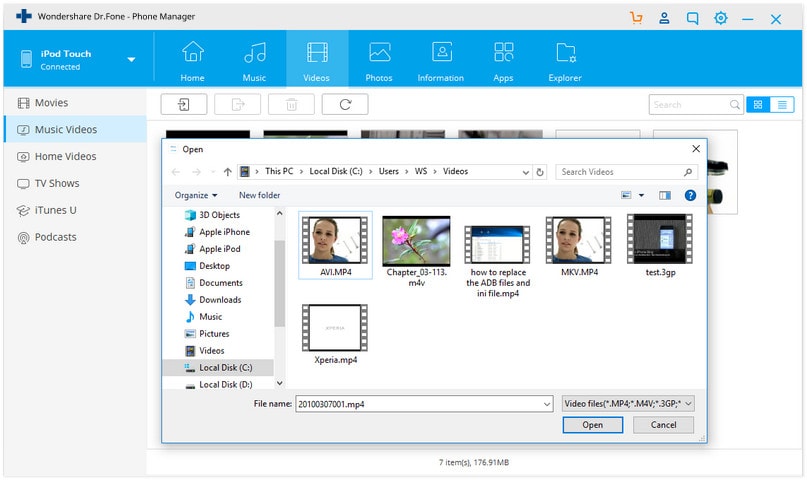
Step 4 Select and Transfer Your Videos
A new window will open, allowing you to browse your computer for the video files you want to add. Select your videos and click 'Open'. If a video is in an unsupported format, Dr.Fone will prompt you to convert it. Click 'Yes' to proceed. The software will then convert and add the video to your iPod nano automatically.
Part 2. Add Videos to iPod Nano Using iTunes (Drag & Drop)
You can also use iTunes to manually add videos to your iPod nano. However, this process requires more effort and has a major limitation: iTunes will not convert unsupported video formats for you. You must first ensure your video is in an iPod-compatible format (like MP4) before starting. If not, you'll need a separate video converter tool.
-
Step 1 Configure iTunes and Connect iPod
Launch iTunes on your PC. Connect your iPod nano and click the device icon. Go to the 'Summary' tab and ensure the 'Manually manage music and videos' option is checked. Then, from the dropdown menu on the left, select 'Movies'.

-
Step 2 Drag and Drop the Video File
Open the folder on your computer that contains the compatible video file. Simply drag the video from your folder and drop it into the iTunes 'Movies' library area.

-
Step 3 Wait for the Transfer to Complete
After dropping the file, iTunes will begin copying the video to your iPod. You will see a small progress indicator next to your device name.

-
Step 4 Confirm the Video is Added
Once the transfer is complete, the video will appear in your iPod's movie list within iTunes. You can now disconnect your iPod and enjoy the video.

Part 3. How to Sync Videos to iPod Nano via iTunes
Another way to add videos with iTunes is by syncing. This method involves adding videos to your main iTunes library first and then syncing that library with your iPod nano. Be cautious with this approach, as syncing can sometimes overwrite the existing content on your iPod if your settings aren't configured correctly.
-
Step 1 Open iTunes and Connect iPod
Launch iTunes on your computer and connect your iPod nano with a USB cable. Click the device icon to go to the 'Summary' page.

-
Step 2 Add Video to iTunes Library
To add a video to your main library, go to the iTunes menu and click 'File' > 'Add File to Library...'.

-
Step 3 Browse for Your Video File
A file browser window will appear. Navigate to the location of your video file, select it, and click the 'Open' button.

-
Step 4 Confirm Video is in Library
Your video should now appear in the 'Movies' section of your main iTunes library. You're now ready to sync it to the iPod.
-
Step 5 Sync Your iPod with iTunes
Return to the iPod summary page. Here, you can select which content to sync. Go to the 'Movies' tab under your device settings, check 'Sync Movies', and select the video you added. Finally, scroll down and click the 'Sync' button at the bottom right.

-
Step 6 Verification
iTunes will sync its library with your iPod, adding the new video. Once the sync is complete, the video will be available on your device.

Part 4. Key Tips for Transferring Videos to iPod Nano
Choosing the right method depends on your technical comfort and needs. Here are some final tips and a quick comparison to help you decide.
Tip 1: Check for Compatible Formats First
If you plan to use iTunes, always remember that your video must be in an iPod-compatible format. The iPod nano generally supports H.264 or MPEG-4 video in .mp4, .m4v, and .mov file formats. Using a tool that converts automatically, like Dr.Fone, saves you the extra step of manual conversion.

Tip 2: Use the Right Software for the Job
While iTunes is the official tool, it can be cumbersome and restrictive. For a hassle-free experience, a third-party application like Wondershare Dr.Fone - Phone Manager (iOS) is highly recommended. It automates complex tasks, prevents data loss, and gives you more control over your media.
Video Tutorial: How to Transfer Videos to iPod Nano with Dr.Fone
Conclusion
Adding videos to your iPod nano doesn't have to be a complicated task. While iTunes offers native methods through manual management and syncing, they come with limitations, particularly the lack of automatic format conversion and the risk of data loss during syncing. For a truly effortless and safe experience, using a tool like Wondershare Dr.Fone - Phone Manager (iOS) is the superior choice. It streamlines the entire process, handles format conversions on the fly, and ensures your existing library remains untouched, letting you enjoy your favorite movies and videos on your classic device with ease.
FAQ
-
1. What video formats does the iPod nano support?
The iPod nano primarily supports video files in .mp4, .m4v, and .mov formats, encoded with H.264 or MPEG-4 video codecs. If your video is in another format like .avi, .wmv, or .mkv, it must be converted before you can add it via iTunes. -
2. Can I put movies on my iPod nano without using iTunes?
Yes, you can. Third-party software like Wondershare Dr.Fone - Phone Manager (iOS) allows you to directly transfer videos from your computer to your iPod nano without needing to open iTunes. These tools often include the benefit of automatic video format conversion. -
3. Will syncing videos to my iPod nano delete my existing songs?
It can. If your iPod is set to sync automatically with an iTunes library, any content on the iPod that is not in that specific library could be erased. This is a primary risk of the iTunes sync method. Using the 'Manually manage music and videos' option or a tool like Dr.Fone avoids this issue. -
4. Is it still possible to add videos to an old iPod nano in 2026?
Absolutely. As long as the device is functional and you have the correct USB cable, you can still add videos using the methods described. Software like Dr.Fone is regularly updated for compatibility with modern operating systems, ensuring you can continue managing your legacy Apple devices.
 Add Wondershare Dr.Fone as a preferred source on Google


