How to Transfer Music from iPod to USB Flash Drive

Jun 30, 2026 • Filed to: Data Transfer Solutions • Proven solutions
 TL;DR:
Transferring music from an iPod to a USB flash drive requires routing the files through a computer and can be achieved using Wondershare Dr.Fone, iTunes/Finder, iCloud, or Windows Explorer depending on your file types and preferences.
● The manual Windows Explorer method requires an MFi-Certified cable and enabling hidden items to access the "iPod_Control" folder, which outputs files with random four-letter names that require manual renaming.
● Using iTunes or Finder restricts you to transferring only purchased tracks and requires you to select the "Prevent iPods, iPhones, and iPads from syncing automatically" preference before connecting the device.
● Direct transfers from an iPod to a USB drive without a computer are impossible due to iOS system restrictions, and the iPod should be fully charged before starting to avoid transfer interruptions.
Ask AI for a summary
 ChatGPT
 Perplexity
 Gemini
 Claude
 Grok
Grok
Dr.Fone Basic:
Better Control for Your Phone
Manage, transfer, back up, restore, and mirror your device
I have a 5th-generation Nano. I have several songs on it that are not on my iTunes. How can I transfer these to a flash drive? Thanks.
Have you ever found yourself in a situation where you need a track or an album you had and due to either computer crash, iTunes installation, buying a new PC, or phone loss; such a song or an album could no longer be found? What if it meant a great deal? It might be an evergreen track you love much or a song that lifts your heart when you feel down. Then transfer your music from iPod to a USB flash drive is an excellent idea.
Identifying that you need to transfer your music to a USB flash drive is excellent, however, it comes with a challenge; How do you transfer that music from your iPod to the USB flash drive? Here 2 solutions are provided for you to transfer music from iPod to USB flash drive. You get the step-by-step actions that will be of tremendous help but before we hit the nail of its head.
Note: It's almost the same steps to transfer music from iPhone/iPad/iPad mini to USB flash drive.
- Part 1: How to Transfer Music from iPod to USB Flash Drive with Wondershare Dr.Fone

- Part 2: How to Transfer Music from iPod to USB Flash Drive via iTunes/Finder
- Part 3: How to Transfer Music from iPod to USB Flash Drive via iCloud
- Part 4. How to Transfer Music from iPod to USB Flash Drive via Windows Explorer
- FAQs
Part 1: How to Transfer Music from iPod to USB Flash Drive with Wondershare Dr.Fone
With Wondershare Dr.Fone, you can not only copy music from iPod to USB Flash Drive directly but also manage files and media on iPod and other Apple devices easily. You can export and copy music and also sync between different iOS devices without the need for iTunes. Music to iPod and iPhone can also be imported and you can create backups and even restore lost files and videos.
Unique Features:
- Wondershare Dr.Fone performs a thorough scan of your iPod to eliminate the chance of duplicated items in the music library. It matches up with existing songs so that only relevant songs are transferred from iPod to a USB drive.
- The process of transfer of music does not miss out on song details. Information like play counts, ratings, ID3 tags, and cover and album arts are synced and stored as they're along with your songs on the Flash drive. Apart from music, you can also copy entire playlists using Wondershare Dr.Fone. It retains the perfect audio quality as there is no loss during the copying.
- Many times we come across songs that we cannot add to our iPods as they are not compatible with iOS. The program solves this problem as it features easy conversion of files to Apple-supported formats. This way you can play them on any Apple device without any problems.
- You can transfer between various devices from your iPod with Wondershare Dr.Fone. You can copy as well as import music and videos and other files from PC or Mac to iPod and vice versa.
- You can connect multiple iOS devices at one time and directly transfer files between them without having to save it on a desktop first.
- Fully compatible with the latest iOS version
Wondershare Dr.Fone
Transfer Music from Computer to iPod/iPhone/iPad without iTunes
- Transfer, manage, export/import your music, photos, videos, contacts, SMS, Apps, etc.
- Backup your music, photos, videos, contacts, SMS, Apps, etc. to computer and restore them easily.
- Transfer music, photos, videos, contacts, messages, etc from one smartphone to another.
- Transfer media files between iOS devices and iTunes.
- Support all iPhone, iPad, and iPod touch models with any iOS version.


Now we will discuss the steps required to do the transfer. You have to download and install Wondershare Dr.Fone on your desktop before you perform the steps below. There are two methods available to transfer music from iPod Shuffle, iPod Nano, iPod Classic, and iPod Touch to
Step 1: Download Wondershare Dr.Fone and install it on your desktop to begin.

Step 2: Now access Wondershare Dr.Fone by launching it. Then connect your iPod to a computer via the USB cord.

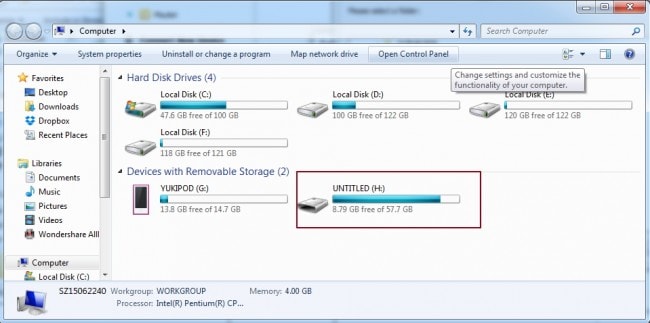
Step 3: Insert your USB drive into your desktop and wait for it to get detected under the Removable Storage in MY Computer window.
Step 4: Click Music on the left of the interface and right-click the music that you want to transfer to USB Flash Drive: "Export" > "My Computer".

Step 5: Now browse for a destination folder or create a new one in your USB drive to save the songs. After that click on "OK". The music starts transferring and the export is completed within a few minutes.

Video Tutorial: How to Transfer Music from iPod to USB Flash Drive with Wondershare Dr.Fone
Part 2: How to Transfer Music from iPod to USB Flash Drive via iTunes/Finder
If you favor utilizing built-in applications, you have the option to move music from your iPod to a USB flash drive using iTunes/Finder. Leveraging iTunes (for Windows) or Finder (for Mac) presents a recognizable approach to shifting music from your iPod to a USB flash drive. Use these guidelines to protect and share your music collection across various devices.
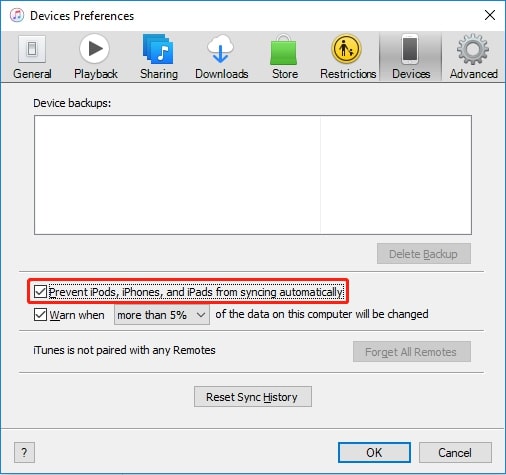
Step 1: To begin, access iTunes/Finder on your personal computer. Next, locate the "Edit" tab and select "Preferences." Within the Preferences window, choose "Devices" and mark the "Prevent iPods, iPhones, and iPads from syncing automatically" checkbox. Lastly, click "OK" to confirm and save the modifications you've applied.
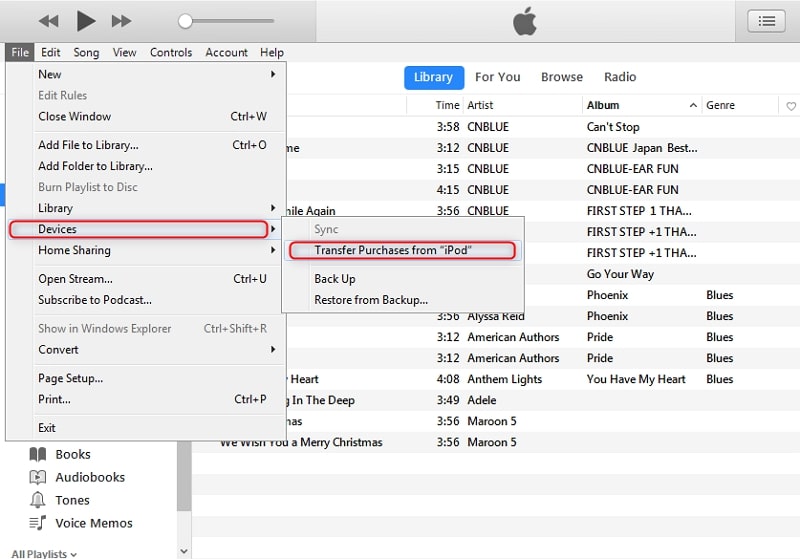
Step 2: Now, use a USB cable to connect the iPod Touch to the computer and access "File" in iTunes. Here, click "Devices" and select "Transfer Purchases from [XXX]." After that, go to “Recently Added” to check your songs. Now, you can download the songs to your computer and copy them to your USB flash drive.
Part 3: How to Transfer Music from iPod to USB Flash Drive via iCloud
To make the most of the complete advantages offered by Apple Music, you can utilize a smooth sharing approach. To effortlessly transfer your favorite tracks from your iPod touch to a USB flash drive, ensure your iPod is operating on the most recent iOS version before leveraging iCloud. Moreover, ensure a reliable internet connection to facilitate a smooth transfer. Follow these steps to successfully transfer music from your iPod to a USB drive:
Step 1: First, move to your iPod Touch and access "Settings." Here, move to the "Music" tab and enable "Sync Library." Now, move to iTunes/Finder on the computer and launch it.
Step 2: To begin, select "Edit," located near the upper left corner. Then, access the drop-down menu and choose the final option labeled "Preferences." Once in "Preferences," navigate to the "General" tab and ensure that the "iCloud Music Library" box is selected.
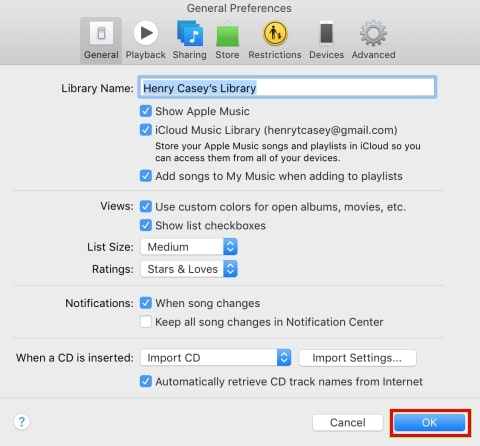
Step 3: Tap the "OK" button to confirm the changes and allow the Apple Music Library to synchronize. Once the syncing is finished, you can access the specific songs and transfer them to a USB drive.
Part 4. How to Transfer Music from iPod to USB Flash Drive via Windows Explorer
Transferring music from an iPod to a USB flash drive via Windows Explorer is a direct and reliable method. With its user-friendly interface, Windows Explorer streamlines the transfer process, making it easier for iPod owners to navigate their device's directory and move music to a USB drive. To complete the music transfer process, follow these steps:
Step 1: Using an MFi-Certified cable, connect your iPod Touch to your computer. Once it is detected by Widows and opened in Windows Explorer, go to the "View" tab on the top bar of the window.
Step 2: Here, check the "Hidden Items" box to view the hidden folder within the iPod directory. Now go to the "Music" folder inside the "iPod_Control" folder and copy all the folders and files to the location on your computer.
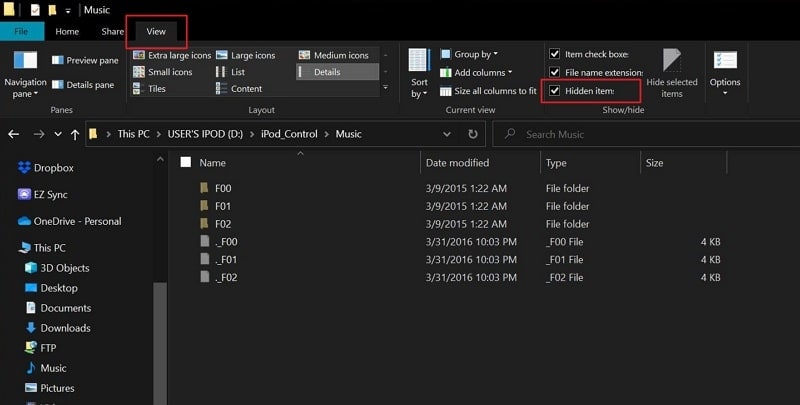
Step 3: All the music files will have random four-letter names, which you can edit and organize them. Afterward, attach the USB drive to the computer and copy the songs there to complete the process.
Frequently Asked Questions
- What if my computer doesn't recognize my iPod?
If your computer fails to detect your iPod, attempt the subsequent troubleshooting measures: Experiment with an alternate USB port on your computer. Verify that the USB cable remains intact and is securely linked. Reboot your computer and reconnect the iPod.
Moreover, upgrade the device drivers on your computer and consider testing the iPod on a different computer to determine whether the issue pertains to your computer or the iPod itself.
- Can I transfer music from an iPod to a USB drive without a computer?
Transferring music from an iPod to a USB drive without a computer is typically not possible, as it usually requires an intermediary device to facilitate the transfer. This limitation arises from the closed nature of the iOS operating system. It restricts direct file transfers from the iPod to external storage devices such as USB drives.
- Can I transfer music purchased from the iTunes Store?
You have the option to move your iTunes Store acquisitions from your mobile device to any authorized computer for playback. You can purchase music from the iTunes Store, enabling you to enjoy it on your computer, iPhone, iPad, or iPod touch.
- Are there any precautions I should take during the transfer process?
When transferring music from your iPod to a USB flash drive, it is crucial to observe specific precautions. Initially, ensure your iPod is fully charged to prevent any interruptions during the transfer process.
Additionally, it is advisable to generate backups of your music files to prevent any unforeseen issues that may arise during the transfer. To prevent data corruption or loss, always safely eject your devices from the computer.
Conclusion
In summary, music has ingrained itself deeply into our daily existence, underscoring the critical importance of dependable techniques for transferring music between devices. While various approaches exist, the use of trustworthy software like Wondershare Dr.Fone emerges as the ideal choice. This is due to its user-friendly interface and robust functionality.
With Wondershare Dr.Fone, users can effortlessly transfer music from their iPod to a USB flash drive. It ensures the preservation and accessibility of their favorite tunes across multiple devices. Its intuitive design and comprehensive features make it a standout option for music enthusiasts.
Dr.Fone Basic:
Better Control for Your Phone
Manage, transfer, back up, restore, and mirror your device


Bhavya Kaushik
contributor Editor