 Effortlessly manage data through preview, delete, export, etc.

 100% Security Verified | No Subscription Required | No Malware

 :
: 
 ChatGPT
 Perplexity
 Gemini
 Claude
 Grok
Grok

I have now got most of my music on iTunes. My wife now wants to put some playlists onto her MP3 player. Anybody knows how to do it?
From Apple Support Community
Transferring your favorite playlists or albums from one device to another should be straightforward. However, when it comes to Apple devices, moving data isn't always as simple as a basic copy-and-paste command. If you have been enjoying your tracks on an iPod and suddenly decide to switch to a non-Apple device, you might be wondering how to transfer iPod music to another MP3 player. Since iOS typically restricts direct file transfers to third-party devices to prevent piracy and maintain ecosystem exclusivity, many users find themselves stuck.
Fortunately, there are proven workarounds to easily convert your iPod music to MP3 format or directly export them to another music player. In this comprehensive guide updated for 2026, we will walk you through the most effective methods to successfully transfer iPod music. Whether you prefer a quick, automated software solution or a manual approach using iTunes, you will find the step-by-step instructions below to seamlessly share music from your iPod to any MP3 player.
In this article
Part 1. Transfer iPod Music to Another MP3 Player with Dr.Fone Basic
To bypass the strict limitations of the Apple ecosystem, utilizing a dedicated third-party tool is highly recommended. For those looking for a hassle-free method to transfer iPod music to another MP3 player, Wondershare Dr.Fone is an exceptional choice. Unlike traditional methods, this intuitive software does not require complex disk configurations or dealing with hidden files. It allows you to selectively export your favorite tunes directly to your PC or another connected device without erasing any existing data.
What you will need for this method:
- Two functioning USB cables to connect both your iPod and your MP3 player to the computer.
- The source iPod containing the music you wish to export.
- The destination MP3 player.
- A Windows or Mac computer.
- Wondershare Dr.Fone - Phone Manager (iOS) installed on your system.
You can try the free version to experience its seamless file management or upgrade to the premium version for unlimited transfers. Beyond just music, it empowers you to manage playlists, TV shows, movies, audiobooks, and photos with a few simple clicks.
Explore the full suite of device management features below.
 Effortlessly manage data through preview, delete, export, etc.
- Transfer all data between devices.
- Robust backup solutions for reliable data protection.
- Mirror screens to PC for meetings, teaching, and control.

If you prefer a visual guide on how to transfer iPod music smoothly, check out the video tutorial below before jumping into the written steps.
Step-by-step Guide to Transfer Music
-
Step 1 Install and Launch the Software
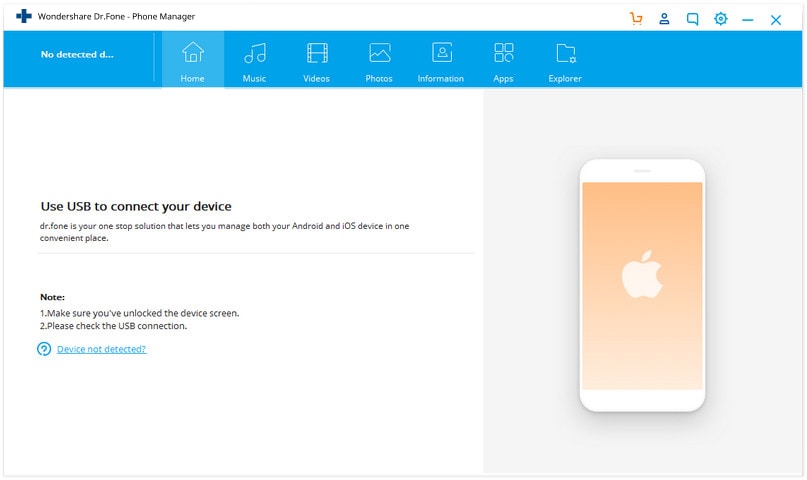
Begin by downloading the Wondershare Dr.Fone software to your PC or Mac. Install the application following the on-screen instructions, then open it to access the main interface. Click on the "Phone Manager" module to proceed.
-
Step 2 Connect Both Devices to Your PC
Using compatible USB cables, plug your iPod into one USB port and your target MP3 player into another. The software will automatically detect and display the devices. You can select your iPod as the source device from the top-left corner.

-
Step 3 Export Your Entire Music Collection
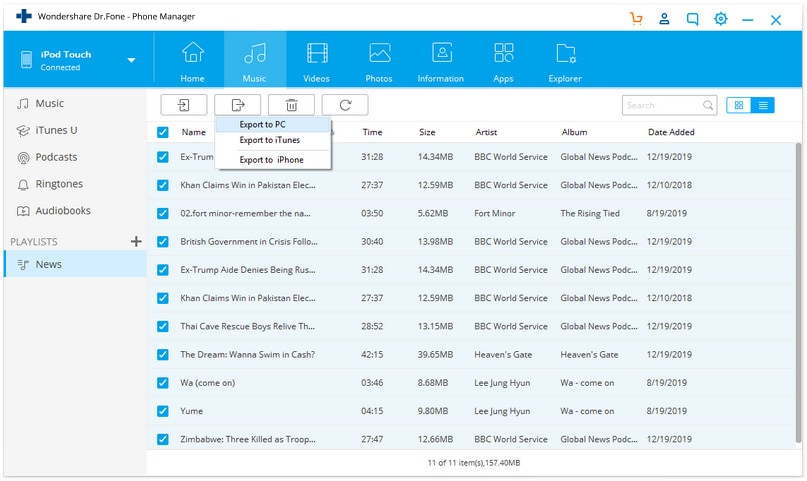
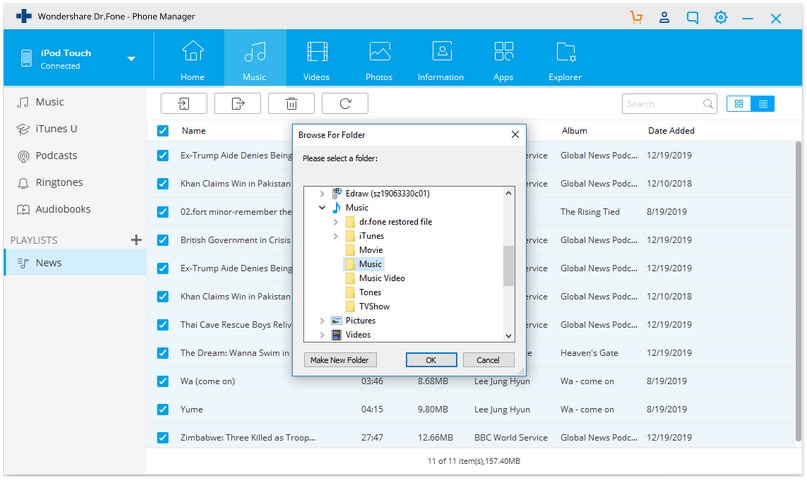
If you want to move all your tracks at once, click on the "Music" tab at the top of the interface. Select all the audio files listed. Next, click the "Export" button from the top menu and choose "Export to PC" or directly export to the connected MP3 player if recognized. If exporting to the PC, simply set your MP3 player's storage as the destination folder and hit "OK."
-
Step 4 Transfer Music Selectively
If you only need specific songs, navigate to the "Music" tab, expand the categories on the left pane, and check only the boxes next to the tracks you want. Right-click your selection and choose "Export to PC," then locate your MP3 player’s folder to save the files. This selective feature prevents your new MP3 player from being cluttered with unwanted files.

By connecting both devices simultaneously, Dr.Fone acts as an intuitive bridge, making the process of turning iPod music to MP3 format or migrating playlists incredibly efficient. You can also use this application to move photos, videos, and podcasts flawlessly.




Part 2. Transfer iPod Music to Another MP3 Player with iTunes
If you prefer not to use third-party software, it is technically possible to manually extract your music using iTunes. However, be aware that this method can be somewhat tedious. Apple intentionally hides the music folders on your iPod to discourage unauthorized sharing. Consequently, you have to enable specific settings in both iTunes and your Windows operating system to reveal the raw audio files before you can copy them.
What you will need for this method:
- Two USB cables to connect your iPod and the MP3 player to the PC.
- A Windows PC running the latest version of iTunes.
- Your source iPod and the destination MP3 player.
Detailed Instructions for the Manual iTunes Method:
-
Step 1 Connect the iPod to the PC
Start by hooking up your iPod to your computer using a USB cable. Launch the iTunes application. If you haven't installed it yet, download iTunes for Windows first. Once connected, your device data will load into the interface.

-
Step 2 Enable Disk Mode
To access the internal files of your iPod, you must turn on Disk Mode. Locate your iPod icon on the left-hand panel in iTunes and click it. Scroll down to the "Options" section and check the box labeled Enable disk use. Confirm any warning prompts by clicking "OK."

-
Step 3 Access Windows Explorer Tools
Now, close iTunes. Open My Computer (or "This PC" on newer Windows versions) and look for your iPod listed under the connected devices. Double-click to open it. Press the "ALT" key on your keyboard to reveal the top menu bar, and click on "Tools."

-
Step 4 Uncover Hidden Files
From the Tools dropdown, select "Folder Options," then navigate to the "View" tab. Scroll down to find the option that says "Show hidden files, folders and drives." Check this option, click "Apply," and then "OK." This step is crucial because Apple stores iPod music in a hidden directory.

-
Step 5 Locate and Copy the Music Folder
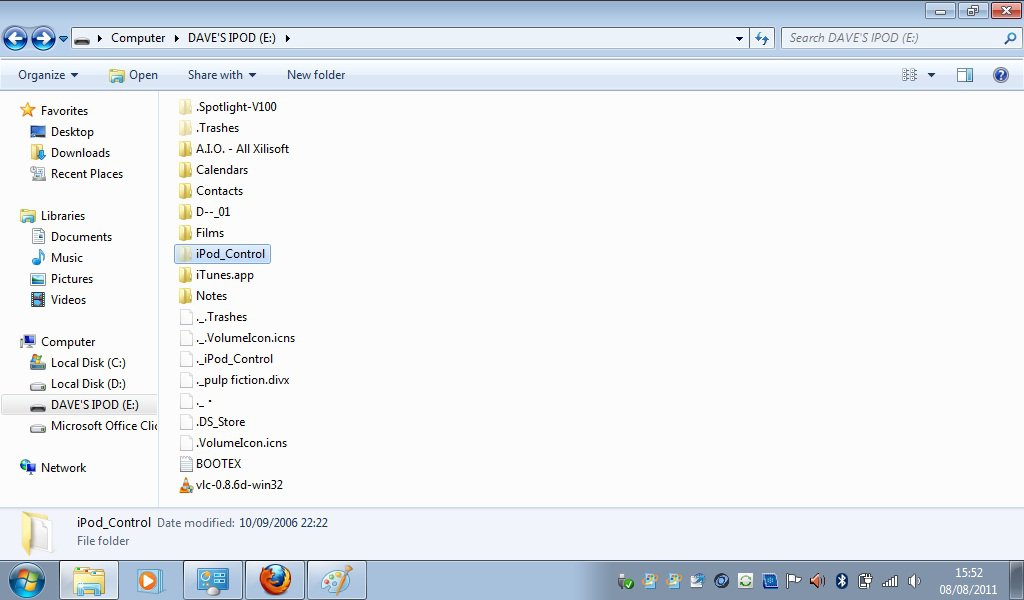
With hidden files now visible, open the iPod drive and navigate to the newly revealed 'iPod_controls' folder. Inside, you will find the music folder containing your tracks. Copy this entire folder and paste it into a safe location on your computer's hard drive.
-
Step 6 Eject the iPod
Once the massive file transfer to your PC is successfully finished, safely eject your iPod from the system and disconnect the USB cable.

-
Step 7 Connect and Open the Target MP3 Player
Plug your new non-Apple MP3 player into the computer. Open its dedicated music management software or simply access its storage drive via File Explorer. Drag the previously copied music folder from your PC into the MP3 player's library or main storage directory. Wait for it to process the new metadata (artists, albums, track names).

-
Step 8 Complete the Synchronization
If you are using a companion app for the MP3 player, hit the "Sync" button to finalize moving the iPod music to MP3 format into its memory. Once the sync finishes, your tracks are ready for playback on the new device.

While this iTunes method is completely free, it requires a fair amount of manual labor and adjusting system settings. Furthermore, track names might occasionally appear scrambled due to Apple's encoding, requiring you to manually rename them.
Conclusion
Deciding to transfer iPod music to another MP3 player doesn't have to be a frustrating experience. Whether you are migrating away from the Apple ecosystem or simply sharing some fantastic playlists, you have two primary routes. You can utilize the manual iTunes extraction method by enabling hidden files, copying raw folders, and syncing them to the new device. Alternatively, for a completely seamless, drag-and-drop experience that preserves file integrity and metadata, relying on professional tools like Wondershare Dr.Fone is highly recommended. By following the steps outlined above, you can successfully move all your favorite iPod music and start enjoying it on any MP3 player of your choice.
FAQ
-
1. Can I transfer iPod music to another MP3 player via Bluetooth?
No, Apple devices impose strict Bluetooth restrictions that prevent direct file sharing of copyrighted music to non-Apple devices. To transfer iPod music to another MP3 player, you must rely on a physical computer connection using tools like Dr.Fone or the iTunes file extraction method. -
2. Will transferring iPod music to an MP3 player convert the file format?
If your iPod tracks are saved in Apple's proprietary formats like ALAC or DRM-protected AAC, some MP3 players may not support them natively. When using advanced management software, it can often convert iPod music to MP3 or other compatible formats during the transfer. Manual iTunes transfers copy the exact raw files, which might require a separate audio converter afterward. -
3. Why can't I see my music folders when I connect my iPod to my PC?
Apple intentionally hides the internal media directories on iOS and iPod devices to prevent unauthorized copying. To see them, you must enable "Disk Use" in iTunes and configure your Windows Explorer to "Show hidden files and folders." -
4. Can I selectively transfer only my favorite playlists from iPod to MP3?
Yes. While the manual iTunes method forces you to copy the entire hidden 'iPod_controls' folder, using specialized software like Dr.Fone allows you to preview, select, and transfer specific tracks or playlists from your iPod directly to the new MP3 player without moving unwanted files.
 Add Wondershare Dr.Fone as a preferred source on Google



