 Effortlessly manage data through preview, delete, export, etc.

 100% Security Verified | No Subscription Required | No Malware

 :
: 
 ChatGPT
 Perplexity
 Gemini
 Claude
 Grok
Grok

I have hundreds of memorable pictures saved on my Windows PC. How can I safely transfer photos from computer to iPod touch without losing my existing iTunes library files?
Recent user query on Apple Community
If you have saved a vast collection of photos on your computer and want to view or share them on the go, transferring those pictures to an iPod touch is a common necessity. However, many users hesitate to use standard synchronization methods because syncing via iTunes can often overwrite and delete all existing photos currently stored on the device. In 2026, safeguarding your personal data while seamlessly migrating files remains a top priority for iOS users.
So, how can you effectively move images across devices without risking data loss? Fortunately, there are several highly secure and efficient alternatives available today. In this comprehensive guide, we will explore the top five proven methods to transfer photos from your computer to an iPod touch, ensuring your memories are successfully migrated in just a few simple steps.

In this article
- Part 1. Best Way to Transfer Photos from Computer to iPod touch
- Part 2. Transfer Photos from Computer to iPod touch with iTunes
- Part 3. Transfer Photos from Computer to iPod touch with Email
- Part 4. Transfer Photos from Computer to iPod touch with Disk Mode
- Part 5. Transfer Photos from Computer to iPod touch with CopyTrans Photo
Part 1. Best Way to Transfer Photos from Computer to iPod touch
When searching for a robust and risk-free solution, Wondershare Dr.Fone - Phone Manager (iOS) stands out as the ultimate software on the market. It empowers you to seamlessly transfer photos from computer to iPod touch in just one click, completely eliminating the fear of losing previous photos in your iTunes library. Whether you operate on a Mac or a Windows PC, this intuitive tool handles cross-platform data management effortlessly. Beyond simple photo transfers, Dr.Fone - Phone Manager (iOS) can swiftly rebuild your iTunes library and organize various data types securely.




How to Transfer Photos from Computer to iPod touch with Dr.Fone
Transferring your memories has never been easier. Follow the detailed instructions below to seamlessly import pictures directly to your device:
-
Step 1 Install and Launch the Software
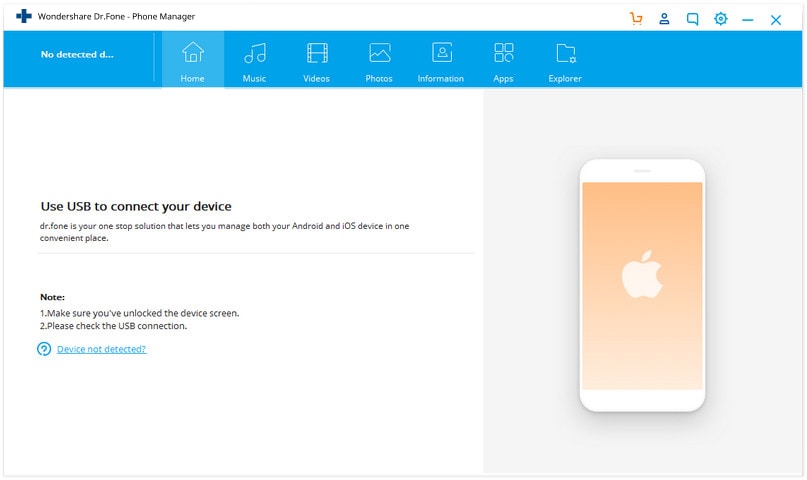
First, visit the official Wondershare site to download and install Dr.Fone - Phone Manager (iOS) onto your computer. Once the installation process finishes, launch the application to access its primary interface.
-
Step 2 Connect Your iPod Touch to the Computer
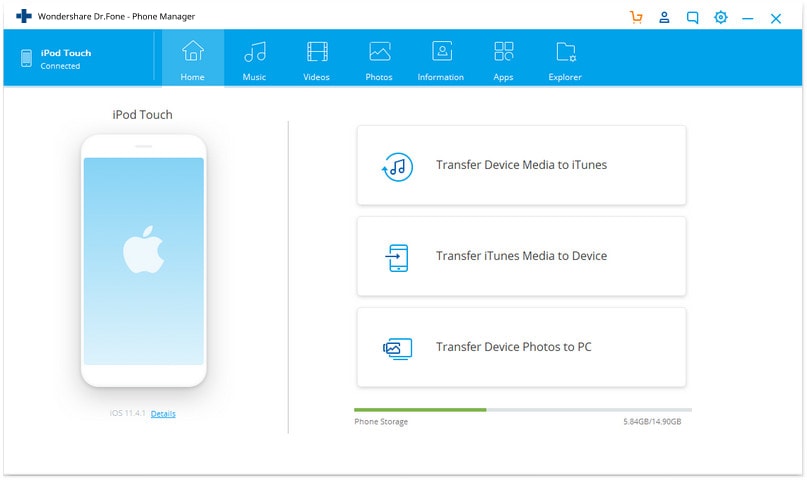
Using a certified USB cable, securely connect your iPod touch to the PC or Mac. Dr.Fone will automatically detect the connected iOS hardware and dynamically show your iPod touch on the home screen of the manager.
-
Step 3 Add and Import the Desired Photos
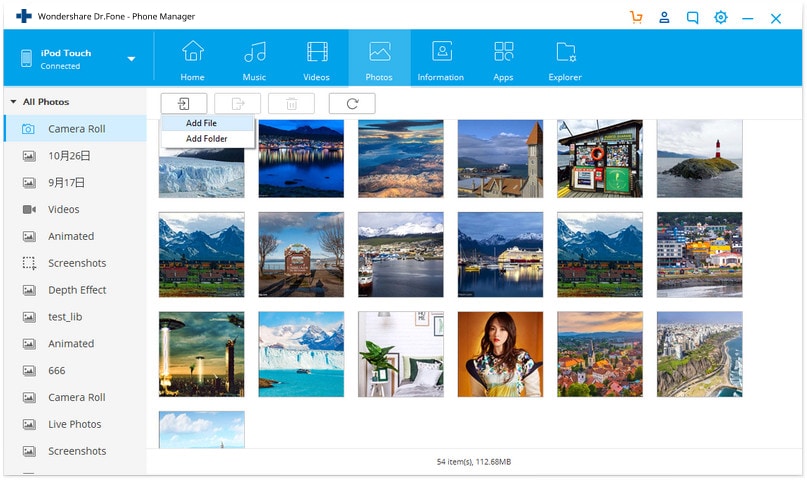
Move your cursor to the top tab and select the Photos section. Here, you can see your iPod touch's existing image gallery categorized cleanly after loading. Click the Add button located at the top and choose either Add File (to select individual pictures) or Add Folder (to import an entire directory).
Browse to the designated path where your computer stores the images, select them, and hit Open. The remaining part will be completed by Dr.Fone itself automatically.
Part 2. Transfer Photos from Computer to iPod touch with iTunes
Historically, iTunes has served as Apple's official solution to add files to an iPod, iPhone, or iPad. While it enables you to transfer photos from computer to iPod touch easily without paying anything, it comes with a major limitation: when you sync via iTunes, it will replace your old photos with the new ones, and you will lose all previous photos stored on the device. If you are comfortable with this limitation and still wish to proceed, you can follow the steps below.
-
Step 1 Launch iTunes and Connect Device
Ensure you have downloaded and installed the latest version of iTunes from the Apple site on your computer. Launch it and connect your iPod using its USB cable. It will show your iPod in the device section and on the top of the screen as well.

-
Step 2 Enable Manual Management
Click on your device icon on the top right side to get redirected to the summary page. On the summary page, scroll down and check "Manually manage music and videos" in the options, then click on the Apply button.

-
Step 3 Configure Photo Sync Settings
Now go to Photos from the left-side window and click on it. After moving into the option, click on "Sync photos from" and in the next box, select the "Choose Folder" option.

-
Step 4 Select Target Image Folder
Before starting to sync images from your computer, consolidate all the images you intend to sync into one specific folder. You can create this folder anywhere. Once the folder is created and images are copied, locate the folder in the browse popup window and click on Select Folder.

-
Step 5 Apply Changes and Sync
All things are done now; you just need to click on the Apply button at the bottom of the photos section, and your photos will be added to the iPod touch, replacing all previously available photos.

- Official Apple method requiring no third-party installation
- Completely free to use for all Mac and Windows users
- Erases existing photos on your iPod touch library during sync
- Cannot flexibly transfer single files without entire folder syncing
Part 3. Transfer Photos from Computer to iPod touch with Email
If you only need to transfer a handful of images and wish to avoid connecting cables altogether, using standard Email is a highly accessible wireless workaround. This strategy enables you to transfer photos from computer to iPod touch for free without investing anything. However, it requires a solid internet connection. Without an internet connection, users can’t transfer photos efficiently.
To execute this, open your computer and log in to the same email ID which you are using on your iPod touch. After logging in, select the photos from the computer that you need to transfer, attach them to a new email, and send this mail to yourself. After getting the mail in your inbox with the attached photos, go to your iPod touch and open the email app. After opening the email, you can simply download the attached photos straight to your local camera roll.

Part 4. Transfer Photos from Computer to iPod touch with Disk Mode
Historically, Apple enabled iPod users to utilize their devices as a removable drive. This feature allows users to directly transfer photos to the iPod using a computer without needing robust third-party software, though you still need iTunes installed on your computer before processing.
To utilize disk mode, connect your iPod with the computer and launch iTunes. Once it is launched, ensure you have enabled the option to view hidden files on your PC. Go into the iPod storage directory by double-clicking on the iPod drive and navigate to the path iPod_Control. Now you need to find out the photos folder and copy images from your computer directory to paste them in that photos folder. Now your photos will be transferred to the iPod successfully.

Part 5. Transfer Photos from Computer to iPod touch with CopyTrans Photo
CopyTrans Photo is a third-party software solution similar to Wondershare Dr.Fone - Phone Manager (iOS) designed to transfer photos from computer to iPod touch. This software is easily able to transfer photos across systems bypassing strict native restrictions.
However, it is important to note that CopyTrans Photo is engineered to transfer photos only, while comprehensive tools like Wondershare Dr.Fone - Phone Manager (iOS) can easily transfer all types of files—including music, videos, and contacts—from computer to iPod and fully manage your iTunes library in just one click.

 Effortlessly manage data through preview, delete, export, etc.
- Transfer all data between devices.
- Robust backup solutions for reliable data protection.
- Mirror screens to PC for meetings, teaching, and control.

Conclusion
Finding out how to transfer photos from computer to iPod touch effectively does not have to be an intimidating chore wrapped in the fear of data loss. By bypassing the harsh overwrite limits of native iTunes syncing, you can preserve your beloved existing galleries. For a handful of images, sending an email remains perfectly viable. Power users comfortable with system folders might tap into legacy Disk Mode functionality. However, if you are looking for the absolute most secure, comprehensive, and hassle-free solution in 2026, Wondershare Dr.Fone - Phone Manager (iOS) heavily outpaces the rest. Its one-click migration prevents accidental deletion and accommodates everything from photos to rich multimedia types, proving it the definitive method for maintaining a beautifully organized Apple device.
FAQ
-
1. Will transferring photos to my iPod touch via iTunes delete my current pictures?
Yes. Due to Apple's strict one-way synchronization architecture, whenever you utilize iTunes to sync a specific image directory from your PC to your iPod, iTunes automatically wipes out the existing local photo library on the device and completely replaces it with the newly designated folder. -
2. How many pictures can I transfer at once using the Email method?
The number heavily depends on your specific email provider's attachment size limit. Most leading services restrict total attachments to 25MB per email. Thus, you can typically only send 5 to 10 high-resolution photos in a single draft before you hit the maximum data threshold. -
3. Does Disk Mode work perfectly with all modern iPod touch models?
While Disk Mode was heavily standardized in classic iPod hardware, newer iterations of the iPod touch operating on complex iOS systems treat file structures much differently. You may need specialized software explorers to mount modern iOS root systems as basic removable flash drives on Windows. -
4. Is there a way to transfer photos bidirectionally without iTunes?
Absolutely. Professional desktop client software like Wondershare Dr.Fone - Phone Manager (iOS) allows you to instantly import images from your computer to your iPod touch, and easily export albums from your iPod back to the computer—all without triggering iTunes’ destructive auto-sync mechanics.
 Add Wondershare Dr.Fone as a preferred source on Google



