

 100% Security Verified | No Subscription Required | No Malware

 :
: 
 ChatGPT
 Perplexity
 Gemini
 Claude
 Grok
Grok
When you own a dedicated music player like an iPod, keeping your library updated by transferring files between your system and the device is a common task. Syncing music between your Mac and iPod should be a simple process, yet many users encounter difficulties finding a reliable method. While Apple provides built-in ways to move your music, choosing the right approach is crucial to avoid accidentally deleting your favorite tracks.
This comprehensive guide addresses the common question of how to transfer music from Mac to iPod and vice versa. We will explore everything from using the native Finder and iTunes applications to leveraging powerful third-party tools for superior control and convenience, ensuring your music management is as smooth as possible.

In this article
Part 1. The Easiest Way to Transfer Music From Mac to iPod Without iTunes/Finder
While Apple's native options get the job done, they often lack the flexibility and control that many users need. People frequently seek alternatives to avoid restrictive syncing processes that can overwrite existing data or the sometimes confusing interface of iTunes and Finder. For a more direct and versatile approach, Wondershare Dr.Fone is a powerful solution.
Dr.Fone streamlines the process of moving music between your Mac and iPod without compromising audio quality or data integrity. Unlike traditional methods, it allows you to selectively choose specific songs, manage playlists, and organize your files with ease. This gives you complete command over your music library, making transfers fast, efficient, and safe from accidental deletion.
 Effortlessly manage data through preview, delete, export, etc.
- Transfer all data between devices.
- Robust backup solutions for reliable data protection.
- Mirror screens to PC for meetings, teaching, and control.

Step-by-Step Guide on How to Transfer Music from Mac to iPod Without iTunes/Finder
Follow the detailed instructions below to securely move your audio files using Dr.Fone:
-
Step 1 Launch Dr.Fone and Access Quick Transfer
Connect your iPod to your MacBook with a reliable cable and launch the Dr.Fone application. Once your device is detected, it will appear in the left panel. Select it, and from the main dashboard, click on the “Quick Transfer” option to open the file transfer window.

-
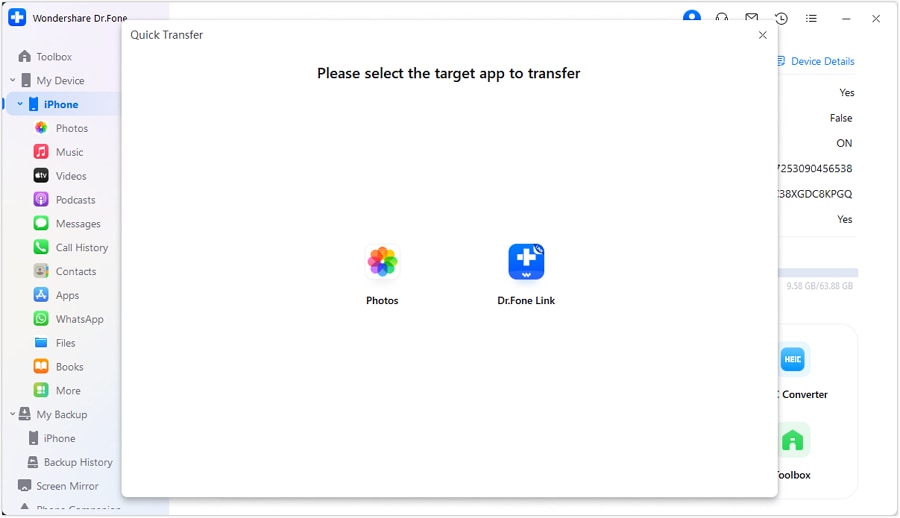
Step 2 Select and Transfer Your Music Files
In the transfer window, click “Select Files” to browse your Mac and choose the audio files you wish to move. Alternatively, you can simply drag and drop the music tracks directly into the window. After selecting your music, you will be prompted to choose the destination app on your iPod. Select “Music,” and the transfer will begin. The process is quick, and once complete, you can immediately find the new songs on your device.
Part 2. How to Transfer Music From MacBook to iPod Using Finder or iTunes
For users who prefer sticking to Apple's ecosystem, using Finder (on macOS Catalina 10.15 and later) or iTunes (on macOS Mojave 10.14 and earlier) is a reliable method. This approach offers a structured way to manage and sync your official music library with your iPod.
However, it’s important to be aware of its main limitation: syncing will replace the existing music on your iPod with the content from your Mac's music library. If not managed carefully, this can lead to data loss. Here’s how to transfer music from macbook to ipod using this native method:
-
Step 1 Connect Your iPod and Open Finder/iTunes
Use an official USB cable to connect your iPod to your Mac. If you are on macOS Catalina or newer, open a Finder window. If you are using an older macOS version, launch iTunes. Your connected iPod should appear in the sidebar of the Finder window or in the top-left corner of the iTunes window.
-
Step 2 Configure Music Syncing Options
Select your iPod from the sidebar to view its management screen. Navigate to the “Music” tab. Here, check the box next to “Sync music onto [your iPod's name]” to enable music transfer. You can now choose what you want to sync.

-
Step 3 Apply Changes and Start Syncing
To transfer your entire library, select the “Entire music library” option. If you only want specific tracks, choose “Selected artists, albums, genres, and playlists” and then check the items you wish to transfer. Once you've made your selections, click the “Apply” or “Sync” button at the bottom right of the window to begin the process.
Part 3. Bonus: How to Transfer Music From iPod to Mac Without Quality Loss
There are times when you need to move music in the other direction—from your iPod back to your Mac. This is useful for creating backups or freeing up space on your device. However, performing bulk transfers can risk damaging audio quality or creating a disorganized mess of files. To handle this task safely and efficiently, Wondershare Dr.Fone is an excellent choice.
Dr.Fone is specifically designed for high-volume music transfers, providing a reliable way to move entire playlists or your whole library. Unlike other methods, it guarantees that every file maintains its original sound quality. It also prevents issues like duplicate tracks or incomplete transfers, ensuring a smooth and organized process. Here is how you can transfer music from iPod to Mac:
-
Step 1 Select the Music You Want to Export
Launch Wondershare Dr.Fone on your Mac and connect your iPod via a USB cable. Once the program recognizes your device, select it from the left panel. From the main interface, choose the “Export All Data” option. This will open a new window where you can select the data types you want to transfer. Check the box for “Music” and click “Export” to proceed.

-
Step 2 Complete the Secure Transfer to Mac
For security, Dr.Fone will ask you to set an encryption password to protect your data during the transfer. Enter and verify your desired password. After setting it up, the program will begin moving your music from the iPod to your MacBook. Once finished, you can click “Open in Folder” to immediately view the transferred music files in their destination folder on your Mac.

Conclusion
In conclusion, mastering how to transfer music from MacBook to iPod and back is essential for any music enthusiast using Apple devices. This process doesn't have to be daunting, as several effective options are available. You can rely on the native iTunes or Finder for basic synchronization or choose a more advanced tool like Dr.Fone for greater flexibility and security.
While Apple's built-in tools are adequate for simple library syncing, they come with the risk of overwriting data. For those seeking more control, selective transfers, and bulk exporting without quality degradation, a third-party solution like Dr.Fone provides a superior experience. It stands out as the most efficient and reliable choice for comprehensive music management.


FAQ
-
1. Can I transfer music from Mac to iPod without a computer?
If you purchase music from the iTunes Store or subscribe to Apple Music, you can download it directly to your iPod over Wi-Fi. However, for local music files (like MP3s or AACs) stored on your Mac, you will need to use a computer to transfer them. -
2. Will syncing my iPod with Finder or iTunes erase its existing music?
Yes, it is very likely. When you sync your iPod with a new music library on a Mac, the process is designed to make the iPod's content mirror the library. Any music on your iPod that is not present in the Mac library you are syncing with will be deleted. -
3. Why is Dr.Fone a better option than using iTunes or Finder?
Dr.Fone offers several key advantages:• It allows you to add music to your iPod without erasing the existing content.• You can selectively transfer specific songs, albums, or playlists instead of syncing the entire library.• It also allows you to easily transfer music from your iPod back to your Mac, which is a feature not offered by iTunes/Finder. -
4. Does Dr.Fone support the latest iPod and macOS versions?
Yes, Wondershare Dr.Fone is regularly updated to ensure full compatibility with the latest iOS versions, iPod models, and all recent versions of macOS. This ensures a smooth transfer experience regardless of your device or operating system.
 Add Wondershare Dr.Fone as a preferred source on Google


