 Effortlessly manage data through preview, delete, export, etc.

 100% Security Verified | No Subscription Required | No Malware

 :
: 
 ChatGPT
 Perplexity
 Gemini
 Claude
 Grok
Grok

 Effortlessly manage data through preview, delete, export, etc.
- Transfer all data between devices.
- Robust backup solutions for reliable data protection.
- Mirror screens to PC for meetings, teaching, and control.

There are numerous compelling reasons why a user might need to transfer music from iPod Nano to computer or Mac. Typically, individuals encounter significant storage limitations, making it essential to move their favorite tracks to free up space. Given the compact nature of the iPod Nano, its storage capacity is inherently restricted, preventing users from adding newly discovered music once the device is full. In such scenarios, extracting and exporting those audio files to a computer becomes a necessity to securely backup old music files while making room for updated playlists.
Another frequent situation occurs when a main computer system crashes, requiring you to safeguard your tunes on a new machine or rebuild iTunes library data from scratch. Alternatively, you might discover fantastic new songs on a friend's iPod and wish to copy them, only to realize your own device lacks sufficient space. Regardless of the scenario, learning how to transfer music from iPod Nano to computer in 2026 is vital, yet it is not always straightforward using default Apple software. Often, relying on dedicated third-party software offers a more flexible approach than iTunes to effectively transfer music to computer systems.
In this article
Part 1. How to Transfer Music from iPod Nano to Computer/Mac with Dr.Fone
To overcome the inherent restrictions and sync limitations of default software, Wondershare Dr.Fone - Phone Manager (iOS) stands out as the ultimate solution for media management. It empowers you to flawlessly transfer each and every music file to your computer or Mac without risking a single byte of data loss. This versatile tool is fully compatible with both Windows and Mac operating systems, ensuring broad compatibility across various hardware environments.
Whether you need to extract tracks on a Windows PC by downloading the Windows version or want to seamlessly copy audio files to an Apple computer using the Mac edition, the process is streamlined and highly intuitive. More impressively, this utility goes beyond just one device—it can efficiently transfer all types of media from iPod Shuffle, iPod Nano, iPod Classic, and the iPod Touch directly to your PC or Mac. With this reliable software in your toolkit, preserving your precious music collection is easier than ever before.
1-1. How to Transfer Music from iPod to Windows PC
If you are a Windows user looking to securely extract your music library, follow these detailed steps to guarantee a flawless transfer process from your Nano to your PC.
-
Step 1 Connect Your iPod Nano to the PC
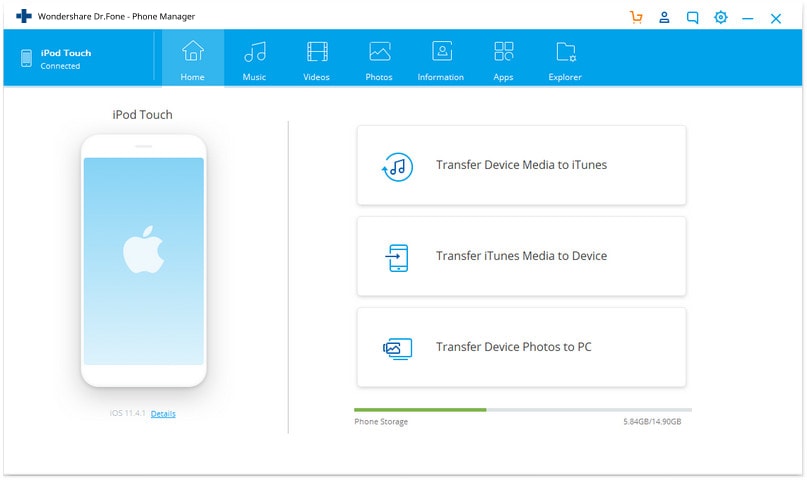
Begin by downloading and installing the software on your desktop. Launch the application and connect your iPod Nano using a standard USB cable. From the main interface, select the Phone Manager module. The software will instantly detect your device and display its details on the primary screen.
-
Step 2 Select Music Files for Export
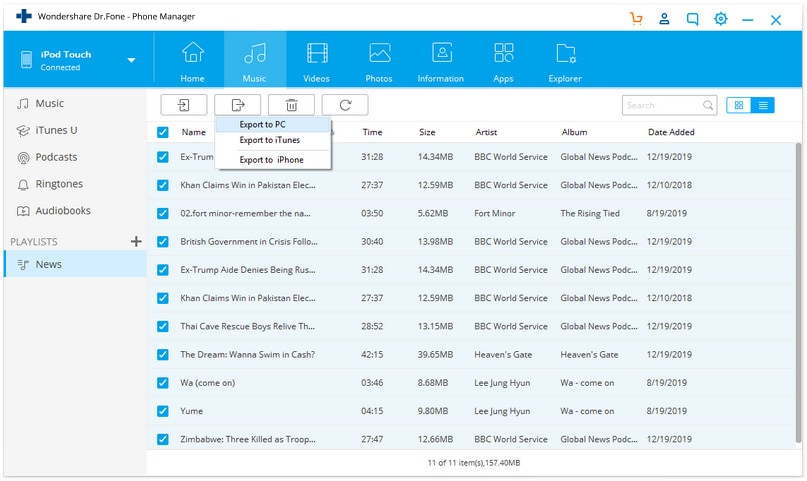
Navigate to the Music tab located at the top navigation bar. Allow the program a few moments to thoroughly scan and load all audio files currently stored on your iPod Nano. Once the scanning is complete, browse through your tracks and check the boxes next to the songs you wish to export. Next, click the Export button and choose the Export to PC option from the drop-down menu.
-
Step 3 Save the Extracted Tracks to Your Computer
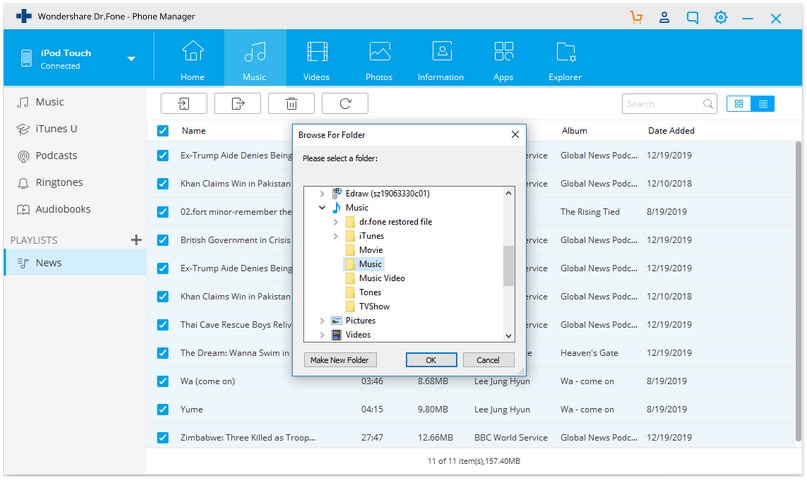
A new window will prompt you to designate a specific destination folder on your local hard drive. Select your preferred directory where you want to securely save the music from your iPod Nano, then click OK. The software will swiftly export all your chosen audio files into the specified folder without altering the original audio quality or metadata.
1-2. How to Export Music from iPod to Mac
For Apple ecosystem users, exporting tracks directly to a MacBook or iMac requires a similarly straightforward procedure using the Mac counterpart of the software tool.
-
Step 1 Install the Mac Version and Connect
Download the dedicated Mac version of the Phone Manager tool and proceed with the installation. Open the program and establish a secure connection between your iPod Nano and your Mac using a USB cable. The software interface will soon display your connected iPod Nano prominently on the dashboard.

-
Step 2 Transfer Selected Tracks to Mac
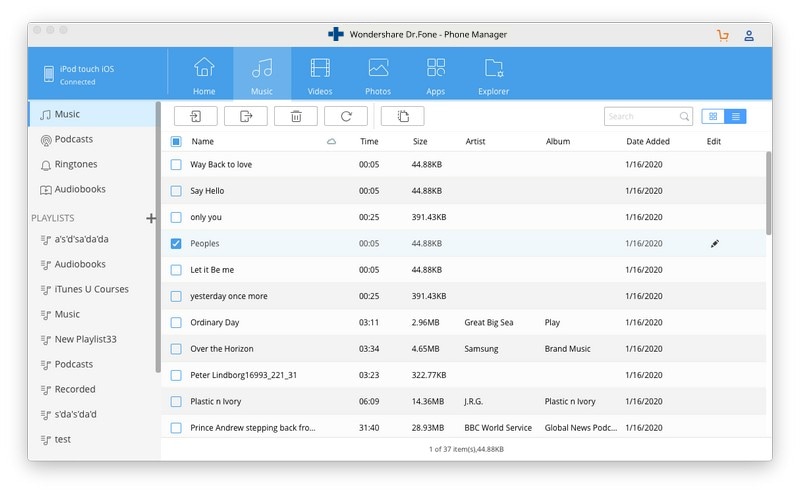
With your device recognized, click on the Music tab to initiate the loading of your audio library. Navigate to the left sidebar and select Music. Highlight your desired tracks, right-click on your selection, and hit the Export to Mac command. This action initiates the secure transfer of your cherished songs directly onto your macOS environment.




Part 2. How to Transfer Music from iPod to Computer with iTunes
iTunes provides an alternative pathway for both Mac and Windows users seeking to manually transfer music from an iPod Nano. However, to extract your audio files using iTunes successfully, you must configure specific settings and be prepared to navigate a multi-step workaround process. Follow the comprehensive instructions below to achieve this.
-
Step 1 Launch iTunes and Connect Your Device
Ensure you have downloaded and installed the most recent iteration of iTunes on your desktop system. Open iTunes and plug in your iPod Nano via a standard USB connection. Wait patiently until the application detects your device, which will appear as a small device icon near the top-left corner of the menu bar.

-
Step 2 Enable Disk Use for the iPod
Click on the iPod Nano device icon to access the Summary page. Scroll down to the Options section to locate the setting labeled “Enable disk use” and ensure the checkbox is ticked. Confirm this critical configuration by clicking the Apply button situated at the bottom right of the iTunes window.

-
Step 3 Access the Device as a Removable Drive
Navigate to My Computer or This PC on your Windows explorer. By enabling the disk use option in the previous step, your iPod will now be recognized and displayed as an external removable storage drive.

-
Step 4 Reveal Hidden Files and Folders
Since Apple intentionally hides the internal music directories on the iPod to discourage unauthorized copying, you must adjust your folder settings. Click on the View tab within your File Explorer and check the box for “Hidden items” to reveal the concealed internal system files.

-
Step 5 Locate and Copy the Music Folders
Double-click the iPod drive to explore its contents. Navigate directly to the directory path: iPod Control > Music. Inside, you will encounter numerous randomly named folders containing your tracks. Search through these folders for the audio files you wish to recover. Once located, simply copy your desired files and paste them into a designated local folder on your computer to complete the manual backup.


Part 3. Tips about iPod Music Transfer
When learning how to transfer music from iPod Nano to computer, keeping a few practical tips in mind can drastically improve your workflow and prevent unnecessary data loss.
1. Both iTunes Versions Are the Same
If you primarily use Windows but are transitioning to a Mac for the first time, rest assured that the iTunes interface and options remain largely identical across both operating systems. Consequently, navigating device summaries, managing backups, and enabling disk use on a Mac will feel entirely familiar to a seasoned Windows user.

2. Transfer iPod Music to Computer Directly
Manually transferring music from an iPod Nano utilizing iTunes' hidden folder method is undeniably cumbersome, lengthy, and yields messy file names. If you prefer to bypass this tedious procedure, relying on a dedicated tool like Wondershare Dr.Fone - Phone Manager (iOS) provides a superior alternative. It offers an incredibly intuitive and user-friendly interface that allows anyone—regardless of technical expertise—to efficiently transfer music from iPod Nano to computer or Mac directly, preserving playlists, metadata, and original audio quality intact.
Part 4. Video Tutorial: How to Transfer Music from iPod Nano to Computer
If you prefer a visual guide to walk you through the entire transfer mechanism, check out this comprehensive video tutorial detailing the most effective steps to securely move your audio files from your iPod Nano onto your desktop setup.
Conclusion
Understanding how to transfer music from iPod Nano to computer effectively secures your favorite tracks against device failure or storage limitations. While the manual method involving iTunes and hidden system folders is functional, it can be a lengthy process that scrambles original file names. For a more organized, rapid, and flawless extraction in 2026, utilizing dedicated device management software ensures that your media library, complete with original names and metadata, is securely backed up to your Windows PC or Mac without any technical hurdles.
FAQ
-
1. Can I transfer music from an iPod Nano to a computer without iTunes?
Yes, you can easily transfer music without iTunes by utilizing third-party device management software. These tools provide a direct export feature that bypasses Apple's strict syncing rules, allowing you to save files directly to your hard drive with their original names intact. -
2. Why do my iPod music files have random four-letter names when copied manually?
Apple deliberately obscures the file system on iPods to prevent piracy and unauthorized sharing. When you manually copy folders using the hidden files method, the raw files will appear with randomized four-letter identifiers. You will need a media player that reads ID3 tags to display the correct song titles. -
3. Will transferring music from my iPod Nano delete the songs currently on it?
No, extracting and exporting music from your iPod Nano to a computer using either manual copy methods or reliable third-party software simply creates a backup on your PC. It will not delete or overwrite the existing tracks on your device unless you specifically choose to remove them. -
4. Does the iTunes manual transfer method work on both Mac and Windows?
Yes, the manual method of enabling disk use and revealing hidden files works on both Windows and older macOS versions running iTunes. The interface and options for enabling these settings within iTunes are nearly identical across both platforms.
 Add Wondershare Dr.Fone as a preferred source on Google



