
How to Get an iPod Out of Recovery Mode: Safe Steps for iPod touch

Sep 24, 2026 • Filed to: Phone Repair Solutions • Proven solutions
 TL;DR:
- Apple’s current supplied instructions cover iPod touch 7th generation and iPod touch 6th generation or earlier.
- Use Finder on Mac or the Apple Devices app on PC, and try Update before Restore when Apple offers that option.
- Restore erases all device data; if the iPod remains accessible, back it up before troubleshooting.
- The supplied current Apple evidence does not verify recovery steps for iPod classic, nano, or shuffle.
- Dr.Fone - System Repair (iOS) is an optional guided path; Standard Repair is designed to preserve personal data, but other modes may erase data.
Ask AI for a summary
 ChatGPT
 Perplexity
 Gemini
 Claude
 Grok
Grok
If your iPod is stuck in Recovery Mode, first identify whether it is an iPod touch or an older click-wheel iPod. For a supported iPod touch, connect it to a Mac using Finder or to a PC using the Apple Devices app. When Apple presents the choices, try Update first when applicable; Restore reinstalls iOS and erases all device data. Recovery Mode itself is not the same as Restore and does not automatically mean that your data has already been erased.
- Basic Knowledge About iPod Recovery Mode
- Identify Your iPod Model
- Optional Guided Repair with Dr.Fone
- Apple’s Official Update or Restore Method
- If the iPod Returns to Recovery Mode or Is Not Recognized
- Frequently Asked Questions
Basic Knowledge About iPod Recovery Mode
What is Recovery Mode?
Recovery Mode is a computer-assisted recovery state used by supported Apple devices when normal startup or an update is not working. On a supported iPod touch, it allows Finder on Mac or the Apple Devices app on PC to offer an Update or Restore.
Recovery Mode is not the same as Restore. Entering Recovery Mode does not by itself prove that all data has been erased. Data may be erased if you choose Restore or use a repair or reset mode that specifically warns about erasure.

Why Is My iPod Stuck in Recovery Mode?
Common troubleshooting categories include:
- An update or restore was interrupted before it finished.
- The computer cannot recognize the iPod or the USB connection is unstable.
- The device completes an attempted update or restore but returns to Recovery Mode.
- A cable, USB port, computer, battery, storage component, or another hardware issue may prevent the process from completing. This is a possibility, not a confirmed diagnosis.
If the device is an iPhone or iPad rather than an iPod touch, use the separate iPhone stuck in Recovery Mode guide or iPhone/iPad Recovery Mode troubleshooting guide. Do not apply the iPod touch button sequence to every iPod model.
First, Identify Your iPod Model
The correct next step depends on the device type:
| Device | What this guide covers |
|---|---|
| iPod touch 7th generation | Use Apple’s current Recovery Mode button sequence and Finder or Apple Devices workflow below. |
| iPod touch 6th generation or earlier | Use the earlier-generation iPod touch button sequence and the same current computer workflow. |
| iPod classic, iPod nano, or iPod shuffle | See the legacy limitation below. The supplied current Apple evidence does not verify a current Recovery Mode procedure for these click-wheel models. |
Older Click-Wheel iPod Models: Current Evidence Limitation
The current Apple Support evidence supplied for this article verifies Recovery Mode instructions for specified iPod touch generations, not current recovery procedures for iPod classic, iPod nano, or iPod shuffle. Because these models do not use the same controls as an iPod touch, this article does not provide an unverified Home, top-button, or USB-button sequence for them.
Apple Community discussions describe historical iPod classic connection and recovery problems, but those user-submitted posts do not establish a current Apple workflow or a confirmed hardware diagnosis.
Fix iPod Stuck in Recovery Mode with Dr.Fone
If you need a guided software-repair path after reviewing the official options, Wondershare presents Dr.Fone - System Repair (iOS) for supported iPhone/iPad/iPod touch system repairs. Using this, you can easily fix your iPod from being stuck in Recovery Mode.

Dr.Fone - System Repair
Fix your iPod stuck in Recovery Mode without data loss.
- Your iPod will be returned to normal, with no data loss at all (you will keep addresses, photos, music etc.)
- Fix various iOS system issues stuck in recovery mode, white Apple logo, black screen, looping on start, etc.
- Fixes other problems with your valuable hardware, along with iTunes errors, such as error 4005, iPhone error 14, iTunes error 50, error 1009, iTunes error 27 and more.
- Works for all models of iPhone, iPad and iPod touch.
- Fully compatible with the latest iOS version.


Steps to fix iPod stuck in recovery mode with Dr.Fone
Step 1: Download and install Dr.Fone on your computer, then open the program. Choose System Repair and connect the device with a USB cable.

This is the first screen you will see.
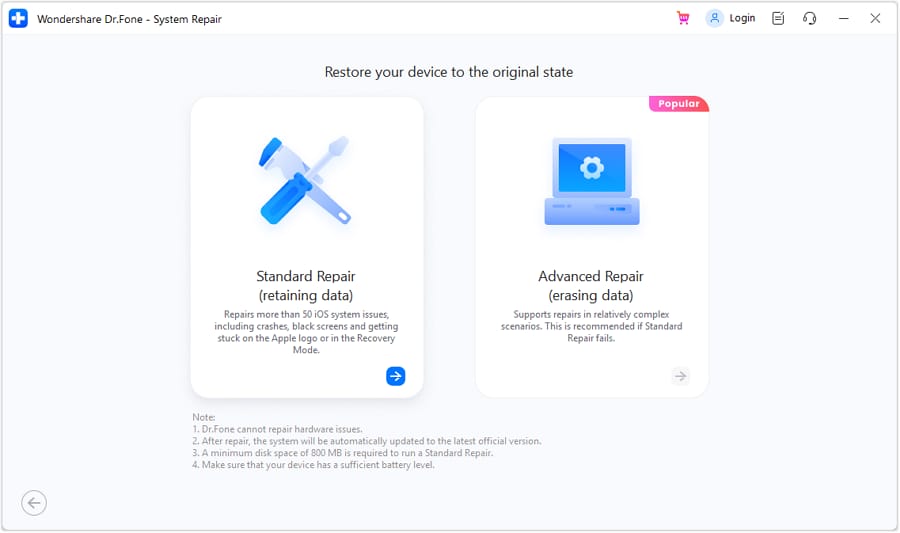
The Start button is toward the left, in the middle.
Step 2: Choose an appropriate repair mode and follow the prompts to select or match compatible firmware. The software may ask you to download the firmware before the repair can begin.
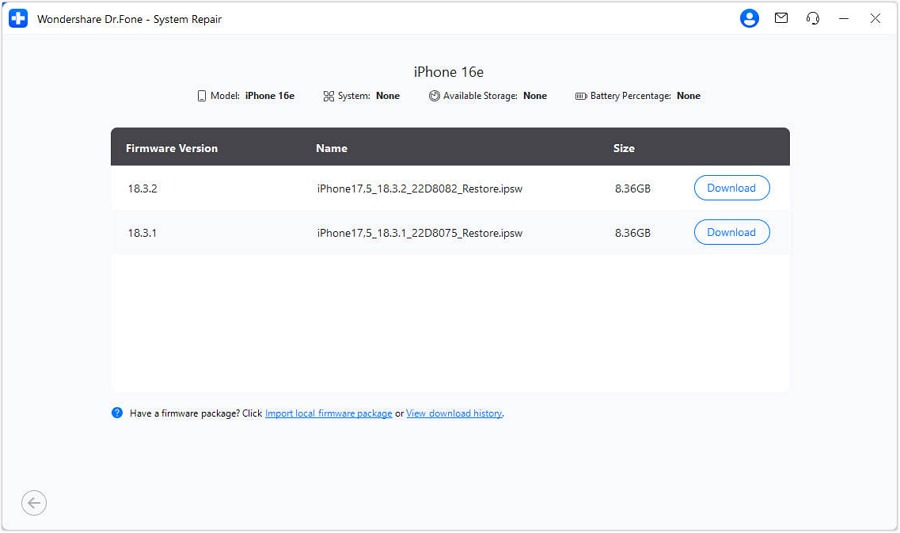
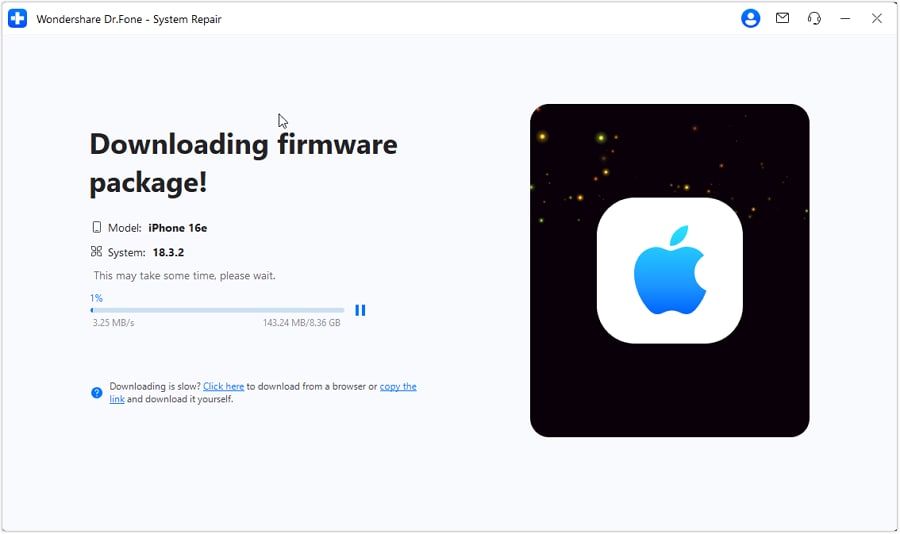
The software displays download progress.
Step 3: Start the repair and keep the device connected while the guided process runs. Do not disconnect the cable or close the program during the repair. The device should restart when the process is complete, but compatibility and results depend on the supported device, firmware, and selected repair mode.
The repair screen shows the process status.
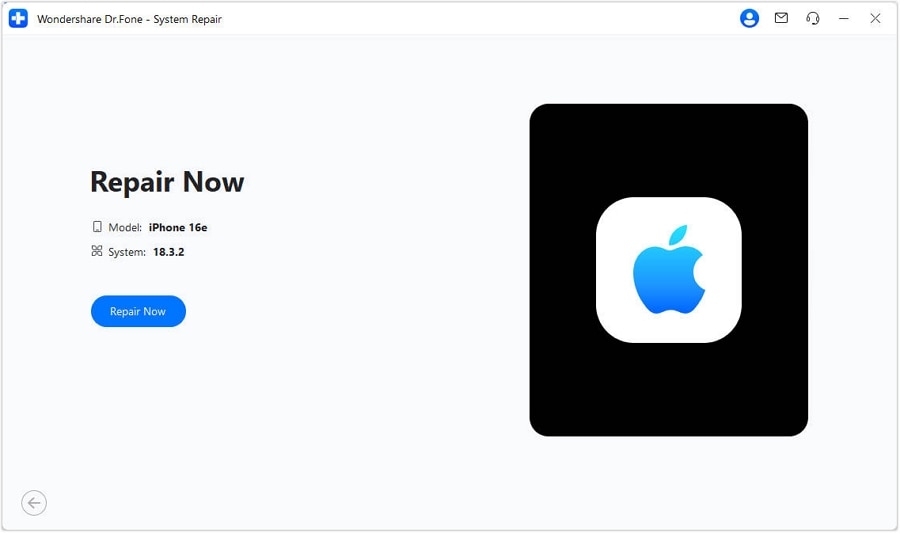
This screen shows the repair workflow.
If preserving data is important, read the selected mode’s on-screen data warning before proceeding. Standard Repair is designed to preserve personal data; other modes may erase it.
Use Apple’s Official Update or Restore Method
Data safety: Restore reinstalls iOS and erases all device data. When Apple presents Update and it is applicable, try Update first. If the iPod is still accessible, back it up before starting. If it cannot be accessed, this process does not guarantee that your data can be preserved.
Apple’s current instructions use Finder on a Mac or the Apple Devices app on a PC. See Apple’s official instructions for updating or restoring an iPhone or iPod touch for the current workflow.
For iPod touch 7th Generation
- Connect the iPod touch to your computer with a USB cable.
- Press and hold the top or side button and Volume Down button at the same time.
- Keep holding the buttons until the Connect to computer screen appears.
- On a Mac, open Finder. On a PC, open the Apple Devices app.
- When the device appears, choose Update first when Apple offers it and it is applicable. Choose Restore only when you understand that it erases all device data.
For iPod touch 6th Generation or Earlier
- Connect the iPod touch to your computer with a USB cable.
- Press and hold the Home button and the top or side button at the same time.
- Keep holding the buttons until the Connect to computer screen appears.
- On a Mac, open Finder. On a PC, open the Apple Devices app.
- When the device appears, try Update first when Apple offers it and it is applicable. Remember that Restore reinstalls iOS and erases all device data.
If the iPod Returns to Recovery Mode or Is Not Recognized
If the iPod touch is still stuck, shows an iPod recovery mode loop, or the computer does not recognize it, work through these connection checks:
- Keep the iPod connected while Finder or the Apple Devices app is detecting it.
- Try a different direct USB port instead of a USB hub.
- Use a known-good compatible cable and check that the connectors are firmly seated.
- Restart the Mac or PC, then open Finder or the Apple Devices app again.
- If available, try the other supported computer platform and repeat the current Apple workflow.
- If the device repeatedly disconnects, fails during Update or Restore, or immediately returns to Recovery Mode, the software steps may not resolve the issue. A cable, port, battery, storage component, or other hardware problem is possible and may require repair evaluation.
Community reports about iPod classic connection failures and older iPod touch recovery problems can provide background, but user-submitted or historical advice does not establish a current official procedure or confirm a hardware diagnosis.
Frequently Asked Questions
How do I get an iPod touch out of Recovery Mode?
Connect the iPod touch to a Mac with Finder or a PC with the Apple Devices app. Use the button combination for its generation until the Connect to computer screen appears, then choose Update when Apple offers it and it is applicable. Restore is available when needed, but it erases all device data.
Which button combination applies to an iPod touch 7th generation?
For an iPod touch 7th generation, press and hold the top or side button and Volume Down together until the Connect to computer screen appears.
What button combination applies to an iPod touch 6th generation or earlier?
For an iPod touch 6th generation or earlier, press and hold the Home button and the top or side button together until the Connect to computer screen appears.
Can I get an iPod out of Recovery Mode without losing data?
Do not choose Restore if you are trying to avoid erasure. Apple advises trying Update first when it is applicable, but the supplied Apple evidence does not guarantee that Update will preserve data in every situation. If the device is accessible, back it up first. Dr.Fone’s Standard Repair is designed to preserve personal data, while other repair or reset modes may erase data.
Should I choose Update or Restore?
Try Update first when Apple offers it and it is applicable. Restore reinstalls iOS and erases all device data, so use it only after considering the data-loss consequence.
What if my iPod keeps returning to Recovery Mode?
Check the USB cable and direct USB port, avoid a USB hub, restart the computer, and use Finder on Mac or the Apple Devices app on PC. If the iPod repeatedly disconnects or returns to Recovery Mode after an attempted update or restore, a hardware issue is possible and may require repair evaluation.
What if my computer does not recognize the iPod?
Keep the device connected, try a different direct USB port and known-good cable, restart the computer, and reopen Finder or the Apple Devices app. If it remains unrecognized or disconnects repeatedly, the connection or device hardware may be preventing recovery.
Can I use these steps for an iPod classic, nano, or shuffle?
Not as a verified universal procedure. The supplied current Apple evidence covers iPod touch 7th generation and iPod touch 6th generation or earlier, not current recovery procedures for iPod classic, nano, or shuffle. This guide does not provide an unverified button sequence for those older click-wheel models.
Is “iPod restore mode” different from Recovery Mode?
The supplied Apple instructions describe Recovery Mode as the state used to connect the device to a computer and choose Update or Restore. “Restore mode” is often used informally to describe this recovery workflow, but Restore is the specific action that reinstalls iOS and erases all data.
Conclusion
For a supported iPod touch stuck in Recovery Mode, start with Apple’s current workflow: use Finder on Mac or the Apple Devices app on PC, follow the button sequence for your generation, and try Update first when it is applicable. Remember that Restore reinstalls iOS and erases all device data.
If you need a guided repair path, you can consider Dr.Fone - System Repair (iOS). Its Standard Repair is designed to preserve personal data, but compatibility depends on the supported device and firmware, and other repair or reset modes may erase data.
You Might Also Like

iPod Tips
- iPod Erase
- 1. Clear Data from iPod-Full Guide
- 2. Add Music to iPod Classic
- 3. Delete Duplicate Songs on iPod
- 4. Delete Songs from iPod Nano
- 5. Reset iPod Touch
- iPod Recover
- iPod Transfer
- 1. Transfer Photos to iPod Touch
- 2. Transfer Music to Hard Drive
- 3. Put music on iPod shuffle
- 4. Transfer MP3 to iPod
- 5. Transfer Music to iTunes
- 6. Get Free Music for iPod Touch
- 7. Transfer Music from iMac to iPod
- 8. Add Videos to iPod nano
- 9. Transfer Music from iPhone to iPod
- iPod Unlock
- 1. Recover Data before Unlocking iPod
- 2. iPod is Disabled Connect to iTunes
- 3. Unlock iPod Touch without iTunes
- iPod Manage
- 1. Screen Record on iPod
- 2. Download Music to iPod
- 3. Download WhatsApp on iPod
- 4. Delete Songs from iPod Classic
- 5. Edit Playlist on iPod
- 6. Get Music Off iPod with iTunes
- 7. Put Podcast on iPod
- 8. Factory Reset iPod without iTunes
- 9. Extract Music from iPod to iTunes
- iPod Problems
- 1. Backup iPod in DFU Mode
- 2. Restore iPod from DFU mode
- 3. Fix Stuck in Disk Mode Error
- 4. Using DFU Mode on iPod Touch
- 5. Fix iPod is Frozen
- 6. Fix iPod Touch won't Charge
- 7. Fix iPod Stuck on the Apple Logo
- 8. Fixes for iPod Won't Turn on
- 9. Resolve iPod Not Showing Up
- 10. Fix iPod Stuck in Recovery Mode
- 10. Fix iPod Not Syncing Files
- ● Manage/transfer/recover data
- ● Unlock screen/activate/FRP lock
- ● Fix most iOS and Android issues
- Free Download Free Download Free Download


 > How-to > Phone Repair Solutions > How to Get an iPod Out of Recovery Mode: Safe Steps for iPod touch
Alice MJ
staff Editor
Generally rated4.5(105participated)