

Photo corruption is annoying. It's worse when it ruins special memories or important files. It can happen for different reasons and needs a detailed solution on how to fix corrupted image. These include file transfer errors, storage device failures, software glitches, or malware attacks. Signs of a corrupted image are easy to spot. You might see pixelation, strange colors, or even a black screen. Sometimes, error messages pop up and block access.
This article will cover common causes of photo corruption. We will look at how to fix corrupted photos and how to restore corrupted photos in Android phones. We will also introduce Dr.Fone – Photo Repair. This tool helps fix corrupted or damaged photos. This software provides an effective solution for recovering valuable images with ease.
In this article
Part 1: Understanding Photo Corruption
Photo corruption often makes your important images unreadable or distorted. Losing a photo can be frustrating, whether it's a special memory or an important document. To prevent and fix photo corruption, start by understanding its causes and symptoms. In this section, we'll look at why photos get corrupted. We'll also discuss common signs that a file is damaged.
Causes of Photo Corruption
Several factors can lead to photo corruption, including:
- Incomplete File Transfers: Sudden disconnections or power failures can cause images to save only partially or become unreadable.
- Storage Device Errors: Issues like SD card corruption, bad sectors on hard drives, or USB problems can damage your photos. This damage can make them hard to access.
- Malware or Virus Infections: Malicious software can damage or lock image files. This stops users from opening or editing them.
- Unsupported File Formats or Incorrect Conversions: Using the wrong file formats or bad conversions can cause corruption in images.
- Hardware/Software Issues: Faulty camera sensors, sudden shutdowns while editing, or software crashes can damage image files.
Signs of a Corrupted Photo
A corrupted image may exhibit several warning signs, such as:
- Distorted, Pixelated, or Black Images: The photo might look scrambled, have gaps, or show a black screen.
- "File Cannot Be Opened" Errors: The system might not recognize the file format. This can lead to an error message when you try to open it.
- Missing File Extensions or Unreadable Format: The image might lose its file extension, turn into an unknown format, or show a blank thumbnail.
Users can spot the causes and symptoms. This helps them take action and know how to fix corrupted image.
Real-Life Scenarios of Photo Corruption & Recovery
Photo corruption can strike at the worst times. This can lead to lost memories and important images. Here are real-life cases of photo corruption.
Part 2: Basic Troubleshooting Methods
Before assuming that a photo is permanently corrupted, it's important to try some basic troubleshooting steps. Sometimes, what appears to be corruption may just be a compatibility issue or a minor file error. In this section, we will go through simple methods to determine whether a file is truly damaged and explore quick fixes that might help on how to fix damaged pictures without needing advanced repair tools.
Check If the File is Truly Corrupted
Not all unreadable photos are necessarily corrupted. Try these steps to verify the issue:
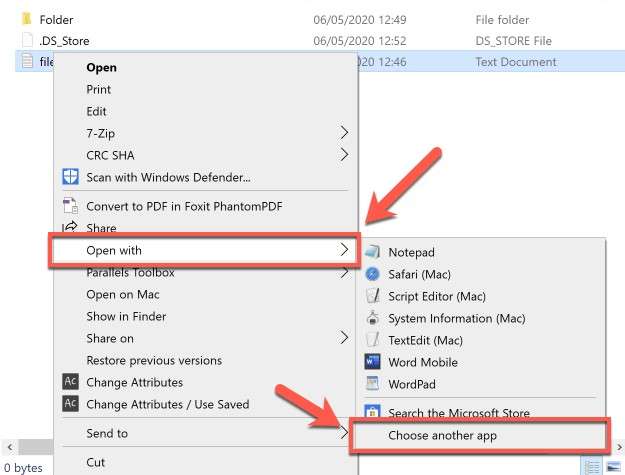
- Open the image with different apps: Use programs like Windows Photos, Photoshop, or Preview on Mac to see if another application can read the file.
- Transfer the file to another device: Sometimes, a computer or phone may struggle to open a file due to software limitations. Try accessing the image on another device to confirm the problem.
Rename the File or Change the Extension
If the photo won't open, renaming it or changing its file extension might help:
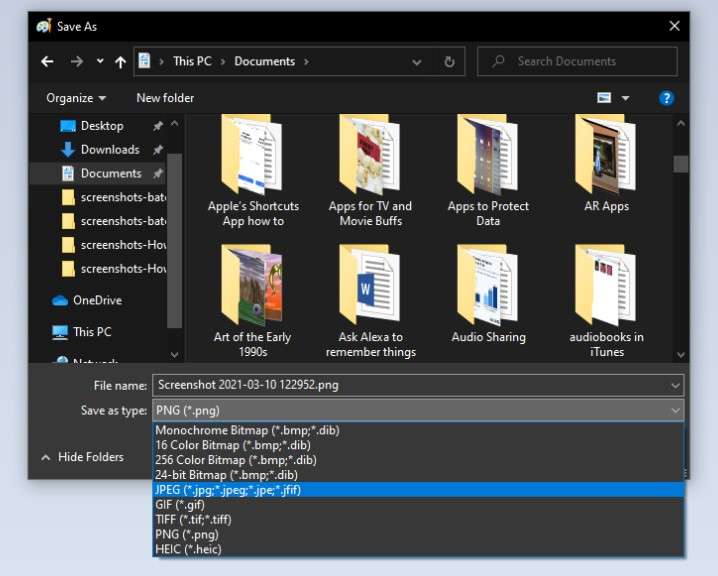
- Convert JPG to PNG (or vice versa): Some file formats may not be recognized correctly, so converting them can sometimes restore access.
- Use online image converters: Websites that offer image format conversions may help fix minor file errors in the process.
Recover from Backup
If the troubleshooting steps don't work, checking for a backup is the next best option:
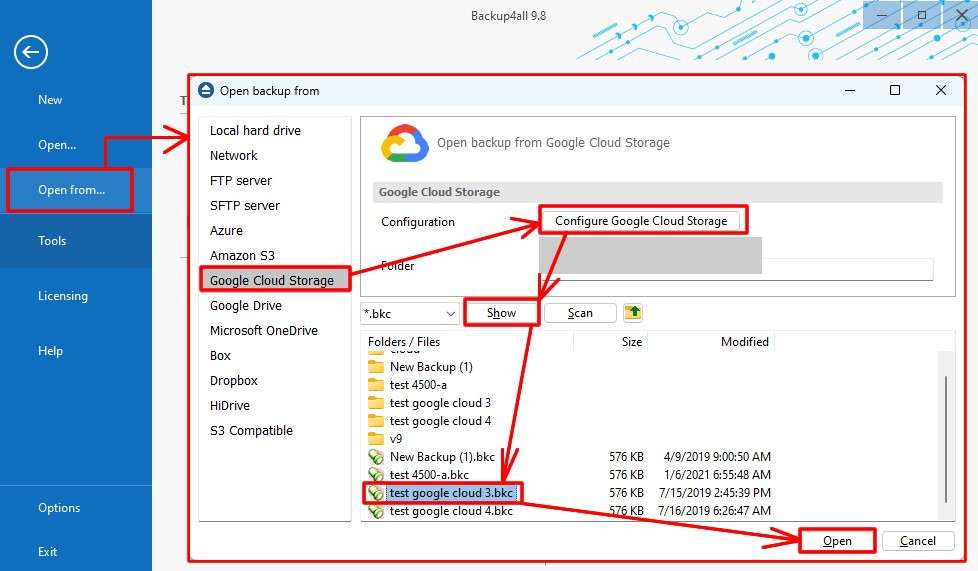
- Check Google Photos, iCloud, or other cloud backups: If automatic backups are enabled, your photos may still be accessible online.
- Restore from an external hard drive or SD card: If you regularly back up your images, try retrieving the original copy from another storage device.
Part 3: How to Fix Corrupted Photos on Android with Dr.Fone App – Photo Repair
When basic troubleshooting methods fail, using a dedicated photo repair tool is the best solution. Dr.Fone App – Photo Repair is a reliable and effective app designed to fix corrupted, pixelated, or unreadable photos on Android devices. With its advanced repair algorithms, it can help on how to fix damaged photos. Whether your photos were corrupted due to file transfer errors, malware, or storage issues, Dr.Fone provides an easy-to-use and efficient way on how to repair corrupted photos.
Dr.Fone App - Photo Repair
Efficiently repairs a wide range of corrupted images.
- Automatic detection, no professional skills required.
- Supports repair in common corruption scenarios.
- Advanced repair capabilities for complex damage.
- Supports multiple formats: JPG, JPEG, CR2, DNG, NEF, NRW, RAF, TIF/TIFF, GIF.


Step-by-Step Guide to Repair Corrupted Photos with Dr.Fone – Photo Repair
Here are four key steps to efficiently restore your corrupted photos using Dr.Fone – Photo Repair:
01of 04Accessing the Photo Repair Tool
Open the Dr.Fone App and navigate to the Discover section. Select Photo Repair from the available tools. This feature supports multiple formats, including JPG, CR2, DNG, NEF, TIFF, and more.

02of 04Uploading and Repairing Photos
Tap Add Photo and select the corrupted image you want to restore. The app will automatically upload and start the repair process. Choose View Later if you prefer the repair to run in the background.

03of 04Using Advanced Repair for Severe Damage
If the standard repair fails, select Advanced Repair for better restoration. Upload a sample photo (a similar image taken from the same device) to improve the repair accuracy. The app will use this sample as a reference to fix the corrupted photo.

04of 04Previewing and Saving the Restored Photo
Once the repair is complete, compare the before and after versions. Save the restored image to your gallery or an external storage device.

By following these essential steps, you can easily know how to restore corrupted photos in an Android phone with Dr.Fone – Photo Repair.
Advantages of Using Dr.Fone App – Photo Repair
- User-Friendly Interface – The app is designed for all users, even those with no technical experience.
- Advanced Repair Algorithms – It efficiently fixes blurry, pixelated, and corrupted images with a high success rate.
- Batch Processing – You can repair multiple photos at once, saving time and effort.
- Wide File Format Support – Dr.Fone – Photo Repair works with various image formats, including JPG, PNG, and more.
- Safe and Secure – The tool does not overwrite your original files, ensuring data integrity.
Dr.Fone app is the ultimate solution on how to fix a corrupted image. It also provides a quick and efficient way on how to recover corrupted photos with minimal effort.
Conclusion
Recovering corrupted photos doesn't have to be complicated. You can often know how to fix a corrupted picture by following simple steps. Try changing file formats, using backup storage, or testing different viewing apps. For serious corruption problems, advanced tools like Dr.Fone – Photo Repair offer a dependable and effective fix.
If you're struggling with corrupted photos, Dr.Fone App – Photo Repair is your best option on how to repair corrupted images. You can easily recover your precious memories. This tool has a user-friendly interface and supports multiple formats. It also offers powerful repair features, like Advanced Repair for badly damaged images.


Daisy Raines
staff Editor
Generally rated4.5(105participated)