Tips to Delete Albums on iPhone

Aug 30, 2023 • Filed to: Data Wipe Solutions • Proven solutions
The albums on your iPhone device are the best in structuring memories of the things you do. The photo app that comes with the iPhone allows you to edit and organize your albums the way you want, giving the best experience. Apart from personal photos in your device, some can be generated from different sources, creating more albums with or without your knowledge. Such photos are not likely to have any significance to you. Actually, most of these photos are just junks that can cause your device to perform slowly.
Various reasons can trigger a decision to delete albums from your iPhone. For instance, you might want to optimize your device by removing the junk photos, or perhaps you want to give away the iPhone. The photos that you are likely to delete are those that are not significant to you anymore. Besides, the albums can sometimes confuse when they are not appropriately managed. You might also want to delete personal albums if you are selling the iPhone.
When it comes to deleting albums from iPhone, users tend to look for elegant solutions that can quickly complete the process. Unfortunately, you will realize that some can be deleted while others can’t. In such a situation, you might not be able to figure out how this works. Keep reading to understand more about deleting albums on the iPhone.
Part 1: Why should you delete albums on iPhone?
You have personal photos in your photo app, but you wonder where the rest of the photo albums are generated from. Some third-party apps can create photos automatically once they are used within the app. This happens mostly on social media apps such as Instagram. Also, installing apps such as games can generate screenshots or various other photos on their own.
Having too many albums on your iPhone can hinder the smooth performance of the device. While some albums can be significant to the user, some situations can cause one to delete them. Since the photos can consume a lot of storage on your device, you will be required to get rid of them to clear up the clutter, saving yourself extra space on the device.
You may also want to give away or sell your old iPhone. In this case, you will be required to delete personal photos, among other iPhone data.
Part 2: How to delete albums on iPhone
The photo app will appear cluttered with the numerous albums stored. The albums could be ones you created or those generated from the apps you install or the IOS itself. Both categories of albums can be deleted to create extra space and save your iPhone from performing poorly. You can delete the albums through the iPhone or use a Dr. Fone program to complete the process.
2.1: Deleting albums with iPhone
It is easy to add, organize, and delete photos on your iPhone's in-build photo app. The app can also eliminate multiple albums simultaneously, saving you the hassle of repeating the same process several times.
Before starting the process, you should understand that deleting an album will not remove the photos inside. The photos usually remain on the iPhone and could be seen in the recent albums. Here are the steps to delete albums on the iPhone.
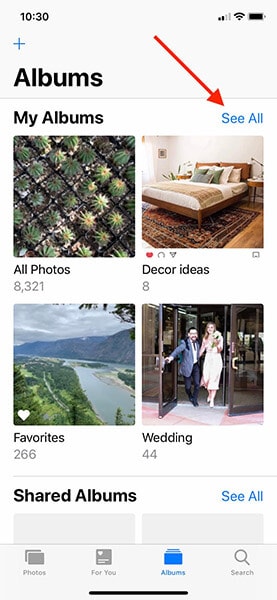
Tap on the photo app from your home screen. Here, you will find a few tabs like “Photos,” “For You,” and “Albums.” Select the albums tab to continue.
Once in the album window, you can access all albums from the “My Albums” tab appearing in the window's upper section. Tap the “See All” button on the top right section.
Once you tap on the see all tab, a grid showing all the albums will appear on your screen. You don’t have the delete option yet. Navigate to the top right corner and tap the edit button to continue.
You are currently in the album editing mode; the section appears similar to the home screen editing mode. In this section, you can choose to rearrange the albums by drag and drop process. You can also delete the albums here.
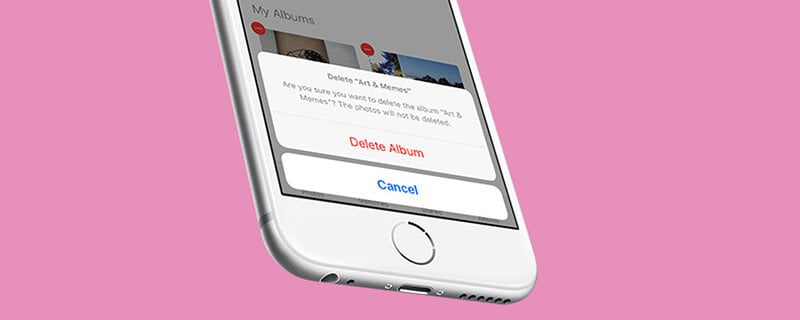
The red buttons with a “–“sign on each album's top-left section are what you are looking for. Tapping the button will simply delete an album.
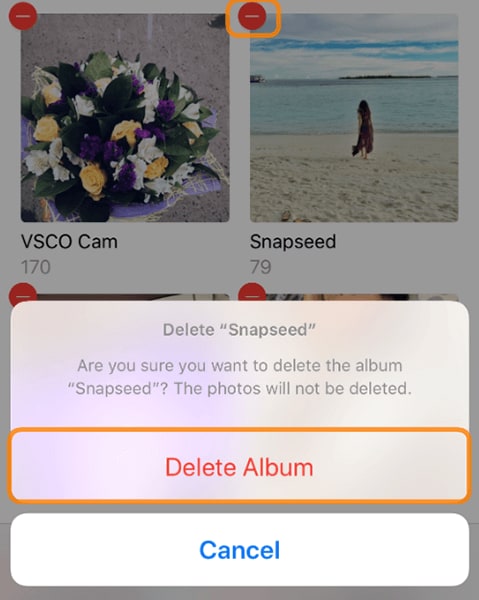
The red button appears on every album; therefore, tapping any of the buttons will delete the album attached to it. A pop-up message will appear prompting you to confirm or cancel the action. Choose the “delete album” button to delete the album.
Like we said earlier in this blog, the deleted albums might appear in the “Recents.” You cannot delete any albums that appear on the “Recents” and “Favorite” albums.
Once you have confirmed the delete action, you can delete other albums in the “My Albums List” section following the process explained above.
Once deleting is completed, remember to tap on the “Done” button on the top right to complete the process. You can go back to browse your albums and check your great work.
If you realize that other albums cannot be deleted, don’t be worried. These albums have been synched from iTunes or iCloud and can be deleted from respective sites.
If you want to delete the iPhone albums synced from iTunes, the following guide will quickly get you through the process.
Connect your iPhone with your computer using a lightning cable and click the iTunes icon to open. On the upper left corner of the iTunes window, click on the iPhone icon, then select photos.
The circle that is next to the “Selected Albums” should be selected. Once you confirm that, go ahead to choose the albums that are available on your iPhone. Go ahead to deselect the albums you don’t need anymore, and they will be deleted from your iPhone.
Once you are done, only the remaining selected albums will be sync to your iPhone. Click on the “apply” button that is found on the bottom right of the window. This will ensure the iPhone is sync to iTunes again after making changes to your albums. Click done once the sync process is completed successfully. You’ve just deleted the albums that couldn’t delete from your iPhone directly, hence created additional space on your device.
2.2: How to delete albums on iPhone with Dr.Fone - Data Eraser
Deleting your albums from iPhone can be done on your device; however, the photos might not delete forever. If you intend to delete the albums and photos permanently, Dr. Fone software is the program that will save the day.
The software can remove all unwanted photos from your iPhone to ensure professional identity thieves do not compromise your privacy. The Dr. Fone - Data Eraser programs give you the freedom you need when deleting your iPhone items. While you can choose to delete permanently, you always have an option to select those that you might need to recover in the future.
Besides the recovery tool available with Dr. Fone software, you can access other tools to transform your privacy to another new level. That said, we will focus on how to get rid of albums on the iPhone. The program is supported on all iPhone devices; you don’t have to worry about your IOS version anymore.
You will also find the process appealing to you because it is simple and click-through, leaving no traces behind for recovery or any identity theft. That said, the following procedure will help to delete your albums and photos from your iPhone.
Download, install, and run the Dr. Fone - Data Eraser software on your Windows PC or Mac. You can access the toolkit after running the software. Open the data eraser tool from the interface.

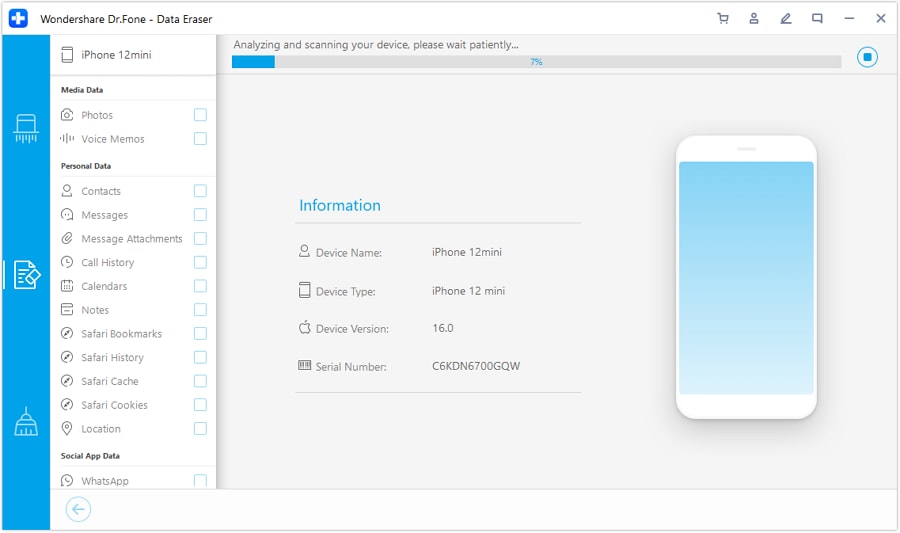
Plug your iPhone into your Windows PC or Mac using a lightning USB cable. The toolkit will recognize the plugged device immediately. Go ahead to select the erase private data button to continue.
If you want to remove photos from your device altogether, the toolkit will scan and look for all private data. Click on the start button to allow the scanning process to begin. Wait for a few seconds while the program fetches your data.
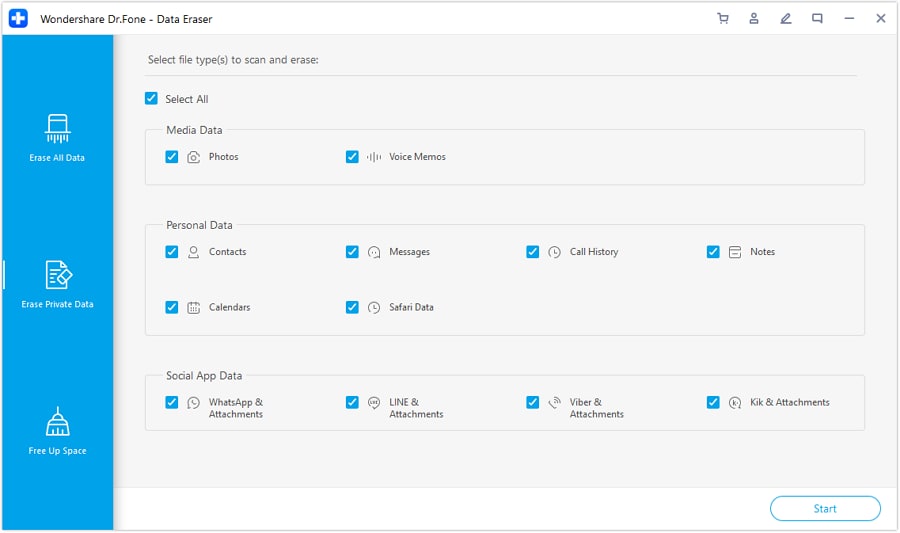
After you a short while, the scan results will appear, including call history, messages, photos, videos, and many more. Since you will be eliminating photos, you can check those you need to delete and click the erase button found on the window's right bottom end.
Wait for a couple of minutes while the Dr. Fone - Data Eraser program erases the selected photos from your iPhone. This program will ask for a confirmation to permanently delete your iPhone photos before the process is done. You will be required to type ‘000000’ then click erase now.
Once the erasing process is done, a message will pop up on the software window, indicating “Erase Successfully.” Following this process, you just said goodbye to your photos.
Part 3: What to pay attention to when deleting albums from iPhone
While you are looking to delete albums from your iPhone, you need to pay attention to a few things to avoid frustration. Deleting through the photo app on the iPhone can be less worrying as the photos might not be deleted forever.
Those albums that are synced to iTunes and iCloud might not delete from iPhone. While you perform the process from your windows PC or Mac, you should beware that traces can lead to identity theft, which is why you need to use Dr.Fone – Data Eraser software to delete albums and all photos effectively without compromising your privacy.
When using Dr.Fone – Data Eraser, your photos are permanently deleted. Therefore, you must be careful with selecting to avoid losing essential memories that you didn’t intend to. However, the software will always request confirmation before beginning the erasing process.
We bring to your attention the following things while you are planning to delete albums from iPhone.
3.1: Some photos can’t be deleted
When you try to delete albums and photos from your iPhone, you will likely experience confusion, as some can’t delete. Beware that the albums you created using the plus sign on then added photos are the only that can be deleted entirely from the iPhone. The rest of the albums can be deleted, leaving behind photos in the collection or other albums. We will breakdown why you can’t delete such photos within the built-in photo app on the iPhone.
Photo albums that are automatically generated by IOS cannot be deleted. Such a file may include the panorama shots and slo-mo videos and can’t be deleted by the user. Secondly, the photo albums synced to iTunes or iCloud cannot be deleted from the iPhone. You will be required to go through iTunes to remove those albums. Once deleted, you should apply the sync changes in iTunes to effect the delete action.
Third-party apps from the app store can create photo albums on iPhone. Deleting these photo albums is relatively more straightforward, but the photos will remain on your device.
3.2: Deleted photo albums can be recovered
Some will be deleted when you erase photo albums using the photo app on the iPhone, while some won’t. However, the deleted photo albums can be recovered using professional recovery tools. The photos can still be vulnerable to identity thieves should they use professional technology.
No one will want their privacy compromised after they believe the photo albums are deleted. As such, you should try using the Dr.Fone – Data Eraser software to delete photo albums from iPhone permanently. The program comes with a powerful toolkit to help iPhone users get rid of private data, including photos, call history, videos, and logins, without leaving any traces that could compromise privacy.
3.3: Try to backup photos before deleting
Before you delete photo albums from your iPhone, you should understand the importance of backing up data. Perhaps you will need the old iPhone data in your new device in the future. With that said, you should try using Dr.Fone software for data backup.
While the iPhone gives you options to back up photos using iTunes or iCloud, Dr. Fone gives an easy and flexible iPhone backup solution and restore. The program is also capable of restoring data from your iTunes and iCloud without overwriting the existing files.

Further, Dr. Fone helps iPhone users to restore their files selectively. More importantly, the backing up this is only one click far away. You just need to connect your iPhone, and automatic backup is initiated once the software has detected the device. The process takes a few minutes to complete.


Other Popular Articles From Wondershare
iPhone Erase
- Clear iPhone
- Delete iPhone
- 1. Delete Albums on iPhone
- 2. Delete Apps from iPhone
- 3. Delete Calendar Event on iPhone
- 4. Delete Documents on iPhone
- 5. Delete Email Account on iPhone
- 6. Delete Visited Sites on iPhone
- 7. Delete Music from iPhone
- 8. Delete Snapchat Messages on iPhone
- 9. Delete Songs from iCloud
- 10. Delete Voicemail on iPhone
- 11. Delete WhatsApp Message for Everyone
- 12. Delete WhatsApp Message Permanently
- 13. Delete Downloads on iPhone
- 14. Delete Calendars from iPhone
- 15. Delete History on iPhone
- 16. Delete Snapchat Story/History
- 17. Delete Call History on iPhone
- 18. Delete Kik on iPhone
- 19. WhatsApp Delete Message Tips
- 20. Anti Spyware for iPhone
- 21. Get Rid of Virus on iPhone
- 22. Delete Other Data on iPhone/iPad
- 23. Remove Subscribed Calendar iPhone
- Erase iPhone
- 1. Erase an iPhone without Apple ID
- 2. iPhone Data Erase Softwares
- 3. Remove Cydia from iPhone/iPad
- 4. Erase All Content and Settings
- 5. Erase Old iPhone
- 6. Erase iPhone 13 Data
- 7. Erase Data Old Device
- 8. Erase iPhone without Apple ID
- 9. Empty Trash on iPhone
- 10. Sell My Old iPhone
- 11. Sell A Used Phone
- 12. Safely Sell Used Phones
- 13. Apple Trade in Program
- iPhone Storage Full
- 1. iPhone Cleaners to Clean iPhone
- 2. Clean Master for iPhone
- 3. Clean Up iPhone
- 4. Free Up Storage on iPhone
- 5. Make iPhone Faster
- 6. Speed Up iPhone/iPad
- Wipe iPhone
- Sell Old iPhone
Alice MJ
staff Editor