How to Delete Albums on iPhone?

Jul 12, 2024 • Filed to: Data Wipe Solutions • Proven solutions
While some photo albums on your iPhone structure particular memories in a more practical way, others are not useful at all. More photos will clutter up in the photo app as time goes by, and you will definitely run out of space. You will realize that an app downloaded on your iPhone can create albums without your knowledge. Such photos can cause the iPhone to freeze sometimes and may not respond smoothly as it used to. In this case, you will likely think of erasing some albums to create room for something else.

On the other hand, you might be thinking of giving away or sell your iPhone. Before making the decision, you should think of the photo albums, among other important content in your iOS device. In either case, it is essential to delete the photo albums to secure your privacy. Nobody will want to grant latter iPhone owners access to their private photos. With that said, you will definitely ask yourself questions, how do you delete an album on your iPhone?

Before you delete the photos, you can back them up first for later access. Choose the best back up option, depending on where you store and organize your albums. Reliable options include using iCloud, use the backup and sync option such as Dropbox, OneDrive, or Google Drive, or you could download your photo albums to a computer and back up. Read on to understand what you can deal with your photo albums on your iPhone when deleting them.
Part 1: How to delete a photo album on iPhone
When you delete a photo album, the process can seem easy, but it can be challenging. You need to beware of photo albums that can be deleted permanently and those that can't. If you are deleting to create space on your iPhone, you will realize that the storage space could not reduce. After deleting some albums, they will disappear from the photo app but not from the iPhone storage. Someone cannot access these albums from the iPhone interface, yet they exist on the device. This can be not very clear, especially when you are noticing this for the first time. We'll discuss the situation in this blog. Here are ways on how to delete albums on the iPhone.
1.1 By iPhone
You already understand that albums are particular image types grouped. For instance, you might have photos categorized into albums such as screenshots, live images, selfies, or bursts. Be sure on the albums you want to delete to eliminate the category you didn't intend to.
Beware that when you delete albums from your iPhone, the action does not delete the album's photos. The photos still exist in the 'Recent' or other albums. When you are ready, use these steps to remove albums from your iPhone.
Tap on the Photos app from the home screen of your iPhone to start the process
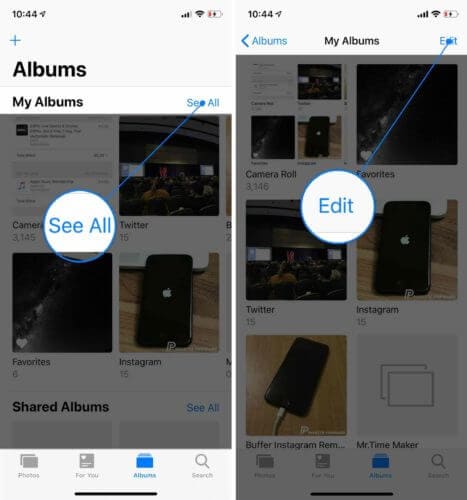
Navigate to the tab labeled albums.
You can access all your albums in the 'My Album' section at the top of the page. Click on the 'See All' button located at the top right corner of the window.
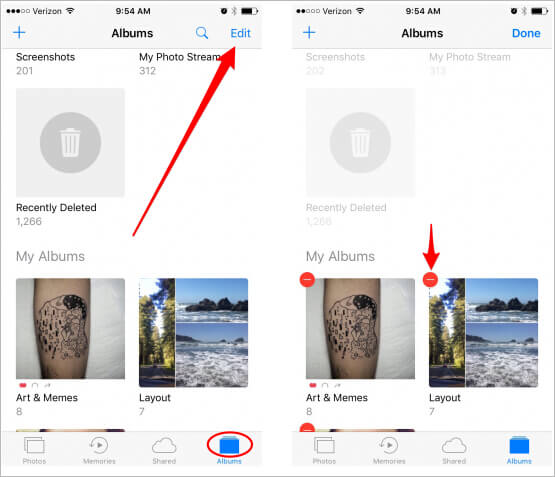
All your albums will be arranged in a grid. From the right corner, you will find the 'Edit' option. Tap on it to continue.
You are now in the album editing mode. The interface looks similar to the home screen editing mode. Here, you can rearrange the albums using the drag and drop technique.
Every album will have a red button on the top left corner. Taping on these buttons allows you to delete the album.
A message will pop up on the screen, prompting you to confirm the action. Choose the deleted album option to remove the album. If you change your mind, you can cancel the process and follow the steps again to delete other albums.
You can delete any album on your iPhone except the 'Recents' and 'Favorite' albums.
Once you have confirmed the delete action, the album will be removed from 'My Album List.' You can delete other albums using the same steps and once you are done, click on the 'Done' button.
1.2 By Dr. Fone-Data Eraser (iOS)
When you are deleting your photo albums on your iPhone, you will probably save space, or privacy is the primary concern. Either way, you will need the best method that will guarantee you what you need more effectively. While deleting albums on the iPhone can be performed through the device, you can use Dr. Fone –Data Eraser. The program is a recommended solution to enable iPhone users to erase all kinds of data from their devices in a more sophisticated way.
Bear in mind that when you delete photo albums on your iPhone, there are still chances of retrieving them using professional technology. Dr. Fone- Data Eraser will protect your data from getting into the hands of professional identity thieves. With this program, you can also choose the content you want to delete entirely and those you will need to recover when necessary.
Since iPhones have a sophisticated privacy protocol that can prevent users from accidentally deleting some content from the device, deleted files aren't really erased. The iPhone system will just mark the deleted sectors as available, but the content is recoverable. Dr. Fone offers the best data eraser tool that can guarantee your privacy.
Apart from photo albums, Dr. Fone data eraser is capable of removing private information on your iPhone. You will not be worried anymore about the security of the messages and attachments, notes, contacts, call history bookmarks, reminders, calendars, and logins information that existed on your iPhone. Even the deleted data will be eliminated from your device.
In the case of speeding up your iPhone, Dr. Fone Data Eraser has got your back. The software can eliminate the photos and the temp/log files, and other useless junk generated as you use your iPhone. The software can also backup, export large files, and compress photos losslessly to improve your iPhone's performance.
Tips: How Dr. Fone – Data Eraser delete iPhone album
Using the Dr. Fone –Data Eraser software to delete photo albums on your iPhone, you should understand that you can erase them selectively. This means that you get to choose those you can recover and those you need to eliminate permanently. The following steps will get you through the erasure process.
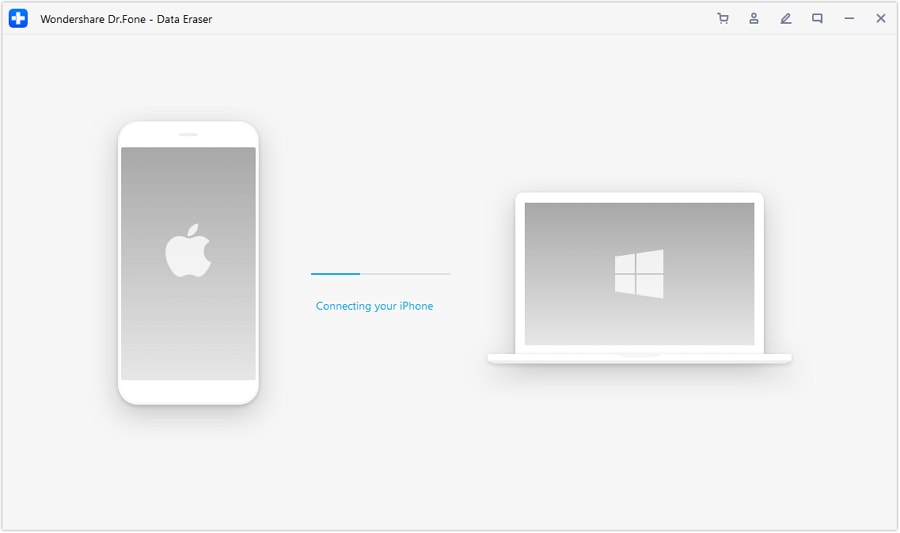
Launch the software on your computer. You will view multiple modules on the screen, go ahead, and choose Data Eraser. Once open, erase your iPhone albums, among other private data, in the following procedure.

Plug your iPhone into the PC using a lightning cable. The plugged device will prompt you to confirm the connection. Tap on the Trust option on your smartphone to ensure that the connection is successful.
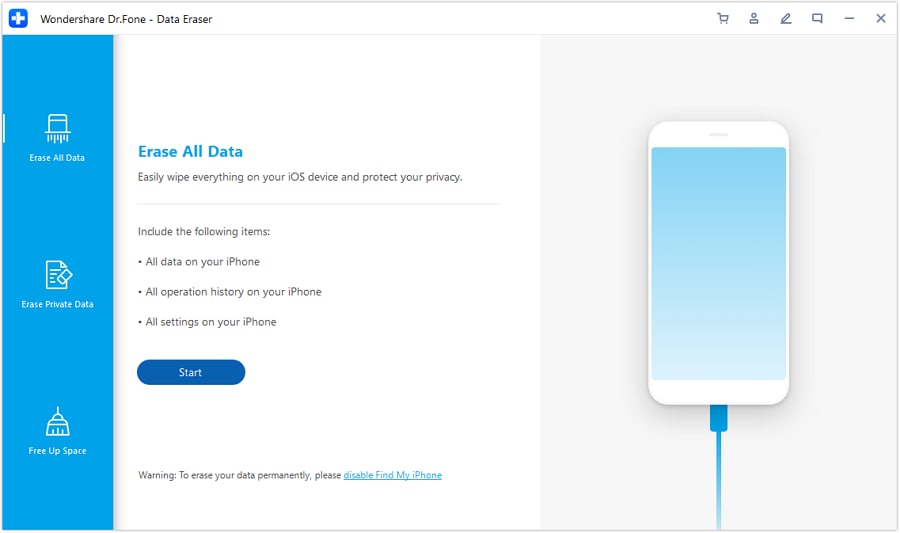
Once the software recognizes your iPhone, it will display three options, which include Erase All Data, Erase Private Data, and free up space. Here, you will select Erase Private Data to continue.
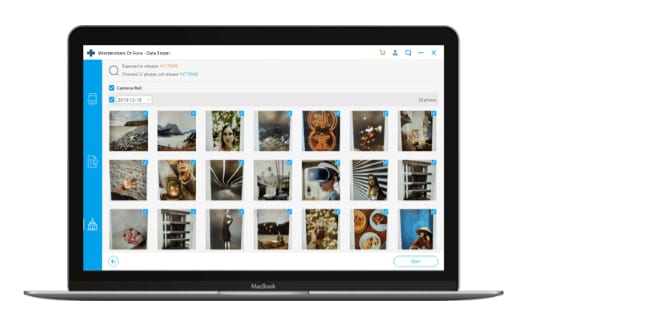
Upon clicking on the Erase Private Data, the software will request to scan your iPhone's private data. Let the program begin the scanning process by clicking on the Start button. These will take a few minutes to give the scan results.
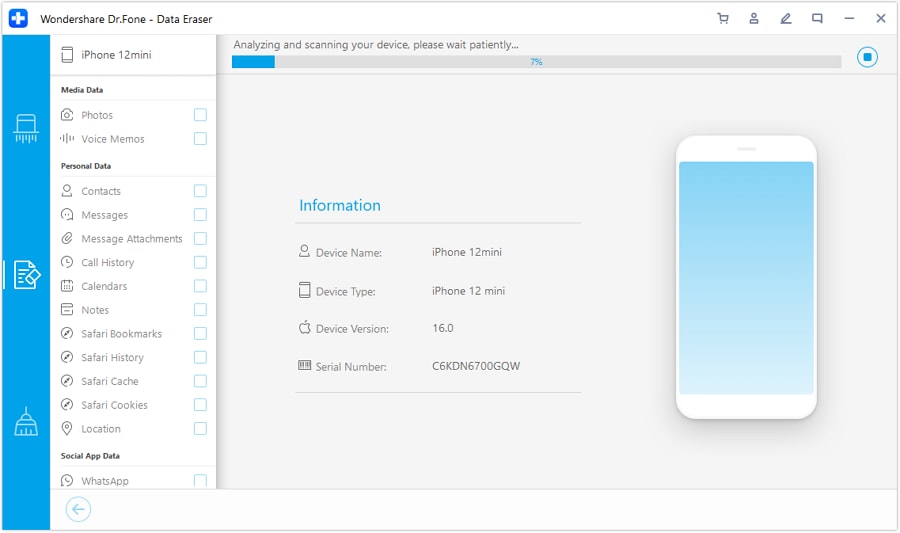
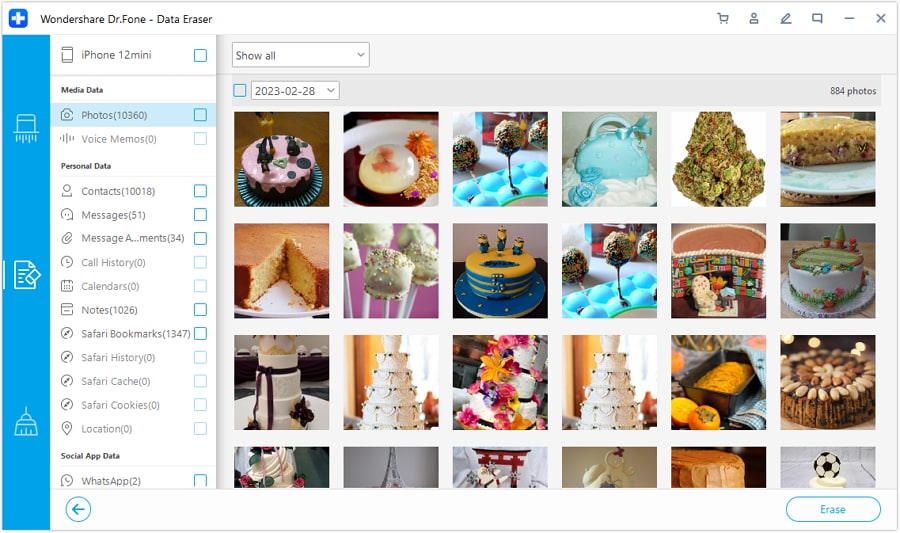
The scan results will be displayed, showing the photos, call histories, messages, social app data, and more private data on the iPhone. You will then select the data you want to delete and then click the erase button to start deleting them. In our case, you can choose the photo albums you needed to eliminate.
If you had deleted the photo albums from your iPhone, they are marked orange, indicating deleted files. You access the deleted items from the drop-down menu available on the top of the window. Select the 'Only show the deleted,' then select the items you want and click the 'erase' button.
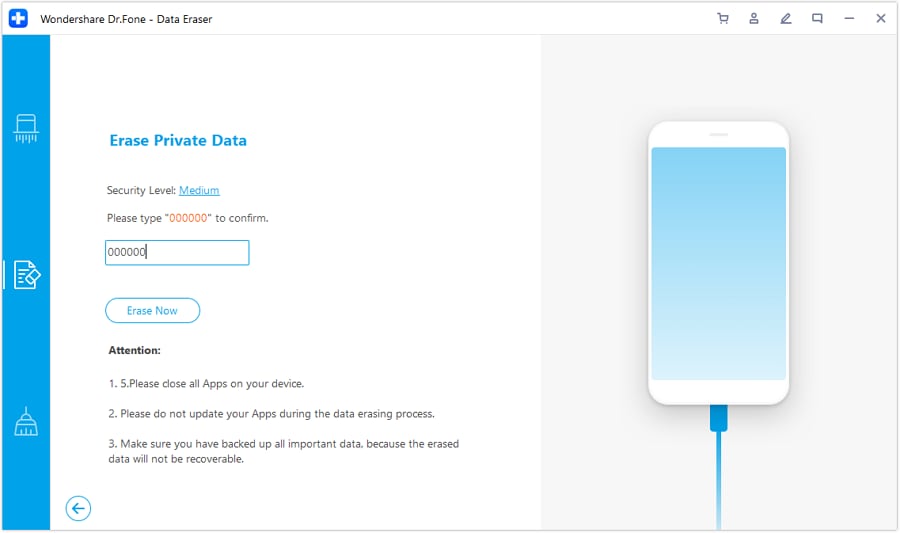
Beware that the erased data will not be recovered again. Since we can't be too careful to proceed, you will be required to enter'000000' in the box provided to confirm and then click 'Erase Now.'
When the erasure process begins, you can take a break and wait for its end as it can take some time. The iPhone will be restarting as the process continues. Keep the device connected until the erasure process is completed successfully.
Upon completion, a message will pop up on the screen showing the data has been erased successfully.
Part 2: Why can't I delete some albums?
The in-built photo app on iPhone is significant when it comes to managing albums. However, users get confused when it comes to deleting albums. It becomes challenging to figure out why some albums cannot be deleted like the others. If you are in the same situation, you should know when deleting albums on an iPhone.
The following points explain why some of the albums cannot e deleted from your iPhone.
The media type albums
If you are using the newer versions of iOS, they will sort albums automatically for you, especially the media type albums. Such albums contain slo-mo videos and panorama shots, and the user cannot delete these.
Albums synched from computers or iTunes.
If you have transferred photos from your computer to the iPhone using iTunes, you cannot delete such albums from your handset. If you want to get rid of a specific or the entire album, you need to go through iTunes to erase it successfully. You can delete a few photos from your computer and then apply the sync changes through iTunes. For deleting the entire album, uncheck it from iTunes and sync again to take effect.
Albums created by app store apps
When you download third-party apps from the app store, they will likely give you trouble deleting the albums that automatically build up on your iPhone. For instance, apps like Snapchat, Prynt, among others, will create albums automatically. Deleting such albums does not really remove the photos from your device.
Similarly, albums from iPhone's camera roll and those automatically generated from iOS such as people and places cannot be deleted.
Even though the albums mentioned above cannot be deleted from iPhone, Dr. Fone –Data Erase can fix them. The software is capable of eliminating all photo albums without leaving traces for recovery.
Part 3: Too many albums/photos! How to save iPhone space
Photos and albums can quickly clutter in your iPhone storage while you are using it. Such can reduce the performance of your iPhone soon as they fill up the device storage. You will realize the problem when your iPhone displays error messages that indicate poor performance.
Dr. Fone Data Eraser is a recommended solution to fix the problems on your iPhone. The software has a feature called 'Free Up Space,' which can organize your photos and clean the useless junks on the device. The guide below will take you through the entire process of saving space on the iPhone.
Install and start Dr. Fone on a computer. Connect your iPhone using a lightning cable and select the Data- Eraser option on the program window to get started.
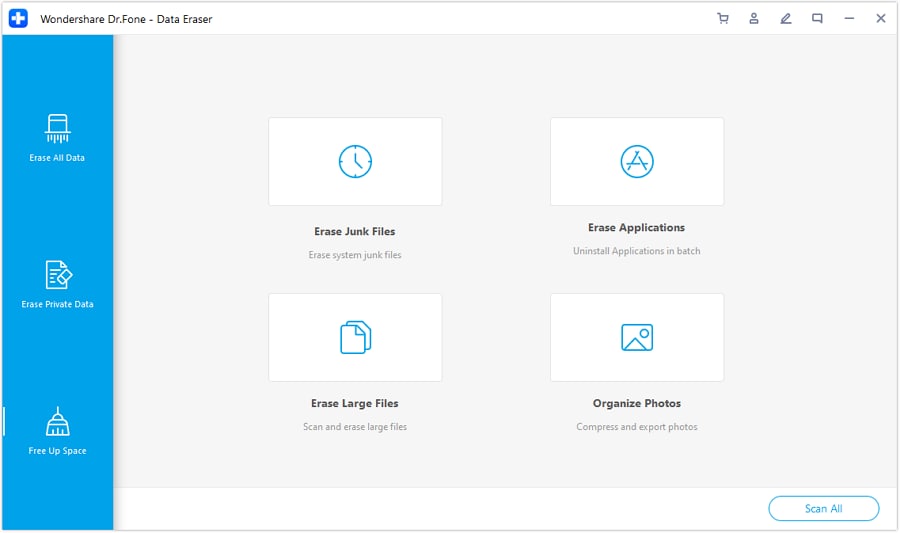
You will perform the following functions to free up space on your iPhone;
- Erase junk files
- Uninstall useless apps
- Erase large files
- Compress or export photos
To erase junk, click on the 'erase junk file' option from the main interface. The program will scan for all hidden files on the iPhone. Click on the 'clean' button after selecting all or some junk files to wipe them.
To erase the applications you no longer need on your iPhone, click on the 'erase application' option to select them. Click 'uninstall' to remove the apps and app data.
You can also erase large files by clicking on the 'erase large files' module on the main interface. Let the program scan for the large files that are likely to slow down your device. You can select specific options of the format and size to be displayed. Select and confirm the useless files, then click the delete button. The files can also be exported to your computer before deleting them.
Do not delete the iOS files as they may cause problems to your iPhone.
The 'organize photos' option allows you to manage your photos. You can choose from the choices' compress the photos losslessly' or 'export to pc and delete from iOS.'
To compress the photos losslessly, click on the start option. After the photos are displayed, choose the date and the photos to compress and click the start button.
If there is not enough space created yet, click on the Export option to move the photos to a pc, then delete from iOS. The program will scan and display the photos. Choose a date and the photos to export, and then click start. Ensure that the 'Export then delete' option is checked to prevent the program from retaining your iPhone's photos. Select a location on your pc, then click export and wait for the process to complete.
Conclusion
Dr. Fone Data eraser is a recommended and effective solution to fixing various problems on your iPhone. Besides deleting all types of albums, the software can free up your iPhone using multiple methods. Both functions can be performed smoothly as the software entails straightforward procedures.


iPhone Erase
- Clear iPhone
- Delete iPhone
- 1. Delete Albums on iPhone
- 2. Delete Apps from iPhone
- 3. Delete Calendar Event on iPhone
- 4. Delete Documents on iPhone
- 5. Delete Email Account on iPhone
- 6. Delete Visited Sites on iPhone
- 7. Delete Music from iPhone
- 8. Delete Snapchat Messages on iPhone
- 9. Delete Songs from iCloud
- 10. Delete Voicemail on iPhone
- 11. Delete WhatsApp Message for Everyone
- 12. Delete WhatsApp Message Permanently
- 13. Delete Downloads on iPhone
- 14. Delete Calendars from iPhone
- 15. Delete History on iPhone
- 16. Delete Snapchat Story/History
- 17. Delete Call History on iPhone
- 18. Delete Kik on iPhone
- 19. WhatsApp Delete Message Tips
- 20. Anti Spyware for iPhone
- 21. Get Rid of Virus on iPhone
- 22. Delete Other Data on iPhone/iPad
- 23. Remove Subscribed Calendar iPhone
- Erase iPhone
- 1. Erase an iPhone without Apple ID
- 2. iPhone Data Erase Softwares
- 3. Remove Cydia from iPhone/iPad
- 4. Erase All Content and Settings
- 5. Erase Old iPhone
- 6. Erase iPhone 13 Data
- 7. Erase Data Old Device
- 8. Erase iPhone without Apple ID
- 9. Empty Trash on iPhone
- 10. Sell My Old iPhone
- 11. Sell A Used Phone
- 12. Safely Sell Used Phones
- 13. Apple Trade in Program
- iPhone Storage Full
- 1. iPhone Cleaners to Clean iPhone
- 2. Clean Master for iPhone
- 3. Clean Up iPhone
- 4. Free Up Storage on iPhone
- 5. Make iPhone Faster
- 6. Speed Up iPhone/iPad
- Wipe iPhone
- Sell Old iPhone
Alice MJ
staff Editor