How to Completely Erase iPhone 13 Data to Protect Privacy: A Step-By-Step Guide

Jul 12, 2024 • Filed to: Data Wipe Solutions • Proven solutions
Septembers have come to be known in the tech world to chiefly mean one thing - Apple picked a date and released new iPhones. The latest iPhone 13 comes with improvements across the board, and the Pro series comes in a beautiful new blue shade they call Sierra Blue, with new ProMotion displays, enabling a 120 Hz experience on an iPhone for the first time ever. In excitement, we can often buy the latest and greatest without giving much thought. Fortunately, Apple provides a return window and if we are not satisfied with the iPhone 13 for any reason, we can return it. Now, have you given a thought as to how to completely erase iPhone 13 and preserve your privacy?
Part I: Factory Reset iPhone 13: The Official Apple Way
Apple has, since long, provided a simple and easy-to-use way to erase an iPhone should you want to, for any reason. If you have never needed it before, here is how to completely reset your iPhone 13:
Step 1: Launch Settings on your iPhone.
Step 2: Scroll down to General.
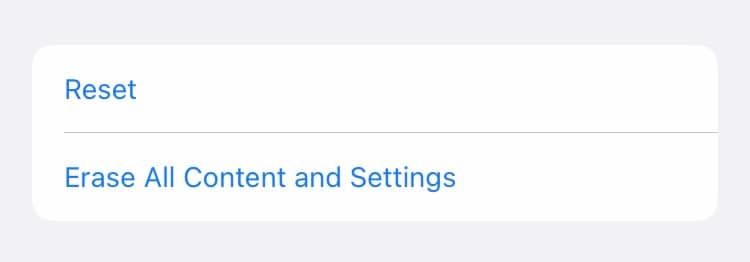
Step 3: Scroll down to Transfer or Reset.
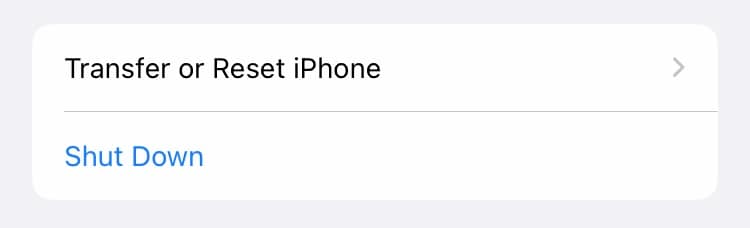
Step 4:Select Erase All Content and Settings.
That step will erase everything on your iPhone and restore it to factory settings. This is regarded as the recommended method by Apple when you want to restore your iPhone to default factory settings, for whatever reason.
The Problem With This Method
However, we have a problem here with this method, and that concerns you - the user - and your privacy. As you might be aware, storage works with what is called a file system, and a file system is nothing but a register that knows where on the storage a particular data is. When you erase your iPhone or any other storage, you only erase the file system - your data exists on the disk as is. And this data can be recovered using specialized tools for the job. Do you see the issue here?
The very reason why macOS Disk Utility has options to securely wipe the disk, running it with zeroes and even more extreme military-grade passes to make the data unrecoverable, is completely and conveniently missing on an iPhone.
Arguably, our phones hold a sizeable chunk of our personal life in form of our contacts, our memories, the photos and videos, the notes, and other data we have on the phone storage. And this does not get wiped out securely and completely the Apple way.
Imagine what happens if you sell your iPhone 13 because you did not like it enough, and the buyer wants to get access to your data. The buyer could do that if you only used the official Apple way to erase your iPhone 13 - through the Erase All Content and Settings option in the Settings app.
This is where, if you are concerned about your privacy and the privacy of your data, you need some help. This is where you need to ensure that you have a tool at your disposal that you can use to wipe your iPhone 13 completely and securely in a way that ensures your data privacy before you sell it off. This is where Wondershare Dr.Fone comes into the picture.
Part II: Dr.Fone - Data Eraser (iOS): Wipe Your Device Completely and Securely
Dr.Fone is a set of modules bundled into one software app that is designed specifically for the modern consumer's requirements in today's world. These modules take care of every requirement a user might potentially have in relation to the operation of their devices and specific use-cases such as this when you want to erase your iPhone 13 completely and securely to make data unrecoverable. The module that is used for this task is called Dr.Fone - Data Eraser (iOS).
Dr.Fone - Data Eraser (iOS) is a powerful module that is capable of wiping your iPhone 13 safely and securely so that data on the storage is unrecoverable. It functions akin to Disk Utility on macOS, only that Apple conveniently does not provide a similar way for consumers to erase iPhone 13 completely to preserve data privacy, an oversight on their part when you think about how much they toot about privacy. Wondershare Dr.Fone - Data Eraser (iOS) fills that void for you. It also allows you to keep your iPhone in ship shape, cleaning out data selectively. You can erase junk files, specific apps, large files, and even compress photos and videos.
Dr.Fone - Data Eraser (iOS)
Permanently delete data and protect your privacy.
- Simple, click-through, process.
- Erase iOS SMS, contacts, call history, photos & video, etc selectively.
- 100% wipe 3rd-party apps: WhatsApp, LINE, Kik, Viber, etc.
- Works greatly for iPhone, iPad, and iPod touch, including the latest models and the latest iOS version fully!

Here are steps to completely erase data on your iPhone 13 to preserve your privacy and make your data unrecoverable:
Step 1: Download Dr.Fone
Step 2: After Dr.Fone installation, connect your iPhone to the computer.
Step 3: Launch Dr.Fone and select the Data Eraser module and wait for Dr.Fone to recognize your iPhone.
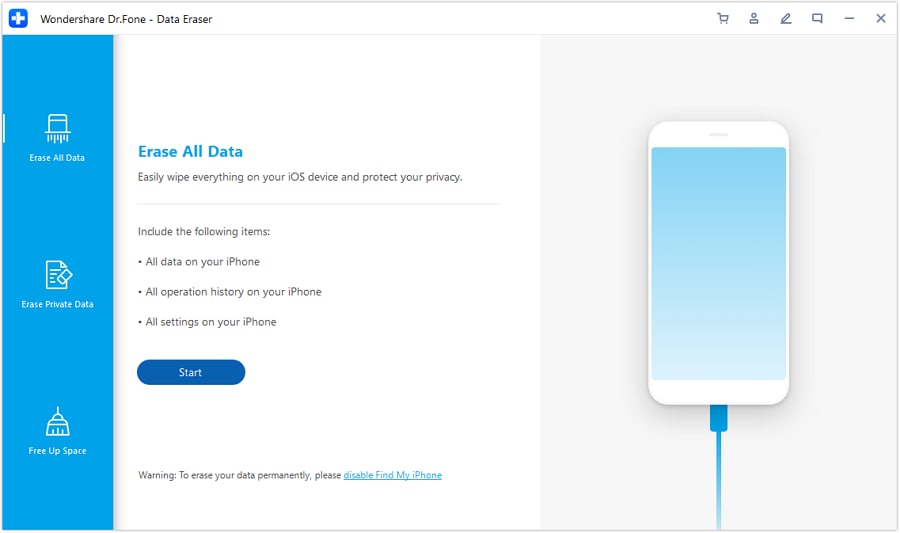
Step 4: Click Erase All Data and click Start.
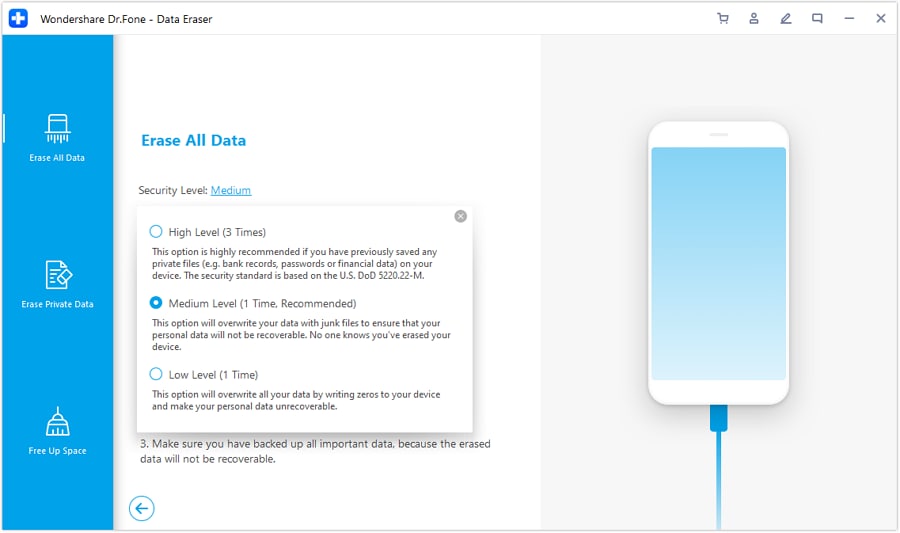
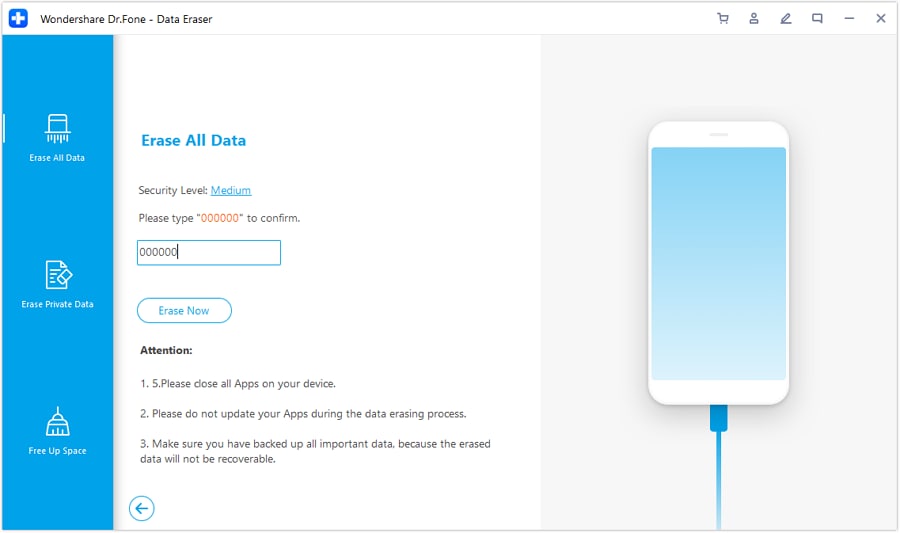
Step 5: Here is where the magic is. Using Dr.Fone - Data Eraser (iOS), you can select the security level you desire, just like you can do on macOS with Disk Utility. You can select the security level from 3 settings. Default is Medium. If you want the maximum security, select High Level as shown below:
Step 6: After that, enter the digit zero (0) six times (000 000) to confirm and click Erase Now to start wiping the device completely and make the data unrecoverable.
Step 7: After the iPhone is completely and securely wiped, you will be required to confirm the device reboot. Click OK to continue and reboot the iPhone.
The device will reboot to factory settings, just like it does with the official Apple way, with only one difference - now you know that data on the disk is unrecoverable, and your privacy is preserved.
Erase Private Data From iPhone 13
Sometimes, all you want to do is just erase your private data from the device as safely and securely as possible. Now you can do that, with Dr.Fone - Data Eraser (iOS). Here are the steps to erase all your private data from iPhone 13 safely and securely and render it unrecoverable:
Step 1: Connect your iPhone to your computer and launch Dr.Fone.
Step 2: Select the Data Eraser module.
Step 3: Select the middle option, Erase Private Data.
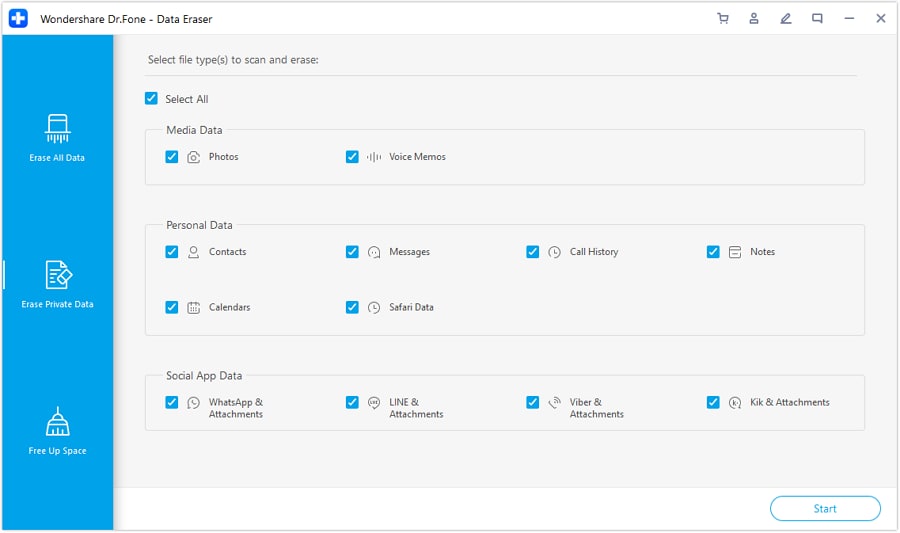
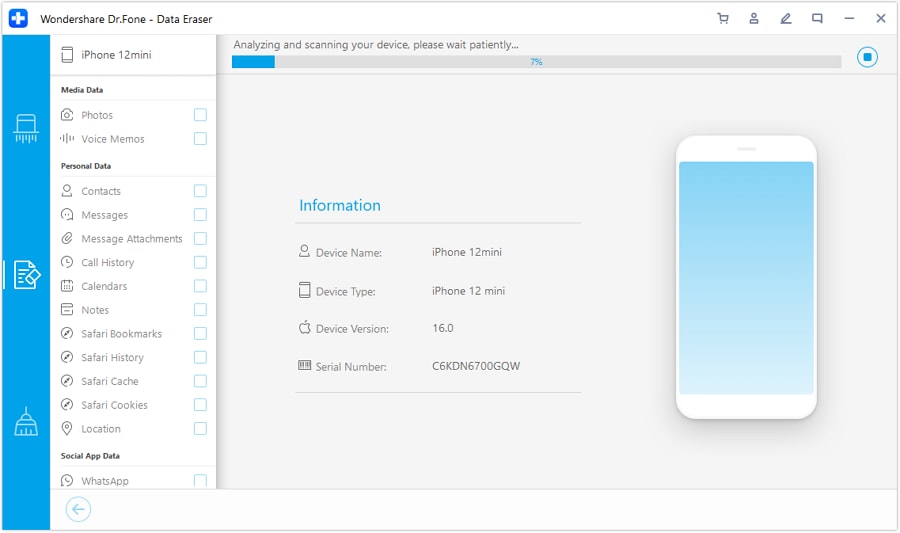
Step 4: The app needs to scan your device for all your private data. Select the types of private data to scan and click Start and wait.
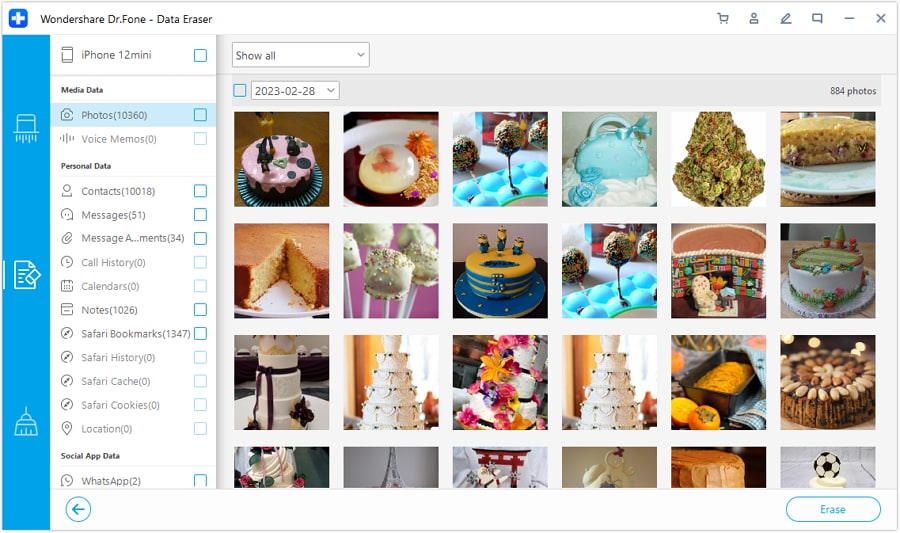
Step 5: When the scan is complete, you can see the types of data on the left and preview it on the right. Select all or choose what to delete by checking the boxes and click Erase.
Your private data will now be erased securely and will be unrecoverable.
What about the data that we deleted so far on the device? What if we want to wipe only the deleted data? There is an option in the app for it. When the app is done analyzing in step 5, you will have a dropdown sitting above the preview pane on the right that says Show All. Click it and select Only Show The Deleted.

Then, you can proceed by clicking Erase at the bottom, like before.
Selectively Wiping Your iPhone
Sometimes, you may want a little more control over how you perform some tasks on your iPhone, such as removing apps. It is surprisingly easy to end up with hundreds of apps on an iPhone these days. Are you going to delete a hundred apps one by one? No, because Dr.Fone - Data Eraser (iOS) has you covered for that, too.
Step 1: Connect your iPhone to your computer and launch Dr.Fone.
Step 2: Select the Data Eraser module.
Step 3: Select Free Up Space from the sidebar.
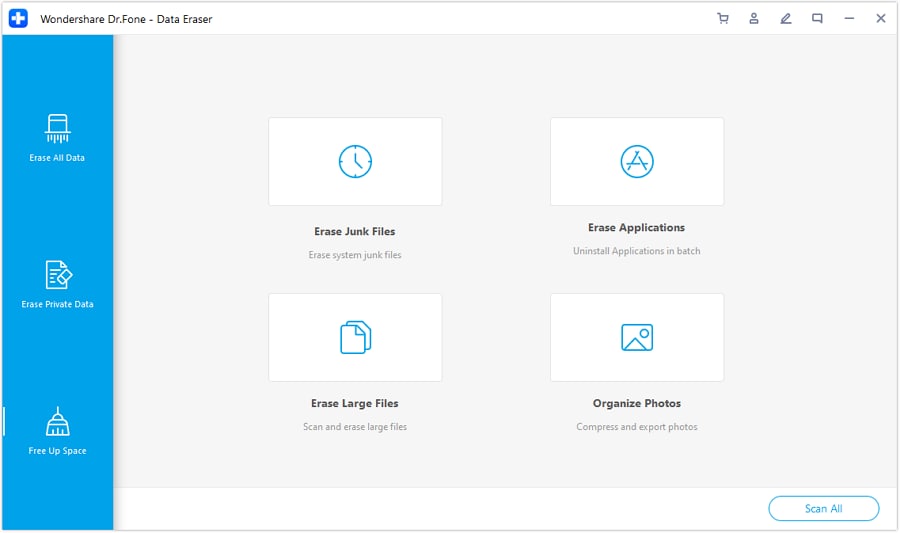
Step 4: Here, you can select what you want to wipe from your device - junk files, apps, or take a look at the largest files taking up the most space on your device and delete data selectively on your iPhone. You even have an option to compress photos on your iPhone and export them as well.
Step 5: Select what you want to do, for example, Erase Applications. When you do that, you will be presented with a list of apps on your iPhone, with unchecked boxes to the left of each app.
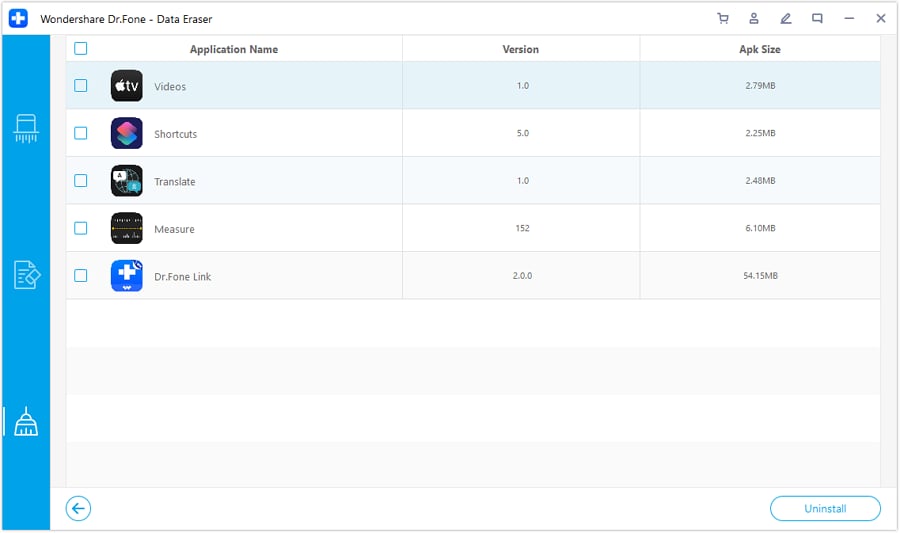
Step 6: Now, go through the list, checking the box to the left of every app you want to uninstall from your iPhone.
Step 7: When you are done, click Uninstall at the bottom right.
Apps will be uninstalled from the iPhone, along with their data, just like they do when you do them on the iPhone. Only, you have now saved yourself a lot of time and donkey work by gaining the ability to batch-select the apps you want to delete. This is the smart way and it is baffling how Apple still does not provide a way to do that, considering the average number of apps people have on their iPhones now is well over a hundred.
Part III: Conclusion
Wondershare has always been about making meaningful differences in the lives of the people that use its software, and the legacy continues with Dr.Fone in ever-evolving ways. Wondershare lets users do what Apple does not, and that is to give power in the hands of the people that use the devices, trusting that the users need and want that power for their own good, and in this case, for their own privacy. Apple provides no way for users to safely and securely wipe their iPhones. Wondershare Dr.Fone - Data Eraser (iOS) does, and not only can users wipe the entire device safely and securely in a way that data can never be recovered again, but they can also even wipe only their private data from the devices, as well as wipe the already deleted data safely and securely. Wondershare Dr.Fone - Data Eraser (iOS) is a must-have tool for everyone who values their privacy and that of their data in this age.


iPhone Erase
- Clear iPhone
- Delete iPhone
- 1. Delete Albums on iPhone
- 2. Delete Apps from iPhone
- 3. Delete Calendar Event on iPhone
- 4. Delete Documents on iPhone
- 5. Delete Email Account on iPhone
- 6. Delete Visited Sites on iPhone
- 7. Delete Music from iPhone
- 8. Delete Snapchat Messages on iPhone
- 9. Delete Songs from iCloud
- 10. Delete Voicemail on iPhone
- 11. Delete WhatsApp Message for Everyone
- 12. Delete WhatsApp Message Permanently
- 13. Delete Downloads on iPhone
- 14. Delete Calendars from iPhone
- 15. Delete History on iPhone
- 16. Delete Snapchat Story/History
- 17. Delete Call History on iPhone
- 18. Delete Kik on iPhone
- 19. WhatsApp Delete Message Tips
- 20. Anti Spyware for iPhone
- 21. Get Rid of Virus on iPhone
- 22. Delete Other Data on iPhone/iPad
- 23. Remove Subscribed Calendar iPhone
- Erase iPhone
- 1. Erase an iPhone without Apple ID
- 2. iPhone Data Erase Softwares
- 3. Remove Cydia from iPhone/iPad
- 4. Erase All Content and Settings
- 5. Erase Old iPhone
- 6. Erase iPhone 13 Data
- 7. Erase Data Old Device
- 8. Erase iPhone without Apple ID
- 9. Empty Trash on iPhone
- 10. Sell My Old iPhone
- 11. Sell A Used Phone
- 12. Safely Sell Used Phones
- 13. Apple Trade in Program
- iPhone Storage Full
- 1. iPhone Cleaners to Clean iPhone
- 2. Clean Master for iPhone
- 3. Clean Up iPhone
- 4. Free Up Storage on iPhone
- 5. Make iPhone Faster
- 6. Speed Up iPhone/iPad
- Wipe iPhone
- Sell Old iPhone
Daisy Raines
staff Editor