
The Ultimate Guide to Bypassing iCloud Activation in iOS 9.3

Jun 11, 2026 • Filed to: Screen Lock Removal • Proven solutions
 TL;DR:
Bypassing the iOS 9.3 iCloud Activation Lock requires using device-specific software like Remove iCloud Lock, keeping in mind that the procedure deletes all local data and success is not unconditionally guaranteed.
● The Remove iCloud Lock utility is compatible specifically with iPhone 5, 5c, 5s, 6, and 6 Plus, requiring a PC or Mac, a USB connection, and the device's IMEI number to execute the unlock.
● Since the bypass operation completely wipes the device, restoring lost information requires a pre-existing iTunes or iCloud backup, which can be selectively extracted using Dr.Fone - Data Recovery (iOS).
● A manual Wi-Fi DNS modification offers a tool-free alternative granting restricted access to media and web functions, but it is unreliable and highly unlikely to function successfully on iOS 9.3 compared to older iOS 8 to 9.2 versions.
Ask AI for a summary
 ChatGPT
 Perplexity
 Gemini
 Claude
 Grok
Grok
Dr.Fone Basic:
Better Control for Your Phone
Manage, transfer, back up, restore, and mirror your device
The iOS Activation Lock provides strong security but can be problematic, especially for second-hand device buyers. Often, those purchasing from sites like eBay can't use their iPhone or iPad because the previous owner didn’t share the activation code or disable the lock. If this sounds like your situation, you may need to bypass iCloud activation in iOS 9.3 to regain access to your device.
While many tools online promise to bypass iCloud 9.3 effortlessly, not all of them deliver as claimed. Choosing a trusted tool and following the right steps is key. Luckily, we've found a reliable solution to help you unlock your iOS 9.3 device quickly and easily, restoring it to full functionality.
Note: This operation will remove all data when bypassing the iCloud activation lock. But you can restore data from your iCloud backup or iTunes backup.
Solution 1: Bypass iCloud Lock iOS 9.3 using Remove iCloud Lock
Remove iCloud Lock is an online tool designed to bypass iCloud lock on iPhone 5s, 5c, 5, 6, and 6 Plus. Each device requires a specific tool, so ensure you download the correct one for your model.
Download the iPhone 5 or iPhone 7 tool for free, though you may need to share the website on social media or make a small donation. Once you have the appropriate tool for your device, follow the easy steps to bypass the iCloud lock.
Step 1: Download the iCloud unlock tool to your PC or Mac. Run the installation wizard, wait for it to finish, and click "Next." Once installed, double-click the "Bypass iCloud Lock Unlock Tool" shortcut on your desktop and select "Run as Administrator."
Step 2: Use a USB cable to connect your iPhone to your computer. Open the tool, click "Check" to scan your device, and ensure the tool mimics the Apple server. Enter your IMEI number and email address in the provided boxes.
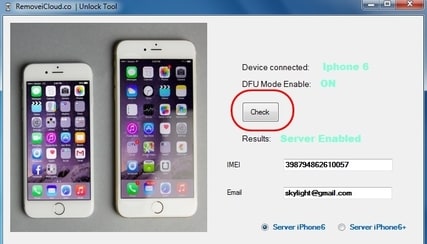
Step 3: Select the correct server for your device (e.g., iPhone 6 or iPhone 6+). Make sure you choose accurately to avoid any errors during the process.

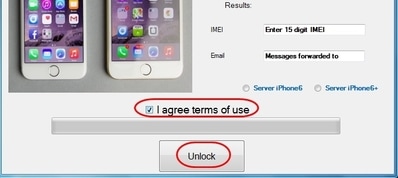
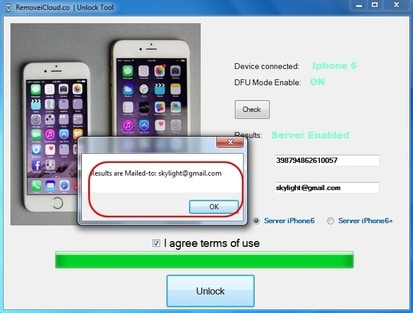
Step 4: Agree to the terms, click "Unlock," and the tool will bypass iCloud activation in iOS 9.3 automatically. You’ll receive a confirmation email once the process finishes. If a message says "Error Please Repeat," restart the process as needed.
Apart from the tool introduced above, if you are interested in more tools about iCloud bypass, here this article - Top 8 iCloud Bypass Tools is for your reference.
Solution 2: Recover Lost Data After iCloud Lock Bypass
After bypassing the iCloud lock, you may need to restore your iPhone. While iTunes can restore from iCloud or iTunes backups, it’s often difficult to use and doesn’t allow you to preview or selectively restore data. Dr.Fone - Data Recovery (iOS) solves this by letting you view and choose what to restore from your iCloud or iTunes backup, offering a more flexible, easy, and user-friendly solution.
Dr.Fone - Data Recovery (iOS)
Recover lost data on iPhone and iPad after bypassing iCloud activation lock.
- Safe, fast, flexible, and simple.
- Allows you to restore iPhone from iTunes backup and iCloud backup
- Flexibly select whatever iPhone data to restore and export.
- Supports all iOS devices with the latest iOS version fully!


How to recover contacts on iPhone easily and fastly
If you have an iTunes backup containing the contacts you need, you can restore them in two ways: selectively recover contacts using Dr.Fone, or restore the entire backup via iTunes. Choose the method that best suits your needs.
Method 1: Selectively recover iPhone contacts from iTunes backup (Flexible and Fast)
As we introduced above, Dr.Fone - Data Recovery (iOS) allows us to preview and selectively restore whatever you want from iTunes backup. And you can also export your contacts to your computer, they will be saved as HTML and CSV files. If needed, you can view them directly on your Windows or Mac. Now let's see how to retrieve iPhone contacts from iTunes backup with Dr.Fone.
Step 1. Launch Dr.Fone Software
Launch Dr.Fone and there will be a list of tools displayed. Select "Data Recovery" > "iOS" and click on "Recover Data from iTunes" to recover iPhone contacts from iTunes backup.

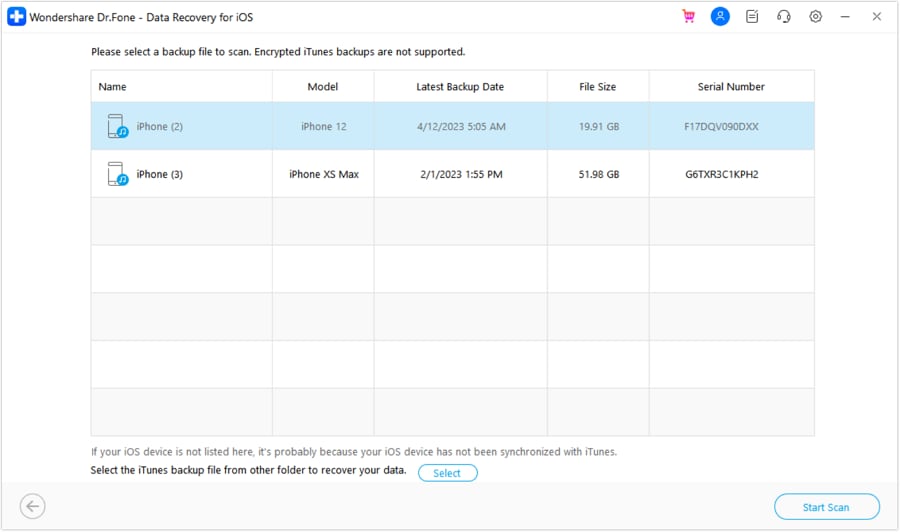
Step 2. Scan the backup file
Choose the one for your iPhone and click "Start Scan".
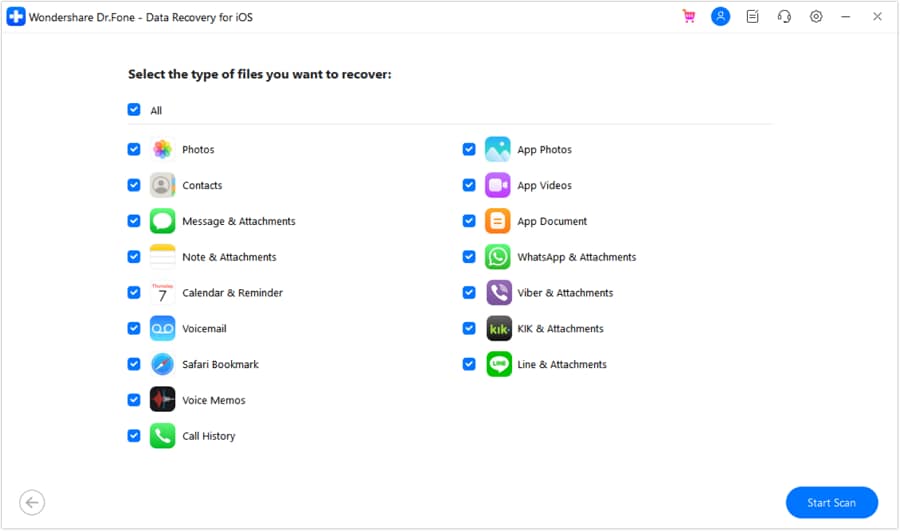
Step 3. Preview and restore your iPhone
After the scan process. All the contents from the backup file will be displayed in the window like below. Just check the data and click the "Start Scan" > "Restore to Device" button to restore the selected data to your iPhone.
How To Recover Data From iCloud With Dr.Fone?
Method 2: Recover entire iPhone backup from via iTunes
In this guide, we’ll show you how to restore your entire iPhone backup via iTunes. Whether you’ve lost data, faced software issues, or upgraded to a new device, restoring your backup can quickly bring back your information and settings. Follow our simple 8-step guide to recover your iPhone backup using iTunes.
- Step 1. Open iTunes on your computer. If you don't have it installed, download it from the official Apple website and install it.
- Step 2. Connect your iPhone to the computer using a USB cable.
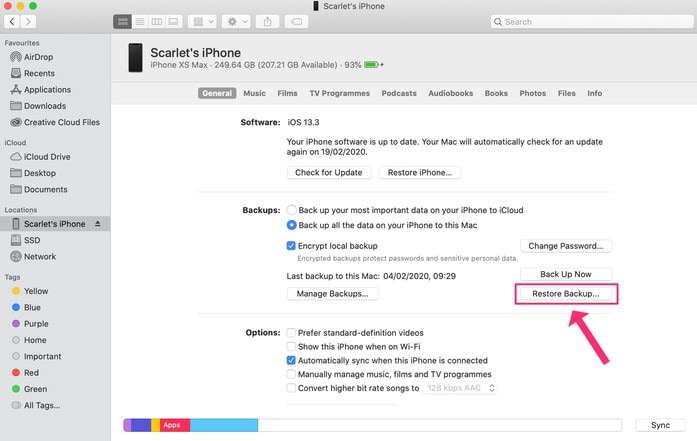
- Step 3. Once connected, your iPhone will appear on iTunes. Click on the device icon in the top left corner of the iTunes window.
- Step 4. In the "Summary" tab, find the "Backups" section.
- Step 5. Click on "Restore Backup." A list of available backups will appear.
- Step 6. Choose the backup you want to restore from the list. Make sure to select the most recent or desired backup.
- Step 7. Click "Restore" and wait for the process to complete. Your iPhone will restart, and the backup data will be restored to your device.
- Step 8. Once the restore is complete, your iPhone will restart, and you'll see your data and settings from the backup.
Note: Make sure your iPhone is charged and connected to a stable Wi-Fi network during this process to avoid any interruptions.
Solution 3: Bypass iCloud Lock without using a Bypass Tool
If you would rather not use a bypass tool to Bypass iCloud Activation, you can try to do it this way.
If you are unable to bypass the "Activate iPhone Screen" press the home button on the iPhone and tap on Wi-Fi settings. Next Tap on "I" next to the Wi-Fi symbol and then follow these steps.

Step 1: You need to enter a new DNS. This is different depending on where you are;
- In USA/North America, type in 104.154.51.7
- in Europe, type in 104.155.28.90
- in Asia, type in 104.155.220.58
- In the rest of the world, type in 78.109.17.60
Step 2: Tap on Back > Done > Activation Help and you will see "You have successfully connected to my server"
You will then be able to access different functions like Video, Audio, Games, Maps, Mail, Social, Internet, and more.
This method is not very reliable as it may not give you full access to the device. It is also very likely that it may not work for iOS 9.3. It may work for iOS 8 and iOS 9.1, iOS 9.2.
The solution we provided is a reliable method to bypass iCloud on devices running iOS 9.3. However, success is not guaranteed, as the iCloud Lock is designed to protect your device. It’s crucial to choose a trustworthy tool, like the one we recommended, from a reputable developer. Many iCloud bypass tools claim to work with iOS 9.3, but few offer credible tutorials or clear instructions on how their tools function. Always ensure you understand the process before proceeding.
Conclusion
In conclusion, this article offers effective solutions for bypass iCloud lock without password. It covers two main methods: using a specialized tool and a manual bypass technique, along with data recovery options after unlocking.
Dr.Fone Basic:
Better Control for Your Phone
Manage, transfer, back up, restore, and mirror your device


iCloud Unlock
- Remove Apple/iCloud Account
- 1. Remove iCloud Account
- 2. Remove iCloud from iPhone
- 3. Use This iPhone To Reset Apple ID
- 4. Unlock Apple Watch iCloud/Apple ID
- 5. Unlock iCloud Lock on iPhone/iPad
- 6. Unlock iCloud Account No Password
- 7. Reset Apple ID and Apple Password
- 8. Delete iCloud Account No Password
- 9. Does Factory Reset Remove the iCloud Activation Lock
- 10. Does Find My iPhone Work When Phone Is Dead
- Bypass Activation Lock (Specific)
- 1. Bypass iCloud Lock on iPhone 4/4S
- 2. Bypass iCloud Lock on iPhone 5/5S/5C
- 3. Bypass iCloud Lock on iPhone 6/6S/7
- 4. Bypass iCloud Lock on iPhone SE
- 5. Bypass iCloud Lock on iPhone 8
- 6. Bypass iCloud Lock on iPhone XS/XR/X
- 7. Bypass iCloud Lock on iPhone 11/12
- 8. Bypass iCloud Lock on iPhone 13
- 9. Bypass iCloud Lock on iPhone 14
- 10. Bypass iCloud Lock on iPad 2/3
- 11. Bypass iCloud Lock on iPad 4/Mini
- 12. Bypass Activation Lock in iOS 9.3
- 13. Bypass Activation Lock iOS 14
- 14. Remove Activation Lock iOS 15
- 15. Bypass Activation Lock iOS 16
- 16. Bypass iCloud Activation Lock iOS 18
- Bypass Activation Lock (General)
- 1. Unlock iCloud Activation Lock
- 2. Unlock Activation Lock Online
- 3. Remove iCloud Activation Lock
- 4. Bypass Activation Lock on iPhone
- 5. Bypass Activation Lock on iPod
- 6. Bypass Activation Lock on iPad
- 7. Bypass Activation Lock on Mac
- 8. Bypass iCloud Lock on Apple Watch
- 9. Remove iCloud Lock With IMEI
- 10. Remove Without Previous Owner
- Activation Lock Bypass Tools
- 1. iCloud DNS Bypass Guide
- 2. Top 7 iCloud Bypass Tools
- 3. Bypass iCloud By Checkra1n
- 4. iCloud Bypass Tool Version 1.4
- 5. Top 10 Apps to Unlock Your iCloud
- 6. iCloud Unlocker Download
- 7. iCloud Unlock Deluxe Software
- 8. DarkRa1n iCloud Bypass Tool
- 9. Mina Activator Review
- 10. iUnlocker Check iCloud
- Recover iCloud Password
- iCloud Unlock Tips
- 1. Check iCloud Activation Lock Status
- 2. Fix iCloud Lock on iPhone and iPad
- 3. Jailbreak iCloud Locked iPhone
- 4. Can You Sell Locked iPhones
- 5. iPad Stuck On Activation Lock
- 6. This iPad is Linked to an Apple ID Problem
- 7. Fix iPhone Locked After Update
- Turn Off Camera Sound
- ● Manage/transfer/recover data
- ● Unlock screen/activate/FRP lock
- ● Fix most iOS and Android issues
- Free Download Free Download Free Download


James Davis
staff Editor