How To Add Music Into iTunes: Step-by-Step With Pro Tips
Oct 24, 2025 • Filed to: Device Data Management • Proven solutions
Dr.Fone Basic:
Better Control for Your Phone
Manage, transfer, back up, restore, and mirror your device
Do you have music on your iPhone that you wish to put in your iTunes? This enables you to enjoy easy access to your music anytime, even when your iPhone is not at hand.
The process of transferring music from your iPhone to iTunes isn't limited to purchased tracks; you can also add your personal recordings or any freely available music to your iTunes library. It's an easy way to make your music collection special and more about what you love.
Ready to enhance your iTunes library and learn how to add music into iTunes? Let’s get started.
- Part 1. How To Transfer Purchased Music From iPhone to iTunes
- How to purchase music from iTunes store on iPhone
- How To Transfer Purchased Music From iPhone to iTunes
- Part 2. How To Import Music From iPhone to iTunes by Syncing

- Part 3. How to Transfer Downloaded Music from iPhone to iTunes
- Tips: How to Ensure Seamless Music Transfer from iPhone to iTunes
Part 1. How To Transfer Purchased Music From iPhone to iTunes
iTunes, developed by Apple Inc., has long been a staple in digital music. It serves not only as a media player but also as a comprehensive media library and an online storefront through the iTunes Store. This powerful software has revolutionized the way we access and organize our music collections.
Before we delve into how to get music from iPhone to iTunes, let's briefly explore how to purchase music from iTunes.
How to purchase music from iTunes store on iPhone
Step 1: Open the iTunes on iPhone
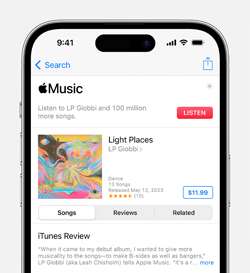
Launch iTunes on your iPhone and head to the iTunes Store.
Step 2: Navigate to the music section
Once in the iTunes Store, tap on the "Music" tab at the bottom of the screen. Here, you'll find a variety of options, including charts, genres, and new releases.
Step 3: Select your desired music
When you find a song or album you want to purchase, tap on it to view more details. If it's a single track, you might see a price listed next to it. For albums, the price is usually displayed at the top.
Step 4: Download and purchase the music.
Tap the price button or the "Buy" button next to the track or album you want to purchase. If it's a paid item, you may need to confirm your Apple ID or use Touch ID/Face ID.

Once the purchase is complete, the selected music will automatically download to your iPhone. To transfer it to your iTunes, you can follow the steps in the next section.
How To Transfer Purchased Music From iPhone to iTunes
After I have downloaded and purchased the songs from the iTunes store, how do I transfer music from iPhone to iTunes? First, make sure to have the latest iTunes version on your computer. Then, connect your iPhone and proceed with the steps below.
How to transfer music from iPhone to iTunes:
Step 1: Launch iTunes on Your Computer
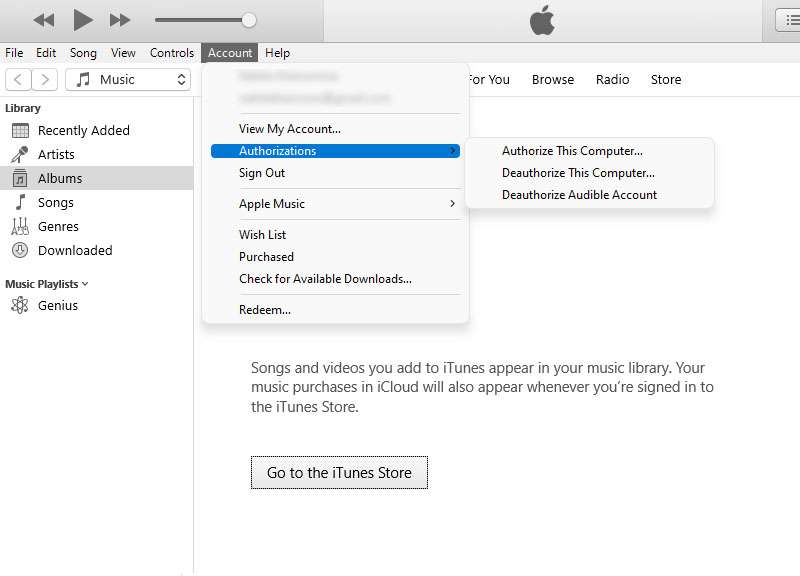
Run iTunes on your computer. Click on "Account" in the toolbar, then navigate to "Authorizations" > "Authorize This Computer." This step establishes a connection allowing your PC to access the music on your iPhone.
Step 2: Authenticate your Apple ID
Sign in with your Apple ID and Click "Authorize" to grant your computer permission to play iTunes Store purchases associated with your Apple ID.
Step 3: Initiate music transfer
Select "File" > "Devices" > "Transfer Purchases From [Your iPhone Device]."
Step 4: Check and Confirm
Go to "Recently Added" to review and confirm the import of your newly acquired songs. The transferred music will now be seamlessly integrated into your iTunes library.

If you wish to store the music on your computer, you can select "Account" > "Purchased" in the toolbar. In the Music section on the left, download the purchased music from your iPhone to your computer. You will be able to access your music library even when offline.
Part 2. How To Import Music From iPhone to iTunes by Syncing
Another way to transfer music is to sync iPhone music to iTunes. Syncing allows you to seamlessly integrate your music collection between your iPhone and iTunes, ensuring that the latest additions and changes are reflected on both devices.
To get started, follow these straightforward steps of how to put music from iPhone to iTunes:
Step 1: Connect your iPhone to iTunes.
Start by connecting your iPhone to your iTunes on your computer. If it's the first time connecting, don't forget to tap "Trust" on your iPhone to authorize the connection.
Step 2: Navigate and Enable Syncing
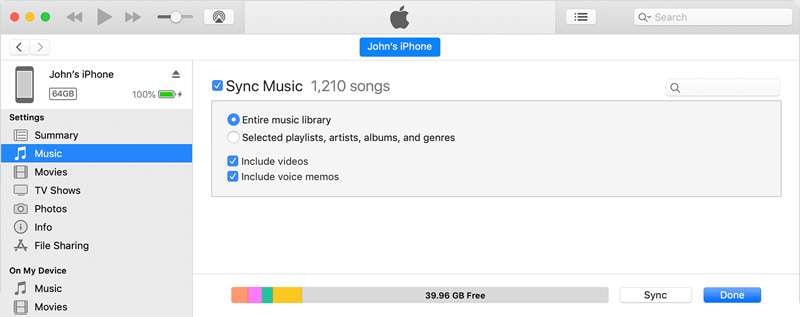
Click on the device icon within iTunes, then navigate to the Music tab on the left sidebar. Activate the "Sync Music" option.
From here, you can choose whether to sync the entire music library or opt for specific playlists, artists, albums, or genres. Once your preferences are set, tap the Apply button to initiate the music transfer from your iPhone to iTunes.

Part 3. How to Transfer Downloaded Music from iPhone to iTunes
While iTunes typically allows you to add only purchased songs from the iTunes store, adding your own recordings or free music downloaded from your iPhone to iTunes is made possible with Wondershare Dr.Fone.
With its user-friendly interface, Dr.Fone’s Phone Manager feature simplifies transferring music from iPhone to iTunes, ensuring a quick and hassle-free experience.
Dr.Fone’s Phone Manager enables two-way transfer, allowing you to import music to iTunes and export it back to your iPhone. It also supports more than 20 different data types including videos, photos, music, and files. Besides, this tool regularly updates to support the latest OS.

Dr.Fone - Phone Manager (iOS)
Transfer Downloaded Music from iPhone to iTunes without iTunes
- Transfer, manage, export/import your music, photos, videos, contacts, SMS, Apps, etc.
- Back up your music, photos, videos, contacts, SMS, Apps, etc., to the computer and restore them easily.
- Transfer music, photos, videos, contacts, messages, etc., from one smartphone to another.
- Transfer media files between iOS devices and iTunes.
- Fully compatible with the newest iOS system.
Here’s how to export music from iPhone to iTunes:
Step 1: Launch Dr.Fone and connect your iPhone
Begin by launching Wondershare Dr.Fone and connect your iPhone to your computer.

Step 2: Access the music section
Navigate to the "My Device" > "Music" section in the left panel of Dr.Fone. It will open up your entire music catalog stored on your iPhone.

Step 3: Add more music
If you want to import new music or entire music folders to your iPhone, click "Add" > "Add File" or "Add Folder" at the top of the platform.

Step 4: Select music from the list
Choose and select the song files you want to transfer from the displayed list.

Step 5: Export Music With Ease
After selecting the music you want to export, right-click to open a drop-down menu. Navigate to the "Export" option and proceed to export the chosen files to iTunes.

Once the export process is complete, a prompt will appear to signal the successful music transfer.
Tips: How to Ensure Seamless Music Transfer from iPhone to iTunes
Importing music to iTunes may pose challenges at times, such as encountering failures or compatibility issues. To help you navigate the potential challenges and make the process seamless, here are some valuable tips you can try.
1. Update iTunes and iPhone software
Make sure you have the latest versions of iTunes and iOS on your iPhone. Updates often include bug fixes that can improve the transfer process.
2. Authorize your computer
Authorize your computer in iTunes before attempting to transfer music. Go to "Account" > "Authorizations" > "Authorize This Computer."
3. Avoid duplicate songs
Check your iTunes library for duplicate songs before syncing. Duplicate files can cause errors and clutter your library.
4. Convert unsupported formats
If you encounter errors with specific song formats, convert them to a compatible format (e.g., MP3 or AAC) before transferring to iTunes.
5. Use reliable third-party software
Consider using reputable third-party software designed for music transfer if you continue to experience difficulties with iTunes. Tools like Wondershare Dr.Fone can provide alternative and user-friendly interfaces for managing your music library.
Conclusion
You have learned the easiest ways how to import music from iPhone to iTunes. Whether you choose to use the traditional iTunes syncing method or explore third-party tools like Wondershare Dr.Fone, the key is to find an approach that suits your preferences and meets your specific needs.
By following the steps outlined in this guide, you can seamlessly import your favorite music from your iPhone to iTunes, ensuring that your entire music library is easily accessible. Remember to keep your iTunes software updated to take advantage of the latest features and improvements.
Dr.Fone Basic:
Better Control for Your Phone
Manage, transfer, back up, restore, and mirror your device
iPhone Music
- Download Music to iOS
- 1. Download Music to iPhone
- 2. Download Songs on iPhone/iPad/iPod
- 3. Download Free Music on iPhone
- 4. Download on iPhone without iTunes
- Make iPhone Ringtones
- 1. Set Voice Memo a Ringtone on iPhone
- 2. Ringtone Apps to Download Ringtones
- 3. Add Custom Ringtones to iPhone
- 4. iPhone Ringtone Apps
- 5. Ringtone Maker Apps for iPhone
- 6. Change iPhone Alarm Volume
- 7. Set A Ringtone on iPhone
- 8. Set MP3 As Ringtone iPhone
- 9. Set Ringtone iPhone
- 10. Make Custom Text Tones for iPhone
- 11. Websites for Free iPhone Ringtones
- 12. Move Ringtone from iPhone to Android
- 13. Popular iPhone Ringtone Remix
- Transfer Audio Media to iPhone
- 1. Send Ringtone from iPhone to iPhone
- 2. Transfer MP3 to iPhone
- 3. Transfer Audiobook from PC to iPhone
- 4. Transfer Songs from CD to iPhone
- 5. Put Ringtones on iPhone
- Transfer Music from iPhone
- 1. Transfer Music from iPhone to computer
- 2. Transfer Music from iPhone to iCloud
- 3. Transfer Music from iPhone to Android
- 4. Transfer Music from iPhone to iPod
- 5. Put Music on iPhone from Computer
- 6. Add Music to iPhone from Computer
- 7. Sync Apple Music Library
- Transfer Music from iTunes
- 1. Transfer Music from iTunes to iPhone
- 2. Transfer Music from Mac to iPhone
- 3. Transfer Music from Laptop to iPhone
- Transfer Music to iPhone
- 1. Transfer Music from Computer to iPhone
- 2. Transfer Music from Mac to iPhone
- 3. Transfer Music from Mac to iPhone
- 4. Music from PC to iPhone
- 5. Music from PC to iPhone without iTunes
- 6. Transfer Music from Android to iPhone
- 7. Transfer Music from iPad to iPhone
- 8. Transfer Music from iPod/iPhone
- 9. Transfer Music from iPhone to iPhone
- 10. Transfer Music from External Hard Drive
- 11. Transfer to iPhone without iTunes
- 12. Transfer Music to Jailbroken iPhone
- 13. Transfer Music to iPhone
- Transfer Music to iTunes/PC
- 1. Transfer Music from iPhone to iTunes
- 2. Transfer Music from iPhone to PC
- 3. Transfer Music from iPhone to Mac
- 4. Transfer Music between PC and iPhone
- 5. Transfer Music from to PC without iTunes
- iPhone Music Problems
- 1. Song Missing After iOS Update
- 2. Music Won't Play on iPhone
- 3. iPhone Plays Music by Itself
- 4. Apple Music Song Is Not Available
- 5.Fix Apple Music Library Not Syncing
- iPhone Music Tips
- ● Manage/transfer/recover data
- ● Unlock screen/activate/FRP lock
- ● Fix most iOS and Android issues
- Transfer Now Transfer Now Transfer Now


Alice MJ
staff Editor