100% Security Verified | No Subscription Required | No Malware

 :
: 
 ChatGPT
 Perplexity
 Gemini
 Claude
 Grok
Grok
A common misconception among iOS users is that figuring out how to transfer ringtones from iPhone to iPhone is a tedious technical challenge. In reality, moving your personalized audio files is easier than ever. Whether you want to retain your signature notification sounds when upgrading to the latest iPhone 17 as we head deep into 2026, or simply want to share a custom tone with a friend, there are multiple hassle-free methods designed for seamless sharing.
In this comprehensive guide, we will explore five proven techniques to safely export ringtones from iPhone to another iOS device. From lightning-fast third-party data management software to built-in Apple tools like AirDrop and iTunes, you can ensure your favorite sounds transition perfectly without losing audio quality or spending hours troubleshooting.
In this article
- Part 1. How to Transfer Ringtones from iPhone to iPhone with 1-Click [Fastest]
- Part 2. How to Send Ringtones to iPhone (Including iPhone 17) Using iTunes/Finder
- Part 3. How to Send Ringtones to iPhone Using OneDrive
- Part 4. How to Send Ringtones from iPhone to iPhone Using AirDrop
- Part 5. How to Send Ringtones to iPhone Using Email
- Bonus Tip. How to Make a Custom Ringtone on iPhone
Part 1. How to Transfer Ringtones from iPhone to iPhone with 1-Click [Fastest]
Wondering how to export a ringtone from iPhone without iTunes and its complex syncing rules? The easiest approach is bypassing Apple's restrictive ecosystem entirely. You can securely transfer ringtones from iPhone to iPhone using professional iPhone transfer tool software, which acts as a bridge for quick data migration. For those who want to ensure everything moves perfectly to their new iOS device, Dr.Fone - Phone Transfer is highly recommended. It handles cross-device transfers effortlessly.
Transfer via Computer (Recommended)
 Move data between iOS to Android and vice versa.
- Transfer contacts, SMS, photos, videos, music, and more types.
- Available with all phones with Android and iOS versions.
- Simple, click-through process.
Step 1 Install and Launch the Application
Begin by downloading and installing the transfer software on your PC or Mac. Once set up, open the application.
Step 2 Access the Phone Transfer Module
From the main interface, navigate through the options and select the Phone Transfer feature to initiate the device-to-device protocol.

Step 3 Connect Both iPhones
Use compatible USB cables to connect your old iPhone and the target iPhone to the computer. The software will detect both devices automatically.

Step 4 Select Ringtones and Transfer
Review the list of transferable data. Choose the custom audio or ringtone files you wish to move, then click the transfer button. Ensure both devices remain connected until the process finalizes.

Transfer Using the Mobile App
If you lack access to a computer, you can utilize the mobile application version with a direct cable connection.
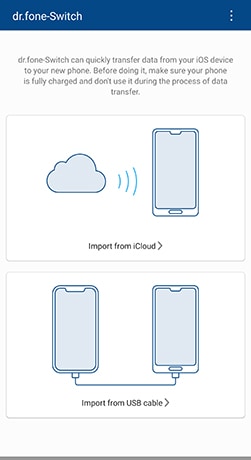
Step 1 Connect Devices Directly
Download the dedicated mobile transfer app on your devices. Connect your source iPhone and the target device utilizing an appropriate OTG or lightning-to-USB-C cable.
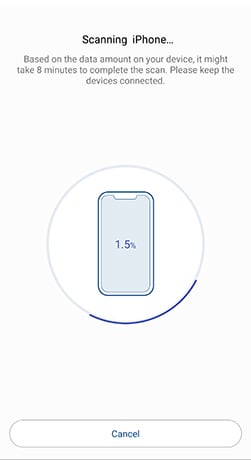
Step 2 Scan Device Storage
Allow the application to perform a deep scan of the synchronized data present on your source device.
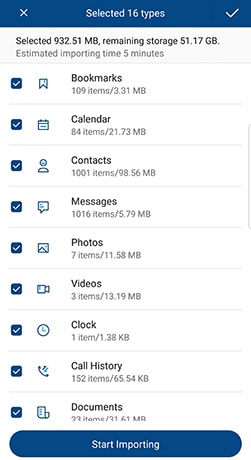
Step 3 Import Your Tones
After the scan concludes, choose the relevant audio files or contacts and tap to start importing them to the new iOS environment.


Part 2. How to Send Ringtones to iPhone (Including iPhone 17) Using iTunes/Finder
For users who prefer Apple's native ecosystem, iTunes or macOS Finder remains a viable method to send ringtones to iPhone. It is important to note that only iTunes versions 12.6 and earlier natively support dedicated ringtone synchronization. Newer updates prioritize Apple Music and require manual file dragging in Finder. Here is how to transfer ringtones from iPhone to iPhone using the traditional sync method:
Step 1 Transfer Purchases to Computer
Install iTunes 12.6 or older and connect your original iPhone. In the top menu, navigate to Files, then select Devices, and choose the Transfer Purchases from iPhone option to back up your custom tones locally.

Step 2 Sync Tones to Target iPhone
Allow the sync to finish, unplug the old phone, and connect your new device. Click the device icon, go to the Tones tab, and check the Sync Tones box. You can opt for All Tones or Selected Items before clicking Apply to finalize the export.

Part 3. How to Send Ringtones to iPhone Using OneDrive
While wired desktop solutions can quickly export ringtones from iPhone, wireless cloud alternatives like OneDrive offer incredible flexibility. Cloud storage enables you to back up your favorite audio files and redownload them onto any device without physical cables.
Step 1 Install the Cloud Service
Download the OneDrive application from the App Store on both your sending and receiving iOS devices. Alternatively, you can visit its official store page right here.
Step 2 Upload the Audio File
Open OneDrive on the iPhone containing the ringtone. Tap the plus (+) icon, select the Upload option, and browse your local files to upload the ringtone directly to your secure cloud drive.

Step 3 Download on the Target Device
Launch OneDrive on your new iPhone and log in using the identical Microsoft account credentials. Locate the uploaded ringtone file, open the options menu, and save it to your local device storage.
Part 4. How to Send Ringtones from iPhone to iPhone Using AirDrop
AirDrop is undeniably the fastest built-in method for local file sharing between Apple products. If you are wondering how to send a ringtone from iPhone to iPhone without third-party tools or internet connectivity, AirDrop utilizes Bluetooth and Wi-Fi Direct for instant transfers.
Step 1 Enable Network Connectivity
Ensure both iOS devices have Wi-Fi and Bluetooth activated. Open the Control Center and toggle AirDrop visibility to Everyone to prevent connection errors.

Step 2 Share the File via AirDrop
Open the Files app on the sending device and locate your target ringtones. Select the audio file, tap the Share icon, and pick AirDrop. Tap the avatar of your receiving device, then accept the incoming file prompt on the target iPhone to finish the transaction.

Part 5. How to Send Ringtones to iPhone Using Email
If you only have one or two audio files, using standard email is a very straightforward way to export ringtones from iPhone. Because ringtone files are generally small (under 1MB), they easily bypass standard email attachment limits, making this a reliable fallback method.
Step 1 Attach the Ringtone
Navigate to the ringtone file on your source device using the Files app. Select the item, tap the Share menu, and select your preferred Mail client (like Apple Mail or Gmail).

Step 2 Send and Download
Input an email address that you can access on the target iPhone in the recipient field. Press the Send icon. On your secondary iOS device, open the corresponding email inbox, locate the message, and download the attached tone.

Bonus Tip. How to Make a Custom Ringtone on iPhone
Standard alert tones can become repetitive. Upgrading to a custom sound ensures your iPhone feels uniquely yours. Rather than relying on generic options, you can design custom alerts utilizing comprehensive solutions like Wondershare Dr.Fone. This integrated toolkit features a robust ringtone creator that lets you seamlessly convert device music and quickly export ringtones from iPhone without dealing with complex audio editing software.
Step 1 Open the Ringtone Maker Tool
Connect your iOS device to the computer and open Dr.Fone. From the suite of features, select the Ringtone Maker tool. In the resulting interface, choose whether you want to import Local Music from your PC or Device Music directly from the connected iPhone.
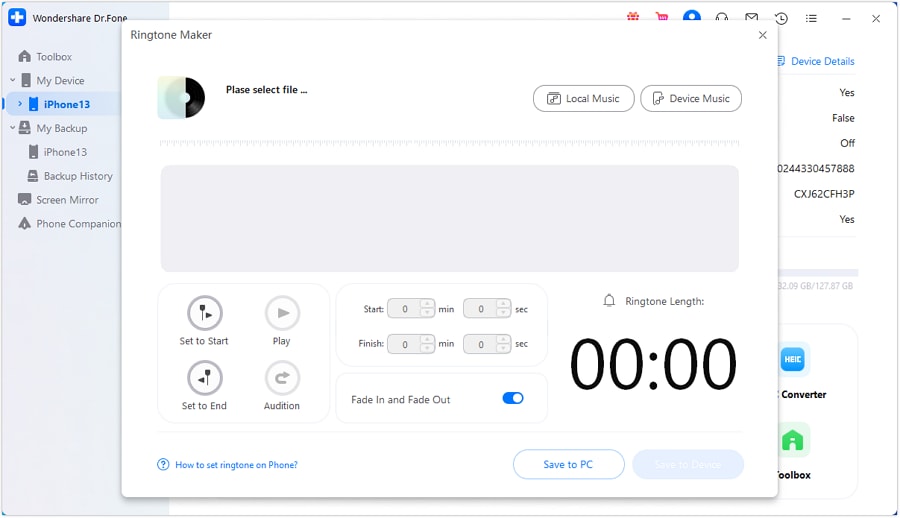
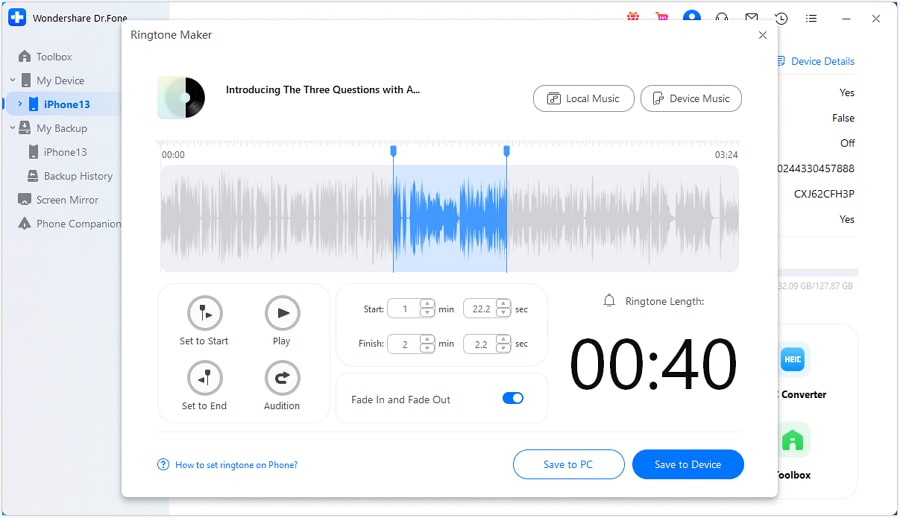
Step 2 Edit and Save the Ringtone
Use the provided timeline to trim the song to your preferred segment (usually 30 seconds for an iOS ringtone). Apply Fade In or Fade Out effects for a professional touch. Once satisfied with the preview, click Save to Device to push the new ringtone straight to your phone's sound library.
Conclusion
Understanding how to send ringtones from iPhone to iPhone is essential for users who value customization. From rapid local sharing via AirDrop to cloud synchronization through OneDrive, there is a method for every scenario. For those looking to bypass size limitations and transfer bulk custom audio safely—especially when migrating to advanced models like the iPhone 17—utilizing a dedicated solution like Dr.Fone - Phone Transfer ensures your digital assets remain organized and instantly accessible on the new device.
FAQ
1. Where exactly are custom iPhone ringtones stored in iOS?
Custom ringtones imported into an iPhone are natively housed within the internal storage system. You can access and manage these active files by navigating to the Settings app, then selecting Sounds & Haptics, and tapping on Ringtone. If synced via legacy desktop software, the source files are concurrently backed up in the iTunes Media folder on your hard drive.2. What is the most efficient method for transferring a massive collection of ringtones?
If you need to export ringtones from iPhone in large batches, manual methods like AirDrop or Email become highly inefficient. Utilizing professional desktop management software like Wondershare Dr.Fone is the best choice for bulk transfers, allowing one-click migration of hundreds of tones. Alternatively, packing them into a folder and syncing via cloud services like Google Drive or OneDrive offers great wireless scalability.3. Are there any critical prerequisites before initiating a ringtone transfer?
Yes. First, guarantee that the audio file is correctly formatted (iOS requires the .m4r extension for ringtones). Second, always execute a full device backup prior to third-party data migration to prevent accidental data loss. Lastly, ensure sufficient internal storage on the receiving device to accommodate the incoming media.4. How should I troubleshoot a failed ringtone export?
When a transfer fails, start by verifying your network connections (if using AirDrop, Wi-Fi, or Email) and ensuring Bluetooth is unrestricted. If utilizing cable transfers, inspect the physical USB connection and update your iOS device drivers on the computer. For persistent issues, double-check that the file isn't corrupted and falls under Apple's 30-second ringtone duration limit.
 Add Wondershare Dr.Fone as a preferred source on Google