Different Ways on How To Transfer Music From iPhone to Computer
Oct 24, 2025 • Filed to: Device Data Management • Proven solutions
Dr.Fone Basic:
Better Control for Your Phone
Manage, transfer, back up, restore, and mirror your device
Are you looking for ways to move your favorite music from your iPhone to your computer? We have the solutions for you. Due to the differing operating systems, many find it challenging to transfer music from iPhone to computer.
But fret not; in this article, we will learn how to transfer music from iPhone to computer. Different situations call for different methods, and we'll help you find the one that fits you best. Just keep reading, and soon, your favorite music will be happily playing on your computer!
- Part 1. Can I Use iTunes To Transfer Music From iPhone to Computer?
- Part 2. iTunes Alternative: How To Send Music From iPhone to Computer by Email
- Part 3. How to Transfer Music from iPhone to Computer Using Cloud Services (Dropbox or Google Drive)

- Part 4. Easy Software To Transfer Music From iPhone to Computer
- Conclusion
Part 1. Can I Use iTunes To Transfer Music From iPhone to Computer?
Yes, you can. Many people usually use iTunes to transfer music from iPhone to computer. The process involves syncing your iTunes library. But keep in mind that you'll need an Apple Music subscription or songs purchased on iTunes to make sure the process works properly.
If you want to know how to copy music from iPhone to computer, follow these steps:
Step 1. Make a connection between your iPhone and computer with a USB cable. If it's the first time connecting, just hit "Trust" on your iPhone.
Step 2. Open iTunes for Windows on your computer and click the Device button at the top left. Then, head to the Music tab and turn on the Sync Music option.
Step 3. Choose between syncing the "entire music library" or "selected playlists, artists, albums, and genres" to the computer.
Step 4. Click the "Apply" button to start moving your music from iPhone to the computer with iTunes.

Part 2. iTunes Alternative: How To Send Music From iPhone to Computer by Email
If you're not using iTunes and want another way to move music from your iPhone to your computer, here's a simple trick: just send it via email. Email is something we all use on both iPhones and computers, so it's a great way to share files, including music.
Just remember, this trick works best for music you've recorded yourself or downloaded from the internet. Unfortunately, it won't help if your tunes are from streaming services like iTunes or Apple Music.
Let’s find out how to send music from iPhone to computer by email:
Step 1: Open the Email app on your iPhone
Start by opening your email on your iPhone. It could be the default Mail app or any other third-party email app you prefer, such as Gmail or Outlook.
Step 2: Compose a new email
Create a new email by tapping "Compose" or "New Email" button. This will open a blank email where you can enter the recipient's email address.
Step 3: Attach the song files to your email.
It’s better to make sure the file format is compatible with your computer, such as MP3. It will allow for seamless playback and easy access to your music once they are downloaded on your computer.
Step 4: Enter your email address
In the "To" field, enter your own email address. This may seem counterintuitive, but you are essentially sending the email to yourself to transfer the music files. Then, start sending the email with your songs attached.
Step 5: Access your email on your computer.
Now, open your email on your computer. Locate the email you sent, and download the attached music files to your computer. Most email services allow you to download attachments directly.
Once the files are downloaded, you can move them to your preferred location on your computer, such as the Music folder.

Part 3. How to Transfer Music from iPhone to Computer Using Cloud Services (Dropbox or Google Drive)
Other than using iTunes and Email, you can also use cloud storage services (for example: Dropbox or Google Drive) to transfer music from iPhone to computer. It allows you to transfer data between devices connected to the same account.
The steps on how to move music from iPhone to computer using Google Drive or Dropbox are generally similar. Yet, Google Drive gives you 15 gigabytes of free storage, while Dropbox provides a more modest 2 gigabytes. Feel free to choose the service that best suits your preferences, familiarity, and meets your storage requirements.
Follow these steps on how to transfer songs from iPhone to computer using Cloud Services:
Step 1: Download and install the Cloud Services.
Start the process by visiting the official Cloud Services (in this case, Dropbox or Google Drive) or app store on your PC and iOS device. Then, download and install the Cloud Services application on both devices to ensure compatibility.
Step 2: Sign in to the cloud services on both devices.
Signing in using the same Cloud Services account across all your devices is essential for seamless communication between your PC and iPhone.
Step 3: Open the cloud services on your iPhone to upload the songs you want to transfer.
Open the Cloud Services app on your iPhone, then choose the specific songs you wish to transfer by uploading them.
Step 4: Wait until it finishes uploading, then open the Cloud Services on your computer.
Once the upload is complete, access the Cloud Services on your computer. Find the uploaded music files within your account, then download them.

Part 4. Easy Software To Transfer Music From iPhone to Computer
When seeking a seamless method for transferring music from your iPhone to a computer, opting for reliable and trusted software like Dr.Fone proves to be an efficient choice. With its user-friendly interface, Dr.Fone simplifies the process, ensuring a quick and hassle-free experience.
Some of the Dr. Fone's key features include:
- Easily export various data like Photos, Contacts, Messages, Voicemail, and more.
- Securely transfer and back up data with encryption.
- Compatible with iOS, Android, Mac, and Windows.
- Regular updates for an enhanced user experience.

Dr.Fone Basic
Backup & Restore iOS Data Turns Flexible.
- One-click to back up the whole iOS device to your computer.
- Preview and selectively restore files to any device with simplicity.
- Export what you want from the backup to your computer.
- Your device's data remains intact during the restore process.
- Supports iPhone, iPad, iPod touch, and the latest iOS version.
So, here is a quick tutorial on how to export music from iPhone to computer using Dr.Fone:
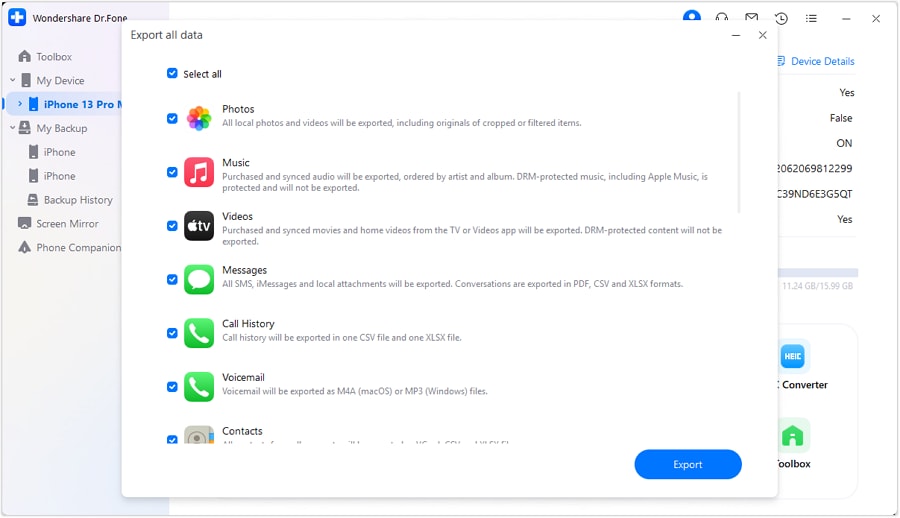
Step 1: Open Dr. Fone's Export All Data feature.
Start the program and make connections between your iPhone and computer with a USB cable. From the device menu, select "Export all data."

Step 2: Select Music as the file type to export
Next, select “Music” as the file type you wish to transfer and click "Export" to start the process. Then, choose where you want to save the exported music files on your computer.

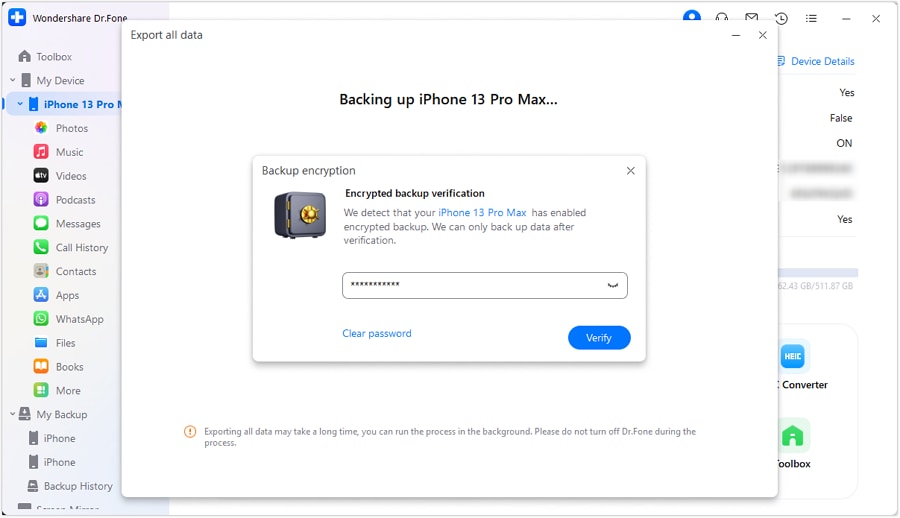
Step 3: Create a password.
After that, you'll be prompted to create an encrypted password. Type in your password, verify it, and click "Done" to continue the process.

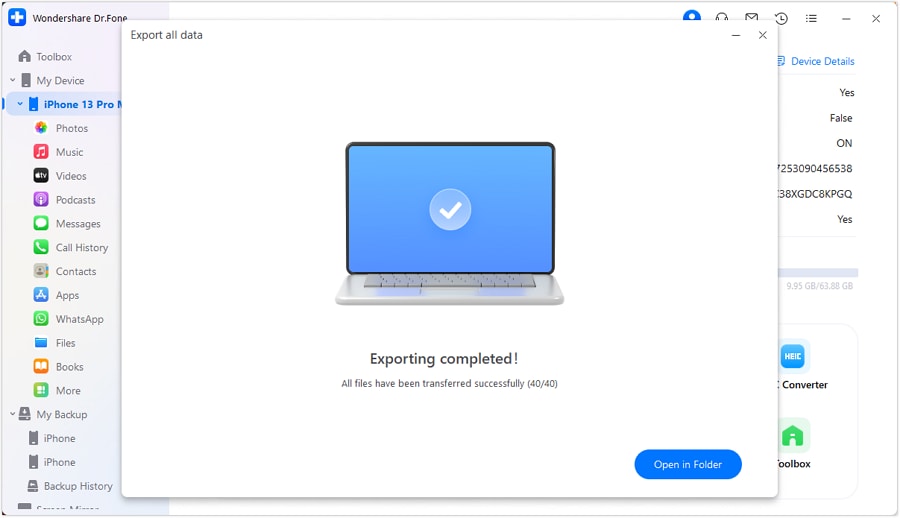
Step 4: Watch the progress
Now, your iPhone should be in the process of exporting its data to the computer using Dr.Fone. Feel free to observe and keep an eye on the progress directly on the screen.

Step 5: Successfully transfer music to Mac
Once the data export process is successful, click "Open" to see the exported music in the specified folder on your computer.

Conclusion
After going through this article, you now know that you can easily transfer or copy music from iPhone to computer. The process of transferring music from your iPhone to your computer is a straightforward and valuable skill to have, especially when you want to create backups, free up storage space on your device, or simply enjoy your music library on a larger screen. It is essential to adopt a reliable tool like Dr.Fone Basic to manage your data.
It doesn't matter if you choose to use iTunes, third-party software, or cloud services, the key is to find a method that suits your preferences and technical comfort.
Dr.Fone Basic:
Better Control for Your Phone
Manage, transfer, back up, restore, and mirror your device
iPhone Music
- Download Music to iOS
- 1. Download Music to iPhone
- 2. Download Songs on iPhone/iPad/iPod
- 3. Download Free Music on iPhone
- 4. Download on iPhone without iTunes
- Make iPhone Ringtones
- 1. Set Voice Memo a Ringtone on iPhone
- 2. Ringtone Apps to Download Ringtones
- 3. Add Custom Ringtones to iPhone
- 4. iPhone Ringtone Apps
- 5. Ringtone Maker Apps for iPhone
- 6. Change iPhone Alarm Volume
- 7. Set A Ringtone on iPhone
- 8. Set MP3 As Ringtone iPhone
- 9. Set Ringtone iPhone
- 10. Make Custom Text Tones for iPhone
- 11. Websites for Free iPhone Ringtones
- 12. Move Ringtone from iPhone to Android
- 13. Popular iPhone Ringtone Remix
- Transfer Audio Media to iPhone
- 1. Send Ringtone from iPhone to iPhone
- 2. Transfer MP3 to iPhone
- 3. Transfer Audiobook from PC to iPhone
- 4. Transfer Songs from CD to iPhone
- 5. Put Ringtones on iPhone
- Transfer Music from iPhone
- 1. Transfer Music from iPhone to computer
- 2. Transfer Music from iPhone to iCloud
- 3. Transfer Music from iPhone to Android
- 4. Transfer Music from iPhone to iPod
- 5. Put Music on iPhone from Computer
- 6. Add Music to iPhone from Computer
- 7. Sync Apple Music Library
- Transfer Music from iTunes
- 1. Transfer Music from iTunes to iPhone
- 2. Transfer Music from Mac to iPhone
- 3. Transfer Music from Laptop to iPhone
- Transfer Music to iPhone
- 1. Transfer Music from Computer to iPhone
- 2. Transfer Music from Mac to iPhone
- 3. Transfer Music from Mac to iPhone
- 4. Music from PC to iPhone
- 5. Music from PC to iPhone without iTunes
- 6. Transfer Music from Android to iPhone
- 7. Transfer Music from iPad to iPhone
- 8. Transfer Music from iPod/iPhone
- 9. Transfer Music from iPhone to iPhone
- 10. Transfer Music from External Hard Drive
- 11. Transfer to iPhone without iTunes
- 12. Transfer Music to Jailbroken iPhone
- 13. Transfer Music to iPhone
- Transfer Music to iTunes/PC
- 1. Transfer Music from iPhone to iTunes
- 2. Transfer Music from iPhone to PC
- 3. Transfer Music from iPhone to Mac
- 4. Transfer Music between PC and iPhone
- 5. Transfer Music from to PC without iTunes
- iPhone Music Problems
- 1. Song Missing After iOS Update
- 2. Music Won't Play on iPhone
- 3. iPhone Plays Music by Itself
- 4. Apple Music Song Is Not Available
- 5.Fix Apple Music Library Not Syncing
- iPhone Music Tips
- ● Manage/transfer/recover data
- ● Unlock screen/activate/FRP lock
- ● Fix most iOS and Android issues
- Transfer Now Transfer Now Transfer Now


Daisy Raines
staff Editor