100% Security Verified | No Subscription Required | No Malware

 :
: 
 ChatGPT
 Perplexity
 Gemini
 Claude
 Grok
Grok
Music is a vital part of our daily lives, transforming commutes, workouts, and quiet moments. Building a personal music library on your iPhone allows you to carry your favorite tracks everywhere. However, getting those songs from your computer onto your device can sometimes be confusing, especially for new iPhone users or those who find iTunes complicated.
Many users ask how to transfer music from computer to iPhone, whether it's a new iPhone 15 or an older model. This guide provides clear, step-by-step instructions for transferring your music library using two distinct methods: the traditional iTunes way and a more flexible approach without it. You can choose the method that best suits your needs.
In this article
Part 1. How to Transfer Music from Computer to iPhone Using iTunes
For most iOS users, iTunes is the official and most well-known tool for managing media. Developed by Apple, it allows you to organize and sync your music library with your iPhone. While effective, the process can feel a bit rigid. If your music is already organized in your iTunes library, you can simply sync it. If not, you'll need to add the files to iTunes first. Here’s a detailed breakdown of how to transfer songs from your PC to your iPhone with iTunes.

-
Step 1 Connect Your iPhone and Launch iTunes
First, ensure you have the latest version of iTunes installed on your computer. Launch the application and connect your iPhone to the computer using a USB cable. Wait for iTunes to recognize your device.
-
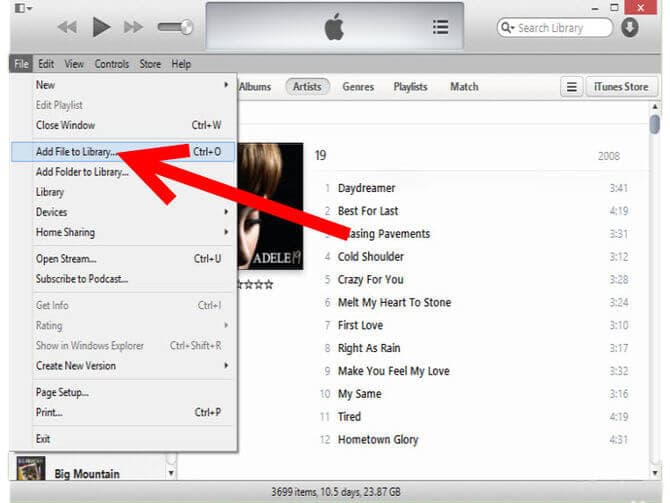
Step 2 Add Music Files to Your iTunes Library
If your music isn't already in iTunes, you need to add it. Go to the menu bar, click on File, and select either Add File to Library to add individual songs or Add Folder to Library to import an entire folder of music. Navigate to your music files on your computer and select them to add them to your library.
-
Step 3 Configure Music Sync Settings
Once your iPhone is recognized, a small device icon will appear near the top-left corner of the iTunes window. Click on it. In the left-hand sidebar under Settings, click on the Music tab.
-
Step 4 Sync Music to Your iPhone
Check the box next to Sync Music. You can then choose to sync your Entire music library or select specific playlists, artists, albums, and genres. After making your selection, click the Apply button at the bottom right of the screen. iTunes will begin transferring the selected music to your iPhone.

Part 2. How to Transfer Music from PC to iPhone Without iTunes
If you find the iTunes syncing process restrictive or are concerned about accidentally deleting your existing music, a third-party tool offers a more flexible solution. Dr.Fone - Phone Manager (iOS) is a powerful alternative that simplifies the transfer process, allowing you to move music and other media files to your iPhone without data loss. This tool offers a drag-and-drop interface and doesn't require a full library sync, giving you complete control over your music. It's an excellent iPhone manager compatible with all iOS versions. Follow these steps to learn how to transfer music from a computer to an iPhone effortlessly.
 Effortlessly manage data through preview, delete, export, etc.
- Transfer all data between devices.
- Robust backup solutions for reliable data protection.
- Mirror screens to PC for meetings, teaching, and control.

-
Step 1 Launch Dr.Fone and Connect Your iPhone
Download and install Wondershare Dr.Fone on your PC. Open the application and select Phone Manager from the main dashboard.

-
Step 2 Let the Software Detect Your Device
Connect your iPhone to your computer with a USB cable. Dr.Fone will automatically detect your device and display its information on the screen. If prompted on your iPhone, tap “Trust” to allow the connection.

-
Step 3 Navigate to the Music Tab
Once your device is connected, click on the Music tab at the top of the interface. This will display all the audio files currently on your iPhone, sorted into categories like Music, Ringtones, and Podcasts on the left panel.

-
Step 4 Import Music from Your Computer
To add music from your computer, click the Add icon (a plus sign) in the toolbar. You will get two options: Add File or Add Folder. Choose 'Add File' to select specific songs or 'Add Folder' to import an entire music folder at once.
-
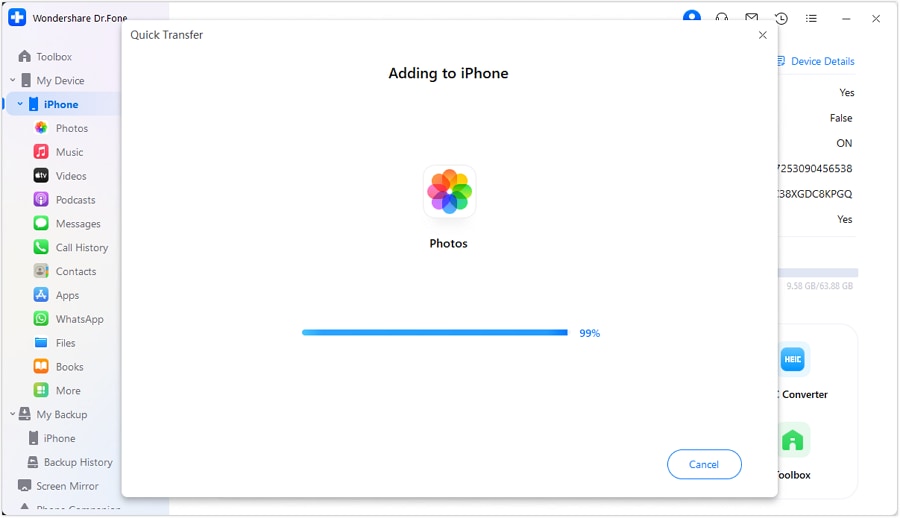
Step 5 Select and Transfer Your Music
A file browser window will open. Navigate to the location of your music files or folder on your computer, select what you want to transfer, and click Open. Dr.Fone will immediately begin transferring the music to your iPhone without affecting your existing library. Once finished, you can find the new songs in the Music app on your iPhone.
Conclusion
Now you know how to transfer music from your computer to your iPhone, both with and without iTunes. The method you choose depends on your needs. iTunes is Apple's standard solution, but its all-or-nothing sync approach can be risky if you want to preserve your iPhone's current music library. For a safer, more flexible, and user-friendly experience, Dr.Fone - Phone Manager stands out as the superior choice. It gives you precise control over your files, ensures no data is lost, and simplifies the entire management of your iPhone's media.
FAQ
-
1. Can I transfer music from my computer to my iPhone for free?
Yes, using iTunes to transfer music is completely free. However, it comes with the limitation of syncing, which can erase existing music on your iPhone. Third-party tools like Dr.Fone often offer a free trial to test their features before purchasing. -
2. Will transferring music with iTunes delete my existing songs?
Yes, it is highly likely. The iTunes sync process is designed to make your iPhone's music library an exact copy of your iTunes library. If you sync with a new or different library, any music on your iPhone that is not in that library will be deleted and replaced. -
3. What audio formats can I transfer to my iPhone?
The iPhone natively supports formats like MP3, AAC, WAV, AIFF, and Apple Lossless. If you have music in other formats like FLAC or WMA, you will need a tool like Dr.Fone, which can often convert incompatible formats automatically during the transfer process. -
4. Why isn't my music transferring to my iPhone?
Several issues could be the cause. Common problems include using an outdated version of iTunes, a faulty USB cable or port, not having enough storage space on your iPhone, or trying to transfer an unsupported audio file format. Ensure everything is up-to-date and your connections are secure.
 Add Wondershare Dr.Fone as a preferred source on Google