3 Ways to Backup Notes on iPhone and iPad
iPhone Backup
- iPhone Data Backup
- 1. Back up iPhone in Recovery Mode
- 2. Back Up iPhone With/Without iTunes
- 3. Back up iPhone to Mac
- 4. Back up iPhone/iPad to Computer
- 5. Back up iPhone to Mac Catalina
- 6. Back up Jailbreak Apps And Restore
- 7. iPhone Backup Software
- 8. Back up iPhone/iPad Easily
- 9. Back up iPhone/iPad in DFU Mode
- 10. Back up iPhone Apps and App Data
- 11. Back up Notes on iPhone and iPad
- 12. Back up iOS to External Hard Drive
- 13. Export Notes from iPhone to PC/Mac
- 14.Back up iPhone Photos to Google Photos
- 15. Back Up Your iPhone Voicemails
- 16. Back Up to External Drive
- 17.How to Back Up to NAS
- 18.Back Up iPhone With Broken Screen
- 19.Back Up iPhone to Google Drive
- 20.Buy Used iPhones
- 21.Sell Used Phone for Cash
- 22.Sell Used iPhone for Dollar
- 23.How Much is My iPhone Worth
- iPhone Data Recovery
- 1. Recover iPhone Data Without Backup
- 2. Restore Calendar on iPhone
- 3. Recover Call History on iPhone
- 4. Recover iPhone Lost Data
- 5. Restore iPhone in Recovery Mode
- 6. Undelete iPhone Backup Files
- 7. Recover Deleted iPhone Messages
- iPhone Data Restore
- 1. Restore iPhone from iTunes Backup
- 2. Restore iPhone after Downgrade
- 3. Restore iPhone from Backup
- 4. Restore iPhone from iPad Backup
- 5. Restore iPhone from DFU Mode
- 6. Restore iPhone Deleted Text Message
- iPhone Backup Problems
- 1. Find iPhone Backup Location on Mac
- 2. iPhone Backup Password Never Set
- 3. iPhone Backup Password Forget
- 4. iCloud Backup Taking Forever
- 5. iPhone Won't Backup to iCloud
- 6. iTunes Won't Backup iPhone
- iPhone Restore Problems
- 1. iTunes Stuck on Verifying iPhone
- 2. Not Space to Restore iPhone Backup
- 3. iTunes Backup Not Restoring
- 4. iPhone Won't Restore
- WhatsApp Backup & Restore
- 1. WhatsApp from Google Drive to iOS
- 2. Restore Old WhatsApp Backup
- 3. Restore WhatsApp Chat on iPhone
- 4. Retrieve WhatsApp Chat History
- 5. See Deleted Messages on WhatsApp
- 6. Restore WhatsApp Stuck on iPhone
- 7. iPhone WhatsApp to Google Drive
- 8. Back Up WhatsApp on iPhone
- 9. Backup WhatsApp Data before Changing Number
- iPhone Backup Tips
- 1. Extract Data From iPhone
- 2. Encrypt iPhone Backup
- 3. Reset iPhone Backup Password
- 4. Extract iPhone Backup in Win 10
- 5. How Long take iPhone to Backup
- 6. Find iPhone Backup Location
- 7. iPhone Backup Password
- 8. View iPhone Backup on Computer
- 9. iPhone Backup with iTunes/iCloud
- 10.Check Last Backup on iPhone
- 11.How To Encrypt iPhone Backup
- 12. Best Backup Chargers for iPhone
- 13. Speed Up Your iPhone Backups
- 14. Save Data When iPhone Disabled
- ● Manage/transfer/recover data
- ● Unlock screen/activate/FRP lock
- ● Fix most iOS and Android issues
- Back up Now Back up Now Back up Now
Oct 24, 2025 • Filed to: Backup & Restore Solutions • Proven solutions
Dr.Fone Basic:
Better Control for Your Phone
Manage, transfer, back up, restore, and mirror your device
The Notes app is one of the most used apps on iPhones and iPads - it would be a real shame if you happen to lose them, whether if it is because you misplaced your device or accidentally deleted the notes. It is highly recommended that you routinely export notes on iPhone and iPad into a different storage space.
In this article, we show your 3 ways backup notes on iPhone and iPad. It is really simple and easy to do.
- Part 1: How To Selectively Backup iPhone/iPad Notes To PC or Mac
- Part 2: How To Backup Notes On iPhone and iPad Via iCloud
- Part 3: How To Backup Notes On iPhone and iPad To Google
Part 1: How To Selectively Backup iPhone/iPad Notes To PC or Mac
iPhone and iPad users that use PCs would understand the struggle in backing up anything on their PC computer. With the help of the Wondershare Dr.Fone - Phone Backup (iOS), you will be able to directly scan and backup Notes on iPhone and iPad in a readable HTML file. You can also do this backup for iPhone messages, contacts, photos, Facebook messages and many other data.

Dr.Fone - Phone Backup (iOS)
Backup Notes on iPhone and iPad Turns Flexible.
- One click to backup the whole iOS device to your computer.
- Allow to preview and restore any item from the backup to a device.
- Export what you want from the backup to your computer.
- No data loss on devices during the restore.
- Selectively backup and restore any data you want.
- Supports iPhone 15 and former and the latest iOS 17 fully!

- Fully compatible with Windows 10 or Mac 14.
Steps to backup notes on iPhone and iPad with Dr.Fone
To help you start backing up your device, we have laid out the steps that you need to do to export your data.
Step 1. Connect iPhone or iPad to Computer
Connect your device and launch Wondershare Dr.Fone. Click on the option of “Phone Backup” from Dr.Fone interface.
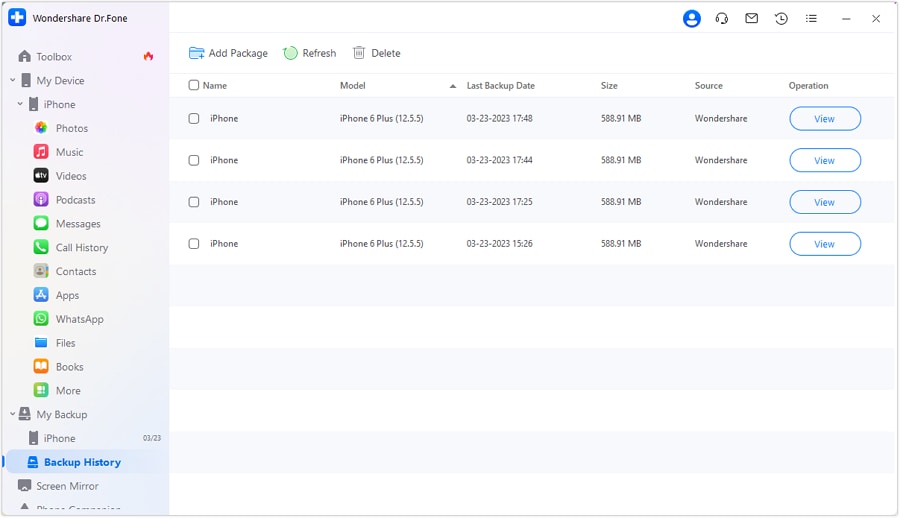
Notes: If you have used the software to backup your phone previously, click "To view the previous backup files >>" to find your previous backup files.

Step 2. Select File Types to Backup
The software will scan and detect the types of files you have on your device. Select the ones you want to backup and click" Backup" to start the process.

Depending on the amount of data you have on your iPhone or iPad, this will take several minutes. You will be able to see a list of data that you can backup and export such as Photos & Videos, Messages & Call Logs, Contacts, Memos etc.

Step 3. Print or Export Backup File
After selecting the specific files that you want, click "Export to PC" to save the files onto your computer. Once you have clicked this button, you can either click "Only Export This File Type" or "Export All The Selected File Types". You can then determine the destination folder of the exported files. If you'd like print these backup data directly, you can just click the "Printer" button on the top right of the window to get it done!

Note: It is very convenient to preview and selectively backup notes on iPhone and iPad with Dr.Fone. If you choose iTunes or iCloud, you are not allowed to preview and selectively backup iPhone notes. So, it maybe a good choice for you to free download Dr.Fone to get your your problem through!
Part 2: How To Backup Notes On iPhone and iPad Via iCloud
What if you want to backup notes on iPad, but do not have you USB cable with you? Well, you can easily do this by using iCloud. Make sure that your device has enough battery when you want to export Notes on iPhone and iPad into the iCloud server. It is also recommended that you use a WiFi network and make sure that there is enough storage.
Note: You will need to enable iCloud to sync with Notes in order for this to work.
Steps to backup notes on iPhone and iPad via iCloud
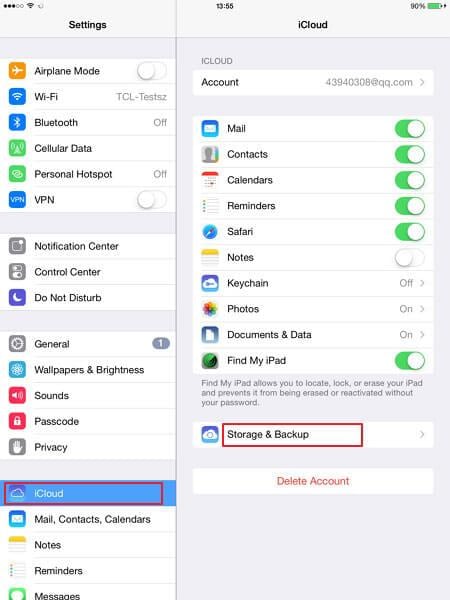
1. On your iPhone or iPad go to "Settings > iCloud".
2. Tap on "Storage & Backup > Backup Now" to start backing up Notes from your iPhone or iPhone.

Note: iCloud only gives 5GB free storage - if during the backup process you exceed the storage space, you will need to purchase extra storage space. Or you can try to fix not enough space on iPhone to restore backup in another method.
Part 3: How To Backup Notes On iPhone and iPad To Google
By using Google Sync, you are able to sync your iPhone with Google emails, calendars and contacts. What you may not know is that you can actually also sync your iPhone Notes with your Gmail account. Of course, you can only use this if your devices are using iOS 4 and later versions of the operating system.
Steps to backup notes on iPhone and iPad to Google
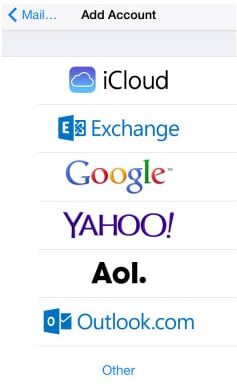
1. On your device, go to "Settings > Mail, Contacts, Calendars > Add Account" and select "Google".
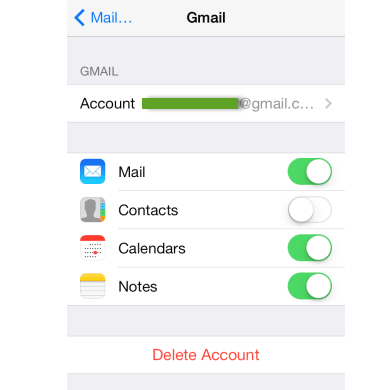
2. Complete the details that is required e.g. name, full email address, password and description. Turn on sync for "Notes".


Your notes will be transferred to your Gmail account under the label called "Notes". However, do note that it is a one-way sync. This simply means that you can only edit the notes from your iPhone or iPad. You cannot transfer notes edited on your Gmail account back into your iPhone or iPad.
You can also customize to enable Notes to sync to multiple Gmail accounts. You can do this with other accounts too. You can setup the settings under "Accounts" in the "Notes" app where you can select to sync all notes to a particular account or different group of notes to a particular account.
Backing up your iPhone and iPad is so much easier these days - all you need to do is find and use the best and most convenient method for you. These three methods are probably the easiest and convenient ways to backup notes on iPhone and iPad. Hopefully this article has helped you narrow down which method will work for you.
Dr.Fone Basic:
Better Control for Your Phone
Manage, transfer, back up, restore, and mirror your device


Alice MJ
staff Editor