How to Find iPhone Backup Location and Delete Backups
iPhone Backup
- iPhone Data Backup
- 1. Back up iPhone in Recovery Mode
- 2. Back Up iPhone With/Without iTunes
- 3. Back up iPhone to Mac
- 4. Back up iPhone/iPad to Computer
- 5. Back up iPhone to Mac Catalina
- 6. Back up Jailbreak Apps And Restore
- 7. iPhone Backup Software
- 8. Back up iPhone/iPad Easily
- 9. Back up iPhone/iPad in DFU Mode
- 10. Back up iPhone Apps and App Data
- 11. Back up Notes on iPhone and iPad
- 12. Back up iOS to External Hard Drive
- 13. Export Notes from iPhone to PC/Mac
- 14.Back up iPhone Photos to Google Photos
- 15. Back Up Your iPhone Voicemails
- 16. Back Up to External Drive
- 17.How to Back Up to NAS
- 18.Back Up iPhone With Broken Screen
- 19.Back Up iPhone to Google Drive
- 20.Buy Used iPhones
- 21.Sell Used Phone for Cash
- 22.Sell Used iPhone for Dollar
- 23.How Much is My iPhone Worth
- iPhone Data Recovery
- 1. Recover iPhone Data Without Backup
- 2. Restore Calendar on iPhone
- 3. Recover Call History on iPhone
- 4. Recover iPhone Lost Data
- 5. Restore iPhone in Recovery Mode
- 6. Undelete iPhone Backup Files
- 7. Recover Deleted iPhone Messages
- iPhone Data Restore
- 1. Restore iPhone from iTunes Backup
- 2. Restore iPhone after Downgrade
- 3. Restore iPhone from Backup
- 4. Restore iPhone from iPad Backup
- 5. Restore iPhone from DFU Mode
- 6. Restore iPhone Deleted Text Message
- iPhone Backup Problems
- 1. Find iPhone Backup Location on Mac
- 2. iPhone Backup Password Never Set
- 3. iPhone Backup Password Forget
- 4. iCloud Backup Taking Forever
- 5. iPhone Won't Backup to iCloud
- 6. iTunes Won't Backup iPhone
- iPhone Restore Problems
- 1. iTunes Stuck on Verifying iPhone
- 2. Not Space to Restore iPhone Backup
- 3. iTunes Backup Not Restoring
- 4. iPhone Won't Restore
- WhatsApp Backup & Restore
- 1. WhatsApp from Google Drive to iOS
- 2. Restore Old WhatsApp Backup
- 3. Restore WhatsApp Chat on iPhone
- 4. Retrieve WhatsApp Chat History
- 5. See Deleted Messages on WhatsApp
- 6. Restore WhatsApp Stuck on iPhone
- 7. iPhone WhatsApp to Google Drive
- 8. Back Up WhatsApp on iPhone
- 9. Backup WhatsApp Data before Changing Number
- iPhone Backup Tips
- 1. Extract Data From iPhone
- 2. Encrypt iPhone Backup
- 3. Reset iPhone Backup Password
- 4. Extract iPhone Backup in Win 10
- 5. How Long take iPhone to Backup
- 6. Find iPhone Backup Location
- 7. iPhone Backup Password
- 8. View iPhone Backup on Computer
- 9. iPhone Backup with iTunes/iCloud
- 10.Check Last Backup on iPhone
- 11.How To Encrypt iPhone Backup
- 12. Best Backup Chargers for iPhone
- 13. Speed Up Your iPhone Backups
- 14. Save Data When iPhone Disabled
- ● Manage/transfer/recover data
- ● Unlock screen/activate/FRP lock
- ● Fix most iOS and Android issues
- Back up Now Back up Now Back up Now
Oct 24, 2025 • Filed to: Backup & Restore Solutions • Proven solutions
Dr.Fone Basic:
Better Control for Your Phone
Manage, transfer, back up, restore, and mirror your device
- Part 1. How to find iPhone Backup Location on Windows and Mac
- Part 2. How to View iTunes Backup for FREE and Restore it to iPhone Without Wiping iPhone Data
- Part 3. How to Change iPhone Backup Location
- Part 4. Why Want to Delete iPhone Backup from the Location
- Part 5. How to Delete Backups of iPhone
Part 1. How to find iPhone Backup Location on Windows and Mac
iTunes backups are stored locally on your computer. They are placed in username/Library/Application Support/Mobilesync/Backup (Check the different locations for backup in different OS in the table). Simply navigate to the relevant folder in your Finder app.
Each folder under Backup contains a single backup. The folders can be copied and moved anywhere on the computer, unfortunately without the proper software, it is impossible to glean any meaningful information from these files.
1. iTunes Backup Locations for Different Operating Systems
1. iTunes backup location on Mac OS:
~/Library/Application Support/MobileSync/Backup/
(The "~" represents the Home folder. If you don't see Library in your Home folder, hold Option and click the Go menu.
2. iTunes backup location on Windows 8/7/Vista:
Users(username)/AppData/Roaming/Apple Computer/MobileSyncBackup
(To access to AppData folder quickly, just click Start, type AppData in the search bar and press Return.)
3. iTunes backup location on Windows 10:
C:\Users\USER\AppData\Roaming\Apple Computer\MobileSync\Backup

Note:iTunes doesn't allow you to view iPhone Backup Files on Mac and Windows because of the data format.
2. iCloud Backup Location on Windows and Mac
On your iPhone, select settings > iCloud, then tap Storage & Backup.
In Mac, go to Apple menu > System Preferences, click iCloud, then click Manage.
In your Windows computer: Windows 8.1: Go to the Start screen and click the down arrow in the lower-left corner. Click the iCloud app, then click Manage.
Windows 8: Go to the Start screen and click the iCloud tile, then click Manage.
Windows 7: Choose Start menu > All Programs > iCloud > iCloud, then click Manage.
So, with the above introduction, we believe it will be easy and clear to find iPhone backup location on Windows and Mac. But you can't read your iTunes and iCloud backup files. To solve this problem, Dr.Fone - Data Recovery (iOS) can perfectly help you to view your iTunes and iCloud backup files for free.
Part 2. How to View iTunes Backup for FREE and Restore it to iPhone Without Wiping iPhone Data
When you find your iTunes backup files on your computer, you will find you can't open it. This is because the iTunes backup is an SQLite file. If you want to view your iTunes backup for free or selectively restore iTunes backup to your device, then you can try Dr.Fone - Data Recovery (iOS). This program allows you to view and selectively restore iTunes backup to your iPhone and iPad. What's more, the restore process won't overwrite your original iPhone data.

Dr.Fone - Data Recovery (iOS)
World's 1st iTunes backup viewer and extractor.
- View iTunes backup for FREE!
- Selectively restore what you want from iTunes backup without overwriting the original data.
- Support ALL models of iPhone, iPad, and iPod touch.
- Fully compatible with the latest iOS.

2.1 How to view iTunes backup (iPhone backup) for free
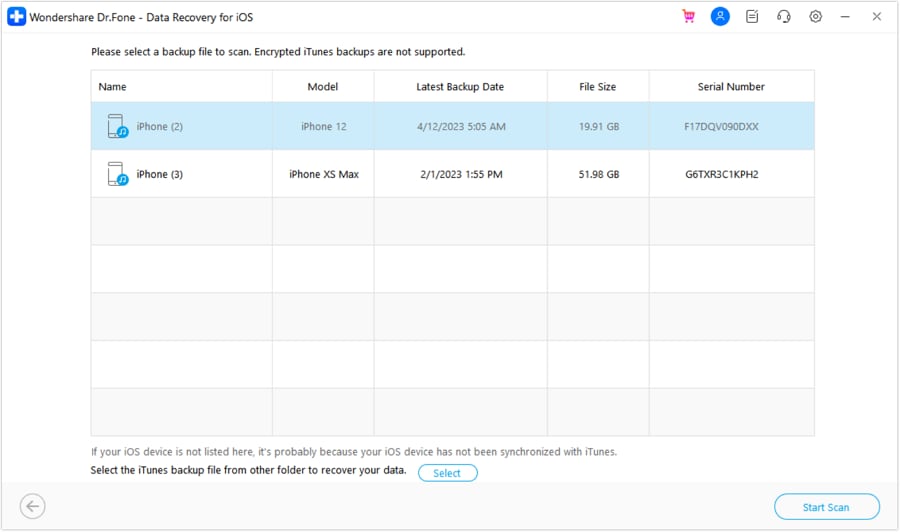
Step 1. Run Dr.Fone, connect your iPhone to the computer, then select "Recover from iTunes backup File". Dr.Fone will detect your iTunes backup files and list them on the below window.

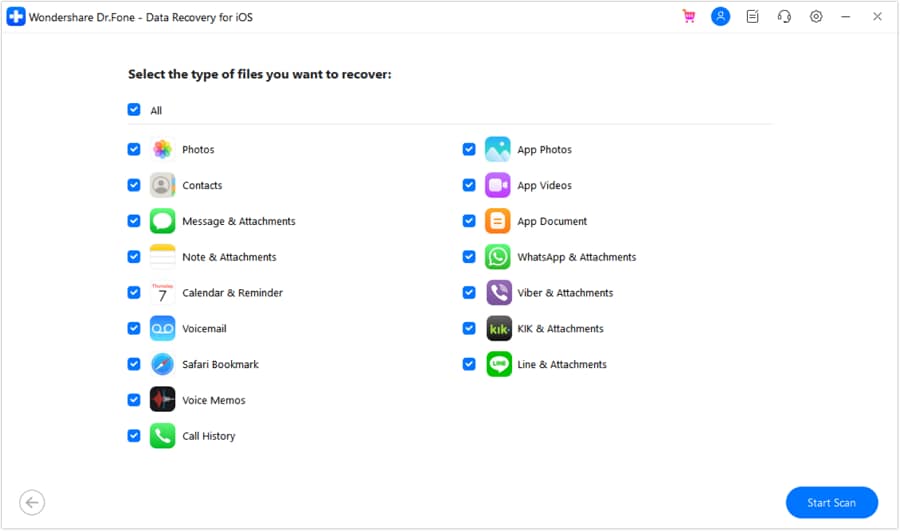
Step 2. Just choose one iTunes backup file you want to restore, and click "Start Scan" to extract your iTunes backup.
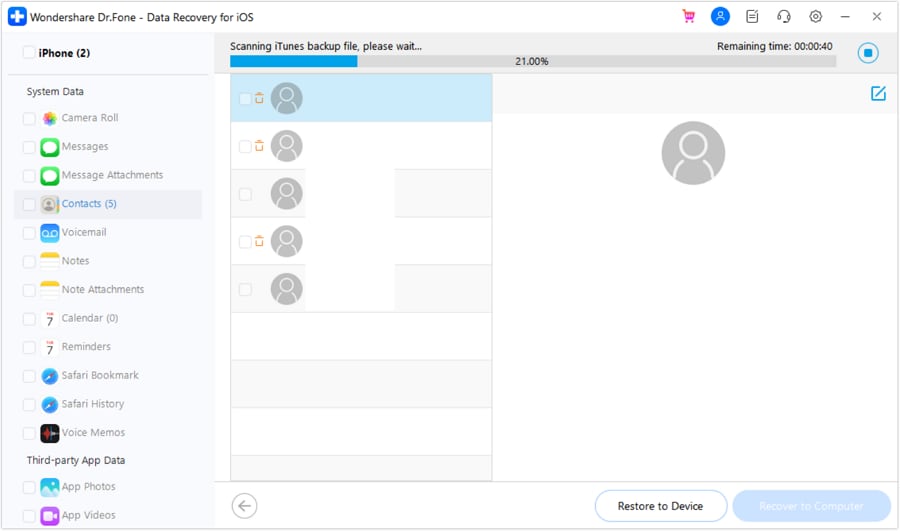
Step 3. When the scanning process is completed, Dr.Fone will list all your data on the interface. Now view your iTunes backup easily.

2.2 How to individually restore or export iTunes backup without losing data
If you want to export the iTunes backup to your computer as a readable file, just tick what you want and click on "Recover to Computer". You can also select the needed files and click "Restore to Device" to restore your iTunes backup to your iPhone without overwriting the original data.

Part 3. How to Change iPhone Backup Location?
Your Disk C runs almost of space, so you want to change the iPhone backup location for somewhere else to free up the Disk C? Prefer to store your important data, like iPhone backups on the SSD, not Disk C? No matter what the reason is, here is the way you can change the iPhone backup location.
Note: Here, I focus on change iTunes backup location on a Windows computer. As for iCloud backup, it's saved in the Apple server. You can change the iCloud account if you like. Just click Settings > iCloud > Account on your iPhone. Log out your iCloud account and log into another one.
Steps to change iTunes backup location
1. Change iTunes backup location in Windows 8/7/Vista
Step 1. Close iTunes.
Step 2. Navigate to the folder where your iPhone backups are. Copy all backup files and paste them to any folder you want to save iPhone backups. For Example, You can save iPhone backups on Disk E:iPhone Backup.
Step 3. Go to the lower-left corner and click Start. In the search box, enter cmd.exe. The cmd.exe program shows up. Right-click it and choose Run as administrator.
Step 4. In the pop-up command prompt, enter a commander: mklink /J "C:Users(username)AppDataRoamingApple ComputerMobileSyncBackup" "D: empBackup".
Step 5. Then, try backing up your iPhone with iTunes and check whether the backup file will be saved in your wanted folder.

2. Change iTunes backup location in Windows XP
Step 1. Make sure iTunes is not running.
Step 2. Download and extract the junction utility on the computer.
Step 3. Unzip Junction.exe to your username folder, which is usually found in C: Documents and Settings.
Step 4. Go to the iTunes backup location folder and move backup files to another folder, like G:iTunes backup.
Step 5. Click Windows + R. When the dialog comes out, type cmd.exe and click OK.
Step 6. In the command prompt, create an NTFS junction point, for example.
cd Desktop junction "C:Documents and Settings(username)Application DataApple ComputerMobileSyncBackup" "G:iTunes Backup"
Step 7. Now, backup an iPhone backup with iTunes and check whether the backup file will be saved in the new folder directory.

3. Change iTunes backup location in Mac OS X
Step 1. Close iTunes.
Step 2. Go to ~/Library/Application Support/MobileSync/Backup/. Copy all backup files to your desired drive, like External.
Step 3. Launch Terminal (located at Applications/Utilities/Terminal) and open a command prompt. Create a symbolic link by using a command similar to the one below,
ln -s /Volumes/External/Backup/ ~/Library/Application Support/MobileSync/Backup
Step 4. Use iTunes to backup your iPhone. Then, go to the new backup folder to see whether the backup file is there or not.

Part 4. Why Want to Delete iPhone Backup from the Location
When it comes to deleting iPhone backup, you have plenty of reasons for it. Here, I list some of them.
Reasons about why delete iTunes backups
1. Get confused every time you select a backup file from a lot.
2. Tens of thousands of files are in your iPhone backup area, most with old dates from previous backups. Want to delete them to free up space of your computer.
3. iTunes could not back up the iPhone "iPhone name" because the backup was corrupt or not compatible with the iPhone. Want to delete the backup for this iPhone, then try again.
4. Cannot backup your iPhone, because it says you have to delete the old backup first.
5. Get a new iPhone, but find it's incompatible with the old iTunes backups.
6. The backup fails and it tells you to delete the backup.
Reasons about why delete iCloud backups for iPhone
1. iCloud backup memory is almost full and can't back up your iPhone. Thus, you have to delete the old backups for the new one.
2. Decide to delete iPhone backup from iCloud because it contains a corrupted file.
3. Recently upgrade to the new iPhone, and back your old one up and restored it to the new one. Now you keep getting notifications that you're running out of storage in iCloud.
Part 5: How to Delete iPhone Backup
1. Delete iTunes Backup File
Deleting a backup is just as simple as creating one with one exception, it isn't possible to delete a backup directly from iTunes. To delete a backup you need to navigate back to where they are located in the filesystem (username/Library/Application Support/Mobilesync/Backups).
Then, right-click on the backup that you want to delete and click Move to Trash. The next time that you empty your trash, the backup will be gone forever.
To Open iTunes Preferences: Windows: Choose Edit > Preferences
Mac: Choose iTunes > Preferences
Note: After you delete all your available information, all of your information will be lost!!!

2. Delete iCloud Backup File
Deleting an iCloud backup is much easier than deleting one that is on a physical computer!
Step 1. You need to open up Settings on your iPhone and click on the iCloud option.
Step 2. Tap the Storage & Backup option.
Step 3. Tap on Manage Storage and then select a backup
Finally, tap on Delete Backup, and your iCloud backup should erase itself.

Dr.Fone Basic:
Better Control for Your Phone
Manage, transfer, back up, restore, and mirror your device


Alice MJ
staff Editor