How to Restore Your iPhone from Backup

May 19, 2026 • Filed to: Backup & Restore Solutions • Proven solutions
 TL;DR:
Restoring an iPhone from an iCloud backup requires either wiping the device completely for a full native setup, using Finder or iTunes for a computer-based recovery, or utilizing the Dr.Fone Data Recovery tool to selectively extract files without data loss.
● A full native iCloud restore mandates erasing all current data on your iPhone to access the Apps & Data setup screen, and the progress will automatically pause if your device disconnects from Wi-Fi.
● For computer-based restorations via a direct USB connection, you must use Finder if operating on macOS Catalina or newer, while PCs and Macs running macOS Mojave or earlier require iTunes.
● Selectively recovering specific file types via the Dr.Fone software allows you to bypass a total device reset, but strictly requires you to deactivate the "Find My" service on your iOS device before the final restoration step.
Ask AI for a summary
 ChatGPT
 Perplexity
 Gemini
 Claude
 Grok
Grok
You should create a backup to avoid any data loss. Maybe your phone is acting up, and you want to reset it to its original settings using the latest backup. Or you're getting a new phone and need to move all your stuff. You could even just back up certain things to be safe.
Whatever the reason, having a backup of your iPhone means you can be ready to restore your data whenever you need it. By default, Apple provides a seamless solution for data storage through iCloud.
As a cloud-based service, iCloud not only simplifies the backup process but also grants you the convenience of accessing your data from various devices. It makes sure your essential information is always within reach.
To get your data back, we will show you how to restore iCloud backup.
Part 1: Check Your Latest Backup
Before you can restore from an iCloud backup, you need to back them up first. Once you have successfully backed up your data to iCloud, you can then easily initiate the restoration process from this backup whenever required.
Now, follow these steps to check your iCloud backup:
- Step 1: Open Settings > your account > iCloud.
- Step 2: Follow one of these options based on your device's operating system:
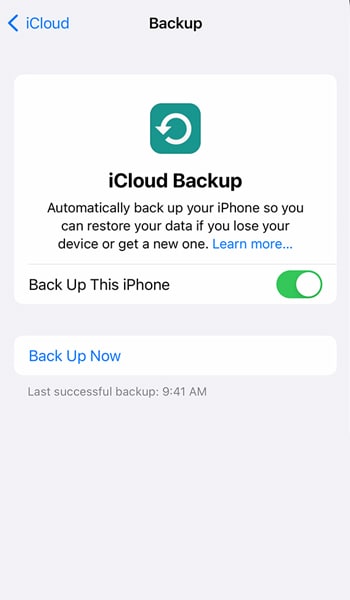
For iOS 16 or later: Simply tap on "iCloud Backup."
If your iPhone is running on iOS 15 or earlier, Tap on "Manage Storage" > "Backups."
See if you have turned on your backup. You can also find the information of your last backup by opening the backup option.
Part 2: How To Selectively Restore iCloud Backup
If you only opt to restore selected data from your iCloud backup, you can use Dr.Fone Data Recovery tool. This tool has been carefully crafted to provide users with a smooth and efficient way to recover specific data from their iCloud backups without any loss.
How to restore iCloud backup selectively with Dr.Fone Data Recovery tool:
- Step 1: Launching the Dr.Fone data recovery tool
To begin, initiate the process by opening the Dr.Fone software on your computer following its successful installation. Navigate to the "Toolbox" section and then select "Data Recovery" to launch the tool.

- Step 2: Choosing the iOS device type
On the next screen, opt for the iOS device since you will be able to recover your data on an iOS device. Once redirected, choose the "Recover Data from an iOS device" option from the list.

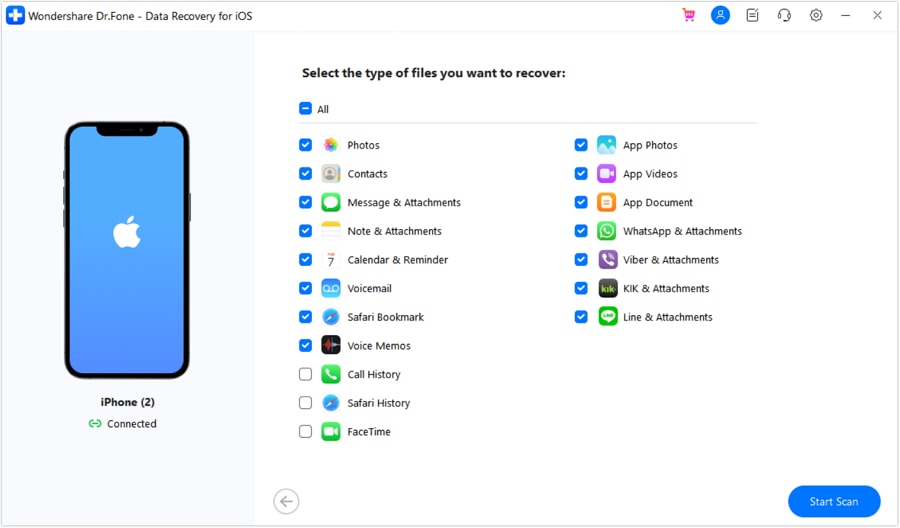
- Step 3: Connecting the iPhone and selecting file types to restore
You will be prompted on the next screen to link your iPhone. After connecting the device, allow the platform to detect it.
Once your iPhone is detected, the next screen will display a list of recoverable file types. You can select specific file types for recovery or exclude certain ones. Then, click the "Start Scan" button.
You will see your data being recovered from your Phone on the next window. Allow the platform to complete the scanning process. Once finished, you can conveniently preview all the recovered data.
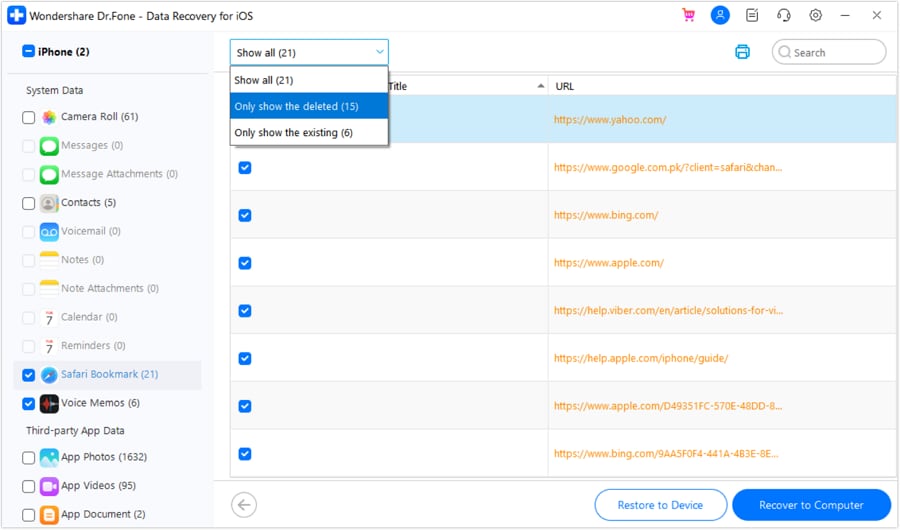
- Step 4: Previewing data and starting the restoration
Upon the completion of the scanning process, you can preview each data you intend to recover. Use the tabs at the top to choose whether you want to view all data or focus on existing or deleted items. Once you've made your selections, proceed by selecting the data you wish to recover and then click "Restore to Device."
- Step 5: Selecting the Device for Restoration
Next, a window will prompt you to select the specific iOS device to which you want to restore the data. Choose your device and click "Continue."
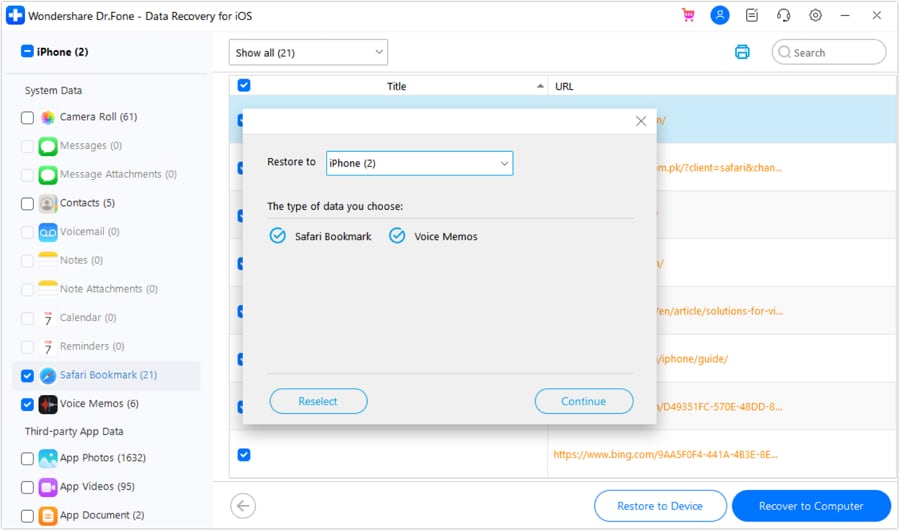
Note: Before restoring the data to your device, it is necessary to deactivate the "Find My" service on your iDevice. After disabling this service on your device, confirm by clicking "OK" on your computer. That’s all! The data will be successfully restored and displayed on the screen.
Bonus: Recovering data to a computer
If you prefer to recover the data to your computer, select the desired data and then click on "Recover to Computer." Then, you will see a prompt allowing you to choose a location for storing the recovered data. Select the location and initiate the recovery process by clicking "Recover."
Part 3: Restoring from iCloud Backup
Now that you've made sure you have your latest backup and know how to back up and restore data selectively, let's learn how to restore all your data from an iCloud backup.
Just remember that a necessary step involves erasing all your data from your iPhone. While this might initially raise concerns like "What if I lose everything in the process?" you don’t have to fret. As long as you have your iCloud backup, you'll soon have your device up and running just the way it was.
How to restore iPhone from iCloud backup:
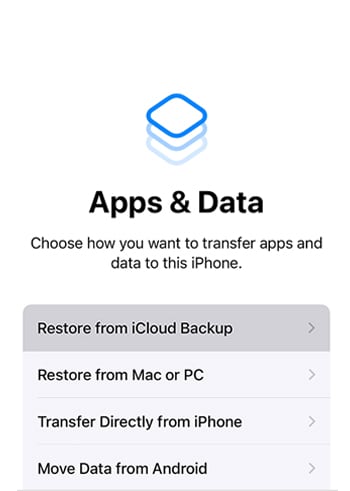
- Step 1: After resetting your iPhone, you’ll need to start turning on your device. As it springs to life, you'll be greeted by the familiar Hello screen, a sign that you're on the right track.
- Step 2: Follow the instructions to set up your iPhone until you reach the Apps & Data screen. This is your golden ticket to restoration. Here, tap on the option that reads "Restore from iCloud Backup."
- Step 3: Sign in to your iCloud account using your Apple ID. This step is vital to access your backup and all the precious data it holds.
Step 4: Among the list of backups, take a moment to examine the dates and sizes. Choose the backup that's most relevant to your needs. After making your selection, the restoration process will commence.
- Step 5: Sometimes, technology requires an update to continue. If a prompt informs you that a newer software version is necessary, follow the onscreen instructions to update. In case the instructions don't pop up, don't worry; just follow the guidance for that too.
- Step 6: When prompted, sign in once again with your Apple ID. This is a vital step to reinstate your apps and purchases.
If you've got a collection from multiple Apple IDs, brace yourself; you'll be asked to sign in to each. Forgot your password? No problem. You can skip this for now and sign in later. Just remember, full access will require that Apple ID input.
- Step 7: When connected to Wi-Fi, watch out for a progress bar that will appear on the screen. How fast this process goes can vary depending on your backup's size and your network speed.
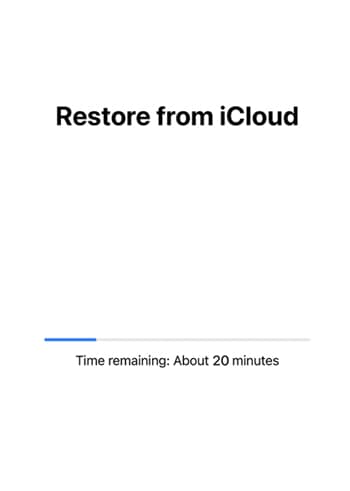
Remember, the progress will pause if you disconnect from Wi-Fi too soon. Keep connected to ensure your restoring progress is going smoothly. As the progress bar completes itself, your device will begin to wrap up its setup. In no time, you'll be reunited with your beloved apps, photos, music, and all other information you hold dear.
So, there you have it – a guide to restore from iCloud backup!
Part 4: How To Restore iCloud Backup Using iTunes/Finder
Both iTunes and Finder on your laptop serve as versatile tools that extend beyond their primary functions – they can also act as efficient backup restoration. By seamlessly integrating with your Apple ecosystem, these applications provide a safeguard for your valuable data, ensuring its accessibility and security.
When you opt to restore iCloud backups through iTunes or Finder, you can store your data on your laptop rather than your phone. Here's a simple guide on how to restore an iCloud backup to your computer:
- Step 1: If you're using a Mac with macOS Catalina or a newer version, open the Finder. For those with macOS Mojave or an earlier version, or if you're on a PC, open iTunes.
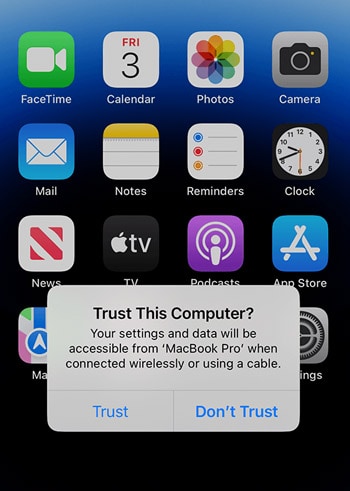
- Step 2: Connect your iPhone. If a message pops up requesting your device passcode or to "Trust This Computer," adhere to the instructions displayed on the screen.
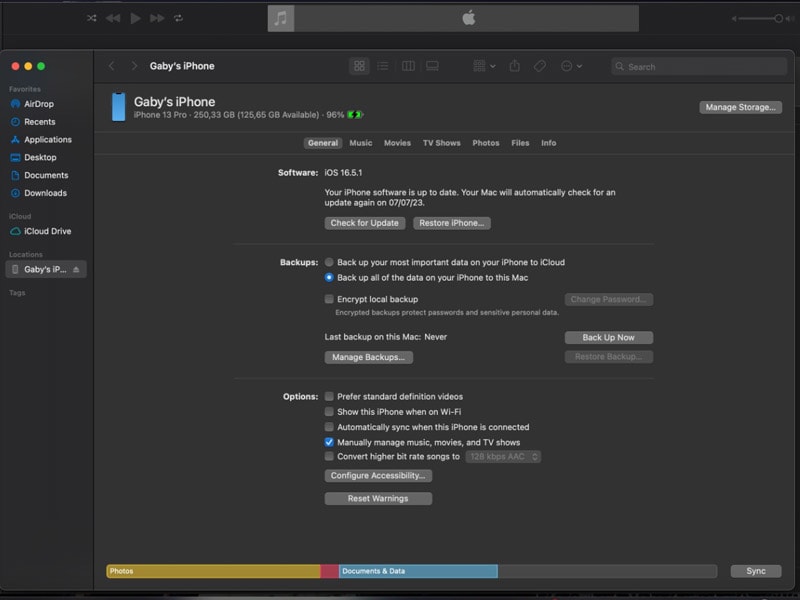
- Step 3: When your iPhone appears in the Finder window or iTunes, select it. If your device doesn't show up, refer to the troubleshooting steps.
- Step 4: Choose the "Restore iPhone" option and review the dates of your available backups. Select the one that you need or the latest one.
- Step 5: Click the "Restore" button and patiently wait for the restoration process to complete. If prompted, input the password for your encrypted backup.
Keep your device connected even after it restarts. Wait for it to sync with your computer. You're free to disconnect once the synchronization finishes.
Common iCloud Restoration Failures and Solutions
While iCloud restoration is a convenient way to restore your Apple devices to a previous backup, there are instances where iCloud restoration might encounter errors that prevent a successful restore.
Common iCloud restoration failures could include:
- Connectivity issue or a problem with the iTunes software.
- Hardware-related issues, such as a faulty Touch ID sensor or mismatched components
- Error during iOS downgrade attempts
- Faulty USB connections
- Issues with iCloud servers or incomplete backups
If one of those things happens to you, you can try the following solutions based on the cause:
- Update your Mac or PC and make sure that your computer's operating system is up to date.
- Connect your device directly to your computer's USB port. Make sure the USB cable is in proper working condition.
- Try a different Apple USB cable or switch to another USB port on your computer.
- Restart both devices.
- Check the security software. Update, change, or uninstall such software if necessary.
Conclusion
iCloud backup restoration is like a safety net for Apple users. It helps you get back your data and settings from a previous backup. If you're switching to a new device, resetting your current one, or something got deleted – this is your solution. It keeps your important stuff from disappearing forever. A must-know trick for all Apple users, ensuring your digital life always stays intact.
You Might Also Like

iPhone Backup
- iPhone Data Backup
- 1. Back up iPhone in Recovery Mode
- 2. Back Up iPhone With/Without iTunes
- 3. Back up iPhone to Mac
- 4. Back up iPhone/iPad to Computer
- 5. Back up iPhone to Mac Catalina
- 6. Back up Jailbreak Apps And Restore
- 7. iPhone Backup Software
- 8. Back up iPhone/iPad Easily
- 9. Back up iPhone/iPad in DFU Mode
- 10. Back up iPhone Apps and App Data
- 11. Back up Notes on iPhone and iPad
- 12. Back up iOS to External Hard Drive
- 13. Export Notes from iPhone to PC/Mac
- 14.Back up iPhone Photos to Google Photos
- 15. Back Up Your iPhone Voicemails
- 16. Back Up to External Drive
- 17.How to Back Up to NAS
- 18.Back Up iPhone With Broken Screen
- 19.Back Up iPhone to Google Drive
- 20.Buy Used iPhones
- 21.Sell Used Phone for Cash
- 22.Sell Used iPhone for Dollar
- 23.How Much is My iPhone Worth
- iPhone Data Recovery
- 1. Recover iPhone Data Without Backup
- 2. Restore Calendar on iPhone
- 3. Recover Call History on iPhone
- 4. Recover iPhone Lost Data
- 5. Restore iPhone in Recovery Mode
- 6. Undelete iPhone Backup Files
- 7. Recover Deleted iPhone Messages
- iPhone Data Restore
- 1. Restore iPhone from iTunes Backup
- 2. Restore iPhone after Downgrade
- 3. Restore iPhone from Backup
- 4. Restore iPhone from iPad Backup
- 5. Restore iPhone from DFU Mode
- 6. Restore iPhone Deleted Text Message
- iPhone Backup Problems
- 1. Find iPhone Backup Location on Mac
- 2. iPhone Backup Password Never Set
- 3. iPhone Backup Password Forget
- 4. iCloud Backup Taking Forever
- 5. iPhone Won't Backup to iCloud
- 6. iTunes Won't Backup iPhone
- iPhone Restore Problems
- 1. iTunes Stuck on Verifying iPhone
- 2. Not Space to Restore iPhone Backup
- 3. iTunes Backup Not Restoring
- 4. iPhone Won't Restore
- WhatsApp Backup & Restore
- 1. WhatsApp from Google Drive to iOS
- 2. Restore Old WhatsApp Backup
- 3. Restore WhatsApp Chat on iPhone
- 4. Retrieve WhatsApp Chat History
- 5. See Deleted Messages on WhatsApp
- 6. Restore WhatsApp Stuck on iPhone
- 7. iPhone WhatsApp to Google Drive
- 8. Back Up WhatsApp on iPhone
- 9. Backup WhatsApp Data before Changing Number
- iPhone Backup Tips
- 1. Extract Data From iPhone
- 2. Encrypt iPhone Backup
- 3. Reset iPhone Backup Password
- 4. Extract iPhone Backup in Win 10
- 5. How Long take iPhone to Backup
- 6. Find iPhone Backup Location
- 7. iPhone Backup Password
- 8. View iPhone Backup on Computer
- 9. iPhone Backup with iTunes/iCloud
- 10.Check Last Backup on iPhone
- 11. How To Backup Foldable iPhone
- 12. Best Backup Chargers for iPhone
- 13. Speed Up Your iPhone Backups
- 14. Save Data When iPhone Disabled
- ● Manage/transfer/recover data
- ● Unlock screen/activate/FRP lock
- ● Fix most iOS and Android issues
- Free Download Free Download Free Download

Selena Lee
chief Editor