
How to Backup a Locked or Disabled iPhone with 4 Easy Methods [iPhone 17 Supported]
iPhone Backup
- iPhone Data Backup
- 1. Back up iPhone in Recovery Mode
- 2. Back Up iPhone With/Without iTunes
- 3. Back up iPhone to Mac
- 4. Back up iPhone/iPad to Computer
- 5. Back up iPhone to Mac Catalina
- 6. Back up Jailbreak Apps And Restore
- 7. iPhone Backup Software
- 8. Back up iPhone/iPad Easily
- 9. Back up iPhone/iPad in DFU Mode
- 10. Back up iPhone Apps and App Data
- 11. Back up Notes on iPhone and iPad
- 12. Back up iOS to External Hard Drive
- 13. Export Notes from iPhone to PC/Mac
- 14.Back up iPhone Photos to Google Photos
- 15. Back Up Your iPhone Voicemails
- 16. Back Up to External Drive
- 17.How to Back Up to NAS
- 18.Back Up iPhone With Broken Screen
- 19.Back Up iPhone to Google Drive
- 20.Buy Used iPhones
- 21.Sell Used Phone for Cash
- 22.Sell Used iPhone for Dollar
- 23.How Much is My iPhone Worth
- iPhone Data Recovery
- 1. Recover iPhone Data Without Backup
- 2. Restore Calendar on iPhone
- 3. Recover Call History on iPhone
- 4. Recover iPhone Lost Data
- 5. Restore iPhone in Recovery Mode
- 6. Undelete iPhone Backup Files
- 7. Recover Deleted iPhone Messages
- iPhone Data Restore
- 1. Restore iPhone from iTunes Backup
- 2. Restore iPhone after Downgrade
- 3. Restore iPhone from Backup
- 4. Restore iPhone from iPad Backup
- 5. Restore iPhone from DFU Mode
- 6. Restore iPhone Deleted Text Message
- iPhone Backup Problems
- 1. Find iPhone Backup Location on Mac
- 2. iPhone Backup Password Never Set
- 3. iPhone Backup Password Forget
- 4. iCloud Backup Taking Forever
- 5. iPhone Won't Backup to iCloud
- 6. iTunes Won't Backup iPhone
- iPhone Restore Problems
- 1. iTunes Stuck on Verifying iPhone
- 2. Not Space to Restore iPhone Backup
- 3. iTunes Backup Not Restoring
- 4. iPhone Won't Restore
- WhatsApp Backup & Restore
- 1. WhatsApp from Google Drive to iOS
- 2. Restore Old WhatsApp Backup
- 3. Restore WhatsApp Chat on iPhone
- 4. Retrieve WhatsApp Chat History
- 5. See Deleted Messages on WhatsApp
- 6. Restore WhatsApp Stuck on iPhone
- 7. iPhone WhatsApp to Google Drive
- 8. Back Up WhatsApp on iPhone
- 9. Backup WhatsApp Data before Changing Number
- iPhone Backup Tips
- 1. Extract Data From iPhone
- 2. Encrypt iPhone Backup
- 3. Reset iPhone Backup Password
- 4. Extract iPhone Backup in Win 10
- 5. How Long take iPhone to Backup
- 6. Find iPhone Backup Location
- 7. iPhone Backup Password
- 8. View iPhone Backup on Computer
- 9. iPhone Backup with iTunes/iCloud
- 10.Check Last Backup on iPhone
- 11. How To Backup Foldable iPhone
- 12. Best Backup Chargers for iPhone
- 13. Speed Up Your iPhone Backups
- 14. Save Data When iPhone Disabled
- ● Manage/transfer/recover data
- ● Unlock screen/activate/FRP lock
- ● Fix most iOS and Android issues
- Free Download Free Download Free Download

Jun 11, 2026 • Filed to: Backup & Restore Solutions • Proven solutions
 TL;DR:
To back up a locked or disabled iPhone without erasing its data, you must leverage pre-existing trusted connections utilizing an automatic iCloud sync over a known network, an iTunes connection on a recognized computer, or Wondershare Dr.Fone - Phone Backup (iOS).
● The iTunes method strictly requires connecting the iPhone via USB to a computer that was previously granted "Trust This Computer" permissions; if this permission was never established, you will be forced to erase all data to regain access.
● iCloud backups will execute automatically without requiring device access as long as the default backup feature is enabled and the disabled phone is left within range of a previously connected WiFi network for at least 30 minutes.
● Wondershare Dr.Fone - Phone Backup (iOS) serves as an alternative for Windows and Mac that bypasses the standard iTunes interface, allowing you to selectively preview and export specific files like contacts or photos rather than performing a blind, full-device backup.
Ask AI for a summary
 ChatGPT
 Perplexity
 Gemini
 Claude
 Grok
Grok
Dr.Fone Basic:
Better Control for Your Phone
Manage, transfer, back up, restore, and mirror your device
Regularly backing up your iPhone is one of the smartest ways to keep your data safe, protecting you from accidental loss, crashes, or unexpected issues. This becomes even more critical if your device is locked or disabled, as knowing how to backup a locked iPhone can provide a vital lifeline. With the release of the latest iPhone 17, creating secure backups ensures your photos, messages, and important files remain protected—no matter what happens to your device. By learning the best ways to backup a locked iPhone, you can safeguard valuable data and restore it whenever needed.
Although it's possible under certain circumstances, backing up a locked iPhonecomes with its own set of obstacles. So today, we will discuss how to back up a locked iPhone thoroughly to ensure the safety of your data.
Part 1: What Happens to a Locked and Disabled iPhone?
In this locked or disabled state, most functions of the iPhone become inaccessible. You can't use your apps, access settings, or get to your personal data on the device.
You’ll need the correct passcode or biometric authentication to unlock it. If someone repeatedly enters the wrong passcode, the iPhone gets disabled temporarily. You will get longer disabling times for each subsequent incorrect attempt.
So, backing up a disabled iPhone is challenging due to Apple's security measures. Certain functionalities, like creating backups, are restricted in this state.
- Forgotten Passcode: If you forget your iPhone passcode, repeated failed attempts to unlock it can lead to temporary or permanent disabling.
- Failed Attempts: When someone repeatedly tries to guess the passcode on your iPhone, it triggers the device's security mechanism and temporarily disables it.
- Device Seizure: In some cases, your iPhone may be seized by law enforcement or unauthorized individuals who try to gain access. This can lead to the device being locked or disabled.
This situation might sound frustrating. In the following sections, we will discuss further various methods to overcome these challenges and ensure the safety of your data when dealing with a locked or disabled iPhone.
Part 2: How to Back Up a Locked and Disabled iPhone
If you’ve previously connected your device to a computer and tapped ‘Trust This Computer,’ you may still be able to backup a locked iPhone or even a disabled one using that trusted computer. This is often the easiest method when learning how to backup a locked iPhone without erasing files. However, if you never set this permission, recovering access to your iPhone—whether it’s an older model or the latest iPhone 17—could require erasing all of your data and restoring from a previous backup.
By default, all iPhone models running the latest iOS have iCloud Backup enabled. If you haven't purposely turned off this feature, you can have a backup of your disabled iPhone on iCloud.
Method 1: How to use iCloud to backup a locked iPhone:
- Step 1: Bring the disabled iPhone near a previously connected WiFi network.
The iPhone should automatically connect to this WiFi network and initiate data backup to iCloud, even without unlocking.
- Step 2: Allow at least 30 minutes for the backup process to complete.
- Step 3: Access to iCloud.
If available, use any accessible device to open a web browser and sign in to icloud.com.
- Step 4: Check if you have been backing up your data.
Navigate to the Photos, Contacts, Notes apps, etc. on iCloud to verify if your iPhone data has been successfully backed up.

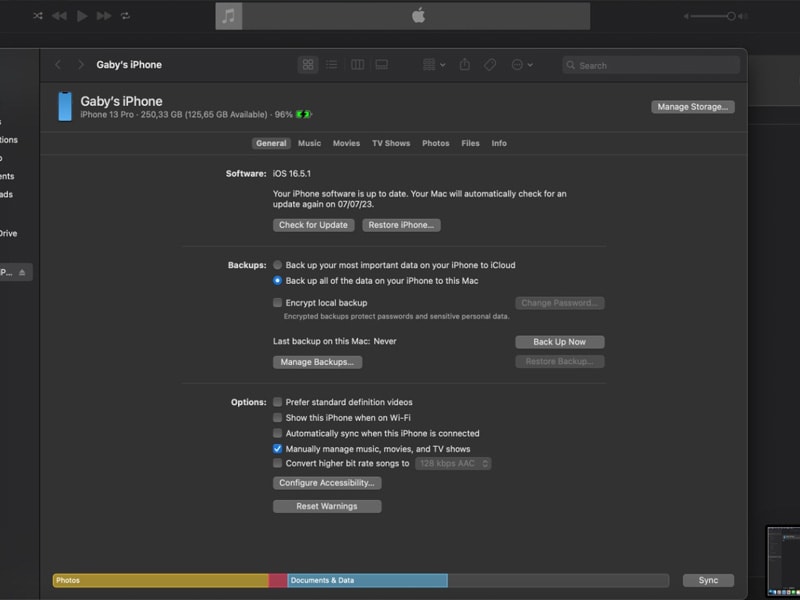
Method 2: How to backup disabled iPhone with iTunes:
- Step 1: Connect to your computer.
Using a USB cable, connect the disabled iPhone to a trusted computer with iTunes installed.
- Step 2: Launch iTunes on the computer.
If your iPhone information is not visible, click the iPhone icon at the top of the iTunes window.
- Step 3: Set the backup.
On the left sidebar, select "Summary." Then, navigate to the Backups section on the right and choose "This Computer." Click "Back Up Now" to initiate the immediate backup of the disabled iPhone to the computer through iTunes.
- Step 4: Restore the backup using iTunes.
After the backup process is complete, you can proceed to unlock the disabled iPhone by erasing its data. Once the iPhone is unlocked, you can restore the data from the backup by selecting the "Restore Backup" option within iTunes.
Bonus Tip: Use Dr.Fone - Phone Backup (iOS) [Recommended Solution]
By now, you can see why creating regular backups is essential to avoid data loss from accidents, system failures, or device lockouts. When it comes to how to backup a locked iPhone, third‑party apps often provide faster and more convenient solutions than iTunes or iCloud alone.
One highly recommended option is Wondershare Dr.Fone - Phone Backup (iOS), which offers a comprehensive backup feature fully compatible with the latest iPhone 17 as well as earlier models. With Dr.Fone, you can easily backup a locked iPhone or a disabled device and safeguard your photos, contacts, messages, and more without risk.
Wondershare Dr.Fone - Phone Backup (iOS)
Selectively backup your iPhone contacts in 3 minutes!
- One-click to backup the whole iOS device to your computer.
- Allow previewing and selectively export contacts from iPhone to your computer.
- No data loss on devices during the restoration.
- Works for all iOS devices. Compatible with the latest iOS version.

How to back up your iPhone with ease using Dr. Fone's backup feature:
- Step 1: Open Dr. Fone's backup feature
Open the Dr.Fone software on your computer and connect your iPhone. Make sure that Dr.Fone recognizes your device. In the left panel of Dr.Fone, click on "My Backup" and then choose the "Back Up Now" option.

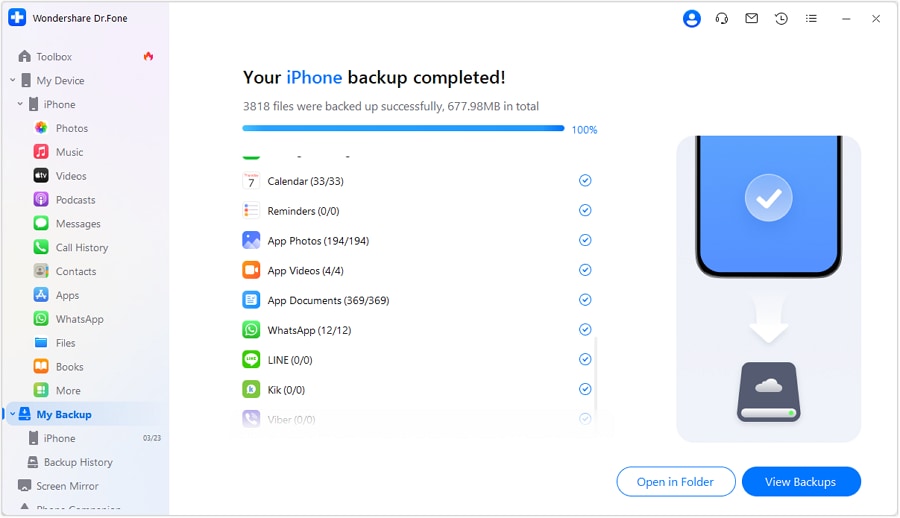
- Step 2: Wait until it finishes the backup.
Allow Dr.Fone to complete the backup process. The software will automatically detect and back up various types of files from your iPhone. See how far the backup progress is on the screen.

- Step 3: Preview and access your backup
After the backup is finished, you will see a prompt window with detailed information about your backup. You can preview your backup contents before restoring them, ensuring that you have selected the necessary data.
To access the backups, you can either click on "View Backups" or manually locate the backup folder by selecting "Open in Folder".
Part 3: Preventative Measures for Future Backups
What can you do to ensure the ongoing safety and accessibility of your iPhone data? We have some tips to prevent any problems with your future backups. Follow these recommendations to minimize the risk of data loss and enhance security:
- Auto-backup your data
Opt for automatic backups on your iPhone to streamline the process. By activating this feature, your device will regularly create backups without the need for manual intervention. This helps ensure that your most up-to-date data is always protected.
- Keeping your iPhone passcode secure and accessible
Maintain a strong and confidential passcode for your iPhone that is not easily guessed. Avoid using common patterns or personal information that could be easily identified.
- Regularly backing up your iPhone to prevent data loss
If you dislike auto-backup, you can regularly back up your iPhone. Determine a backup schedule that suits your needs and make it a habit.
- Encrypting your backups for enhanced security
Consider encrypting your backups to provide an additional layer of protection. Encryption involves securing your data with a password. Only authorized individuals can access it.
- Storing backups in a safe and accessible location
Select a secure storage location for your backups. This can include external hard drives, cloud storage services, or multiple locations for added redundancy.
FAQs:
1. Can I back up a locked iphone if I forget the passcode?
It is possible to back up a locked iPhone if you forget the passcode but under certain circumstances. You need to have your iCloud account connected to other devices and make sure you enable auto backup.
Another method is using iTunes. You will need iTunes that is still connected to your iPhone device, then back it up to your comp
2. How do I restore my locked iPhone from iCloud backup?
After unlocking your iPhone, you will receive a prompt on the Apps & Data screen, allowing you to restore your data from iCloud. Select it and wait for a few minutes until it finishes the restoration.
Conclusion
Backing up a disabled iPhone can be challenging due to Apple's security measures. If you have previously connected your iPhone to a trusted computer, you can use iCloud or iTunes to back up your disabled device.
Apple provides two built‑in methods to back up your device: iCloud, which creates backups over a trusted Wi‑Fi network, and iTunes, which lets you store backups on your computer. However, if you’re wondering how to backup a locked iPhone, especially the latest iPhone 17, relying on these native options may not always be enough. This is where third‑party tools like Wondershare Dr.Fone come in, offering a more user‑friendly and efficient way to backup locked iPhone data—including photos, contacts, messages, and apps—without technical hurdles.
Dr.Fone Basic:
Better Control for Your Phone
Manage, transfer, back up, restore, and mirror your device


James Davis
staff Editor