How to Protect Your iPhone Data with an External Drive Backup
iPhone Backup
- iPhone Data Backup
- 1. Back up iPhone in Recovery Mode
- 2. Back Up iPhone With/Without iTunes
- 3. Back up iPhone to Mac
- 4. Back up iPhone/iPad to Computer
- 5. Back up iPhone to Mac Catalina
- 6. Back up Jailbreak Apps And Restore
- 7. iPhone Backup Software
- 8. Back up iPhone/iPad Easily
- 9. Back up iPhone/iPad in DFU Mode
- 10. Back up iPhone Apps and App Data
- 11. Back up Notes on iPhone and iPad
- 12. Back up iOS to External Hard Drive
- 13. Export Notes from iPhone to PC/Mac
- 14.Back up iPhone Photos to Google Photos
- 15. Back Up Your iPhone Voicemails
- 16. Back Up to External Drive
- 17.How to Back Up to NAS
- 18.Back Up iPhone With Broken Screen
- 19.Back Up iPhone to Google Drive
- 20.Buy Used iPhones
- 21.Sell Used Phone for Cash
- 22.Sell Used iPhone for Dollar
- 23.How Much is My iPhone Worth
- iPhone Data Recovery
- 1. Recover iPhone Data Without Backup
- 2. Restore Calendar on iPhone
- 3. Recover Call History on iPhone
- 4. Recover iPhone Lost Data
- 5. Restore iPhone in Recovery Mode
- 6. Undelete iPhone Backup Files
- 7. Recover Deleted iPhone Messages
- iPhone Data Restore
- 1. Restore iPhone from iTunes Backup
- 2. Restore iPhone after Downgrade
- 3. Restore iPhone from Backup
- 4. Restore iPhone from iPad Backup
- 5. Restore iPhone from DFU Mode
- 6. Restore iPhone Deleted Text Message
- iPhone Backup Problems
- 1. Find iPhone Backup Location on Mac
- 2. iPhone Backup Password Never Set
- 3. iPhone Backup Password Forget
- 4. iCloud Backup Taking Forever
- 5. iPhone Won't Backup to iCloud
- 6. iTunes Won't Backup iPhone
- iPhone Restore Problems
- 1. iTunes Stuck on Verifying iPhone
- 2. Not Space to Restore iPhone Backup
- 3. iTunes Backup Not Restoring
- 4. iPhone Won't Restore
- WhatsApp Backup & Restore
- 1. WhatsApp from Google Drive to iOS
- 2. Restore Old WhatsApp Backup
- 3. Restore WhatsApp Chat on iPhone
- 4. Retrieve WhatsApp Chat History
- 5. See Deleted Messages on WhatsApp
- 6. Restore WhatsApp Stuck on iPhone
- 7. iPhone WhatsApp to Google Drive
- 8. Back Up WhatsApp on iPhone
- 9. Backup WhatsApp Data before Changing Number
- iPhone Backup Tips
- 1. Extract Data From iPhone
- 2. Encrypt iPhone Backup
- 3. Reset iPhone Backup Password
- 4. Extract iPhone Backup in Win 10
- 5. How Long take iPhone to Backup
- 6. Find iPhone Backup Location
- 7. iPhone Backup Password
- 8. View iPhone Backup on Computer
- 9. iPhone Backup with iTunes/iCloud
- 10.Check Last Backup on iPhone
- 11.How To Encrypt iPhone Backup
- 12. Best Backup Chargers for iPhone
- 13. Speed Up Your iPhone Backups
- 14. Save Data When iPhone Disabled
- ● Manage/transfer/recover data
- ● Unlock screen/activate/FRP lock
- ● Fix most iOS and Android issues
- Back up Now Back up Now Back up Now

Oct 24, 2025 • Filed to: Backup & Restore Solutions • Proven solutions
Dr.Fone Basic:
Better Control for Your Phone
Manage, transfer, back up, restore, and mirror your device
Is your iPhone data adequately protected? Given the fragility of your device, it's important to acknowledge that unforeseen events can occur at any time. Rather than relying solely on chance, taking proactive measures to safeguard your data is crucial. After all, it's better to be prepared than to regret it later.
If backing up on the cloud is not enough, you can take extra measures by backing it up to an external hard drive. So, if you haven't given serious thought to the extent of your iPhone data-safeguarding measures, now is the time to act. We are here to provide you with everything you need to know about backing up iPhone data to an external drive.
Part 1: Why You Need to Backup iPhone Data to External Drive
Can you back up iPhone to an external hard drive? Obviously! It’s even recommended to do so, even if you have backed up your data on the cloud.
Why relying solely on cloud backups may not be sufficient? Cloud storage providers typically offer a limited amount of free storage. If you have a large amount of data to back up, you may quickly exceed the available space.
Plus, accessing data from cloud backups requires an active internet connection. It may be subject to download or streaming speeds. It’s also not practical when you are uploading many data all at once since the upload time can take long.
External drives, on the other hand, can be convenient in terms of data storage and accessibility. Transferring data is typically faster since it's a direct and local transfer. If you back up iPhone to external drive, you will also have extra security in case there is a problem with your cloud.

Part 2: How to Backup iPhone to External Drive
Let's address the most important question: How can I back up my iPhone data to an external drive? Worry not. We've got you covered. Follow the step-by-step guide provided below to learn how to back up iPhone to an external drive:
- Step 1: Choose an external drive
A quick tip: Always look for reviews first before purchasing. Select a reliable external drive with sufficient storage capacity and compatibility with your iPhone. It’s better to choose a reputable brand to avoid any damage.
- Step 2: Connect the external drive
Connect the external drive to your iPhone using the appropriate cable or adapter to your computer. Make sure the connection is secure.
- Step 3: Authorization prompt
If it's your first time connecting the external drive to your iPhone, you may receive an authorization prompt on your iPhone. Click “Trust” or follow the on-screen instructions and grant the necessary permissions to access the external drive.
- Step 4: Share to your external drive
Open your iPhone and select the files you want to back up. Then, tap the Share icon and select your external drive name.
Otherwise, you can also open your Mac/computer, then navigate to your iPhone device on Finder. Click the General tab and select “Back up all the data on your iPhone to this Mac” > Apply to move iPhone backup to external drive.
Then, you can also open your iPhone device on Mac, copy all the data you need to back up, and paste them to your Mac folder. Voila! Your data will be saved safely on your external drive.

Part 3: Troubleshooting Common Issues
- Problems with external drive recognition
If your iPhone is not recognizing the external drive, check the connections and compatibility with your device. If there’s no problem, try restarting both the iPhone and the drive. Test with another drive to isolate the issue.
- Insufficient space on the external drive:
Running out of space on your external drive can hinder the backup process. To address this, delete unnecessary files. You can also optimize backup settings by including essential data only. Consider using a larger capacity drive if needed.
- Issues with backup restoration:
If you encounter problems while restoring your iPhone data from an external drive backup, confirm compatibility, verify backup integrity, and reset your iPhone settings if necessary. You should seek professional assistance if the issues persist.
Part 4: Alternative Methods for iPhone Backups
Backing up your iPhone doesn't have to be limited to cloud or external backups alone. There exist alternative methods that offer additional advantages. Let's delve into one such alternative in this section – using Wondershare Dr.Fone software.
Dr.Fone - Phone Backup (iOS)
Selectively backup your iPhone contacts in 3 minutes!
- One-click to backup the whole iOS device to your computer.
- Allow previewing and selectively export contacts from iPhone to your computer.
- No data loss on devices during the restoration.
- Works for all iOS devices. Compatible with the latest iOS version.


Wondershare Dr.Fone has garnered immense popularity among users for its satisfying capabilities. With its user-friendly interface and a lot of powerful tools, Dr. Fone can enhance your backup experience significantly.
It provides a robust solution for iPhone users, offering a wide range of features, including data backup. Some of Dr. Fone's backup features include:
- Comprehensive backup of all iPhone data
- Preview before restore
- Easy data recovery
- Ensure no data loss
- Option for auto-backup
How to use Dr.Fone iOS backup:
- Step 1: Start the iPhone backup
Launch Dr.Fone on your computer. In the left panel, select "My Backup" and click on "Back Up Now."

- Step 2: Allow for the backup process
Let the software complete the backup process until all your data is safely stored. Dr.Fone's system automatically detects and backs up various file types from your iOS device.

Once the backup is complete, a prompt window will display comprehensive backup details. You can access the backups by clicking "View Backups" or locate the backup folder directly by selecting "Open in Folder."
For Automatic Backups with Dr.Fone:
- Step 1: Enable automatic backups
Launch Dr.Fone and go to My Devices > Backup preferences. A window with various options for backing up your data will appear. Then, make sure to enable the "Auto-Backup" feature.
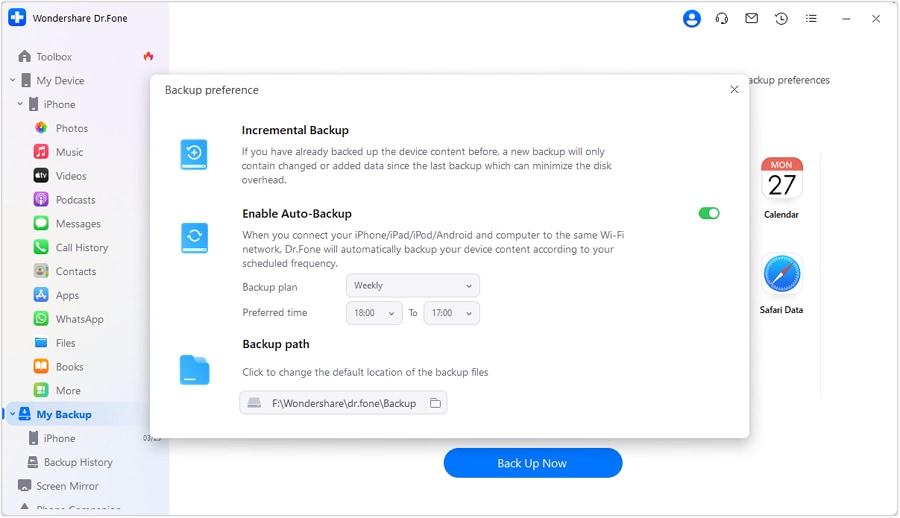
- Step 2: Connect devices to the same Wi-Fi network
Ensure your iPhone and computer are connected to the same Wi-Fi network. The automatic backup feature will function accordingly based on your chosen Backup Plan and Preferred Time.
You are done! See your backup data by clicking Backup History > View.

Part 5: Best Practices for iPhone Backup Management
Previously, you have learned how to backup to an external drive, explore alternative methods, and troubleshoot common backup issues. The next crucial step is to adhere to the best practices that streamline the backup process.
A few essential things you can do during iPhone backup to external drive
- Use Wi-Fi connection
It’s better to connect to a Wi-Fi network when backing up, as large backups may consume significant cellular data and take longer to complete.
- Sufficient iCloud storage
Ensure you have enough iCloud storage to accommodate your backup. You can check your storage availability in the Settings app under your Apple ID > iCloud.
- Regular backups
To ensure you never forget to back up your data, setting up automatic backups is recommended. This way, your data stays up to date without relying on manual backups. Ideally, aim to back up your iPhone at least once a week or whenever you make significant changes to your device or data.
- Verify backups
Periodically verify that your backups are complete and error-free. You can do this by accessing the iCloud Backup settings and checking the backup details.
- Secure your backups
If your backup solution offers an encryption feature, protect your backups with a strong, unique password. It helps to make sure your data remains secure and prevents unauthorized access.
Now, it’s a wrap. You will be able to effectively manage your iPhone backups. Enjoy peace of mind knowing that your iPhone backups are in perfect order.
Conclusion
We have explored the process of backing up an iPhone to an external drive and discussed the importance of effectively managing backups. Just follow the recommended steps here, then you can ensure the safety and accessibility of your data.
Besides, you can also utilize alternatives like Wondershare Dr.Fone if you're looking for a reliable and easy solution for iPhone backup management.
Regardless, remember to regularly update your backups. Whenever you encounter any uncertainties regarding iPhone backup, you can refer back to this guide for guidance and clarification.
Dr.Fone Basic:
Better Control for Your Phone
Manage, transfer, back up, restore, and mirror your device


Daisy Raines
staff Editor