100% Security Verified | No Subscription Required | No Malware

 :
: 
 ChatGPT
 Perplexity
 Gemini
 Claude
 Grok
Grok

I want to wipe my device clean because it's running slow, but I absolutely do not want to install the newest iOS update. Is there a reliable way to learn how to restore iPhone without updating?
User inquiry from online community
We've all been in that frustrating situation: you simply want to refresh your device or load an old backup, but Apple's ecosystem constantly pushes you to update your iPhone to the latest iOS version. Sometimes, a mandatory update disrupts your workflow. Perhaps you are relying on a specific app that hasn't been updated for the newest OS, you want to preserve a jailbreak, or you're using an older device that might experience severe battery drain and lagging on the latest firmware. Regardless of your specific reasoning, knowing how to restore without updating iPhone is a critical skill for maintaining control over your hardware.
But is achieving this actually possible? Absolutely. While Apple’s official channels heavily encourage continuous firmware upgrades, they do leave behind specific built-in avenues to wipe an iPhone and revert it to factory settings without compelling you to adopt the latest iOS version. The process is identical whether you are fixing a smartphone or performing an iPad restore without update.
Of course, traditional methods provided by Apple can sometimes feel convoluted or carry the risk of accidental updates if you click the wrong prompt. For a more streamlined experience, third-party solutions exist to bypass these rigid pathways with a single click. Let’s explore the top four strategies for restoring your iPhone without updating its software so you can pick the perfect path for your technical needs.
In this article
Part 1: Using iTunes and Recovery Mode

For many years, the standard protocol for troubleshooting severe iOS bugs involved placing the device into Recovery Mode and managing the framework via iTunes on a desktop computer. This remains a classic, viable approach if your iPhone is entirely unresponsive, locked, or trapped in a boot loop.
To initiate this sequence, you must power down your iPhone and execute a precise hardware button combination to trigger Recovery Mode. The exact sequence depends entirely on your specific device generation:
- iPhone 8 or newer: Quickly press and release the Volume Up button, followed immediately by the Volume Down button. Finally, press and continuously hold the Side (Power) button until the Recovery Mode screen appears.
- iPhone 7 and 7 Plus: Press and hold both the Side button and the Volume Down button simultaneously. Keep holding them until the Recovery Mode interface shows up.
- iPhone 6s or older: Press and hold both the physical Home button and the Top (or Side) button concurrently until you see the Recovery Mode screen.
Once you have successfully booted into Recovery Mode, use a certified lightning cable to connect your iPhone to a computer running the most recent version of iTunes (or Finder on newer macOS). The software will detect a critical device error and prompt you with options to either Update or Restore your device. By carefully selecting the Restore option and explicitly declining any subsequent update prompts, iTunes will restore your iPhone without installing the latest iOS update.
- Effective for completely unresponsive or disabled devices.
- Utilizes official Apple software infrastructure.
- Bypasses minor software glitches causing boot loops.
- Completely wipes all personal data and custom settings.
- Requires a PC or Mac with installed Apple drivers.
- High risk of accidental updates if the wrong prompt is clicked.
Ultimately, while this native method is robust, it acts as a nuclear option that eradicates your local files. After the process finishes, you will be forced to either configure it as a brand-new handset or restore from a previously archived backup—which could contain outdated settings you'd rather not inherit.
Part 2: A Backup Plan: Restoring from iTunes or iCloud
If you practice good digital hygiene and regularly back up your device to local storage or the cloud, you possess an excellent secondary restore iPhone without updating tactic. The logic underlying this approach is remarkably straightforward: your historical backup file encapsulates the iOS environment as it existed on that specific date. Restoring your device using this archive effectively loads your familiar environment instead of forcing a jump to the most current iOS release.

For iTunes Local Backups:
-
Step 1 Connect and Launch iTunes
Use a secure USB connection to attach your iPhone to your desktop computer and launch the iTunes application (or Finder on newer Macs).
-
Step 2 Navigate to Backup Options
Click on the small device icon located in the upper-left navigation bar of iTunes to access your device summary, then select the "Restore Backup" button.
-
Step 3 Execute the Restoration
A prompt will appear listing your available archives. Choose the specific backup file you wish to deploy and follow the on-screen instructions to finalize the transfer.

For Wireless iCloud Backups:
-
Step 1 Reach the Setup Screen
This method requires you to first factory reset your iPhone. Once wiped, power on the device to begin the initial Hello setup process.
-
Step 2 Select iCloud Recovery
Navigate through the Wi-Fi and language prompts until you land on the "Apps & Data" page. From here, deliberately choose "Restore from iCloud Backup".

-
Step 3 Authenticate and Transfer
Sign securely into your Apple ID account using your credentials, verify your two-factor authentication if required, and select your preferred historical backup from the provided list.

This methodology has a distinct advantage: it restores your cherished personal data, application layouts, and customized settings while cleanly bypassing the iOS update servers. The obvious downside is data deprecation. Because you are reverting to a past state, any new contacts, documents, or photos created after the backup date will be permanently lost unless stored externally. The older the backup, the wider the data gap you will need to reconcile.
Part 3: Reset and Restore: The Settings Shortcut
Many users who browse support forums looking for how to restore iphone without updating reddit threads are surprised to learn that they don't explicitly need iTunes, iCloud, or complicated button combinations to achieve a clean slate. Apple built a native shortcut directly into the iOS settings architecture. This allows you to aggressively erase the hardware while firmly retaining the exact iOS version currently running on the motherboard.
-
Step 1 Access General Settings
Unlock your iPhone and open the primary Settings application. Scroll down and tap on General, then navigate to the very bottom of the menu to find the "Transfer or Reset iPhone" section.
-
Step 2 Erase All Content
Tap on "Erase All Content and Settings". The system will prompt you for your passcode and Apple ID password to disable Find My iPhone. Once confirmed, the device will undergo a complete data wipe, re-emerging in a pristine factory state while flawlessly maintaining its current operating system version.

As highly convenient as this internal shortcut is, it carries the identical caveat found in Recovery Mode. It is a destructive process that mercilessly strips away all local applications, photos, messages, and customized user profiles. If you have not secured your critical data off-device beforehand, you will suffer catastrophic data loss.
Part 4: Restore Your iPhone at Any Time without Updating
While the native methods provided by Apple technically get the job done in an emergency, they are often burdened by frustrating limitations, complete data destruction, or a high risk of accidental software updates. Fortunately, the technology landscape in 2026 offers highly refined, risk-free alternatives to restore your iPhone at any time without updating. The standout utility in this domain is Wondershare Dr.Fone.
Dr.Fone represents an incredibly robust and versatile iOS management suite that goes far beyond standard cloud syncing. With a remarkably intuitive interface, it grants users the power to selectively backup critical files, dive deep into recovery protocols, fix severe system anomalies, and confidently restore your device without updating the iOS version.
 Effortlessly manage data through preview, delete, export, etc.
- Transfer all data between devices.
- Robust backup solutions for reliable data protection.
- Mirror screens to PC for meetings, teaching, and control.

One of the strongest arguments for adopting Dr.Fone into your tech arsenal is the sheer simplicity of its user experience. You don't need a computer science degree to navigate its toolset; you simply connect your device, and the software handles the heavy lifting.
-
Step 1 Select Backup File Types
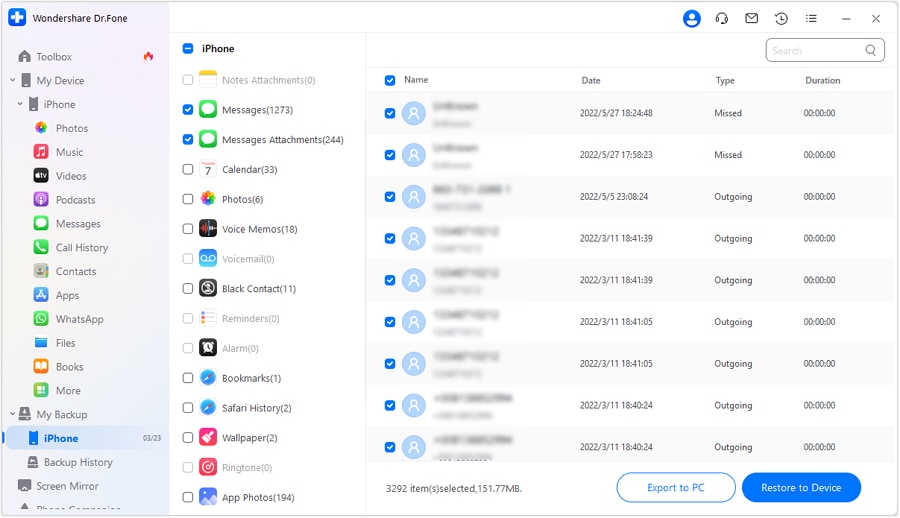
Once you connect your device and access the backup module, Dr.Fone will display a comprehensive list of all data types available. You can also seamlessly access your localized "Backup History" from the left-hand navigation panel. Select an existing archive and click "View" to inspect it.

-
Step 2 Preview and Target Specific Data
Unlike iTunes, which operates as a blind "all-or-nothing" replacement, Dr.Fone allows you to click on distinct categories like "Call History" or "Photos" to visually preview the payload. Simply check the boxes next to the specific files you want to retrieve, and hit "Restore to Device".
-
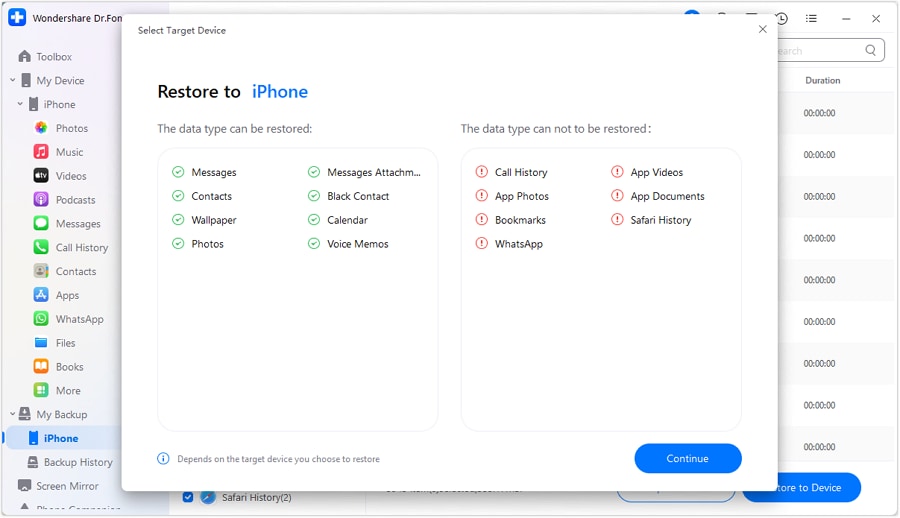
Step 3 Verify Restoration Constraints
A secure dialogue window will populate, clearly outlining which file clusters can safely be injected back into your current iOS environment. Take a moment to review this summary, ensuring your most vital components are included, and tap "Continue".
-
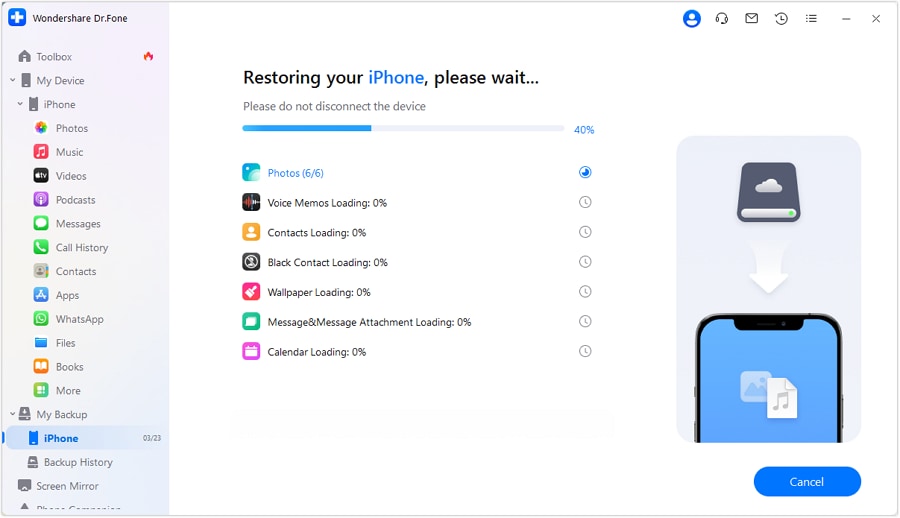
Step 4 Execute the Selective Restore
The highly optimized data transfer sequence begins instantly. An intuitive progress bar provides real-time tracking of the operation. Should you change your mind mid-transfer, a robust "Cancel" protocol is available to safely abort the process.
-
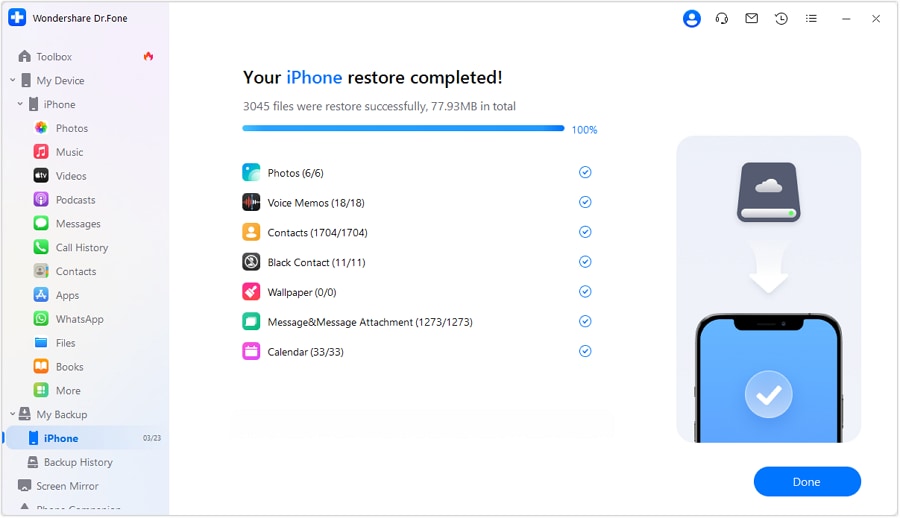
Step 5 Finalize and Reboot
Upon reaching 100% completion, the interface will generate a thorough manifest of the successfully recovered items. Click "Done". Within moments, your iPhone will securely reboot, newly refreshed but steadfastly running your preferred iOS firmware.
The true brilliance of this third-party utility lies in its surgical precision. Are you worried that bypassing iTunes means your data is forever sacrificed? With Dr.Fone, those fears are unwarranted. The system empowers you with granular control, allowing you to manually audit messages, media, contacts, and internal notes before committing to a restore. You are fundamentally decoupled from Apple’s aggressive update cycle, protecting your daily driver from unexpected software shifts, battery hogs, or deprecated app incompatibility.
This solution completely reinvents device maintenance. By operating underneath the standard update protocols, Dr.Fone preserves the system architecture completely intact while refreshing the local storage. It is rigorously tested, universally compatible across generations, and guaranteed not to inject malicious code or compromise system stability.
The Bottom Line
Getting your digital life organized and returning an erratic iOS device to its cleanest operational state shouldn't mandate forcing a massive, unwanted software download. Learning to gracefully reset the iPhone without updating allows you to retain total authority over your application compatibility, visual customizations, and daily workflow. While native maneuvers like Recovery Mode and Setting Shortcuts exist, they frequently expose you to the threat of total data annihilation or unintended updates.
Thanks to dynamic, user-first tools like Wondershare Dr.Fone, you are no longer constrained by the rigid limitations imposed by iCloud sync servers or iTunes interfaces. By leveraging intelligent, one-click restoration techniques, you can safely deploy backups, purge errors, and revitalize your device with absolute confidence. Take control of your mobile ecosystem today, download the free trial of Wondershare Dr.Fone, and discover how effortless it is to dictate exactly how your iPhone operates.


FAQ
-
1. Can you restore an iPhone without updating the software?
Yes, you can easily restore an iPhone without forcing a software update. You can achieve this natively by utilizing the "Erase All Content and Settings" feature directly within the iOS menus, restoring from a previously saved iTunes/iCloud backup, or by employing specialized third-party data management software. -
2. How to restore iPhone without updating Reddit users recommend?
Many Reddit communities dedicated to iOS troubleshooting heavily recommend using the internal Settings app shortcut (General > Transfer or Reset iPhone) to completely wipe the device, as it strictly prevents iTunes servers from triggering an unsolicited firmware download. -
3. Does an iPad restore without update work the same way?
Absolutely. The underlying architecture for iOS and iPadOS is identical in this regard. You can utilize the exact same methods—Settings erasure, iTunes backup deployment, or third-party desktop tools—to safely restore your iPad without bumping up its operating system version. -
4. Will I lose my data if I restore without updating?
If you use the built-in Settings reset or iTunes Recovery Mode without deploying a backup, all localized data will be permanently erased. However, if you utilize specialized software like Dr.Fone or selectively restore an old backup file, you can successfully recover your core data without triggering the firmware update.
 Add Wondershare Dr.Fone as a preferred source on Google