Easy Guide: How to Transfer Files from Android to Mac

May 18, 2026 • Filed to: Device Data Management • Proven solutions
 TL;DR:
To transfer files from Android to Mac, use a wired USB connection with Android File Transfer for Mac OS or Dr.Fone for large data management, or rely on Bluetooth, cloud storage, and SD cards for smaller or cable-free transfers.
● For standard USB connections, you must install Android File Transfer for Mac OS, though it can be slow for large amounts of data; Dr.Fone - Basic provides a faster alternative specifically designed for bulk data exports and cross-platform syncing.
● Wireless transfers using Bluetooth or cloud apps (Google Drive, OneDrive, DropBox) are best suited for small files like pictures, as bulk transfers are bottlenecked by premium storage caps such as the 2 GB free limit on DropBox.
● Moving data via an SD card is a free offline option that bypasses OS software limitations entirely, but it explicitly requires a Mac SD card reader and is restricted by the card's internal storage capacity.
Ask AI for a summary
 ChatGPT
 Perplexity
 Gemini
 Claude
 Grok
Grok
Dr.Fone Basic:
Better Control for Your Phone
Manage, transfer, back up, restore, and mirror your device
Not all Mac users necessarily use an iOS device, and that is perfectly normal. While Android phones offer great customization options, their limited storage options can be a roadblock to saving important data.
But don’t worry! There are various ways to bypass the OS difference between Android and MacOS. You only need the right methods at hand to transfer files from Android to Mac, and we are about to show you how.
In this article, we will dive into the top 5 solutions for transferring files from Android to Mac. We will also guide you through the process with some easy steps so you can carry your file transfer process effortlessly.
Let’s get started!
- Part 1. Transfer files from Android to Mac using USB Cable
- Part 2. Send files from Android to Mac with Bluetooth
- Part 3. Transfer files from Android to Mac with Cloud Services
- Part 4. Transfer files from Android to Mac with SD Card

- Part 5. Best Android to Mac File Transfer Method: Dr.Fone (Fast and Easy)
- Conclusion
Part 1. Transfer files from Android to Mac using USB Cable
Our first method is the most convenient one. Using the USB cable that comes bundled with your Android phone is the smartest way to transfer files to Mac from Android. The USB cable acts as the Image name between the two devices for the file transfer process.
While this method is quite straightforward for Android to Windows file transfer, for Mac, you will need to install the Android File Transfer for Mac OS. Once you are done with that, the rest comes easy.
Steps to transfer files to Mac from Android with a USB Cable
Here are some simple steps to transfer your files to Mac from Android with a USB Cable.
Step 1
Open the Android File Transfer app on your Macbook if it does not open automatically.
Step 2
Now, unlock your Android and connect it to your Mac device using a USB Cable.
Step 3
Next, tap the “USB for File Transfer” notification on your phone. In the next window, select the “Transferring Files/Android Auto” option.

Step 4
Now, open the Android File Transfer app again. Drag and drop files from the app window to the desktop or to a specific folder to start the transfer process.

That’s it! Now, all you have to do is wait until your files are successfully transferred to your Mac. Remember that Android File Transfer for Macbook is mostly useful for transferring small amounts of data as it can be slow and time-consuming.
If this method does not work for you or you don’t have a USB cable at hand, you can try our next option.
Part 2. Send files from Android to Mac with Bluetooth
Our second solution concerns the most traditional way to transfer data between devices. If you are looking to transfer files from Android to mac wirelessly, you can use Bluetooth for this purpose.
Although old-fashioned, this method is quite effective in transferring smaller files like a picture or two. We do not recommend this method for transferring a large amount of data at once. Let’s find out how to use this method to send files to Mac from Android.
Steps to transfer files to Mac from Android with Bluetooth
Here is a stepwise guide to transfer your Android files to MacOS.
Step 1
Turn on Bluetooth on your phone by pulling down the notification panel and tapping on it from the status bar.
Step 2
On your Mac, go to the “System Preferences” and click on “Sharing”. Next, check the Bluetooth Sharing option under Service.

Note: Make sure to choose Accept and Save for receiving items without a notification.
Step 3
To pair your Android with a Mac, go back to System Preferences and click Bluetooth. Here, find the name of your Android device and click to connect.

Step 4
On your Android device, click “Pair” to connect your phone to your Mac device.
Step 5
Now, choose the files you wish to transfer. Click on the Share option and select Bluetooth.
That's all; now your Macbook will start receiving your files. Once done, you can locate the files in downloads or the Bluetooth folder.
Part 3. Transfer files from Android to Mac with Cloud Services
Another convenient way to transfer files from Android to Mac wirelessly is by using Cloud services like Google Drive, OneDrive, DropBox, etc. The best part about using cloud services for data transfer is that they are cross-platform compatible.
The only limitation would be when you need to transfer large amounts of data that exceeds the available cloud storage. If you don’t wish to subscribe to a premium plan, choose the cloud storage that best fits your needs.
Let’s find out how you can use these cloud services to transfer files to Mac from Android.
-
Steps to Transfer Files to Mac from Android with Google Drive
Most Android devices have Google Drive pre-installed. So, it is a convenient way to start transferring your files. Here is how you can do it.
Step 1
Open Google Drive on your Android device.
Step 2
Tap the “+ New” button on the bottom right corner and select “Upload.”
Step 3
Now, choose the files you want to transfer to your Mac and tap “Select” to upload the files.

Step 4
Once the file is uploaded, go to drive.google.com on your Mac browser. Make sure you are signed in with your Google Drive account.
Step 5
Now, find your uploaded file and right-click on it. Select the “Download” option to transfer the file to your Mac.

That’s all; you are done transferring your Android files to your Mac. But if this option does not work for you, you can try our next Cloud solution.
-
Steps to Transfer Files to Mac from Android with OneDrive
Some Android phones also have OneDrive pre-installed. But if you don’t have it, download it from the Google Play store. Then, follow the steps mentioned below.
Step 1
Open OneDrive on your Android device and sign in with your Microsoft account.
Step 2
Now, click the “+” icon located on the top right side of the app and choose “Upload.”
Step 3
Next, select the files you wish to transfer to your Mac and tap “Select” to upload them.

Step 4
Once uploaded, go to onedrive.com using the browser on your Mac device and sign in with your Microsoft account.
Step 5
Right-click the uploaded files and select “Download” to save files on your Mac.

Wait till the files are downloaded successfully. You can access these files in the downloads or the designated folder.
-
Steps to Transfer Files to Mac from Android with DropBox
Our next Cloud solution is one of the oldest cloud services for saving important data and syncing it across devices. To start, download and install DropBox from the Google Play store. Then follow the steps mentioned below to send files from Android to Mac.
Step 1
Open DropBox on your phone and sign in with your email.
Step 2
Now, click the “+” button to upload your files to DropBox.
Step 3
Next, choose whether to “Upload photos or videos” or “Upload folder” to transfer an entire folder at once.

Step 4
To upload photos and videos, select your desired files and tap “Upload.” For folders, tap the desired folder and click “Use this folder” to upload the entire folder.

Step 5
On your Mac, go to dropbox.com and sign in with your Dropbox account. Once done, right-click on the files and select Download to save them to your Mac.

Wait till all the files are transferred. You can locate these files in the downloads or your designated download folder.
DropBox offers a 2 GB of free space. To transfer larger data, you need to get a subscription. But if you prefer to transfer all the data for free, we have another option for you to try below.
Part 4. Transfer files from Android to Mac with SD Card
If you are looking for a free way to transfer files from Android to Mac, then you can use your phone’s SD card. But then again, the data transfer will be limited by the storage capacity of your SD card.
Let’s find out how to do it using the steps mentioned below.
Steps to transfer files with an SD Card
First of all, make sure that your Macbook has an SD card slot and that you have a Mac SD card reader at hand. Then follow the following steps to transfer files to Mac from Android.
Step 1
Open your Android’s internal memory by tapping the “File Manager” or “My Files” and look for the files you want to transfer.
Step 2
Select your desired files and tap the Move or Copy option to transfer files to your SD card.

Step 3
Next, remove the SD card from your device and insert it into your Mac, or use a Mac SD card reader.
Step 4
Now, select the files from the SD card and simply drag and drop them to the desktop or a specific folder.
That’s all. You have transferred your Android files to your Mac successfully. But in case you do not have an SD card or a Mac SD card reader it is best to try a better option.
Part 5. Best Android to Mac File Transfer Method: Dr.Fone (Fast and Easy)
If you are looking to bypass the platform restrictions and manage your data under one roof, Dr.Fone offers a smart solution. With Dr.Fone, you can transfer data between the same and different OS without any complex navigation. With its ease of use and fast performance, you can transfer files from Android to Mac in a few clicks.
Dr.Fone - Basic
One - Stop Solution to Manage and Backup Data&Files on Android Phone
- Transfer files between Android and computer, including contacts, photos, music, SMS, and more.
- Manage, export/import your music, photos, videos, contacts, SMS, Apps, etc.
- Back up Android data to the computer with just one click.
- Manage your Android device on the computer.
- Fully compatible with the newest Android system.


Dr.Fone offers some great features to help you manage your phone’s data effortlessly.
- Complete data transfer, including media files, mobile apps, social data, contacts, etc.
- Export all of your phone data in bulk with a single click.
- Sync your phone to Mac to share data across devices in real-time.
- Drag and drop files to quickly transfer data from Mac back to Android.
Let’s find out how to use this app to transfer your files to Mac.
Steps to Transfer Files to Mac from Android with Dr.Fone
Before we start, make sure you have downloaded and installed Dr.Fone on your Mac device. Then follow the following steps to transfer files to Mac from Android.
Step 1
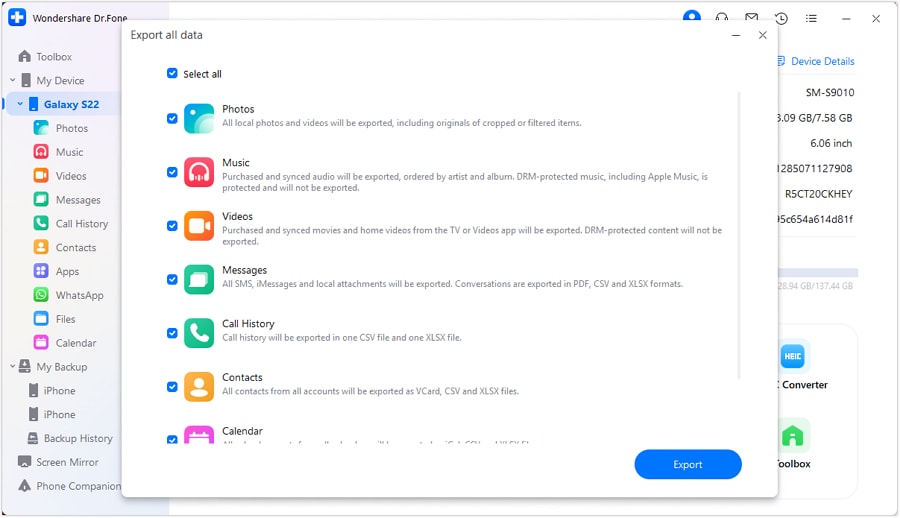
Connect your Mac and Android devices using a USB cable. Once Dr. Fone detects your phone, click the “Export all Data” option at the bottom of the screen.

Step 2
Next, choose the type of files you want to export to your Mac device. Once you have selected your files, click the “Export” option and select the location for exported files.
Step 3
Now, your selected files will start transferring to your Mac from your Android device. You can monitor it in the window, as shown below.

Step 4
Once the data transfer is completed, you will be informed about it. Now, you can click “Open in Folder” to view the location of the exported data.

That’s it. You have successfully transferred your files. Dr.Fone offers the best Android file transfer for Mac to transfer data across any platform seamlessly.
Conclusion
The data transfer process between Mac and Android can be tricky due to platform restrictions. But with our full guide on hand, you can transfer files to Mac from Android effortlessly. You can either use a USB cable for this purpose or opt for a wireless solution.
Bluetooth offers a reliable data transfer solution but only for a smaller size of data. You can also use Cloud services like OneDrive, Google Drive, and DropBox to transfer files from Android to Mac wirelessly.
But for a fast and efficient transfer of large amounts of data between Android and Mac, Dr.Fone Basic offers the best solution. This robust app seamlessly transfers any type of data without complex navigation.
Dr.Fone Basic:
Better Control for Your Phone
Manage, transfer, back up, restore, and mirror your device


Android Manage
- Android to iTunes/iCloud
- Android to Mac
- 1. Transfer Data from Android to Mac
- 2. Transfer Videos from Android to Mac
- 3. Transfer Files from Android to Mac
- 4. Connect Android with Mac
- 5. Transfer Photos from Android to Mac
- 6. Sync Android with Mac OS X
- Android to PC
- 1. Transfer Files Using USB Cable
- 2. Share Apps for Android to PC
- 3. Transfer Photos to Windows 10
- 4. Transfer Contacts to PC
- 5. Transfer Photos from Android
- 6. Transfer Files from Android to PC
- 7. Backup and Transfer SMS
- 8. Transfer Photos from Android to PC
- 9. Transfer Videos from Phone to Computer
- 10. Best MoboRobo Alternative to Manage and Transfer Data
- iCloud to Android
- 1. Tips to Sync Data to Android
- 2. Set Up iCloud Account on Android
- 3. Transfer iCloud Contacts
- 4. Transfer iCloud Photos to Android
- iTunes to Android
- 1. Transfer iTunes Audio Books
- 2. Sync iTunes Music with Google Play
- 3. Copy iTunes Playlists to Hard Drive
- 4. Transfer Music from iTunes
- Mac to Android
- 1. Transfer Files from Mac to Android
- 2. Send Files from Mac to Android
- 3. Transfer Music from Mac
- 4. Transfer Photos from Mac
- PC to Android
- 1. Transfer Files to Android Wi-Fi
- 2. Transfer Pictures from Computer
- 3. Transfer Files from PC to Android
- 4. Transfer data from Acer device
- Manage Tips
- ● Manage/transfer/recover data
- ● Unlock screen/activate/FRP lock
- ● Fix most iOS and Android issues
- Manage Now Manage Now Manage Now


Bhavya Kaushik
contributor Editor