
How To Backup iPhone to DropBox and Finding Alternatives! A Step By Step Guide
iPhone Backup
- iPhone Data Backup
- 1. Back up iPhone in Recovery Mode
- 2. Back Up iPhone With/Without iTunes
- 3. Back up iPhone to Mac
- 4. Back up iPhone/iPad to Computer
- 5. Back up iPhone to Mac Catalina
- 6. Back up Jailbreak Apps And Restore
- 7. iPhone Backup Software
- 8. Back up iPhone/iPad Easily
- 9. Back up iPhone/iPad in DFU Mode
- 10. Back up iPhone Apps and App Data
- 11. Back up Notes on iPhone and iPad
- 12. Back up iOS to External Hard Drive
- 13. Export Notes from iPhone to PC/Mac
- 14.Back up iPhone Photos to Google Photos
- 15. Back Up Your iPhone Voicemails
- 16. Back Up to External Drive
- 17.How to Back Up to NAS
- 18.Back Up iPhone With Broken Screen
- 19.Back Up iPhone to Google Drive
- 20.Buy Used iPhones
- 21.Sell Used Phone for Cash
- 22.Sell Used iPhone for Dollar
- 23.How Much is My iPhone Worth
- iPhone Data Recovery
- 1. Recover iPhone Data Without Backup
- 2. Restore Calendar on iPhone
- 3. Recover Call History on iPhone
- 4. Recover iPhone Lost Data
- 5. Restore iPhone in Recovery Mode
- 6. Undelete iPhone Backup Files
- 7. Recover Deleted iPhone Messages
- iPhone Data Restore
- 1. Restore iPhone from iTunes Backup
- 2. Restore iPhone after Downgrade
- 3. Restore iPhone from Backup
- 4. Restore iPhone from iPad Backup
- 5. Restore iPhone from DFU Mode
- 6. Restore iPhone Deleted Text Message
- iPhone Backup Problems
- 1. Find iPhone Backup Location on Mac
- 2. iPhone Backup Password Never Set
- 3. iPhone Backup Password Forget
- 4. iCloud Backup Taking Forever
- 5. iPhone Won't Backup to iCloud
- 6. iTunes Won't Backup iPhone
- iPhone Restore Problems
- 1. iTunes Stuck on Verifying iPhone
- 2. Not Space to Restore iPhone Backup
- 3. iTunes Backup Not Restoring
- 4. iPhone Won't Restore
- WhatsApp Backup & Restore
- 1. WhatsApp from Google Drive to iOS
- 2. Restore Old WhatsApp Backup
- 3. Restore WhatsApp Chat on iPhone
- 4. Retrieve WhatsApp Chat History
- 5. See Deleted Messages on WhatsApp
- 6. Restore WhatsApp Stuck on iPhone
- 7. iPhone WhatsApp to Google Drive
- 8. Back Up WhatsApp on iPhone
- 9. Backup WhatsApp Data before Changing Number
- iPhone Backup Tips
- 1. Extract Data From iPhone
- 2. Encrypt iPhone Backup
- 3. Reset iPhone Backup Password
- 4. Extract iPhone Backup in Win 10
- 5. How Long take iPhone to Backup
- 6. Find iPhone Backup Location
- 7. iPhone Backup Password
- 8. View iPhone Backup on Computer
- 9. iPhone Backup with iTunes/iCloud
- 10.Check Last Backup on iPhone
- 11. How To Backup Foldable iPhone
- 12. Best Backup Chargers for iPhone
- 13. Speed Up Your iPhone Backups
- 14. Save Data When iPhone Disabled
- ● Manage/transfer/recover data
- ● Unlock screen/activate/FRP lock
- ● Fix most iOS and Android issues
- Free Download Free Download Free Download

Jun 30, 2026 • Filed to: Backup & Restore Solutions • Proven solutions
 TL;DR:
iPhone users can automate media backups via Dropbox's "Camera Uploads" feature, or use the Wondershare Dr.Fone desktop toolkit for comprehensive, wireless local computer backups to bypass cloud storage limits.
● Dropbox automatically encrypts and syncs iOS camera roll files across devices, but restricts free users to 2GB of storage, requiring paid subscriptions starting at $11.99 per month for larger data sets.
● Wondershare Dr.Fone provides a local alternative for Windows and Mac users wanting to back up an entire iOS device without monthly cloud fees, supporting selective data exports and zero-data-loss restorations.
● To automate these backups, Dropbox requires toggling "Turn on Camera Uploads" within the iOS app's Accounts tab, while Dr.Fone requires linking the iPhone and PC to the same Wi-Fi network and setting schedules via desktop Backup Preferences.
Ask AI for a summary
 ChatGPT
 Perplexity
 Gemini
 Claude
 Grok
Grok
Dr.Fone Basic:
Better Control for Your Phone
Manage, transfer, back up, restore, and mirror your device
The phone is a treasure box of your photos, videos, and documents. Especially in this digital age, the dependence on these small electronic devices is immense.
As an iOS user, the stress of losing the data is constant. A minor malfunction- and you will lose the entire data! Amidst this regularly backing up your iPhone can save you from the hassle.
To save your day, this article will walk you through a step-by-step guide to back up your iPhone to Dropbox. Let’s also explore other effective ways to back up data with Dr.Fone. Here, dive into the details of today’s article!
Part 1: Why Backup Phones on Dropbox? Pros and Cons
iOS users prefer backing up data on iCloud. However, iCloud’s interface can be complex to understand. Dropbox is the top alternative Apple users use to save their phone data.
Dropbox is a cloud-based storage platform that boasts seamless data backup and accessibility across multiple devices. The data is continuously synchronized across devices, ensuring reliability and convenience.
However, Dropbox comes with its limitations. Here is a list of pros and cons of using Dropbox to safeguard your crucial data.
Benefits of Using Dropbox:
Here are the reasons why Dropbox is a safe choice to save your phone’s data.
Cross-Platform Compatibility: Seamlessly access files on the Dropbox app via multiple devices like iPhone, Mac, and iPad. Users can easily find or restore files to a new device as well.
Quick Automatic Backup: Dropbox offers automatic, real-time syncing that ensures file accessibility. iPhone data is automatically backed up on Dropbox, synchronizing files across all devices.
Space Management: Unlike iCloud, the Dropbox application allows ample data storage space, up to 2GB, for free. Backing up data clears phone memory, creating space for new data.
Data Encryption: Privacy is a crucial part of all backup applications. Dropbox is equipped with data encryption, providing an additional lock for data security. The data is safeguarded from breaches, enhancing security.
Drawbacks of using Dropbox:
While Dropbox is a very handy application for managing files and backing up data, it has limitations. Here are the cons of relying on Dropbox:
Poor Storage Space: If you want to lean just on Dropbox’s free space, the situation is disappointing. It only offers 2GB of space, which cannot accommodate large backups.
Expensive Subscriptions: Dropbox’s paid subscriptions are available for a hefty price tag. Compared to other applications, its lowest price plan starts from $11.99 a month or $119.88 per annum. Dropbox lacks miserably because solid alternatives are available for a cheaper bargain.
Dropbox has its strengths, yet its weaknesses may disappoint many users. Nonetheless, it competes strongly as a secure backup application.
Part 3: How To Backup iPhone to Dropbox- Step-by-Step Guide.
Overall, backing up an iPhone to Dropbox ensures convenience. It offers data security and space for new files.
Backing up data on an iPhone is simple and easy. Here is a step-by-step guide to do in just a few taps:
Step 1: From the App Store, download the Dropbox app on your iOS.
Step 2: Tap and open the Dropbox application. Now, sign up or sign in with your credentials to set up an account.

Step 3: Navigate to the Accounts in the lower tool tab on the screen. Choose Camera Uploads.

Step 4: In the next screen, select your backup settings. Choose the destination for uploading files. Turn the toggle on to Include Videos or back up with cell data. Tap on Turn on Camera Uploads.

Step 5: After the setting selection, connect the device to WiFi. All images from your Camera roll will be automatically backed up to Dropbox.
Step 6: Periodically check Dropbox to ensure all files are synced to the application in real time.
And that is it! The interface is simple and user-friendly. Smoothly transfer iPhone photos to Dropbox in just a few taps.
Part 4: Finding Alternatives to DropBox: Backup iPhone with Dr.Fone
Considering the drawbacks of Dropbox, if you are confused about the application, here is a solid alternative: Wondershare Dr.Fone.
Wondershare Dr.Fone Toolkit is a one-stop solution for your phones. Whether you are challenged by phone locks, data transfer, recovery of lost data, or phone backup- it caters to all! It encompasses solutions to all the problems of Android or iOS.
Dr.Fone safely backups data and safeguards it against accidental loss or damage. The application seamlessly backups data automatically and wirelessly. Here is why Dr.Fone should be your ultimate phone buddy!
Dr.Fone's robust interface and reliable functionality are indicative of its high performance. Follow these steps here to learn how to back up your data on your iPhone.
Dr.Fone - Phone Backup (iOS)
Backup iPhone with Dr.Fone
- One-click to backup the whole iOS device to your computer.
- Allow previewing and selectively export contacts from iPhone to your computer.
- No data loss on devices during the restoration.
- Works for all iOS devices. Compatible with the latest iOS version.


How To Transfer iPhone Files to Dr.Fone-Step by Step:
Here is a step-by-step guide to teach you everything in detail.
Step 1: Set Up the Software
Download and Install the Dr.Fone application on your PC. Sign up or sign in with your credentials to set up the software.
Step 2: Start the iOS Backup
Next, Launch the Dr.Fone application. From the settings on the left panel, choose My Backup. Click Back up Now to start the backup on your iPhone.

Step 3: Back Up Files
Dr. Fone automatically detects the file types of backup data. Let your files be transferred to Dr.Fone. You can check the progress on your PC screen. To stop the backup, click Cancel anytime.

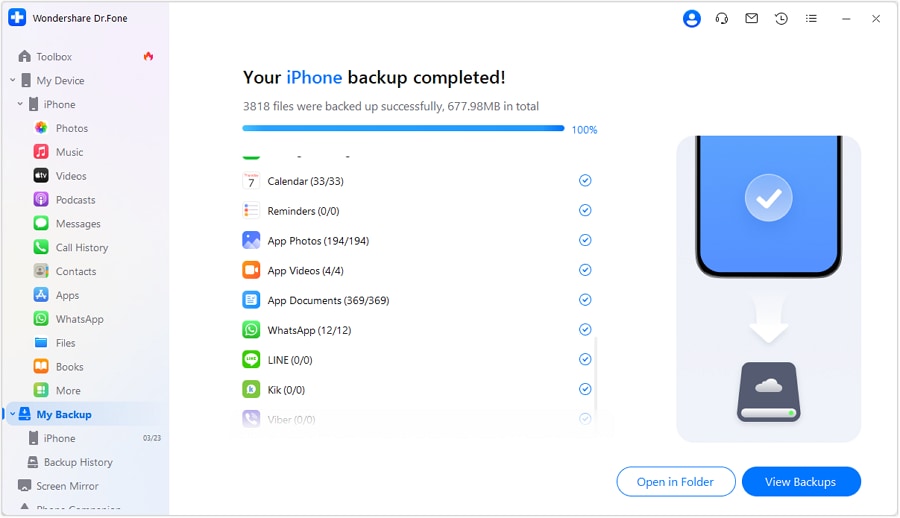
Step 4: View File Backups
Once the backup is complete, the screen will display all the file details. On the lower right side of the screen, click View Backup to preview the files. Or, click View in Folder to see the new destination for your data.
Just four simple steps and the data is easily backed up. Dr.Fone is straightforward and hassle-free. But it doesn’t stop here! We have a special bonus tip to save you from manual backups.
Part 5: Bonus Tip: How to Backup iPhone to Computer Automatically
Dr.Fone brings convenience to your fingertips. Just a few clicks and all your files are automatically backed up. Here is how to do it:
Step 1: Open Backup Settings
Launch the Dr.Fone toolkit on a PC. In the left panel, navigate to My Devices > Backup Preferences. A new window to configure backup settings will open.
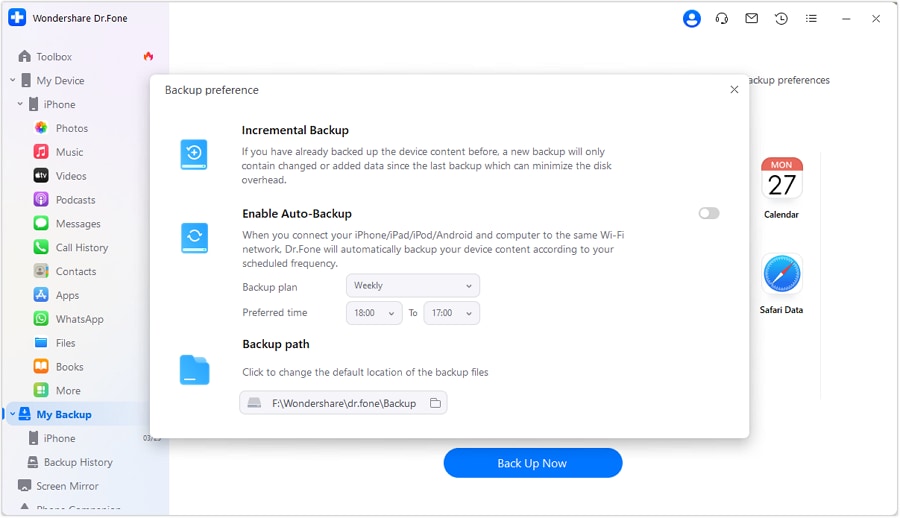
Step 2: Connect iOS and PC with Wi-Fi
Now, connect your iPhone and PC with the same Wi-Fi and enable the toggle for Auto-Backup. Next, choose a Backup Plan and Preferred Time for auto file backups.

Step 3: Check the Backup History
All files will be backed up using the new settings. Make sure to check the Backup History periodically to ensure auto-sync.

Dr.Fone offers flexibility in backing up data per the user’s preference. Auto backups are convenient and can be scheduled during off-peak hours for minimal disruption. Overall, Dr.Fone aces with its excellent performance and expansive feature set.
Conclusion:
And it’s a wrap! When iCloud doesn't accommodate your phone backups, Dropbox is a reliable solution. The article has thoroughly covered how to back up iPhone to Dropbox. However, considering Dropbox’s limitations, there are always better alternatives to lean toward, like Wondershare Dr.Fone!
It is a comprehensive toolkit that briefly caters to all phone bugs for Android or iOS. Dr.Fone offers reliable and secure data backups for your device. The simple yet intuitive interface makes it suitable for beginners and professionals. With a fast 1GHz processor, transfer all your files smoothly!
FAQs
Dr.Fone Basic:
Better Control for Your Phone
Manage, transfer, back up, restore, and mirror your device


Daisy Raines
staff Editor