
A Step-by-Step Guide to Backing Up and Restoring Your iPhone to iTunes
iPhone Backup
- iPhone Data Backup
- 1. Back up iPhone in Recovery Mode
- 2. Back Up iPhone With/Without iTunes
- 3. Back up iPhone to Mac
- 4. Back up iPhone/iPad to Computer
- 5. Back up iPhone to Mac Catalina
- 6. Back up Jailbreak Apps And Restore
- 7. iPhone Backup Software
- 8. Back up iPhone/iPad Easily
- 9. Back up iPhone/iPad in DFU Mode
- 10. Back up iPhone Apps and App Data
- 11. Back up Notes on iPhone and iPad
- 12. Back up iOS to External Hard Drive
- 13. Export Notes from iPhone to PC/Mac
- 14.Back up iPhone Photos to Google Photos
- 15. Back Up Your iPhone Voicemails
- 16. Back Up to External Drive
- 17.How to Back Up to NAS
- 18.Back Up iPhone With Broken Screen
- 19.Back Up iPhone to Google Drive
- 20.Buy Used iPhones
- 21.Sell Used Phone for Cash
- 22.Sell Used iPhone for Dollar
- 23.How Much is My iPhone Worth
- iPhone Data Recovery
- 1. Recover iPhone Data Without Backup
- 2. Restore Calendar on iPhone
- 3. Recover Call History on iPhone
- 4. Recover iPhone Lost Data
- 5. Restore iPhone in Recovery Mode
- 6. Undelete iPhone Backup Files
- 7. Recover Deleted iPhone Messages
- iPhone Data Restore
- 1. Restore iPhone from iTunes Backup
- 2. Restore iPhone after Downgrade
- 3. Restore iPhone from Backup
- 4. Restore iPhone from iPad Backup
- 5. Restore iPhone from DFU Mode
- 6. Restore iPhone Deleted Text Message
- iPhone Backup Problems
- 1. Find iPhone Backup Location on Mac
- 2. iPhone Backup Password Never Set
- 3. iPhone Backup Password Forget
- 4. iCloud Backup Taking Forever
- 5. iPhone Won't Backup to iCloud
- 6. iTunes Won't Backup iPhone
- iPhone Restore Problems
- 1. iTunes Stuck on Verifying iPhone
- 2. Not Space to Restore iPhone Backup
- 3. iTunes Backup Not Restoring
- 4. iPhone Won't Restore
- WhatsApp Backup & Restore
- 1. WhatsApp from Google Drive to iOS
- 2. Restore Old WhatsApp Backup
- 3. Restore WhatsApp Chat on iPhone
- 4. Retrieve WhatsApp Chat History
- 5. See Deleted Messages on WhatsApp
- 6. Restore WhatsApp Stuck on iPhone
- 7. iPhone WhatsApp to Google Drive
- 8. Back Up WhatsApp on iPhone
- 9. Backup WhatsApp Data before Changing Number
- iPhone Backup Tips
- 1. Extract Data From iPhone
- 2. Encrypt iPhone Backup
- 3. Reset iPhone Backup Password
- 4. Extract iPhone Backup in Win 10
- 5. How Long take iPhone to Backup
- 6. Find iPhone Backup Location
- 7. iPhone Backup Password
- 8. View iPhone Backup on Computer
- 9. iPhone Backup with iTunes/iCloud
- 10.Check Last Backup on iPhone
- 11. How To Backup Foldable iPhone
- 12. Best Backup Chargers for iPhone
- 13. Speed Up Your iPhone Backups
- 14. Save Data When iPhone Disabled
- ● Manage/transfer/recover data
- ● Unlock screen/activate/FRP lock
- ● Fix most iOS and Android issues
- Free Download Free Download Free Download

Jun 30, 2026 • Filed to: Backup & Restore Solutions • Proven solutions
 TL;DR:
To locally back up and restore your iPhone without cloud storage, use iTunes for Windows 10 or 11, Finder for macOS Catalina or newer, or Wondershare Dr.Fone for selective data management.
● Apple's native iTunes and Finder applications perform an all-or-nothing backup of your device and require manually checking the encryption box to secure the data with a password.
● Photos previously backed up directly to your computer are excluded from the standard iTunes device restore and must be manually reloaded using the Photos app or Image Capture.
● Wondershare Dr.Fone acts as a third-party alternative for Mac and Windows users who need to schedule automatic backups or selectively restore specific data categories without overwriting the entire device.
Ask AI for a summary
 ChatGPT
 Perplexity
 Gemini
 Claude
 Grok
Grok
Dr.Fone Basic:
Better Control for Your Phone
Manage, transfer, back up, restore, and mirror your device
Making the daily habit of backing up your iPhone to iTunes is probably the smartest thing you can do to protect your data. In case you misplace or damage your device, or should you need to reset it, having a recent backup means that you can immediately transfer your personal information, photos, messages, and so on to a new iPhone.
Furthermore, it also spares you both the annoyance of losing any irreproducible memories or critical information and the wasting of your hours that you might spend manually setting up your new phone.
iTunes has for quite some time now been the default for the people with iPhones who keep their device backups on a computer. Although beginning with the new Mac version, iTunes began to transfer the responsibility for backup to the Finder application while the backup process for old Windows still remains in iTunes.
No matter if you are a Mac or PC user, you can have a local backup of your data to iTunes or Finder that does not include cloud storage.
The following guide will take you through the process of how to back up your iPhone to your iTunes!
Part 1: Using iTunes to Backup Your iPhone

If you're running Windows 10 or 11 on your PC, you'll need to use the iTunes application to backup the iphone to itunes. Don't worry - the process is very straightforward! Just follow these simple steps:
Step 1: First, make sure you have the latest version of iTunes installed on your computer. You can download it for free from the Apple website if you don't have it yet.
Step 2: Connect your iPhone to your PC using the USB cable it came with. iTunes should automatically launch and detect your phone.
Step 3: In the iTunes window, click on the small iPhone icon near the top left corner.

Step 4: On the next screen, you should see an option for "Summary".

Step 5: Click the button that says "Back Up Now" to initiate a manual backup.
Step 6: iTunes will start creating a backup of your iPhone's data, apps, photos, and settings. Depending on how much content you have on your device, this could take a little while to complete. Just let it run until you see the status show "iPhone backup complete".
That's it - you've successfully created a backup of your iPhone! The great thing about doing local iTunes backups is that you can choose to encrypt the backup data as an optional step for enhanced security. If you'd like your backup to be encrypted, just check the box next to "Encrypt iPhone backup" before clicking "Back Up Now".
You'll be prompted to create a password - be sure to pick something secure that you'll remember, as you'll need this password to access the encrypted backup in the future.
One other neat feature is that iTunes will automatically create a new backup every time you connect your iPhone while installing a software update or new version of iOS. So your backups tend to stay relatively up-to-date without you really having to think about it.
Part 2: Restoring Your iPhone From an iTunes Backup
Okay, so you've got backups diligently created - but how do you actually restore that data if you get a new iPhone down the road? Not to worry, it's just as simple. Here are the steps:
Step 1: First, you'll need to prepare your new iPhone for the restore by going through the initial setup process until you get to the screen asking how you'd like to "Transfer or Restore iPhone Data".
Step 2: At this point, connect your new iPhone to the computer that has your latest iTunes backup.
Step 3: Once your device shows up in iTunes, click on the iPhone icon again like you did when creating the backup.

Step 4: Next, click on summary and then the "Restore Backup" button in the middle of the screen.
Step 5: iTunes will show you a list of available backups for your device. Select the most recent one you'd like to restore from.
Step 6: If the backup is encrypted, you'll be prompted for the password you created earlier. Enter it, and click "Restore".
Step 7: iTunes will now start extracting all the data from your backup and restoring it to your new iPhone. This process can take a while, but there's no need to do anything else until it completes.
And that's it - your new iPhone now has all your old apps, data, photos, and settings from your previous device, all thanks to that iTunes backup you created earlier!
One quick note - if you also backup your iPhone photos directly to your computer by connecting your device, iTunes will only restore the photos from your iPhone backup. To reload your photo library from your computer backups, you'll need to use the Photos app or Image Capture utility after the device restore is complete.
Part 3: Using Finder to Backup Your iPhone To iTunes

For Mac users running macOS Catalina or newer, the process for creating iPhone backups has shifted over to using the Finder app instead of iTunes. But don't worry, it works in a very similar fashion. Here are the steps:
Step 1: Start by connecting your iPhone to your Mac using the USB cable.
Step 2: Open the Finder app, then click on your iPhone under the "Locations" section in the sidebar.
Step 3: You may get a prompt to enter your passcode or trust this computer - go ahead and do so.
Step 4: In the main finder window, you should see a button for creating backups under "Backups" Click the "Back Up Now" button to start creating a local backup of your iPhone to this Mac.

Step 5: Just like iTunes, the Finder shows you the progress as your iPhone backup is created. Once completed, you'll see the timestamp of the freshly created backup.

Step 6: If you'd like your backups to be encrypted, simply check the box next to "Encrypt local backup" before clicking "Back Up Now". You'll set an encryption password during the process.
The Finder now will do the job of copying all your apps, data, settings, and content from the backup and load it to your new iPhone. Once this operation is done your new device will be an exact copy of the way you used to have your old iPhone and the backup is made.
If you look at it, the technique of crafting local backups for your iPhone’s data using iTunes or Finder on a Windows PC or Mac is not difficult at all. In such a way, a habit of regularly backing up your device automatically keeps all your information saved. If later on, you need to wipe your iPhone or transfer to a new one, you'll just have to restore all the data with a few clicks.
Part 4: The Best Tool to Backup & Restore iPhone You Should Know
When it comes to backing up and restoring data on your iPhone, one popular tool is Wondershare Dr.Fone - a third-party software that offers a user-friendly way to create backups of your iPhone data and restore it when needed. Dr.Fone is developed by Wondershare and is available for both Windows and Mac operating systems.
With Dr.Fone, you can backup a wide range of data from your iPhone, including contacts, messages, call logs, photos, videos, notes, calendars, reminders, and more. It also allows you to selectively restore specific types of data from your backups, rather than having to restore everything at once.
Dr.Fone - Phone Backup (iOS)
The Best Tool to Backup & Restore iPhone You Should Know
- One-click to backup the whole iOS device to your computer.
- Allow previewing and selectively export contacts from iPhone to your computer.
- No data loss on devices during the restoration.
- Works for all iOS devices. Compatible with the latest iOS version.


Using Dr.Fone for your iPhone backup needs is incredibly simple. Once you've downloaded and installed the software on your Windows PC or Mac, just follow these steps:
Step 1: Launch Dr.Fone and connect your iPhone to your computer using a USB cable.
Step 2: The software will automatically detect your device. In the main menu, click on the "my backup" option.

Step 3: On the next screen, you'll see options to either create a new manual backup by clicking "Backup" or set up automatic scheduled backups. Dr. Fone will clearly demonstrate what backup contains, like contacts and messages, app data, photos, notes and so on and so forth.
Step 4: For that, just click the "Start Backup" button and Dr. Fone will begin backing up your device by encompassing all your device data. Live monitoring is also something you can do.

Step 5: In the end, the backup will be copied onto your computer hard drive completely safely. From the Dr.Fone interface, you can browse as well as verify the backup you have.
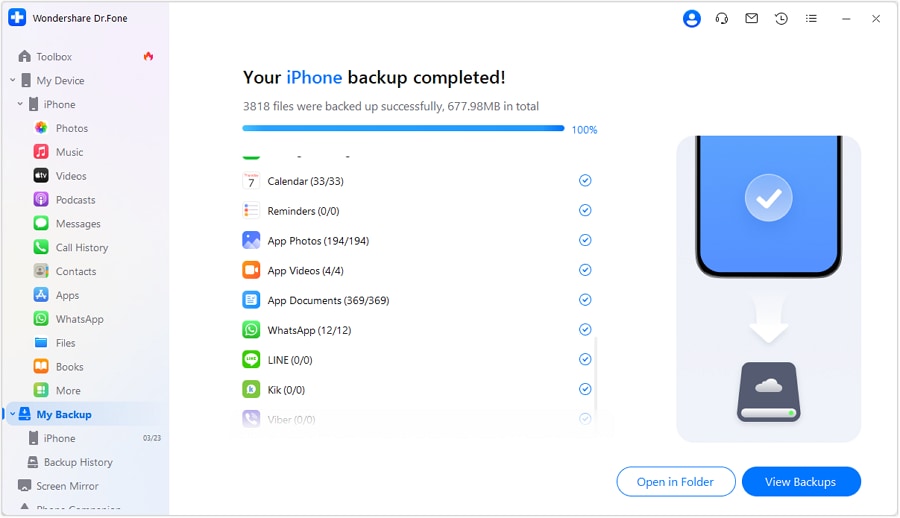
Just a few clicks later, you see that your iPhone is fully and safely backed up, and, indeed, the backup features many more categories of data than the standard backup made with iTunes.
Conclusion
This article has shown you in detail how to take a backup and restore your iPhone data on to itunes; whether it is iTunes/Finder or the powerful third-party program called Dr. Fone. Although the inbuilt iPhone backup options of Apple are practical, they are not as advanced as the Dr. Fone app which clearly shows how the built-in iPhone backups are just a basic feature.
Using the powerful features of Wondershare Dr. Fone such as automatic scheduled backups, encryption, and selective restores, you get the advantage of a fast, flexible, and secure way to completely back up the data of your iPhone. Its data recovery and device repair competencies will also immensely advance in safeguarding your data at all times.
Recall that the most important thing to have in place in order to prevent data loss is backup creation before something goes wrong with your phone. Whether it’s the old but gold iTunes method or you’re adamant about the extra power of Dr. Fone, start the habit of backing up. That is to say, you will be a rightful owner of a precaution against a need to reset, replace, or repair your iPhone for you will have your latest backup to restore from.
Dr.Fone Basic:
Better Control for Your Phone
Manage, transfer, back up, restore, and mirror your device


Daisy Raines
staff Editor