A Comprehensive Guide On How To Hide And Archive Text Messages On iPhone [iPhone 17 Supported]
iPhone Backup
- iPhone Data Backup
- 1. Back up iPhone in Recovery Mode
- 2. Back Up iPhone With/Without iTunes
- 3. Back up iPhone to Mac
- 4. Back up iPhone/iPad to Computer
- 5. Back up iPhone to Mac Catalina
- 6. Back up Jailbreak Apps And Restore
- 7. iPhone Backup Software
- 8. Back up iPhone/iPad Easily
- 9. Back up iPhone/iPad in DFU Mode
- 10. Back up iPhone Apps and App Data
- 11. Back up Notes on iPhone and iPad
- 12. Back up iOS to External Hard Drive
- 13. Export Notes from iPhone to PC/Mac
- 14.Back up iPhone Photos to Google Photos
- 15. Back Up Your iPhone Voicemails
- 16. Back Up to External Drive
- 17.How to Back Up to NAS
- 18.Back Up iPhone With Broken Screen
- 19.Back Up iPhone to Google Drive
- 20.Buy Used iPhones
- 21.Sell Used Phone for Cash
- 22.Sell Used iPhone for Dollar
- 23.How Much is My iPhone Worth
- iPhone Data Recovery
- 1. Recover iPhone Data Without Backup
- 2. Restore Calendar on iPhone
- 3. Recover Call History on iPhone
- 4. Recover iPhone Lost Data
- 5. Restore iPhone in Recovery Mode
- 6. Undelete iPhone Backup Files
- 7. Recover Deleted iPhone Messages
- iPhone Data Restore
- 1. Restore iPhone from iTunes Backup
- 2. Restore iPhone after Downgrade
- 3. Restore iPhone from Backup
- 4. Restore iPhone from iPad Backup
- 5. Restore iPhone from DFU Mode
- 6. Restore iPhone Deleted Text Message
- iPhone Backup Problems
- 1. Find iPhone Backup Location on Mac
- 2. iPhone Backup Password Never Set
- 3. iPhone Backup Password Forget
- 4. iCloud Backup Taking Forever
- 5. iPhone Won't Backup to iCloud
- 6. iTunes Won't Backup iPhone
- iPhone Restore Problems
- 1. iTunes Stuck on Verifying iPhone
- 2. Not Space to Restore iPhone Backup
- 3. iTunes Backup Not Restoring
- 4. iPhone Won't Restore
- WhatsApp Backup & Restore
- 1. WhatsApp from Google Drive to iOS
- 2. Restore Old WhatsApp Backup
- 3. Restore WhatsApp Chat on iPhone
- 4. Retrieve WhatsApp Chat History
- 5. See Deleted Messages on WhatsApp
- 6. Restore WhatsApp Stuck on iPhone
- 7. iPhone WhatsApp to Google Drive
- 8. Back Up WhatsApp on iPhone
- 9. Backup WhatsApp Data before Changing Number
- iPhone Backup Tips
- 1. Extract Data From iPhone
- 2. Encrypt iPhone Backup
- 3. Reset iPhone Backup Password
- 4. Extract iPhone Backup in Win 10
- 5. How Long take iPhone to Backup
- 6. Find iPhone Backup Location
- 7. iPhone Backup Password
- 8. View iPhone Backup on Computer
- 9. iPhone Backup with iTunes/iCloud
- 10.Check Last Backup on iPhone
- 11.How To Encrypt iPhone Backup
- 12. Best Backup Chargers for iPhone
- 13. Speed Up Your iPhone Backups
- 14. Save Data When iPhone Disabled
- ● Manage/transfer/recover data
- ● Unlock screen/activate/FRP lock
- ● Fix most iOS and Android issues
- Back up Now Back up Now Back up Now
Dec 31, 2025 • Filed to: Backup & Restore Solutions • Proven solutions
Dr.Fone Basic:
Better Control for Your Phone
Manage, transfer, back up, restore, and mirror your device
Many of us have personal or sensitive text conversations on our iPhones that we’d prefer to keep private. Whether it’s a heartfelt chat with a partner or confidential information, ensuring that no one else can access these messages is essential. Even with a strong passcode or Face ID in place, there’s always a risk if you lose your device, lend it out, or have a curious family member nearby. With the latest iPhone 17, it’s easier than ever to hide text messages on iPhone or even archive text messages on iPhone to protect your privacy and keep your personal data secure.
The good news is that Apple has built some handy privacy features into your iPhone's Messages app. And there are also some third-party app solutions and clever little tricks you can use to hide texts on your iphone.
In this guide, we’ll walk you through some of the easiest and most effective methods how to hide text messages on an iPhone without having to permanently delete them.
- Part 1: Send Invisible Ink Messages
- Part 2: Back Up Sensitive Texts Securely
- Part 3: Filter Unknown Senders
- Part 4: Use Screen Time Limits
- Part 5: Disable Message Previews
- Part 6: Mute Message Notifications
- Part 7: Set Auto-Lock For Privacy
- Part 8. Bonus Pro Tip: Using Dr.Fone for the Ultimate iPhone Backup

Part 1: Send Invisible Ink Messages
One of the easiest and most clever ways to hide texts on your iPhone is by using the built-in "invisible ink" feature in the Messages app. This cool effect keeps the contents of your messages blurred and hidden until you physically swipe over the text bubble to reveal what it says.
Even better, this invisible ink cloak of secrecy extends to both parties in the conversation as long as you're messaging another iPhone user. The hidden text on your iphone won't be visible on either of your devices until swiped over.
To send an invisible ink text, just follow these simple steps:
Step 1:Open up a Message conversation, either new or existing
Step 2:Type out your super-secret text message
Step 3:Instead of just tapping the Send button, press and hold it down
Step 4:Select "Invisible Ink" from the optional effects that pop up

Step 5:Tap the Send button one more time
That's it! Your message will appear blurred out with animated "static" covering it, both on your iPhone and the recipient's device. To reveal and read the message, you or the other person just needs to swipe a finger over the text bubble to make it visible for a few seconds before it re-hides itself.
Part 2: Back Up Sensitive Texts Securely
Maybe invisible ink mode isn't enough security for your most private text conversations, and you want to hide text messages off your iPhone's Messages app. In that case, you can back up individual messages or entire conversations to a secure password-protected notes file.
To do this, you'll first copy or screenshot any texts you want to save and remove from Messages. Then just:
Step 1:Open the Notes app and start a new note
Step 2:Paste in the copied text or insert your screenshot(s)

Step 3: In Settings,> Notes set up a password specifically for the Notes app
Step 4: Now you'll need to enter that password to access any of your notes

Once your texts are safely backed up to a password-protected note, you can delete that message thread or conversation in the Messages app without losing it forever. Just be sure to also clear any screenshots of the texts from your Photos app if you went that route.
This keeps your private text convos away from prying eyes but still backed up just in case you need to refer back to them later on. A good middle ground between privacy and preserving your conversations!
Part 3: Filter Unknown Senders
Deleting or choosing to archive text messages on iPhone may work in some cases, but sometimes you just need a quick way to hide text messages on iPhone from specific contacts. Fortunately, iOS includes a built‑in message filter that makes it easy to keep certain conversations private without removing them entirely.
You can set it to automatically filter any incoming messages from contacts you don't have saved in your phone as "Unknown Senders." That way any texts from that secret lover or unsaved friend's number won't show up in your main messaging inbox for anyone to see at a glance.
Here's how to enable Unknown Senders filtering:
Step 1:Go to Settings > Messages
Step 2:Scroll down and toggle on "Filter Unknown Senders"

Step 3:In the Messages app itself, go to Filters (top left) and select "Known Senders"
Step 4:Now only saved contacts will show in your main message list
Any incoming texts from unsaved numbers you want to keep private will be filtered out. To view them, just go back to the Filters section and choose "Unknown Senders" or "All Messages". You can keep those private conversations separated until you want to view them.
Part 4: Use Screen Time Limits
Another effective way to hide texts on iPhone is by setting limits through iOS's built-in Screen Time feature. This lets you basically "lock" certain apps or entire app categories so they can't be opened without entering your Screen Time passcode. To lock down Messages using Screen Time:
Step 1:Go to Settings > Screen Time and turn it on

Step 2:Tap “App Limits” and toggle it on
Step 3:Select "Add Limit" and choose the category that includes Messages (like Social)
Step 4:Set the allowed time limit (like 1 minute per day)
Step 5:Create a Screen Time passcode when prompted
Now you can only access Messages for that brief daily limit before it locks you out, needing the Screen Time passcode to reopen. As long as you don't share that code, your message privacy is secure!
Part 5: Disable Message Previews
When your iPhone is locked, does it currently show previews of incoming text messages on the lock screen or in notifications? If so, that's a potential privacy leak you may want to plug.
Luckily, it's easy to disable these message previews on your lock screen and in notifications from showing any sensitive text:
Step 1:Go to Settings > Notifications > Messages

Step 2:Scroll down to the “Show Previews” section
Step 3:Change the setting to “When unlocked” or “Never”

That's it! Now when your phone is locked, any new messages won't show their contents at all in notifications or previews. Just generic alerts that "You have a new message" from the sender with no text preview visible.
Part 6: Mute Message Notifications
Building on that last method, you can also hide text messages on iphone by muting notifications entirely for certain conversations or contacts on a case-by-case basis. That way those private message threads won't bug you with sounds, vibrations or banners while keeping your other message notifications active.
To mute a conversation in the Messages app, just:
Step 1:Swipe left on the conversation
Step 2:Tap the gray Mute button (looks like a bell with a line through it)

Easy! You can also long-press on a conversation, then tap the Mute button to toggle it on or off. Any new messages in that thread won't make a peep or light up your screen until you unmute it.
This muting option is great for sensitive one-on-one chats you want to keep quiet and out of the limelight. But what if you want to take it a step further?
Part 7: Set Auto-Lock For Privacy
This one is a super simple privacy tip that's easy to overlook to hide text messages on an iphone - setting your iPhone to automatically lock its screen after a short period of inactivity. That way, if you ever leave your phone unattended, it will quickly lock itself to prevent someone from snooping through your messages or apps. To set this up:
Step 1:Go to Settings > Display & Brightness
Step 2:Tap on "Auto-Lock"
Step 3:Select the shortest timeframe you're comfortable with, like 30 seconds or 1 minute

Now your iPhone will automatically lock its screen and require your passcode, Face ID, or Touch ID to unlock anytime it's left idle for that brief period after you last touched it. No more leaving your private messages and other sensitive info exposed!
You can take this basic security practice a step further by also setting your iPhone to require a passcode or biometric immediately when the screen wakes from the lock screen. That way there's no opportunity at all for a sneaky peek before entering your credentials.
These simple lock screen habits create an extra layer of protection around your messages and other private phone content and in turn allow you to hide text messages on your iphone. Every little bit of added security helps keep prying eyes away!
Part 8. Bonus Pro Tip: Using Dr.Fone for the Ultimate iPhone Backup
All the methods we’ve covered can help you hide text messages on iPhone, archive text messages on iPhone, or selectively secure private chats. But if you’re using the latest iPhone 17 and want a more complete solution, consider a full backup tool that can mirror your entire device—including messages, contacts, photos, documents, and more—in just a few clicks.
Well, then you need an all-in-one iPhone backup software like Wondershare Dr.Fone. This complete toolkit removes the hassle of manually backing up your crucial iPhone data to a PC or Mac. With just a few clicks, you can create a secure encrypted backup of your entire device that's easily browsable and restorable later.
Dr.Fone - Phone Backup (iOS)
Using Dr.Fone for the Ultimate iPhone Backup
- One-click to backup the whole iOS device to your computer.
- Allow previewing and selectively export contacts from iPhone to your computer.
- No data loss on devices during the restoration.
- Works for all iOS devices. Compatible with the latest iOS version.

Here's a quick rundown of how Dr.Fone can securely back up and restore your private text messages and any other iPhone data:
Backup iPhone Messages to Computer
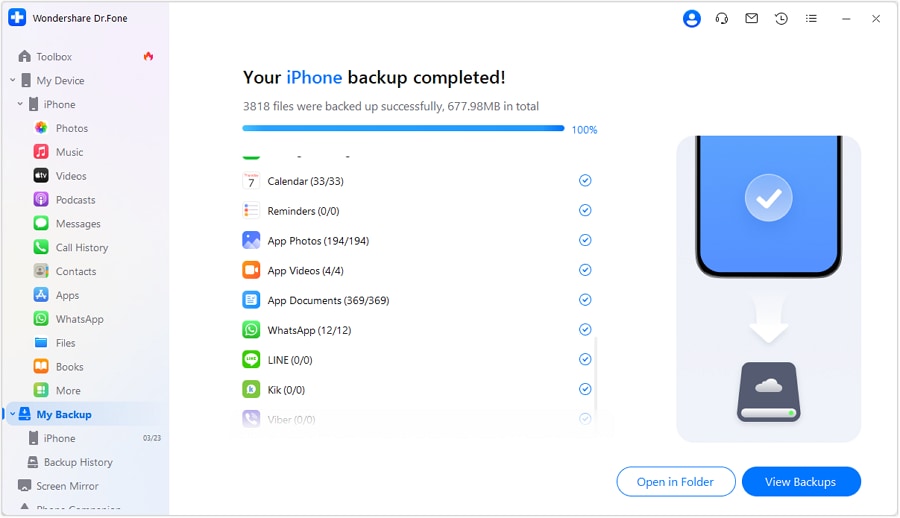
Step 1: Connect your iPhone to your computer and launch Dr.Fone. Select the “My Backup” module, then choose to back up text messages and other data.

Step 2: The backup process will mirror your messages and other selected data to your computer.

Restore iPhone from Dr.Fone Backup
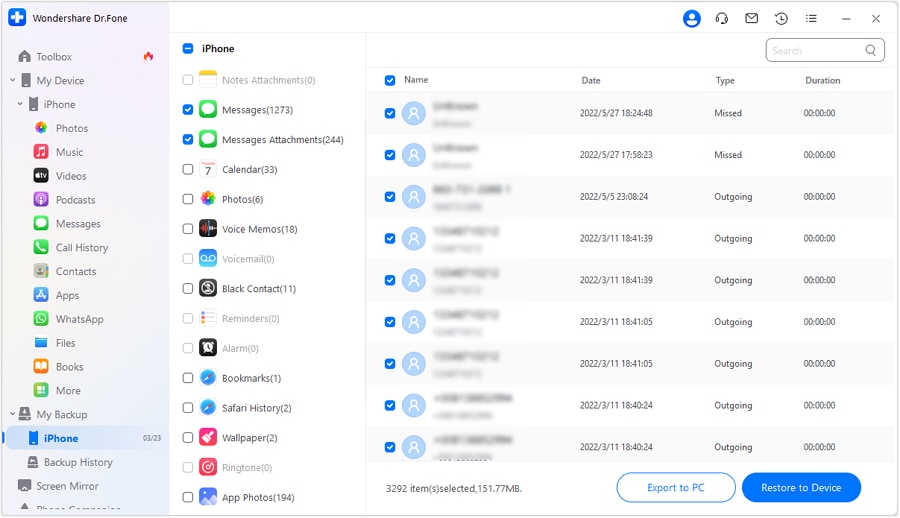
Step 1: Go to the Dr.Fone "View Backups" section and select your backup file.

Step 2: Preview and select the messages or other data types you want to restore

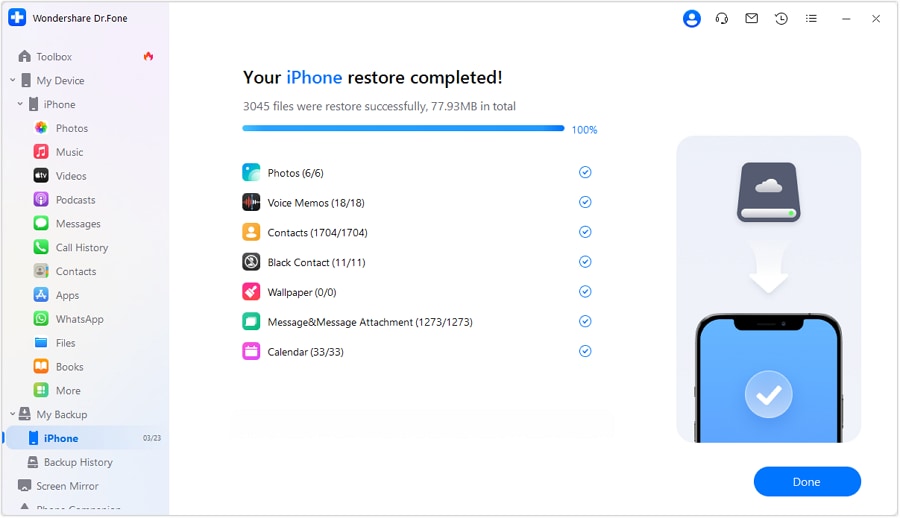
Step 3: Choose to restore the selected data directly back to your iPhone

It's an incredibly easy way to archive sensitive messages and your entire iPhone for total privacy and security with just a few clicks. Dr.Fone even lets you restore that backup seamlessly to a brand-new iPhone if needed.
Conclusion
In today's world of ubiquitous smartphones and endless chats, it's critical to have tools to protect your most intimate conversations and personal data from falling into the wrong hands. Whether you use invisible ink for quick privacy or robust backup solutions like Wondershare Dr.Fone to hide texts on your iPhone, taking steps to safeguard your sensitive mobile messages gives you invaluable peace of mind.
Dr.Fone Basic:
Better Control for Your Phone
Manage, transfer, back up, restore, and mirror your device


Daisy Raines
staff Editor