CapCut Backup Projects Solved Ultimate Guide to Sharing and Saving

Jun 11, 2026 • Filed to: Device Data Management • Proven solutions
 TL;DR:
Protect your CapCut projects from data loss by exporting files locally, enabling cloud auto-sync with Google Drive or Dropbox, and relying on native OS backups or Wondershare Dr.Fone for recovery.
● Native project restoration depends on your operating system: Mac requires Time Machine snapshots, Windows 10/11 relies on an enabled File History backup, and cloud edits can be downloaded directly from the CapCut Spaces menu.
● The CapCut browser version automatically saves your progress, but the mobile application requires manual saving, and any shared direct download links require the recipient to have CapCut installed to open the files.
● Fixing the "CapCut project is being saved try again later" error requires an active internet connection and sufficient local device storage, while Wondershare Dr.Fone can be used via USB connection to extract iOS projects to a PC or recover deleted Android files.
Ask AI for a summary
 ChatGPT
 Perplexity
 Gemini
 Claude
 Grok
Grok
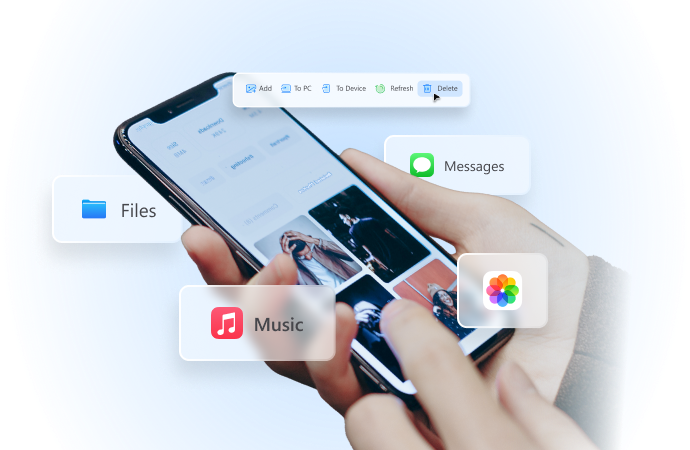
Dr.Fone Basic:
Better Control for Your Phone
Manage, transfer, back up, restore, and mirror your device
Losing a CapCut project after hours of effort is a frustrating reality many creators face. Whether it’s due to accidental deletion, app crashes, or errors like "CapCut project is being saved, try again later," such situations can disrupt your workflow. Additionally, sharing or backing up projects can often feel confusing without the right guidance.
This article addresses these common concerns by providing practical methods to save CapCut project files, share CapCut project files safely, and even restore deleted CapCut projects. Reputable software solutions provide insight into how to transport and retrieve CapCut project files efficiently and effortlessly. By the end of this guide, you will be equipped with measures to prevent data loss and undertake the edits with double efficiency.

- Part 1: Why Saving and Sharing CapCut Project Files Matters
- Part 2: How to Share CapCut Project Files Without Data Loss
- Part 3: Can You Recover Deleted CapCut Projects?
- Part 4: How to Restore Deleted CapCut Projects
- Part 5: Fixing the CapCut Project Is Being Saved Try Again Later Error
- Part 6: Bonus part: How Wondershare Dr.Fone Simplifies CapCut Project Management

Part 1: Why Saving and Sharing CapCut Project Files Matters
For most TikTok users, CapCut is a fundamental resource for video production. However, in light of recent events, there are certain countries that have banned TikTok. They are concerned over whether their CapCut projects would be rendered inaccessible. Data loss or failed file sharing can be frustrating, which makes knowing how to save CapCut project files and ensure they are backed up crucial for creators. By learning these methods, you’ll never have to worry about losing your valuable edits.
Part 2: How to Share CapCut Project Files Without Data Loss
Sharing your CapCut project files securely is essential to avoid errors or losing valuable edits. Follow these steps to ensure a smooth and safe file transfer process:
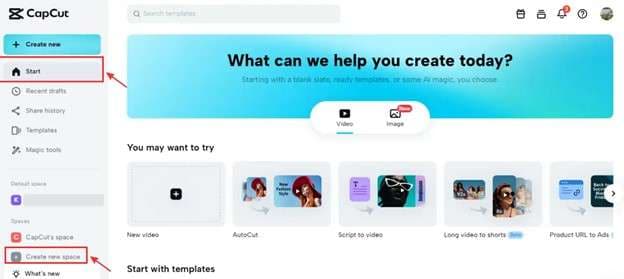
Step 1: Open the CapCut New Project Menu
Start by opening your CapCut new project. Add the media files and make your edits as usual. And click on ‘‘create new space.’’
Step 2: Save CapCut Project File Before Sharing
Click on the "Export" button and save your CapCut project file locally on your device. This ensures the file remains intact even after sharing.
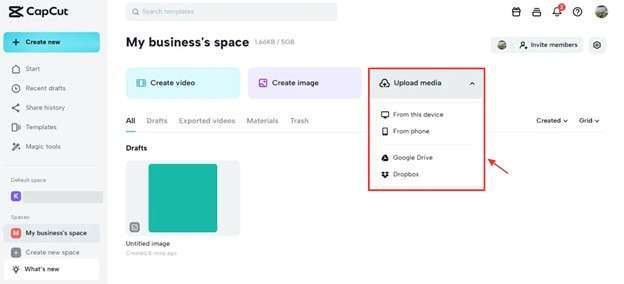
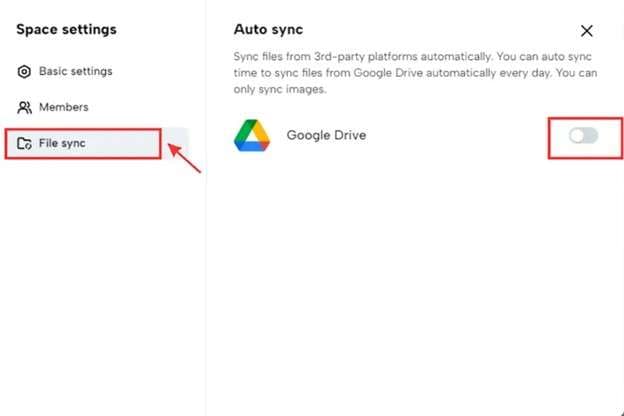
Step 3: Use Cloud Storage for Backup
Upload the CapCut project to cloud storage like Google Drive or Dropbox. You can choose auto-sync image files with Google Drive or Dropbox with one click. This makes it easier to share CapCut project files anywhere with third parties.
Step 4: CapCut Project File Download Links
Share a direct download link of your CapCut project file via email or messaging apps. Ensure the recipient has CapCut installed to open the file.
Part 3: Can You Recover Deleted CapCut Projects?
Recovering a deleted CapCut project depends on several factors. If the project has also been removed from your device’s storage, it can be difficult to retrieve. Deleting a CapCut project file might erase the related data. This can make restoring challenging unless it has been saved, backed up, or uploaded to cloud backup.
It is advisable to periodically back up your CapCut projects to prevent edits from being lost. Save them to another platform, device, or cloud service to ensure your hard work is secure.
Apart from restoring backup data, there are some other ways to recover lost files from a CapCut Project. Lost files that are deleted inadvertently can be recovered by other means as well. The following section outlines the best steps to help you restore deleted CapCut projects effectively.
Part 4: How to Restore Deleted CapCut Projects
Losing a CapCut project doesn’t have to be permanent. Here are the best methods to restore deleted CapCut projects across different platforms.
Method 1: Recover CapCut Projects from My Space
The application CapCut saves users’ projects and edits drafts in the “Projects” section. If you are online editing the application, your files are saved on the cloud. Follow these steps to retrieve them:
Step 1: Open CapCut and log into your account.
Step 2: Navigate to the "Spaces" section in the app.
Step 3: Locate the deleted CapCut project file from the uploaded list.
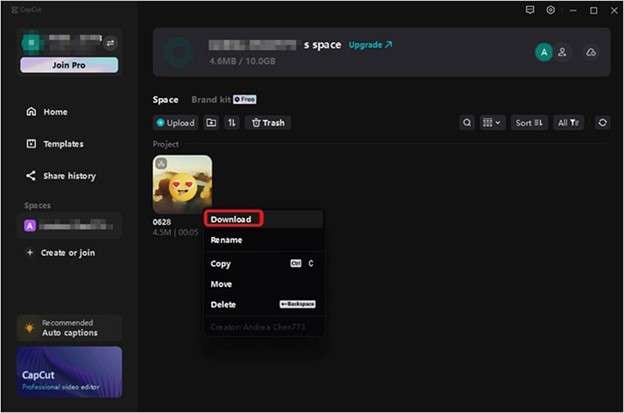
Step 4: Click the three-dot menu next to the project and select Download.
This method works if you’ve enabled the cloud upload feature in CapCut.
Method 2: Restore CapCut Projects on Mac Using Time Machine
For Mac users, Time Machine is a built-in backup feature that allows you to recover deleted CapCut project files. Here’s how:
Step 1: Open the Time Machine from the Launchpad.
Step 2: Search through the snapshots and backups to find the deleted CapCut project file.
Step 3: Select the project, right-click, and choose Restore.
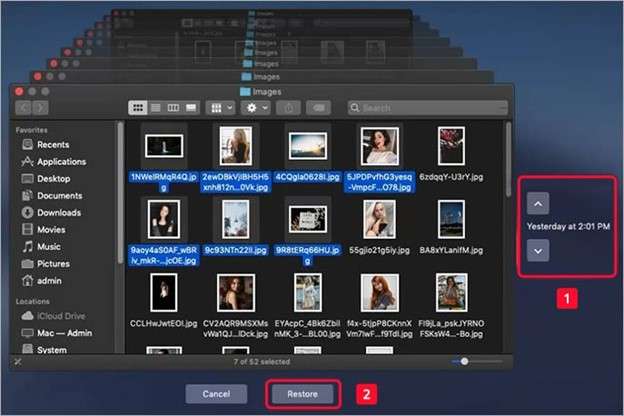
Follow the prompts to return the files to their original location.
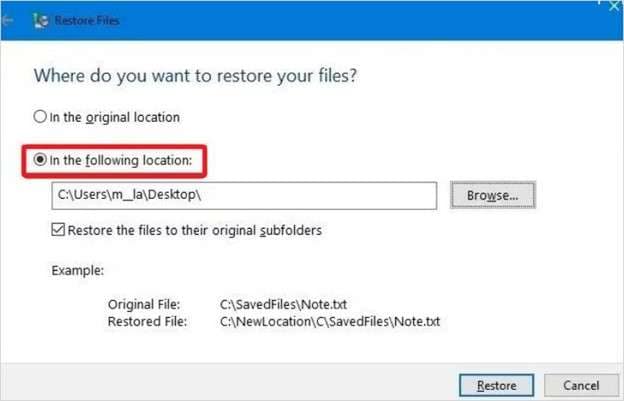
Method 3: Recover CapCut Projects on Windows Using File History
If you use Windows 10/11 and have enabled File History, recovering deleted CapCut project files is straightforward:
Step 1: Open the Settings app and go to Update & Security.
Step 2: Navigate to Backup > Backup and Restore.
Step 3: Click Browse for Files or Browse for Folders and locate the deleted CapCut project.
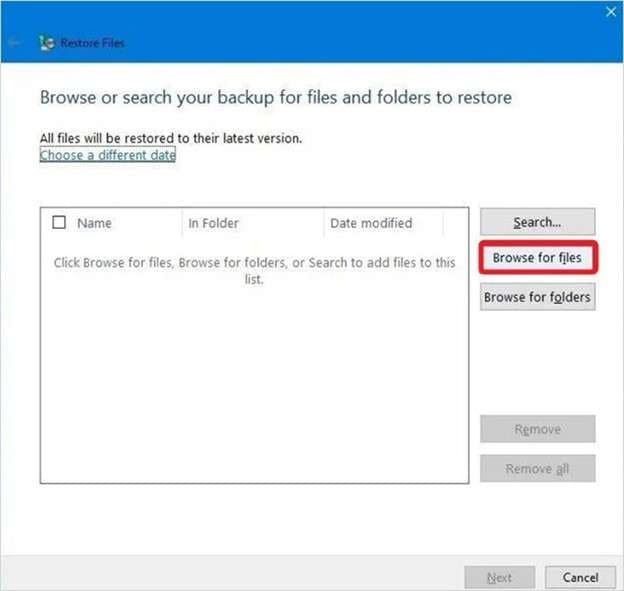
Step 4: Select a restore location and click Restore.
Method 4: Recover Deleted CapCut Projects on Android
Deleted a CapCut project file from your Android device? If you want to retrieve it, you can use Wondershare Dr.Fone - Data Recovery:
Step 1: Dr.Fone - Data Recovery (Android) to be downloaded and installed on your personal computer.
Step 2: Connect your Android mobile to the PC.
Step 3: Run the program and as it launches, scan for the deleted CapCut file project and recover while following the on-screen instructions.
This tool supports every version of Android OS which makes recovering lost projects relatively effortless and has a high success rate.
Part 5: Fixing the CapCut Project Is Being Saved Try Again Later Error
Encountering the "CapCut project is being saved try again later" error can interrupt your workflow. Here’s how to fix it:
- Ensure a Stable Internet Connection
CapCut may require an active connection to save your project. Check your Wi-Fi or mobile data.
- Free Up Device Storage
Low storage can lead to saving errors. Delete unused files to create space for your CapCut project.
- Backup the CapCut Project File and Restart
Back up your current project to avoid losing progress. Restart CapCut and try saving the file again.
Part 6: Bonus part: How Wondershare Dr.Fone Simplifies CapCut Project Management
With Wondershare Dr.Fone, backing up and managing files in your CapCut projects is simple. It enables you to make backups of the project files directly from your iPhone to your personal computer. This ensures your projects remain safe and accessible, even if you face issues with the app or policy changes. Here’s how to use Wondershare Dr.Fone for your CapCut project management:
Wondershare Dr.Fone
How Wondershare Dr.Fone Simplifies CapCut Project Management
- Transfer, manage, export/import your music, photos, videos, contacts, SMS, Apps, etc.
- Back up your music, photos, videos, contacts, SMS, Apps, etc., to the computer and restore them easily.
- Transfer music, photos, videos, contacts, messages, etc., from one smartphone to another.
- Transfer media files between iOS devices and iTunes.
- Fully compatible with the newest iOS system.


Step 1: Connect Your Device
Open the Dr.Fone application to start the process after plugging your iPhone into your computer using a USB cable.
Step 2: Start the Backup Process
- Select the "My Device" option from the main menu.
- Click on "More" and then choose "Start Backup."

Note: The backup time will depend on the size of your data. For large files, it may take longer. Ensure your iPhone stays connected and avoid using it during the backup process.
Step 3: Access Your CapCut Projects
Once the backup is complete, go to the "CapCut Projects" section within Dr.Fone. All your CapCut project files will be displayed here for easy access.
Step 4: Export the CapCut Projects
- Select the projects you want to save. You can choose all files or specific ones.
- Click the "Export" button to transfer the selected projects to your computer.
- After the export is finished, click "Open Folder" to view the saved backup location of your CapCut project files.

Conclusion:
Managing and safeguarding your CapCut projects can save you from losing hours of effort. With proper methods to save CapCut project files, reliable backups, and solutions for sharing and restoring, you can keep your projects secure and accessible.
Tools like Wondershare Dr.Fone add an extra layer of ease, offering seamless backup and export options to protect your edits. By implementing these strategies, you ensure that errors like "CapCut project is being saved try again later" won’t disrupt your creative flow. Stay prepared, and you’ll never lose access to your projects, no matter what challenges arise.
FAQs
Dr.Fone Basic:
Better Control for Your Phone
Manage, transfer, back up, restore, and mirror your device


iPhone Data & Files
- iPhone File Managers
- 1. iPhone File Browsers
- 2. iPhone File Explorers
- 3. iPhone File Managers
- 4. Apps to Transfer File Wirelessly
- Transfer iPhone Files
- 1. Send Large Files For Free
- 2. Transfer File from iPhone to Laptop
- 3. Transfer Files from iPhone to Mac
- 4. Transfer Files from iPhone to PC
- 5. Transfer Files from Mac to iPhone
- 6. Transfer Files from PC to iPhone
- 7. Print Text Messages from iPhone
- 8. Transfer Files Over WiFi
- 9. iPhone File Transfer Without iTunes
- 10. Access iPhone Files Using a PC
- 11. Export Notes from iPhone to PC/Mac
- 12. Save iPhone Text Messages to Computer
- iPhone Manage Tools
- 1. iPhone Transfer Tools
- 2. Manage Apps On iPhone
- 3. Security Apps for iPhone
- 4. Call Forwarding Apps
- 5. iPhone Tracking Apps
- Manage iPhone Apps
- 1. Change Viber Number
- 2. iPhone Calls Apps
- 3. Block People in Facebook
- 4. Monitor Snapchat on iPhone
- 5. Snapchat Saver Apps
- Sync iPhone Data
- 1. Sync Notes from iPhone to Mac
- 2. Ford Sync iPhone
- 3. Sync iCal with iPhone
- 4. iPhone Calendar Not Syncing
- 5. Sync iTunes Library to iPhone
- 6. Unsync iPhone from Computer
- 7. Sync iPhone with Multiple Computers
- More iPhone File Tips
- ● Manage/transfer/recover data
- ● Unlock screen/activate/FRP lock
- ● Fix most iOS and Android issues
- Free Download Free Download Free Download


Daisy Raines
staff Editor