 Effortlessly manage data through preview, delete, export, etc.

 100% Security Verified | No Subscription Required | No Malware

 :
: 
 ChatGPT
 Perplexity
 Gemini
 Claude
 Grok
Grok
Your iPhone messages often hold critical information, from business agreements to cherished memories with loved ones. Losing them due to a device failure, accidental deletion, or a failed iOS update can be devastating. That's why creating a backup on a computer is a crucial step for securing your digital conversations.
For app-based conversations, first identify why the Kik chat history is gone before deciding whether to export an available copy or attempt recovery.
If you're wondering how to save text messages from your iPhone to a computer, you've come to the right place. This comprehensive guide details five distinct methods, catering to both Windows and Mac users. We'll explore everything from specialized software to built-in Apple features, helping you find the perfect solution to keep your messages safe, organized, and accessible whenever you need them.

In this article
Part 1. Why Should You Save iPhone Text Messages to a Computer?
Before diving into the specifics of how to save text messages from an iPhone to a computer, it's important to understand the benefits. Transferring your conversations to a PC or Mac provides a secure, organized, and permanent archive, protecting you from data loss and offering greater flexibility in how you manage your information.

Here are the key reasons why you should regularly backup iPhone text messages to your PC:
- Legal and Business Documentation: Text messages often contain confirmations, agreements, or important details that can serve as official records. Saving them to a computer creates a tamper-proof copy that can be easily organized, searched, and presented as evidence if necessary.
- Preserving Precious Memories: Conversations with family and friends are irreplaceable. A lost or stolen phone could mean losing these memories forever. Exporting them to a computer ensures you have a permanent copy you can revisit, print, or store in the cloud.
- Freeing Up iPhone Storage: Messages, especially those with photos and videos, can consume significant storage space over time, potentially slowing down your device. Archiving them on your computer allows you to safely delete them from your iPhone, freeing up valuable space without losing the data.
- Enhanced Organization and Accessibility: Managing and searching through long message histories on a small screen can be frustrating. On a computer, you can easily search for specific keywords, dates, or contacts, and organize conversations into folders for efficient management.
- Protection Against Device Loss or Damage: Backing up your messages before switching to a new iPhone or performing a major iOS update safeguards them from accidental deletion or data corruption. You can access your saved files anytime, even if the original conversation is no longer on your device.
Part 2. How to Save Text Messages From iPhone to Computer: 5 Effective Methods
For anyone wondering how to download text messages from an iPhone to a computer, this section provides five reliable and straightforward methods. Each option offers a different balance of convenience, features, and accessibility.
Method 1: Use Dr.Fone Basic to Selectively Export Messages
For a comprehensive and user-friendly solution, Dr.Fone Basic - Phone Manager stands out. This powerful tool simplifies iPhone data management, allowing you to transfer files with a simple drag-and-drop interface. It enables you to preview and export specific iOS data, including text messages, photos, and videos, to your computer. You can even transfer data directly from iCloud without needing extensive technical knowledge.
Dr.Fone Basic's key advantage is its batch processing capability, which allows you to select and export multiple SMS conversations at once, saving significant time and effort. Beyond messages, it can also sync music, videos, and podcasts between your iOS device and iTunes. It is fully compatible with the latest iOS 26/iPadOS 26 and the iPhone 17 series, ensuring it works seamlessly with your devices.
 Effortlessly manage data through preview, delete, export, etc.
- Transfer all data between devices.
- Robust backup solutions for reliable data protection.
- Mirror screens to PC for meetings, teaching, and control.

Step-by-Step Guide to Export iPhone Texts with Dr.Fone Basic
-
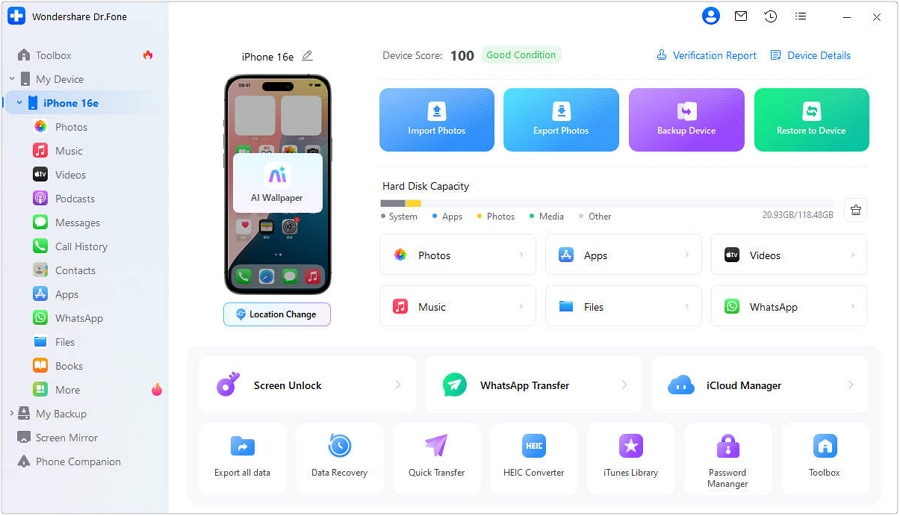
Step 1 Connect and Select Export All Data
Launch Dr.Fone on your computer and connect your iPhone using a Lightning or USB-C cable. From the main interface, navigate to the Quick Start section and click the “Export All Data” option.
-
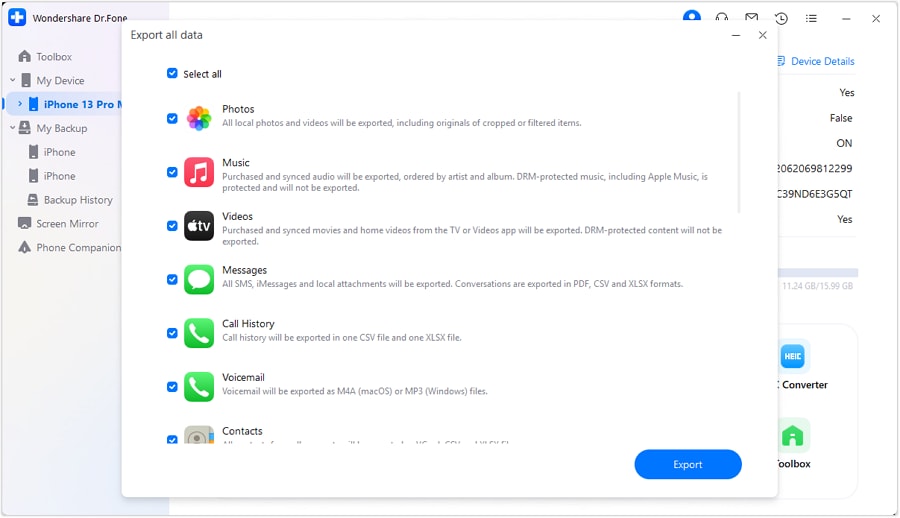
Step 2 Choose Messages and Start Exporting
A new window will display all exportable data types. Check the box next to “Text Messages” and click the “Export” button. If prompted, set a password for the backup file to encrypt it, then click “Verify” and allow the process to complete.
-
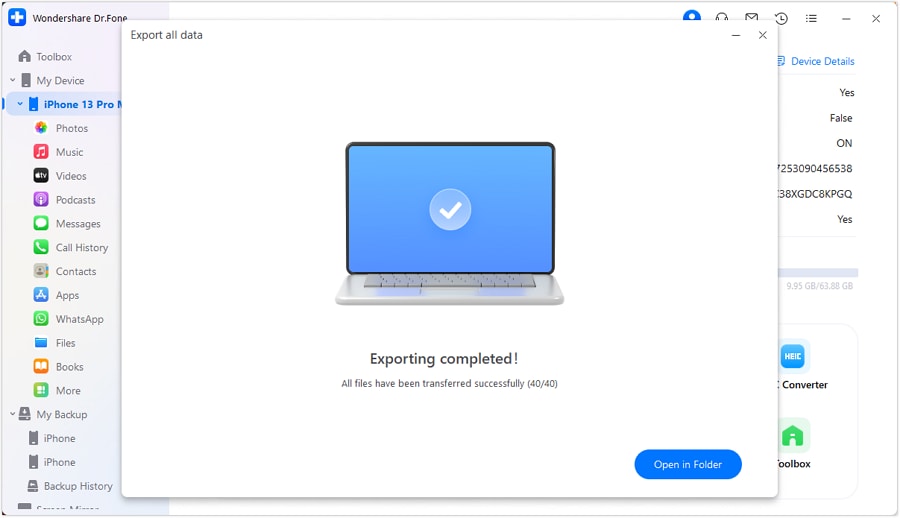
Step 3 View the Exported Messages
Once the export is finished, a confirmation screen will appear. Click the “Open in Folder” option to navigate directly to the location on your computer where the text messages have been saved.




Method 2: Create a Full Backup with iTunes or Finder
For those looking to export text messages from an iPhone to a PC or Mac for free, using iTunes (on Windows or older macOS) or Finder (on macOS Catalina and newer) is a solid option. This method creates a complete backup of your device, including messages, ensuring you don't lose data if your phone is lost, damaged, or reset. While it's a cost-free solution, its main limitation is that the messages are saved in an unreadable database format.
Prerequisites:
- Disable 'Messages in iCloud' if you want messages included in a local computer backup.
- Ensure you have the latest version of iTunes on your Windows PC. Mac users should be on macOS Catalina or a later version.
- Have a compatible Lightning or USB-C cable to connect your iPhone.
Instructions: Connect your iPhone to your computer and launch iTunes or Finder. You may need to tap “Trust” on your iPhone. In iTunes, click the small phone icon to open the Summary tab. Select “This computer” under the Backups section to create a local backup. Finally, click “Back Up Now” and wait for the process to complete without disconnecting your device.


Method 3: Sync Messages Across Devices with iCloud
If you primarily want to export text messages from your iPhone to a Mac for seamless access, syncing via iCloud is an excellent choice. This feature doesn't create a traditional backup file on your computer; instead, it keeps your entire message history updated across all your Apple devices. Any message you send or receive on your iPhone will automatically appear on your Mac, and vice versa.
Before You Start:
- Sign in with the same Apple ID on both your iPhone and Mac, with two-factor authentication enabled.
- Ensure iCloud Keychain is turned on for Messages in iCloud to function correctly.
- Both devices should be updated to at least iOS 11.4 and macOS 10.13.5.
- Connect your iPhone and Mac to a stable Wi-Fi network.
Step 1. On your iPhone, go to Settings, tap your name at the top, then select 'iCloud'. Scroll down, find 'Messages', and toggle on 'Use on this iPhone'.

Step 2. Next, go to Settings > Messages > Send & Receive to confirm that the Apple ID and phone number match what you will use on your Mac.

Step 3. On your Mac, open the Messages app. From the menu bar, go to Messages > Settings (or Preferences) and click the 'iMessage' tab. Check the box for “Enable Messages in iCloud” and then click “Sync Now” to begin syncing your message history.

Method 4: Capture Conversations with Screenshots/Screen Recording
For a quick and simple way to save short message threads, taking screenshots or a screen recording is a viable option. This method requires no special software like iTunes or iCloud and works on any iPhone. Each capture is saved as a standard image (JPG/PNG) or video (MP4) file, which you can easily transfer to your computer via AirDrop, email, or a USB cable. This is perfect for preserving the exact visual appearance of a conversation.
For Screenshots
Instructions: Open the conversation in the Messages app. Press the Side button and the Volume Up button simultaneously to capture the screen. You can take multiple screenshots to cover the entire conversation. Afterward, find the images in the Photos app, select them, tap the Share icon, and choose AirDrop or Email to send them to your computer.

For Screen Recording
Instructions: Open the desired conversation in Messages. Swipe down from the top-right corner to open the Control Center and tap the Screen Record icon. Scroll through your message thread to capture it in a video. Once finished, tap the red bar at the top to stop recording. The video will be saved to your Photos app, where you can share it to your computer via AirDrop or email.

Method 5: Transfer Short Texts Using the Copy and Email Method
If you only need to backup specific iPhone texts to a computer without their original formatting, the copy and email method is a straightforward choice. This technique lets you save selected messages as plain text directly from your iPhone to your email, which you can then access on your computer. It requires no additional software and is ideal for quickly saving short, important snippets of information.
Step 1. Open the Messages app and navigate to the conversation you want to save. Long-press on a specific message bubble until a menu appears, then tap “Copy”. You can also tap “More...” to select multiple messages to copy at once. Once copied, open your Mail app, compose a new email, and paste the text into the body. Send the email to yourself.

Step 2. On your computer, open your email client and find the email you just sent. You can now copy the text from the email and save it as a text or Word document on your computer. You can repeat this process to organize messages by contact or date.

Part 3. Comparison: Which Method is Best for You?
Choosing the best method to download your iPhone text messages depends on your specific needs. Do you need a readable format for legal purposes, a full device backup for security, or just a quick way to save a few texts? This comparison table breaks down the key features of each method to help you decide.
| Method | Output Format | Selective Export | Directly Readable | Bulk Transfer | Best For |
|---|---|---|---|---|---|
| Dr.Fone Basic | PDF, HTML, CSV, TXT | Yes (Per message/chat) | Yes | Yes (One-click) | Archiving, legal proof, and flexible management. |
| iTunes/Finder Backup | Encrypted Database | No | No (Requires extractor tool) | Yes (Whole device only) | Complete device backup and restoration. |
| iCloud + Mac Sync | Mac Messages App | No (Syncs all) | Yes (On Mac only) | Yes (Automatic sync) | Seamless access across Apple devices. |
| Screenshots/Recording | JPG/PNG/MP4 | Yes (Manual) | Yes | No (Impractical) | Saving short conversations with visual context. |
| Copy + Email | Plain Text (Email) | Yes (Manual) | Yes | No (Very tedious) | Quickly sharing a few specific message snippets. |
As the table highlights, Dr.Fone Basic - Phone Manager emerges as the most powerful and versatile option. It offers selective export in multiple readable formats, handles bulk transfers effortlessly, and is perfectly suited for creating organized archives or preparing documents for legal use.
Conclusion
In conclusion, the question of how to save text messages from an iPhone to a computer has multiple answers, each with its own strengths. Whether you choose the comprehensive backup of iTunes, the seamless integration of iCloud, or the quick convenience of screenshots, you now have the tools to protect your important conversations. For users seeking maximum control, flexibility, and readability, Dr.Fone - Phone Manager is the standout solution. It empowers you to selectively export messages in user-friendly formats, making it the ideal choice for creating secure, accessible, and manageable archives of your most valuable data.
Frequently Asked Questions
-
1. Can I save just one specific conversation instead of all my messages?
Yes, you can. While methods like iTunes/Finder back up everything, tools like Dr.Fone - Phone Manager allow you to preview all your conversations and select only the specific ones you want to export to your computer. Manual methods like screenshots or copy/paste also let you save specific messages, but they are less efficient for long threads. -
2. Will saving messages to my computer also save photos and videos sent in the texts?
This depends on the method. Dr.Fone and iTunes/Finder backups will include all attachments like photos, videos, and documents within the messages. iCloud sync also preserves attachments. However, the copy-and-paste method will only save the text content, and you would need to save attachments separately. -
3. Are the messages saved to my computer in a readable format?
With tools like Dr.Fone, your messages are saved in common, readable formats like PDF, HTML, or TXT. Manual methods like screenshots or emailing text also result in readable files. However, if you use iTunes or Finder to back up your iPhone, the messages are stored in an encrypted database file that is not directly readable without specialized software. -
4. Do I need an internet connection to transfer my messages?
For methods that connect your iPhone directly to your computer via a USB cable, such as using Dr.Fone or iTunes/Finder, you do not need an internet connection. An internet connection is only required for cloud-based methods like iCloud Sync or for sending messages via email.
 Add Wondershare Dr.Fone as a preferred source on Google



