
What Is the Apple MobileSync Backup Folder on Mac & PC? [iPhone 17 Supported]
iPhone Backup
- iPhone Data Backup
- 1. Back up iPhone in Recovery Mode
- 2. Back Up iPhone With/Without iTunes
- 3. Back up iPhone to Mac
- 4. Back up iPhone/iPad to Computer
- 5. Back up iPhone to Mac Catalina
- 6. Back up Jailbreak Apps And Restore
- 7. iPhone Backup Software
- 8. Back up iPhone/iPad Easily
- 9. Back up iPhone/iPad in DFU Mode
- 10. Back up iPhone Apps and App Data
- 11. Back up Notes on iPhone and iPad
- 12. Back up iOS to External Hard Drive
- 13. Export Notes from iPhone to PC/Mac
- 14.Back up iPhone Photos to Google Photos
- 15. Back Up Your iPhone Voicemails
- 16. Back Up to External Drive
- 17.How to Back Up to NAS
- 18.Back Up iPhone With Broken Screen
- 19.Back Up iPhone to Google Drive
- 20.Buy Used iPhones
- 21.Sell Used Phone for Cash
- 22.Sell Used iPhone for Dollar
- 23.How Much is My iPhone Worth
- iPhone Data Recovery
- 1. Recover iPhone Data Without Backup
- 2. Restore Calendar on iPhone
- 3. Recover Call History on iPhone
- 4. Recover iPhone Lost Data
- 5. Restore iPhone in Recovery Mode
- 6. Undelete iPhone Backup Files
- 7. Recover Deleted iPhone Messages
- iPhone Data Restore
- 1. Restore iPhone from iTunes Backup
- 2. Restore iPhone after Downgrade
- 3. Restore iPhone from Backup
- 4. Restore iPhone from iPad Backup
- 5. Restore iPhone from DFU Mode
- 6. Restore iPhone Deleted Text Message
- iPhone Backup Problems
- 1. Find iPhone Backup Location on Mac
- 2. iPhone Backup Password Never Set
- 3. iPhone Backup Password Forget
- 4. iCloud Backup Taking Forever
- 5. iPhone Won't Backup to iCloud
- 6. iTunes Won't Backup iPhone
- iPhone Restore Problems
- 1. iTunes Stuck on Verifying iPhone
- 2. Not Space to Restore iPhone Backup
- 3. iTunes Backup Not Restoring
- 4. iPhone Won't Restore
- WhatsApp Backup & Restore
- 1. WhatsApp from Google Drive to iOS
- 2. Restore Old WhatsApp Backup
- 3. Restore WhatsApp Chat on iPhone
- 4. Retrieve WhatsApp Chat History
- 5. See Deleted Messages on WhatsApp
- 6. Restore WhatsApp Stuck on iPhone
- 7. iPhone WhatsApp to Google Drive
- 8. Back Up WhatsApp on iPhone
- 9. Backup WhatsApp Data before Changing Number
- iPhone Backup Tips
- 1. Extract Data From iPhone
- 2. Encrypt iPhone Backup
- 3. Reset iPhone Backup Password
- 4. Extract iPhone Backup in Win 10
- 5. How Long take iPhone to Backup
- 6. Find iPhone Backup Location
- 7. iPhone Backup Password
- 8. View iPhone Backup on Computer
- 9. iPhone Backup with iTunes/iCloud
- 10.Check Last Backup on iPhone
- 11. How To Backup Foldable iPhone
- 12. Best Backup Chargers for iPhone
- 13. Speed Up Your iPhone Backups
- 14. Save Data When iPhone Disabled
- ● Manage/transfer/recover data
- ● Unlock screen/activate/FRP lock
- ● Fix most iOS and Android issues
- Free Download Free Download Free Download

Jun 11, 2026 • Filed to: Backup & Restore Solutions • Proven solutions
 TL;DR:
The Apple Mobilesync folder is the default directory where iTunes saves iOS device backups, while on Android, Mobilesync operates as a distinct wireless application connecting phones to Windows PCs for local Wi-Fi file transfers.
● To prevent the iOS Mobilesync folder from consuming excessive drive space with old iPhone 17 backups that do not overwrite automatically, users must manually delete unused files by navigating to the "Preferences" > "Devices" menu in iTunes.
● Automated Android transfers require installing the MobileSync Station on a Windows PC and the MobileSync App on the device, which must be linked using a shared password on the same local network to utilize Watch Folders.
● Dr.Fone – Phone Backup is recommended as a cross-platform alternative for users needing selective data control; it requires a direct USB connection (with USB debugging enabled for Android) but permits previewing files before restoring them without data loss.
Ask AI for a summary
 ChatGPT
 Perplexity
 Gemini
 Claude
 Grok
Grok
Dr.Fone Basic:
Better Control for Your Phone
Manage, transfer, back up, restore, and mirror your device
Have you ever wanted to transfer your mobile data to a PC to keep a secure backup for the future? With the increasing amount of data we store on smartphones, including the latest iPhone 17, storage often becomes a concern. When space runs low or you simply want peace of mind, using a reliable transfer and backup tool is essential. Mobilesync offers an easy way to move your data, create safe backups, and manage files seamlessly. In this guide, we’ll show you how Mobilesync works and introduce the best alternative for iPhone 17 users looking for a smarter backup solution.
Part 1: What is Mobilesync?
For Android:
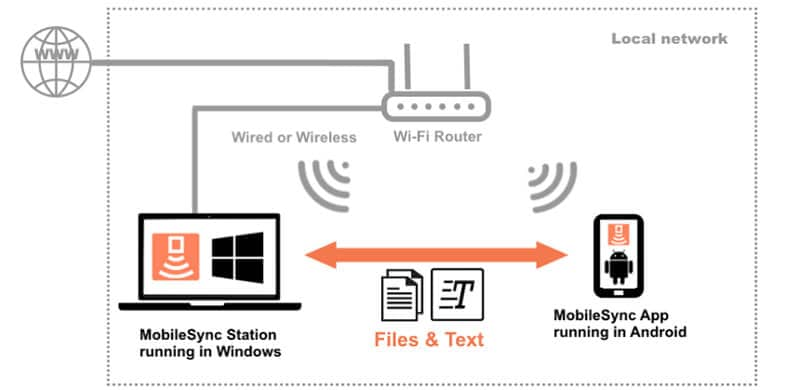
Mobilesync is designed to enable automated file transfer over a Wi‑Fi connection between Windows PCs and Android devices. This smart feature lets you instantly capture photos and videos and transfer them automatically within the Wi‑Fi range, as long as both the PC and mobile phone are connected to the same local network.
It consists of MobileSync Station for Windows PC and MobileSync App for Android devices. It supports fast file transfer and automated file synchronization and back up functions. It makes life much easier.
For iPhone:
When it comes to iOS devices, the Mobilesync folder is where iTunes stores your device backups. In simple terms, whenever you back up an iPhone using Mac, the files are saved in the Mobilesync folder. Over time, these backups can occupy large storage space since older ones aren’t overwritten or deleted automatically. If you back up multiple devices—including the latest iPhone 17—the Mobilesync folder can grow significantly, making it important to manage and clean up regularly.
Part 2: How Mobilesync works?
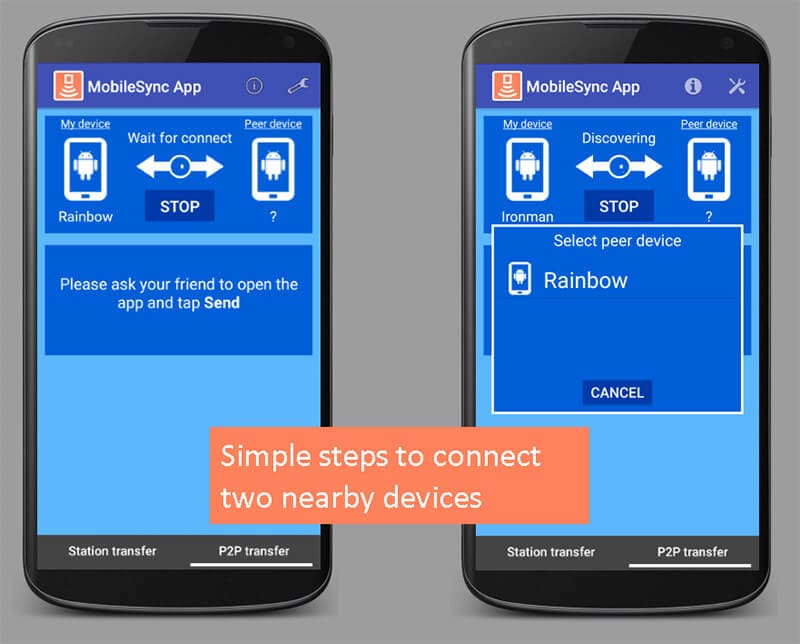
Android:
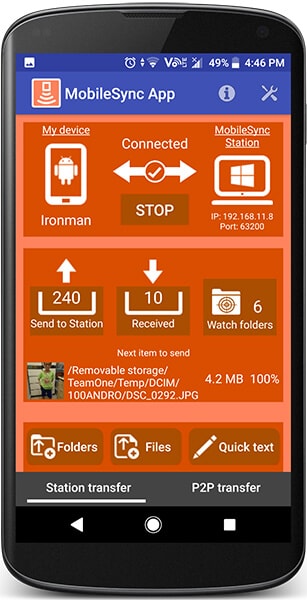
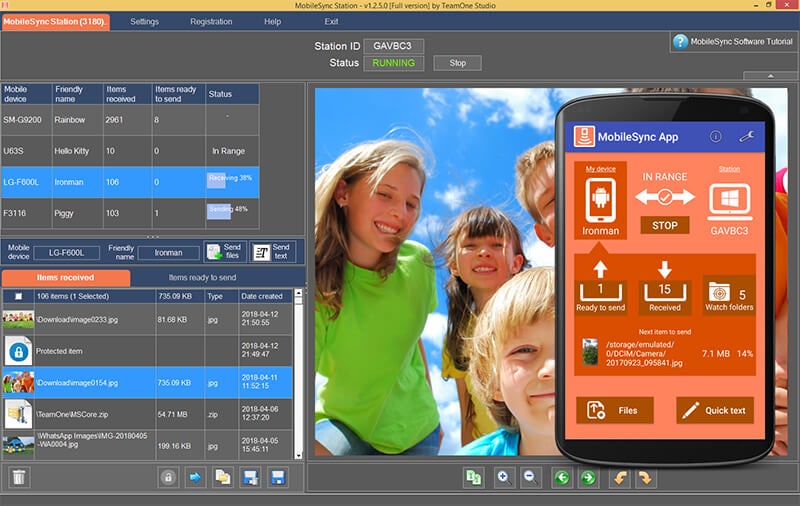
Let’s look at how Mobilesync can be used. First, configure the Mobilesync Station on your Windows PC, note the station ID, and set a password (re‑enter to confirm). Return to the main screen and click ‘Start’ to activate the Mobilesync Station for connection with the Mobilesync App. Next, enter a device name and the same password, then press ‘Start’ again. Once configured, a new mobile device entry will be created in Windows. The key features of the Mobilesync Station and Mobilesync App include:
- Sending Files from Android to Windows by Android Share Menu - The files can be sent through Android share menu. Select a photo and press share, it should open share menu. Now, press MobileSync App icon and the transfer will immediately start, when status is within range. When the transfer is done, that particular photo can be viewed in MobileSync Station.
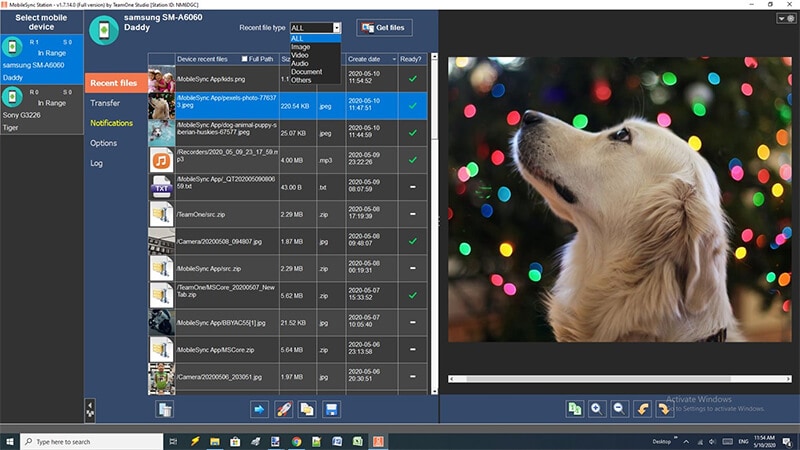
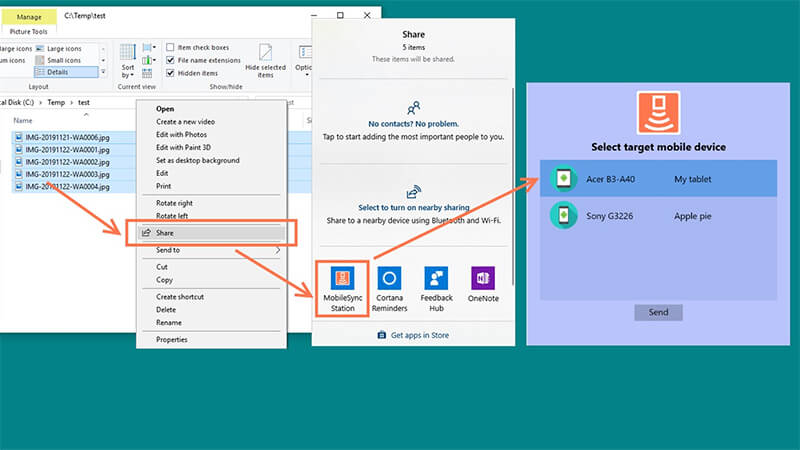
- Sending Files from Windows to Android - In the main screen of MobileSync Station, click add files, select files to send list and the transfer will immediately start when status is within range. You can then open the Files Explorer to select the file to be transferred. Right click on the selected file(s) and choose Mobilesync Station. Choose the target device from the list. Once transferred, the mobile app will show a notification and one can open the received file in the Android phone (in gallery or any such associated application).
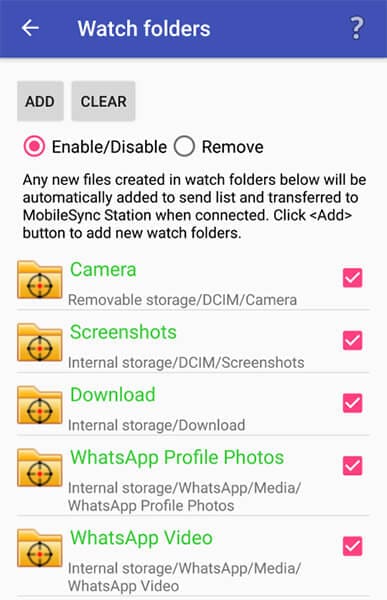
- Watch Folders in MobileSync App - When some specific file types are created in watch folder, MobileSync App will automatically place these files to send list and it will be transferred to MobileSync Station in Windows PC, once connected. All these new photos taken in the android device will be put in the send list and transferred automatically to the PC over the Wi-Fi connection. In the MobileSync App, enter the settings page and press the MobileSync folder icon and enter watch folder set up page. One can add as many folders one wants inside the watch folder. Press add to manually set folders in android device.
Auto scan option will help in searching and adding multimedia folders as watch folders in the running device. When auto scan button is being selected, some major folders will be displayed. Deselect the unnecessary folder inside the watch folder.
- Sending Texts from Android to Windows - By using the send text option, quick text data transfer can be done. If someone wants to open a long mobile URL on the Windows PC, then select send quick text below the settings option, and enter the text and press ok. The text can be viewed in the MobileSync Station.
- Sending Text from Windows to Android - By just entering the send text button and putting the text inside the text box and pressing send. The mobile app will show a notification and the text can be opened in the mobile.
By setting it up once, this Windows/Android file transfer tool is ready to be used. Files can be easily transferred using drag and drop option in MobileSync Station in Windows and MobileSync App in Android. No USB cable connection is needed for any kind of transfer. This saves a lot of time and makes life smooth and easy.
- Another advantage is that, single MobileSync Station running in Windows can connect to multiple MobileSync Apps running in different Android devices. MobileSync App is a free app and can be downloaded from Google Play Store.
iPhone:
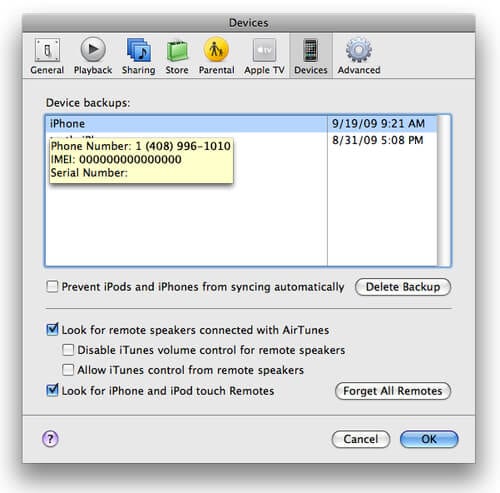
As we mentioned above, iTunes saves the backup of your device like iPad or iPhone. And it is stored as Apple’s “Mobilesync folder”. It simply keeps many copies of your data and therefore at times you are required to clean the old backups. You can simply do this by launching the iTunes. Head to “iTunes” menu and click “Preferences” followed by “Devices”. Now you can choose the device backup. Delete the unused backup. You will be able to get more space now.
Part 3: Backup without mobilesync? How?
If users don’t have access to Mobilesync or prefer an alternative, a reliable option is Dr.Fone – Phone Backup. This tool supports both Android and iOS, including the latest iPhone 17, and makes it easy to back up nearly all types of data—such as call history, calendar, videos, messages, photos, and contacts. Data can then be restored to any Android or Apple device without hassle. Once the device is connected, the program automatically creates a secure backup. Here are some of its key features you should know.
Dr.Fone - Phone Backup (iOS)
Backup Data Before Installing New iOS Beta Version
- One-click to backup the whole iOS device to your computer.
- Allow previewing and selectively export contacts from iPhone to your computer.
- No data loss on devices during the restoration.
- Works for all iOS devices. Compatible with the latest iOS version.


Let us now understand the tutorials to backup your device and how you can restore them with the help of this wonderful tool.
1. Backup Android Phone
Step 1: Begin with downloading Dr.Fone – Phone Backup (Android) on your PC. Install and launch it. Once launched successfully, select “Phone Backup”.

4,039,074 people have downloaded it
Step 2: Then connect the Android phone to the PC using USB. The USB debugging mode should be enabled. Then press “OK”. Then click the “backup” to start it.

Step 3: After connecting the Android phone, select the file types for backup. Then click the “Backup” to start it. It will take a few minutes to complete the process. After the backup is done, the backup file can be viewed.

2. Restoring the Backup (Android)
Step 1: Launch the program on the PC and then select “phone backup”. Then the phone should be connected to the PC using USB.
Then click the “Restore from backup files” option on the left side, all the android backup files will be displayed. Select the backup file and then click “View”.
Step 2: Each file can be previewed. Click on the ones you need and then hit on “Restore to Device” and get them restored to the Android phone. While the process is going on, it is recommended not to disconnect the phone.
3. Backup iOS phone
Step 1: First launch it on the PC, then select “Phone backup” option from the list.
4,039,074 people have downloaded it
Step 2: Then with the help of the cable, connect the iPhone/iPad to the PC. Dr.Fone supports to backup data types including privacy and social app data. Click “Backup” option witnessed on the screen.

Step 3: Choose the files you want to backup. Once selected, click on “Backup” button given at the bottom of the screen.
Step 4: The program will begin to take backup of the selected files. After the backup is completed, click on the “View Backup History” in order to view all the iOS device backup history. Then export them to the PC.
4. Restore backup to the PC
Step 1: After launching the tool, connect the Apple device to the PC. Then click “Restore”.
Step 2: It will offer to view the backup history. Then click the backup file and click “Next” on the bottom of the program.

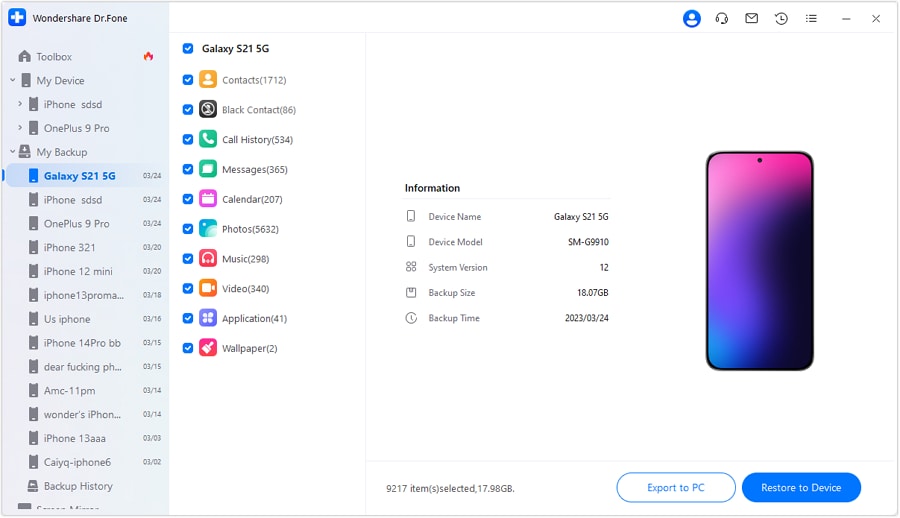
Step 3: Click on view, the backup files will be displayed. Select the files to proceed. Dr.Fone supports all kinds of including contacts, messages, photos, videos, etc. All these files can be restored to the Apple device and all of them can be exported to the PC. Select the files and click on “Restore to Device”. It will take a few minutes, after that all the files can be viewed on the Apple device. If these files need to be exported to the PC, click on “export to PC”.

Conclusion
Mobilesync software is designed to manage Android phones wirelessly within a local network, offering faster file transfers, notification mirroring, and recent file management. With advanced watch and sync folders, files are automatically synchronized and backed up. For iOS users, iTunes creates backups in the Mobilesync folder on Mac, including support for the latest iPhone 17, ensuring seamless data protection and device management.
While Mobilesync offers a way to back up data, many users still face limitations. Dr.Fone – Phone Backup solves these challenges with a simple and efficient solution that supports both Android and iOS. With Dr.Fone, backups run smoothly, can be previewed before restoring, and give users greater control over their data—making it a reliable alternative when Mobilesync is not available.
Dr.Fone Basic:
Better Control for Your Phone
Manage, transfer, back up, restore, and mirror your device


Alice MJ
staff Editor