Ultimate Guide on How to Take a Screenshot on iPhone

Jul 12, 2024 • Filed to: Mobile Repair Solutions • Proven solutions
Our mind is capable of remembering various things related to our personal experiences. We can look back on them whenever we wish to reminisce about the special events in our lives. However, it’s probably fair to say that we cannot trust our memory all the time. Keeping a record of any crucial information is still of paramount importance. Thankfully, the screenshot features of our mobile phones have made it much easier for all of us.
We can’t deny that having the means to capture screenshots on our smartphones is very useful in certain situations. That’s why it’s best to explore how to access this function with just the snap of a finger. Don’t worry. There are numerous ways to grab a screenshot on an iPhone. Just choose one that best fits your style.
In this article, we’ll provide a definite answer to the question: How do you take a screenshot on an iPhone? We will also discuss some tutorials that can help you improve your screen captures even further. Read on to learn more.
Benefits of Taking Screenshots on iPhone
In simple terms, a screenshot is basically an image displaying the content of your screen. iPhones have this feature that lets you capture the activity on your screen and export it in image formats. Screenshots work just like any other photos on your device. You can also store them as long as you want and share them with others if you wish to. However, they actually have a special role to play that makes our mobile experience much better. Check them out from the list of benefits below.
It’s an easy way to take notes and record important data.
Writing notes on a piece of paper is traditionally effective. That’s a fact we can’t deny. But in terms of convenience, it’s true to say that taking screenshots is a much better choice. So don’t take this feature for granted. Discover how you can leverage its functions when you’re recording some important data.
It’s a convenient way to capture and share online images.
Downloading images online may not always be the best option to save a copy on your device. But don’t fret. If certain circumstances do not allow it, try to grab a screen capture of the photo instead. It’s just the same as the former. You can also share it with others straight from your image gallery.
It’s a great tool when giving instructions.
Let’s say you’re remotely teaching someone how to use a particular software. It’s quite challenging, especially if you’re communicating through textual instructions. But to help you make it more efficient, you may try sending annotated screenshots of the interface. It’s indeed an interactive method of virtually providing complex instructions. Just make sure you know how to take a screenshot on your iPhone.
Tutorials How to Take a Screenshot on iPhone?
How do you take a screenshot on an iPhone? Well, the methods vary from one iPhone model to another. It relies heavily on the buttons and keys available on your device. Below is a set of tutorials to help you take a screenshot on your iPhone. Check out the one that suits your device model and specification.
iPhones with Home button
Below is a short guide on how to screenshot on iPhone 7. The same tutorial also answers how to screenshot on iPhone SE and other models with a Home button.
- Step 1: Press and hold the Power and the Home button simultaneously.
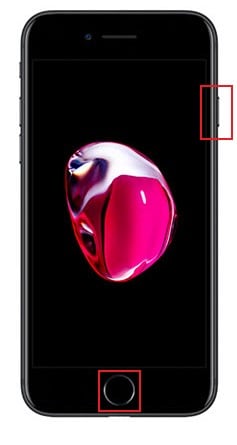
- Step 2: After a few seconds, your iPhone will flash a white screen indicating a screenshot has been captured. You may now release the buttons at this point.
- Step 3: A small preview of the screen capture will be displayed on the screen. Click it to check it or access the customization options.
iPhones with Face ID
The guide below shows how to screenshot on iPhone 14. It can also help you find out how to screenshot on iPhone 13 and other iPhone models with Face ID.
- Step 1: Press and hold the Power and the Volume Up buttons together.
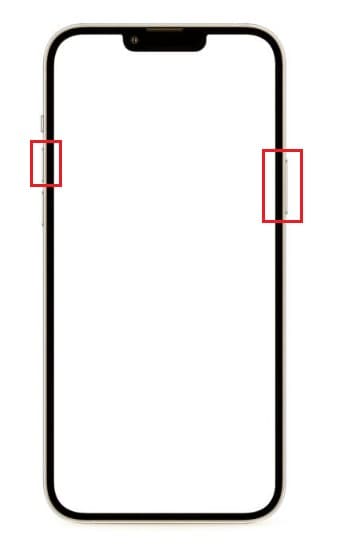
- Step 2: Your iPhone will immediately flash a white screen, alerting you that a screenshot has been captured successfully. At this moment, feel free to release the buttons.
- Step 3: The preview of the captured screenshot will be displayed on your iPhone screen. Click it to review the image or access the customization options.
Taking Screenshots via AssistiveTouch
Pressing a specific button combination on your device is not the only way to take a screenshot on your iPhone. You can also do it by simply tapping the AssistiveTouch on your device. Don’t worry. It doesn’t take a genius to enable and set it up. Follow the provided tutorial below.
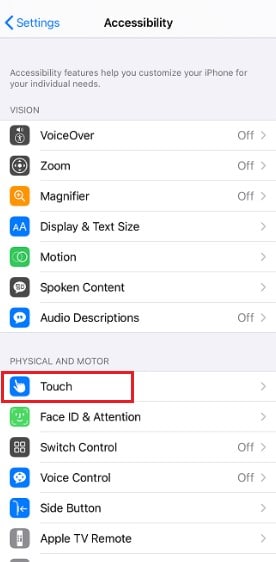
- Step 1: Go to Settings.
- Step 2: Click Accessibility.
- Step 3: Click Touch.
- Step 4: Click AssistiveTouch.
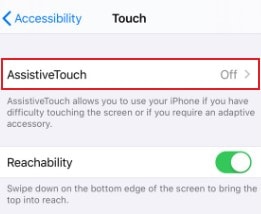
- Step 5: Toggle on the radio button next to AssistiveTouch.
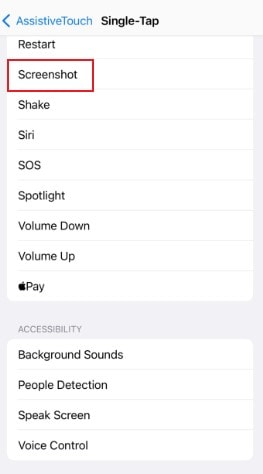
- Step 6: Scroll down to the Custom Actions section and then choose one from the available options. Click on it.
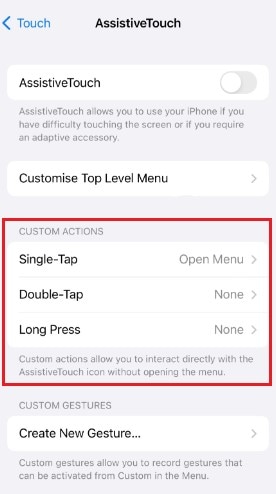
- Step 7: Find and click Screenshot to set it on your preferred Custom Action.
How to Share Screenshots on Your iPhone?
We have previously learned how to screenshot on iPhone 11 and other models. Now, it’s time to know how to check the screen captures and distribute them to others. Don’t worry. It’s a piece of cake. Check the guide provided below to learn how to do it quickly and easily.
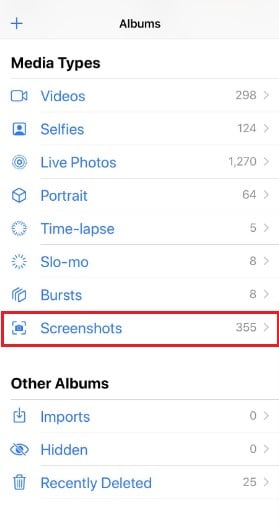
- Step 1: To check the captured screenshots on your iPhone, go to Photos.
- Step 2: Under the Album section, find and click Screenshots. That’s specifically where the screenshots go by default.
- Step 3: Choose the screenshot you wish to share. Then, click the Share button.
- Step 4: Select your preferred sharing option and then click on it. Right after, follow the on-screen instructions for the next steps.

How to Personalize the Screenshots on Your iPhone?
If you’re unaware, you can actually edit the screenshots on your iPhone and customize them according to your liking. You’re given some options to annotate, draw, add shapes and texts, and accentuate certain details. Amazing, right? Don’t worry. Doing it so is indeed a piece of cake. Here’s how to do it in easy steps.
- Step 1: After taking the screenshot on your iPhone, click the small preview that appears at the bottom-left corner of the screen.
- Step 2: Various editing options will then be provided. From there, customize the screenshot based on your preference.
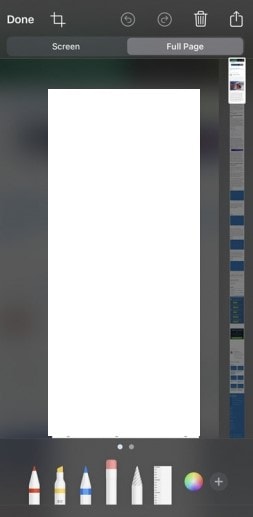
- Step 3: Lastly, click Done to save the changes on your screenshot.
What to Do if iPhone is Not Taking Screenshots?
It’s undeniable that the iPhone’s screenshot feature sometimes fails. The most common reason for such errors is software problems that generally affect the device’s functions and performance. Don’t worry. Resolving this problem is now much easier than most of you think. Wondershare Dr.Fone has a powerful system repair feature that can help you a lot in this kind of unfortunate situation. Here’s how to use it in easy and simple steps.
- Step 1: Download Wondershare Dr.Fone from its official website. Install it on your computer.
- Step 2: Launch the newly installed Wondershare Dr.Fone on your desktop. Wait until it fully loads, and the options become available.
- Step 3: After that, access the left-side panel and then click Toolbox. Afterward, click System Repair on the main dashboard.

- Step 4: Connect your iPhone to the computer using a data cable.
- Step 5: Then, click iPhone.

- Step 6: Various system repair options will be offered to you. From there, find and click iOS Repair.

- Step 7: Right after, click Standard Repair.

- Step 8: At this point, you need to put your iPhone into Recovery Mode. Start by clicking Trust on your iPhone. Afterward, click Enter Recovery Mode on your computer. Should you need further help, click Guide instead.

- Step 9: Wondershare Dr.Fone will display some compatible firmware package available for your device. Select one that best suits the specifications of your iPhone. Click the Download button next to it.

- Step 10: Wait while Wondershare Dr.Fone is downloading the selected firmware package.

- Step 11: When the new firmware package is finally ready, click Repair Now to proceed.

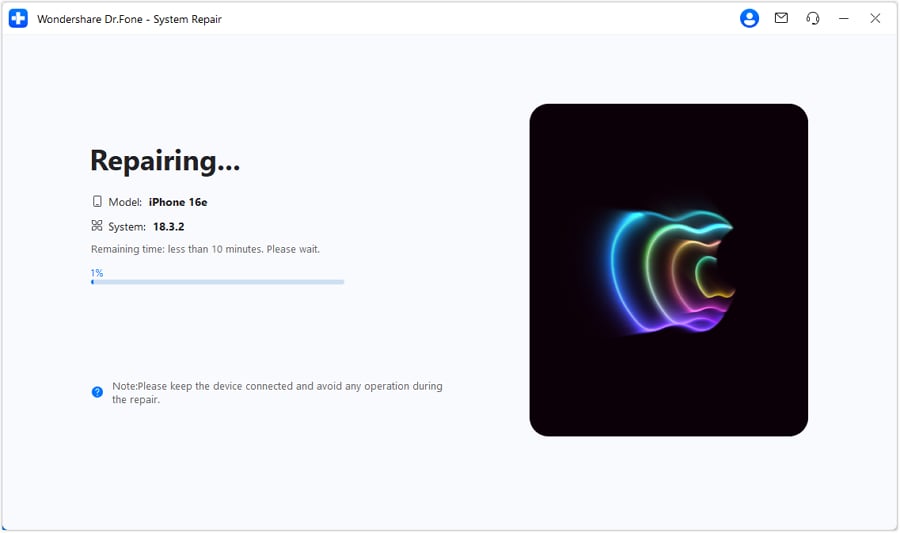
- Step 12: Wait while Wondershare Dr.Fone is repairing your iOS and installing the new firmware package. Refrain from using your iPhone and computer while the process is ongoing.
- Step 13: The process will conclude after a few minutes. Click Done to wrap it up.
-

Conclusion
Learning how to take a screenshot on your iPhone is undeniably a great advantage. You get to enjoy ease of use and convenience. That’s why don’t ever set it aside. Practice the best screenshot method that works best for you. Refer to the tutorials above to help you out. Furthermore, don’t forget to download Wondershare Dr.Fone on your computer. It’s an all-in-one mobile solution that can help you with system repair, data recovery, file backup, and many others.


iPhone Problems
- iPhone Hardware Problems
- iPhone Home Button Problems
- iPhone Keyboard Problems
- iPhone Headphone Problems
- iPhone Touch ID Not Working
- iPhone Overheating
- iPhone Flashlight Not Working
- iPhone Silent Switch Not Working
- iPhone Sim Not Supported
- iPhone Call Volume Low
- iPhone Software Problems
- iPhone Passcode Not Working
- Google Maps Not Working
- iPhone Screenshot Not Working
- iPhone Vibrate Not Working
- Apps Disappeared From iPhone
- iPhone Emergency Alerts Not Working
- iPhone Battery Percentage Not Showing
- iPhone App Not Updating
- Google Calendar not Syncing
- Health App Not Tracking Steps
- iPhone Auto Lock Not Working
- iPhone Screen Recorder No Sound
- Find My iPhone Not Sharing Location
- iPhone Battery Problems
- iPhone Media Problems
- iPhone Echo Problem
- iPhone Camera Black
- iPhone Won't Play Music
- iOS Video Bug
- iPhone Calling Problem
- iPhone Ringer Problem
- iPhone Camera Problem
- iPhone Front Camera Problem
- iPhone Not Ringing
- iPhone Not Sound
- iPhone Mail Problems
- Reset Voicemail Password
- iPhone Email Problems
- iPhone Email Disappeared
- iPhone Voicemail Not Working
- iPhone Can't get Mail connection
- Gmail Not Working
- Yahoo Mail Not Working
- iPhone Update Problems
- iPhone Stuck at the Apple Logo
- Software Update Failed
- iPhone Verifying Update
- Software Update Server Couldn't Be Contacted
- iOS update Problem
- iPhone Won't Update
- iPhone Connection/Network Problems
James Davis
staff Editor
Generally rated4.5(105participated)