The Ultimate Guide to Safely Backup Apple iTunes Library
iPhone Backup
- iPhone Data Backup
- 1. Back up iPhone in Recovery Mode
- 2. Back Up iPhone With/Without iTunes
- 3. Back up iPhone to Mac
- 4. Back up iPhone/iPad to Computer
- 5. Back up iPhone to Mac Catalina
- 6. Back up Jailbreak Apps And Restore
- 7. iPhone Backup Software
- 8. Back up iPhone/iPad Easily
- 9. Back up iPhone/iPad in DFU Mode
- 10. Back up iPhone Apps and App Data
- 11. Back up Notes on iPhone and iPad
- 12. Back up iOS to External Hard Drive
- 13. Export Notes from iPhone to PC/Mac
- 14.Back up iPhone Photos to Google Photos
- 15. Back Up Your iPhone Voicemails
- 16. Back Up to External Drive
- 17.How to Back Up to NAS
- 18.Back Up iPhone With Broken Screen
- 19.Back Up iPhone to Google Drive
- 20.Buy Used iPhones
- 21.Sell Used Phone for Cash
- 22.Sell Used iPhone for Dollar
- 23.How Much is My iPhone Worth
- iPhone Data Recovery
- 1. Recover iPhone Data Without Backup
- 2. Restore Calendar on iPhone
- 3. Recover Call History on iPhone
- 4. Recover iPhone Lost Data
- 5. Restore iPhone in Recovery Mode
- 6. Undelete iPhone Backup Files
- 7. Recover Deleted iPhone Messages
- iPhone Data Restore
- 1. Restore iPhone from iTunes Backup
- 2. Restore iPhone after Downgrade
- 3. Restore iPhone from Backup
- 4. Restore iPhone from iPad Backup
- 5. Restore iPhone from DFU Mode
- 6. Restore iPhone Deleted Text Message
- iPhone Backup Problems
- 1. Find iPhone Backup Location on Mac
- 2. iPhone Backup Password Never Set
- 3. iPhone Backup Password Forget
- 4. iCloud Backup Taking Forever
- 5. iPhone Won't Backup to iCloud
- 6. iTunes Won't Backup iPhone
- iPhone Restore Problems
- 1. iTunes Stuck on Verifying iPhone
- 2. Not Space to Restore iPhone Backup
- 3. iTunes Backup Not Restoring
- 4. iPhone Won't Restore
- WhatsApp Backup & Restore
- 1. WhatsApp from Google Drive to iOS
- 2. Restore Old WhatsApp Backup
- 3. Restore WhatsApp Chat on iPhone
- 4. Retrieve WhatsApp Chat History
- 5. See Deleted Messages on WhatsApp
- 6. Restore WhatsApp Stuck on iPhone
- 7. iPhone WhatsApp to Google Drive
- 8. Back Up WhatsApp on iPhone
- 9. Backup WhatsApp Data before Changing Number
- iPhone Backup Tips
- 1. Extract Data From iPhone
- 2. Encrypt iPhone Backup
- 3. Reset iPhone Backup Password
- 4. Extract iPhone Backup in Win 10
- 5. How Long take iPhone to Backup
- 6. Find iPhone Backup Location
- 7. iPhone Backup Password
- 8. View iPhone Backup on Computer
- 9. iPhone Backup with iTunes/iCloud
- 10.Check Last Backup on iPhone
- 11. How To Backup Foldable iPhone
- 12. Best Backup Chargers for iPhone
- 13. Speed Up Your iPhone Backups
- 14. Save Data When iPhone Disabled
- ● Manage/transfer/recover data
- ● Unlock screen/activate/FRP lock
- ● Fix most iOS and Android issues
- Free Download Free Download Free Download

May 25, 2026 • Filed to: Backup & Restore Solutions • Proven solutions
 TL;DR:
To safely back up your iTunes library, copy the entire iTunes media folder to an external hard drive for a complete local archive, or enable Sync Library via iCloud if you have an active Apple Music subscription.
● Backing up via iCloud Music Library requires an active Apple Music subscription and sufficient iCloud storage, while manual USB or Dropbox backups only export specific AAC or MP3 audio files rather than movies, podcasts, or app data.
● To restore a complete local backup on Mac or Windows, you must paste the copied iTunes folder from your external drive into the computer's default iTunes media folder location before launching the iTunes application.
● If files are accidentally deleted without a prior backup, Wondershare Dr.Fone - iOS Data Recovery allows you to selectively extract lost data, such as MOV and MP4 videos, directly from your iPhone or an existing iCloud backup.
Ask AI for a summary
 ChatGPT
 Perplexity
 Gemini
 Claude
 Grok
Grok
Dr.Fone Basic:
Better Control for Your Phone
Manage, transfer, back up, restore, and mirror your device

Have you ever experienced the heart-sinking moment of realizing your entire iTunes library has disappeared? Or perhaps you're constantly anxious about losing all your beloved songs after a computer crash. Fear not, fellow music enthusiast! This guide is here to arm you with the knowledge and tools to securely backup your iTunes library, ensuring your music collection remains safe and sound.
This comprehensive guide explores various backup methods catering to your specific needs. Whether you want to preserve your entire iTunes library, just the music files, or your Apple Music collection, we've got you covered. We'll explore manual backups, external hard drives, and cloud storage options like iCloud and Dropbox. We’ll also provide you with steps on traditional disc backups like DVDs and CDs. As a bonus, we’ll introduce Wondershare Dr.Fone, a powerful software streamlining the backup process. Read on to learn more.
- Part 1. Understanding Your Backup Needs
- Part 2. 5 Methods on How to Backup Your iTunes Library Safely
- Part 3. Restore iTunes Library From Your Backup
- Part 4. How to Recover Apple Music Library Using Your Computer

Part 1. Understanding Your Backup Needs
Before diving into the nitty-gritty of backup methods, let's take a moment to understand what exactly you want to preserve in your iTunes library. Here's a breakdown of the main options to consider:
Entire iTunes Library
Backuping your whole iTunes library is the most comprehensive option. It includes your entire digital media collection managed through iTunes. It includes:
- Music:All your songs, albums, and playlists.
- Movies:Any movies you've purchased or ripped from DVDs.
- TV Shows:Your favorite shows, including purchased seasons and individual episodes.
- Podcasts:All your subscribed podcasts and downloaded episodes.
- Audiobooks:Any audiobooks you've purchased or imported.
- App Data:Data associated with apps you've downloaded through iTunes (note: app data might not always be compatible across devices).
Choosing this option is ideal if you want to create a complete archive of your iTunes library and ensure everything is readily accessible in one place. However, it requires the most storage space.
Music Only
Focusing solely on music files is a great alternative if your primary concern is your music collection. This includes:
- Songs: All your music tracks.
- Albums:Your entire music collection is organized by album.
- Playlists:Your meticulously curated playlists for different moods and occasions.
This method is perfect for music enthusiasts who prioritize their audio library but don't necessarily need to back up movies, TV shows, or other content.
Apple Music Library
This option caters to users primarily relying on Apple Music's streaming service. Here, the focus is on:
- Downloaded Songs:Any songs you've downloaded from the Apple Music library for offline listening.
- Playlists:All your personalized playlists are created within Apple Music.
Backing up your Apple Music library ensures you have a local copy of your favorite downloaded content, even if your internet connection becomes unavailable. This method might not be necessary if you have a consistently strong internet connection and don't mind relying solely on streaming.
Part 2. 5 Methods on How to Backup Your iTunes Library Safely
After understanding which option you’ll back up, you will know which method you will use. Here are five reliable methods to back up Apple iTunes safely:
Method 1: Manual Backup of iTunes Library
This method allows you to create copies of specific playlists on a USB flash drive.
Method 2: Backup iTunes Music Using External Hard Drive
This method involves copying the entire iTunes media folder containing your music files and playlists to an external hard drive. Here's how (for Mac and Windows):
Mac

Windows
Method 3: Backup iTunes Music Using iCloud
Apple Music includes a feature called iCloud Music Library. With an active Apple Music subscription, you can upload your existing music library to iCloud for access across all your devices. Here's how to enable it:

Note: Free iCloud storage space might not be sufficient for extensive music libraries. If needed, consider upgrading your iCloud storage plan.
Method 4: Backup iTunes Music Using Dropbox
You can leverage Dropbox as a cloud storage option for your iTunes music backup for added flexibility. Here's how:


Method 5: Backup iTunes Music to DVD/CD
Backing up to DVDs/CDs is becoming less frequent due to their limited storage capacity. However, it's still an option if you have a disc burner. Here's a general guideline (specific instructions might vary depending on your burning software):
Part 3. Restore iTunes Library From Your Backup
In case your iTunes library ever goes missing, don't panic! Here's how to restore it using the backup method you chose:
Manual Backup:
Cloud Backup (Apple Music Library):

Other Methods:
Restoring from a USB flash drive or burnt DVDs/CDs involves copying the music files back to your desired iTunes media folder location and adding them to your iTunes library.
Part 4. How to Recover Apple Music Library Using Your Computer
While this helps you safeguard your iTunes library through various backup methods, unexpected situations like accidental deletion or device malfunctions can still lead to data loss. Here's where Dr.Fone—iOS Data Recovery steps in as a valuable safety net.
Imagine this: you've meticulously made a playlist of your favorite music videos in your iTunes library, only to find them mysteriously vanished from your iPhone. Fear not! Dr.Fone - iOS Data Recovery offers a powerful solution to recover those precious videos, even if you haven't specifically backed up the playlist.
Here's what Dr.Fone - iOS Data Recovery can do for you:
- Recover Deleted Videos:Scan your iPhone directly or extract them from iTunes and iCloud backups to recover deleted videos in various formats like MOV, MP4, M4V, etc.
- Flexible Recovery Options:You can recover all deleted videos or selectively restore specific ones based on filters like date, size, or format.
- Supports Various Data Loss Scenarios:Recover videos lost due to accidental deletion, formatting errors, system crashes, or device failures.
- User-Friendly Interface:The software boasts a simple and intuitive interface, making data recovery accessible for users of all technical backgrounds.
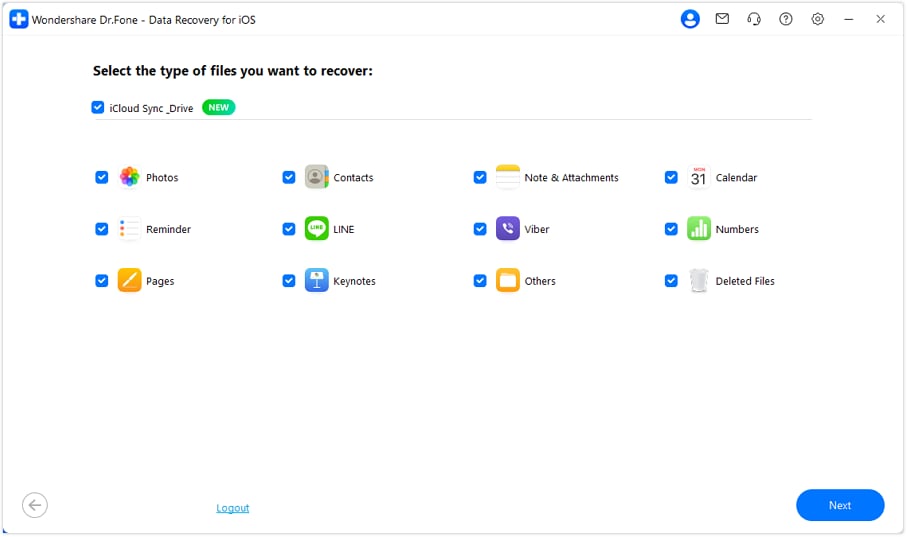
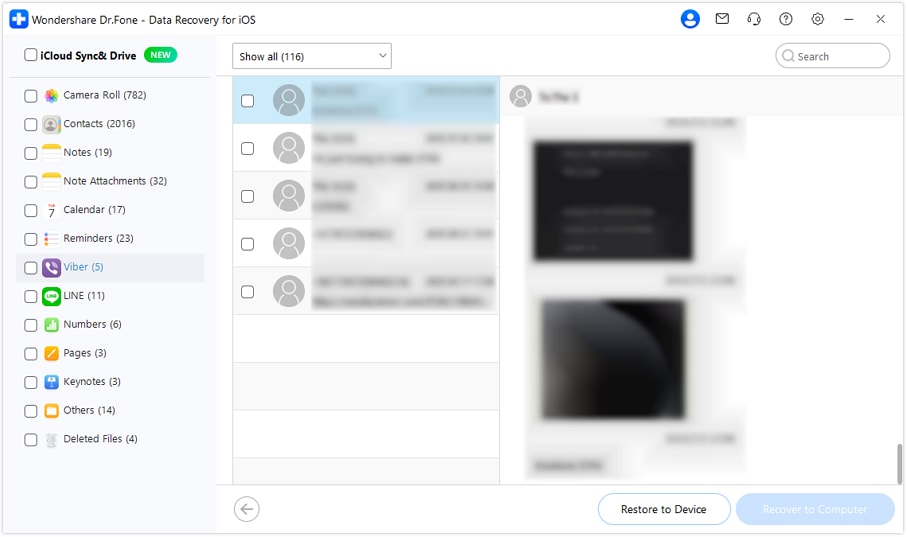
Here's how to recover data from iCloud with Dr.Fone - iOS Data Recovery:


Restore to Device: This option lets you directly restore the selected data to your iPhone.
Recover to Computer: This option lets you save the recovered data to a specific location on your computer. Choose the option that best suits your needs.
Conclusion
Following these simple steps, you can safeguard your precious iTunes library and ensure your music collection is always accessible. Remember to choose the backup method best suits your storage needs and preferences. For Apple Music users facing data loss, Wondershare Dr.Fone can be a valuable tool for exploring data recovery options. Don't hesitate to create backups regularly to maintain peace of mind and keep your music world spinning!
Dr.Fone Basic:
Better Control for Your Phone
Manage, transfer, back up, restore, and mirror your device


Daisy Raines
staff Editor