 Effortlessly manage data through preview, delete, export, etc.

 100% Security Verified | No Subscription Required | No Malware

 :
: 
 ChatGPT
 Perplexity
 Gemini
 Claude
 Grok
Grok

Is there a way to extract music from my first generation iPod nano to my iTunes Library? It seems that all the songs are stuck in the iPod. I don't know how to solve the problem that has bothered me for a long time. Please help. thanks!
User on Apple Support Community
While millions of Apple users have transitioned to the latest iPhones and streaming platforms to enjoy their favorite tracks, countless music enthusiasts still hold onto their older iPod devices. These classic gadgets are often filled with rare, killer songs, carefully curated playlists, and unforgettable memories. However, the pressing question remains: how can you safely extract music from an iPod to update a new iTunes library or back up the files to a new PC in 2026?
It can often feel like a massive headache because Apple's ecosystem is heavily guarded by Digital Rights Management (DRM) and designed strictly for one-way synchronization. Apple does not provide a native, straightforward solution to extract songs from an iPod back to a computer. Fortunately, freeing your tracks from an old, shabby iPod is not impossible. With a bit of guidance and the right methods, you can seamlessly migrate your media. Below, we break down the top ways to extract your music efficiently.

In this article
1. Automated Third-Party Tools: Use dedicated software to bypass iTunes restrictions, allowing you to instantly pull music, playlists, play counts, and ratings without file corruption.
2. Manual Extraction via Hidden Folders: By disabling iTunes auto-sync, you can delve into your device's hidden root folders and copy the raw music data directly to your computer's hard drive.
Part 1. Extract Music from an iPod with Dr.Fone Automatically
Let's begin with the easiest and most reliable method. Utilizing Dr.Fone - Phone Manager (iOS) to extract music from an iPod is extremely straightforward. It completely eliminates the confusing technical barriers of hidden folders and sync settings.
This tool will help you selectively or fully extract all songs and playlists from your old iPod directly to your iTunes Library or your local PC (if you want to back them up securely). It beautifully retains critical metadata like ratings, ID3 tags, and play counts. The software provides comprehensive support for nearly all legacy devices, including iPod Shuffle, iPod Nano, iPod Classic and the modern iPod Touch series.
 Effortlessly manage data through preview, delete, export, etc.
- Transfer all data between devices.
- Robust backup solutions for reliable data protection.
- Mirror screens to PC for meetings, teaching, and control.

Below are the simple steps required to extract music from an iPod using Dr.Fone - Phone Manager. You can download the free trial version of this intuitive iPod Transfer tool to test the waters right now.
-
Step 1 Let Dr.Fone detect your iPod
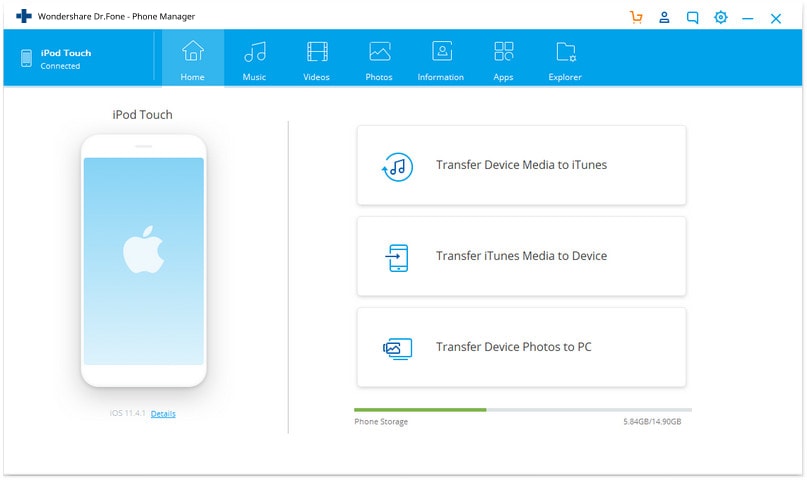
Begin by installing Dr.Fone on your PC or Mac and launch the application immediately. From the main interface toolkit, choose the "Phone Manager" module. Connect your iPod to your computer using its original USB cable. Once connected, Dr.Fone will automatically scan and display the device on the primary window. Note: It might take a few extra seconds the very first time it reads your iPod's hardware logic (we use an iPod nano here as a primary example).
-
Step 2 Extract music from the iPod to iTunes
On the primary interface, you can simply click the "Transfer Device Media to iTunes" option. This 1-click feature will intelligently extract songs and playlists from your iPod directly to your active iTunes Library. The software is smart enough to bypass duplicates, ensuring your library remains clean and organized.
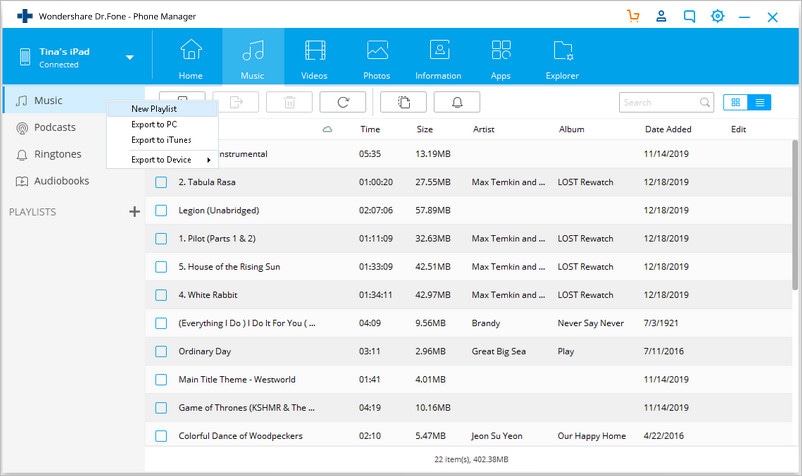
If you prefer more granular control and would like to select and preview individual music files before transferring, navigate to the "Music" tab located at the top menu. Select the specific tracks, right-click, and choose "Export to iTunes". This manual selection seamlessly transfers your chosen music files, allowing you to enjoy your curated sounds immediately.
-
Step 3 Extract music from the iPod to PC
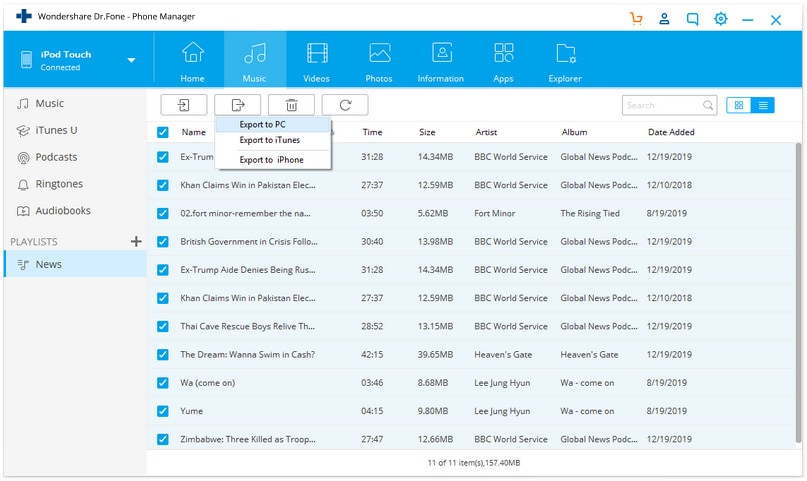
Alternatively, if your goal is solely to extract music from the iPod to a local PC folder for backup or moving to an Android device later, click the "Music" tab to highlight your desired files. Right-click the highlighted items and select "Export to PC". Choose a local directory, and your tracks will be exported safely.
Part 2. Extract Songs from an iPod on PC or Mac Manually
If you prefer not to use third-party applications and have a bit of technical patience, you can attempt to extract songs from the iPod manually. This method is generally viable if your device is an older generation model like an iPod nano, iPod classic, or iPod shuffle (as iOS-based iPod Touches utilize a completely different file structure).

2-1. How to Extract songs from an iPod to PC on a Mac
- Disable the auto syncing option: Launch the iTunes Library (or Finder/Music app on newer macOS) on your Mac. Connect the iPod via a USB cable and ensure the device icon appears. Click 'iTunes' in the top ribbon and navigate to 'Preferences'. From the new window, click the 'Devices' tab and heavily ensure you check the option that says "Prevent iPods, iPhones, and iPads from syncing automatically." Failure to do this could erase the iPod's contents.
- Make the hidden folders visible: Apple hides the actual media folders by default. Open the Terminal application (located in Applications/Utilities). Type
defaults write com.apple.finder AppleShowAllFiles TRUE, press return, and then typekillall Finderand press return again. Your hidden system files will now be visible. - Extract songs from the iPod: Double-click the connected iPod drive icon on your desktop or Finder. Open the slightly transparent 'iPod_Control' folder and locate the 'Music' subfolder inside. Drag this entire music folder from your iPod to a new folder on your Mac's desktop.
- Put the extracted music to iTunes Library: Return to the iTunes Preferences window and click the 'Advanced' tab. Ensure that "Keep iTunes music folder organized" and "Copy files to iTunes music folder when adding to library" are both checked. Next, go to the iTunes 'File' menu, select "Add to library", choose the iPod music folder you just copied to your desktop, and watch as iTunes imports and reads the metadata of the files.

2-2. Extract Songs from an iPod on a Windows PC
Extracting raw files on a Windows environment follows a similar logic but utilizes Windows Explorer instead of Terminal commands.
- Step 1. Disable the auto syncing option in iTunes: Launch iTunes on your Windows PC and connect the iPod. Open 'Edit' > 'Preferences' from the top menu, navigate to the 'Devices' tab, and check "Prevent iPods, iPhones, and iPads from syncing automatically."
- Step 2. Extract Music from the iPod on PC: Open "This PC" or "My Computer". Your iPod will be displayed under 'Devices and drives' as a removable USB disk. Click the 'View' tab on the top ribbon and check the box for "Hidden items" (or go to Tools > Folder Options > View > Show hidden files and folders on older Windows versions). Open the "iPod_Control" folder inside the removable disk, locate the "Music" folder, and copy it to your local hard drive. Finally, drag and drop this folder into your iTunes application to rebuild your library.

- Zero risk of accidental data deletion
- Maintains proper track names and playlist structures
- Transfers play counts, star ratings, and ID3 metadata
- 1-click automation saves significant time
- Highly complex for non-technical users
- High risk of accidental library sync/deletion
- File names appear as random four-letter jargon
- Requires manual reorganization of entire library
Conclusion
You might still wonder, "Why should I use Dr.Fone to extract iPod music instead of free methods? Are there other tools available?" To be completely transparent, yes, alternative software does exist. Programs like Senuti, iExplorer, and CopyTrans have been used in the past to navigate iPod file structures. However, we highly recommend Dr.Fone - Phone Manager (iOS), primarily because it maintains robust compatibility with almost all iPod generations up to 2026. It operates with exceptional speed, avoids the messy file-naming conventions of manual extraction, and ensures a completely hassle-free data transfer experience.




FAQ
-
1. Will I lose my original playlists if I manually extract music?
Yes, when extracting music manually by dragging the "iPod_Control" folder, you only copy the raw audio files. The internal database that organizes those files into custom playlists is not readable via this method. Using a dedicated transfer tool is required to retain playlist architecture. -
2. Can I extract music from a modern iPod Touch using the manual method?
No. The manual folder extraction method generally only works for older "disk-based" models like the iPod Classic, Nano, and Shuffle. The iPod Touch runs on iOS, which uses sandboxed file systems and stricter DRM encryption, making manual extraction through Windows Explorer or Mac Finder impossible without third-party management tools. -
3. Why are my extracted file names shown as random letters (e.g., ABCD.mp3)?
This is a deliberate feature designed by Apple to deter music piracy and unauthorized sharing. While the file name is obfuscated, the internal ID3 metadata (Artist, Album, Track Title) remains intact. When you drop these files back into iTunes or a modern media player, the software will read the metadata and display the correct song information. -
4. Does extracting music from an iPod delete it from the device?
No, extracting music simply copies the data from the iPod's hard drive to your computer. As long as you do not accidentally allow an empty iTunes library to "auto-sync" and overwrite the device, your tracks will remain perfectly safe on your old iPod.
 Add Wondershare Dr.Fone as a preferred source on Google



