Easy Steps to Transfer Android Contacts from Your PC

Dec 31, 2025 • Filed to: Device Data Management • Proven solutions
Dr.Fone Basic:
Better Control for Your Phone
Manage, transfer, back up, restore, and mirror your device
Transferring contacts from your Android device to your PC can be a straightforward process if you know the right tools and methods. Whether you're switching phones, backing up important information, or simply want to ensure your contacts are safely stored, this guide is for you. Let's explore some of the most common methods to transfer Android contacts from your PC and learn how to transfer contacts from PC to Android.
Method 1: Transfer Android Contacts Using Google Contacts
Google Contacts provides a seamless way to manage and transfer your contacts across devices. By syncing your Android contacts with your Google account, you can effortlessly add contacts to your Android phone from your PC. This method ensures that your contact list is always up-to-date and easily retrievable whenever you need it.
Steps on how to add contacts to an Android phone from a PC :
Step 1: Sync Your Android Contacts:
Open the Contacts app on your Android device. Tap on the three lines (hamburger menu) in the top-left corner and select Settings. In the Settings menu, locate the Accounts section and select your Google account. Under the Google account settings, ensure that the Sync Contacts option is enabled. This will allow your Android device to automatically synchronize your contacts with your Google account, making them accessible across various devices. With this setting enabled, any new contacts you add to your Android device will be backed up to your Google account, ensuring that you don’t lose any important information.
Step 2: Access Google Contacts on PC:
Open your browser and go to Google Contacts. Sign in with the same Google account used on your Android device. Once logged in, you will see a list of all your synchronized contacts. From here, you can view, edit, and manage your contacts directly from your PC. This centralized access point allows you to efficiently organize your contact list, delete redundant entries, and add new information. Utilizing Google Contacts on your PC ensures that your contact information is always up-to-date and easily accessible, whether you're working from your computer or mobile device.
Step 3: Export Contacts:
how-to-transfer-android-contacts-from-pc-1

In Google Contacts, click on the Export option from the left-hand menu. This will open a new window where you can select the specific contacts you wish to export. You have the option to either export all contacts or choose specific groups of contacts. Once you've made your selection, choose the CSV format for exporting. This format is widely compatible with other applications and services, making it easy to import your contacts into different platforms if needed. After selecting the CSV format, click on the "Export" button, and the CSV file will be downloaded to your PC. This file will contain all your chosen contacts, along with their detailed information, ready to be backed up, transferred, or used as required.
Benefits:
- This method is fast and doesn't require additional software.
- It easily allows you to manage and organize your contacts.
Method 2: Transfer Android Contacts Using a USB Cable
Transferring contacts directly using a USB cable is an efficient and straightforward method for those who prefer a more hands-on approach. This method involves connecting your Android device to your PC and manually copying the contact files. It can be particularly useful if you want to quickly transfer a large number of contacts without using any cloud services or internet connection. Follow the steps below to move your contacts using a USB cable.
Steps on how to import contacts from PC to Android:
Step 1: Connect Your Android Device to PC:
Use a USB cable to connect your Android device to your computer. Ensure your phone is in File Transfer mode. You might need to swipe down on your device’s notification bar and select the appropriate USB option. This setting allows your computer to access the files stored on your phone. Once the connection is established, your device should appear as a removable drive on your computer. You can navigate through the folders on your Android device to locate the contacts file, which is often in the "Contacts" or "People" directory. Copy the file to your computer by dragging it to your desired location, ensuring that all your contacts are backed up safely.
Step 2: Export Contacts on Android:
how-to-transfer-android-contacts-from-pc-2

Open the Contacts app on your Android device. Tap on the three dots (more options) in the top-right corner and select Export. Choose to export contacts to internal storage or an external SD card. This will save your contacts as a `.vcf` (vCard) file, creating a backup that can be easily transferred to other devices or computers. The `.vcf` file format is widely supported, ensuring compatibility across different platforms and applications. Once the export process is complete, you can locate the `.vcf` file in the designated storage location and proceed to copy it to your computer. This method provides a straightforward way to preserve your contacts without needing an internet connection or additional applications.
Step 3: Transfer the File to PC:
how-to-transfer-android-contacts-from-pc-3

Navigate to your device's storage using your PC’s file explorer. Once your Android device is connected and recognized as a removable drive, look for the internal storage or SD card, depending on where you exported the `.vcf` file. Browse through the directories to find the `Contacts` folder or the location you specified during the export process. Once you locate the `.vcf` file, right-click on it and select "Copy." Then, navigate to the destination folder on your computer where you want to store the contacts file. Right-click within the folder and select "Paste" to copy the `.vcf` file. This process ensures that your contacts are securely transferred and readily accessible on your computer for safekeeping or future use.
Benefits:
- No internet connection is required.
- Direct and secure transfer.
Method 3: Transfer Android Contacts Using Outlook
Transferring Android contacts using Outlook provides a seamless and efficient way to manage your contact list across different devices and email platforms. This method leverages the robust synchronization capabilities of Outlook, allowing you to keep your contacts updated and accessible no matter where you are.
In the following steps, we'll guide you through the process of exporting your contacts from your Android device and importing them into Outlook, ensuring that your contact information is always at your fingertips.
Steps on how to transfer Android contacts from PC:
Step 1: Sync Contacts with Outlook:
First, open the Settings app on your Android device. Scroll down and select Accounts. Tap on Add Account and choose Outlook from the list of available options. Sign in with your Outlook credentials to link your account. Finally, enable the Sync Contacts option to ensure that your contacts are synchronized between your Android device and your Outlook account. This setup will help keep all your contacts up-to-date and accessible across multiple devices seamlessly.
how-to-transfer-android-contacts-from-pc-4

Step 2: Access Contacts on Outlook:
Open the Outlook app on your new device or visit the Outlook web portal. Sign in with the same Outlook account used for syncing your Android contacts. Once signed in, your contacts will be automatically synced and accessible. This streamlined process ensures that all your important contact information transitions seamlessly, providing you with immediate access regardless of the device you are using. As a result, you can easily stay in touch with your connections without any hassle of manual transfers or missing data, enhancing your overall productivity and connectivity.
Benefits:
- Utilizes existing Microsoft services.
- Contacts are backed up and can be easily restored.
- Synchronization across multiple devices for consistent contact management.
By choosing the method that best suits your preferences and needs, you can ensure that your contacts are transferred efficiently and securely.
Method 4: Recommended: Transfer Android Contacts in 3 Minutes
Transferring contacts between devices can often be a cumbersome and time-consuming process. Fortunately, Wondershare Dr.Fone Phone Manager offers a Quick Transfer feature designed to streamline and simplify this task. This method provides a reliable, efficient, and user-friendly solution to ensure all your important contacts are securely transferred from your Android device to your new device with minimal effort.
With Dr.Fone Phone Manager, you can avoid the pitfalls of manual data entry and ensure your contact information is accurately and promptly updated. If you're wondering how to import contacts from PC to Android, Dr.Fone Phone Manager is the perfect tool for the job.
Dr.Fone - Phone Manager (Android)
Transfer Android Contacts in 3 Minutes
- Transfer files between Android and computer, including contacts, photos, music, SMS, and more.
- Manage, export/import your music, photos, videos, contacts, SMS, Apps, etc.
- Transfer iTunes to Android (vice versa).
- Manage your Android device on the computer.
- Fully compatible with the newest Android OS.


Stepwise guide on Quick Transfer From Computer to Android:
Step 1: Connect Your Android and Initiate Quick Transfer
Connect your Android device to the computer using a USB cable. Once the device is successfully detected, click the Quick Transfer button to proceed.
connect android to transfer

Step 2: Import Data for Transfer
Simply drag and drop the files you wish to transfer, or click the "Select Files" button to upload them to the platform.
import android data to transfer

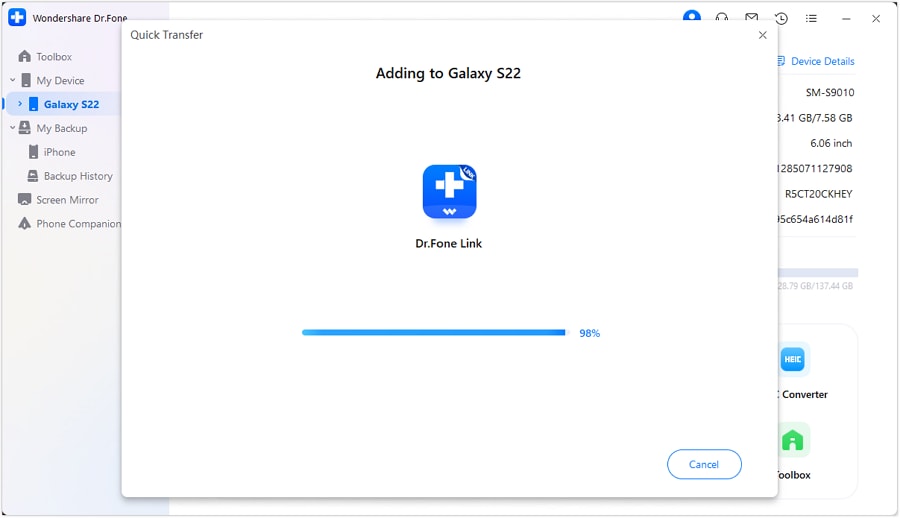
Step 3: Select Dr.Fone Link
Once completed, choose Dr.Fone Link as the destination to store your files on the device.
Note: Android users can only drag and drop files into Dr.Fone Link.
add to Dr.Fone link
Step 4: Successfully Transfer Data to Android
Dr.Fone Link will automatically transfer all selected data to your Android device. Once the process is complete, you can click on the “i" icon to locate the transferred data on your Android.
transfer data to android

Conclusion
Transferring contacts from your Android device to your PC can be done in several ways, each with its benefits. Whether you prefer the seamless integration of Google Contacts, the directness of using a USB cable, or the comprehensive features of reliable third-party software like Wondershare Dr.Fone, there's a method to suit your needs. Ready to try these methods? Start transferring your contacts today and ensure your important information is safely stored. And if you're wondering how to import contacts from PC to Android, these methods can help you with that as well. Happy transferring!
FAQs
Dr.Fone Basic:
Better Control for Your Phone
Manage, transfer, back up, restore, and mirror your device


Android Manage
- Android to iTunes/iCloud
- Android to Mac
- 1. Transfer Data from Android to Mac
- 2. Transfer Videos from Android to Mac
- 3. Transfer Files from Android to Mac
- 4. Connect Android with Mac
- 5. Transfer Photos from Android to Mac
- 6. Sync Android with Mac OS X
- Android to PC
- 1. Transfer Files Using USB Cable
- 2. Share Apps for Android to PC
- 3. Transfer Photos to Windows 10
- 4. Transfer Contacts to PC
- 5. Transfer Photos from Android
- 6. Transfer Files from Android to PC
- 7. Backup and Transfer SMS
- 8. Transfer Photos from Android to PC
- 9. Transfer Videos from Phone to Computer
- 10. Best MoboRobo Alternative to Manage and Transfer Data
- iCloud to Android
- 1. Tips to Sync Data to Android
- 2. Set Up iCloud Account on Android
- 3. Transfer iCloud Contacts
- 4. Transfer iCloud Photos to Android
- iTunes to Android
- 1. Transfer iTunes Audio Books
- 2. Sync iTunes Music with Google Play
- 3. Copy iTunes Playlists to Hard Drive
- 4. Transfer Music from iTunes
- Mac to Android
- 1. Transfer Files from Mac to Android
- 2. Send Files from Mac to Android
- 3. Transfer Music from Mac
- 4. Transfer Photos from Mac
- PC to Android
- 1. Transfer Files to Android Wi-Fi
- 2. Transfer Pictures from Computer
- 3. Transfer Files from PC to Android
- 4. Transfer data from Acer device
- Manage Tips
- ● Manage/transfer/recover data
- ● Unlock screen/activate/FRP lock
- ● Fix most iOS and Android issues
- Manage Now Manage Now Manage Now


James Davis
staff Editor