Mastering VLC for Android: From Download to Customization
Oct 24, 2025 • Filed to: Device Data Management • Proven solutions
Dr.Fone Basic:
Better Control for Your Phone
Manage, transfer, back up, restore, and mirror your device
VLC for Android is a versatile media player that brings the powerful features of its desktop counterpart to mobile devices. With its ability to handle a wide range of audio and video formats and advanced playback options, VLC has become a go-to choice for many users.
This guide aims to walk you through downloading, setting up, and customizing VLC to suit your media consumption needs, ensuring you get the most out of this remarkable application. Additionally, we will introduce Dr.Fone as an extra tool for effective file management on Android. Whether you're a first-time user or looking to refine your experience, you'll find valuable tips and insights here.
Part 1. What is VLC Player for Android Users?
With the rise of Android devices as primary media consumption tools, the need for a versatile and powerful media player has never been greater. Enter VLC Media Player – a free, open-source solution that supports a wide variety of file formats without requiring additional codecs. This blog post will explore the benefits of using VLC for Android and guide users through its key features, including subtitle integration and playlist management.
Part 2. Where to Download VLC for Android?
Finding the right app for your media needs is crucial. VLC media player Android can be easily downloaded from two trusted sources:
2-1. Google Play Store
The Google Play Store is the most common app marketplace for Android devices. To download VLC:

- Open the Play Store app on your device.
- In the search bar, type 'VLC' and hit enter.
- Look for the app developed by 'VideoLAN' – it's usually at the top of the list.
- Tap 'Install' and wait for the app to download.
2-2. VideoLAN's Official Website
For users who prefer direct downloads or need an older version of VLC, VideoLAN's official website offers safe APK files for the Android VLC player APK:

- Open your web browser and go to videoLAN.org.
- Click on 'Download VLC'.
- Once the download is complete, locate the APK file in your device's file manager and open it to start the installation.
Part 3. How to Use VLC Player for Android TV
For those with Android TV, VLC player for Android TV offers an optimized version for larger screens and remote controls:
- After downloading VLC from the Google Play Store, open the app.
- Navigate to the desired media source using the left-side menu (local storage, network, etc.).
- Select your video or audio file to start playback.
- Utilize the on-screen controls to play, pause, or adjust volume.
Part 4. How to Add Subtitles in VLC Android
Subtitles can enhance your viewing experience, especially when watching foreign films or content with hard-to-understand dialogue. Here's how to add subtitles in VLC for Android:
- Before opening your video in VLC, ensure your subtitle file (usually in .srt format) is saved in the same folder as your video file. The subtitle file should have the same name as the video file for automatic recognition.
- Open your video in VLC. If the subtitles don't appear automatically, tap the three dots on the right side of the screen.

- Select 'Subtitle' from the drop-down menu. Here, you can choose to enable the automatically recognized subtitle or browse your device to locate and load your subtitle file manually.
Part 5. How to Set Up a Playlist in VLC Android
Creating a playlist in VLC makes it easier to enjoy multiple videos or songs in one go. Follow these steps to set up a playlist:

- Open VLC on your Android device.
- Tap the 'Browse' option from the left-side menu.
- Navigate to the folder containing your desired media files.
- Long-press the first file you want in your playlist, then tap any additional files to select them. After selecting, tap the 'Add to Playlist' option.
- Name your new playlist when prompted, and hit 'Save'. Your playlist can now be accessed under the 'Playlists' option in the left-side menu.
Part 6. Pro Tip: Streamline Your Data Management with Wondershare Dr.Fone
While VLC provides a fantastic platform for media playback, managing your video library and related files on Android devices can be a challenge. For this, we recommend using Wondershare Dr.Fone's Phone Manager feature. This all-in-one data management tool allows you to:

Dr.Fone - Phone Manager (Android)
One-Stop Solution to Manage and Transfer Data on Android Phone
- Transfer files between Android and computer, including contacts, photos, music, SMS, and more.
- Manage, export/import your music, photos, videos, contacts, SMS, Apps, etc.
- Transfer iTunes to Android (vice versa).
- Manage your Android device on the computer.
- Fully compatible with the newest Android OS.
- Organize your media files into specific folders for easy access
- Transfer videos and playlists between your Android device and computer
- Backup your Android's media files effortlessly, ensuring they're safe and easily retrievable
To get started with Dr.Fone
To get started, download and install Dr.Fone from Wondershare's official website. Next, connect your Android device to your computer using a USB cable. Once connected, open Dr.Fone and select the 'Phone Manager' option. From this interface, you can easily manage your media files, back up data, and much more.
The complete management process requires linking your Android device to a computer via a cable connection. Alternatively, you can connect wirelessly by installing the Dr.Fone Link app on your Android device. Simply scan the QR code to establish a successful connection to the platform. All of these actions can be performed in the My Device section.
Once connected, multiple functions can be performed to manage the data of the Android device, lets take photos and video management as example.
6-1. Photos Manage
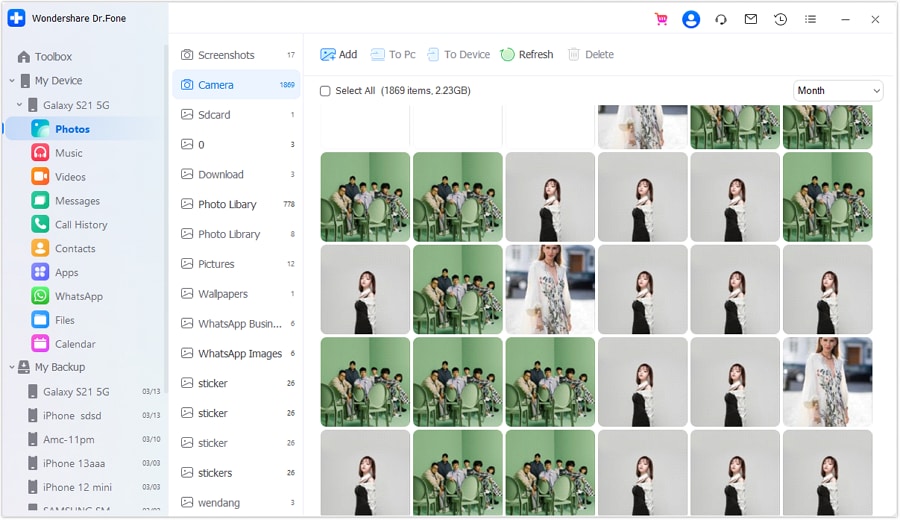
Step 1: Access Android Photos
Once your Android device is connected, navigate to Android Device > Photos in the left-hand panel. Click Add to import additional images to your device. To export selected pictures to your computer, use the To PC option. Additionally, utilize the Delete option to remove specific images and effectively manage your gallery.

Step 2: Preview Photos on Your Android
Choose an image to open and preview. This action will launch a new window, allowing you to rotate and zoom in based on your preferences.

6-2. Video Management
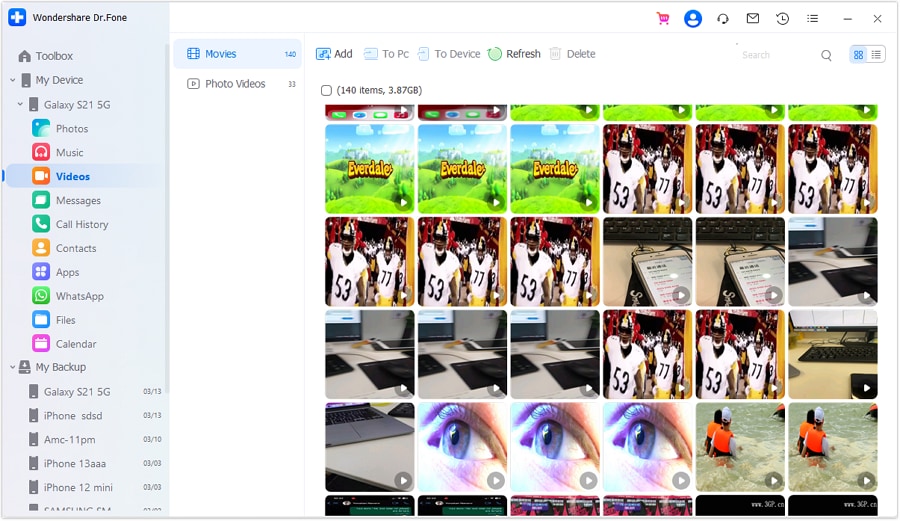
Step 1: Access and Manage Your Videos
To manage your videos, go to Android Device > Videos in the left panel. Here, you can easily import your selected videos and export them as desired. If your video list updates, simply refresh it, and feel free to delete any videos you no longer need.

Step 2: Adjust the Viewing Aspect
You can modify the viewing aspect of the videos using the Album View and List View options located in the top-right corner of the window.

With VLC for Android and Dr.Fone, you can enhance your media consumption experience and make data management seamless.
Conclusion
In conclusion, managing your Android device efficiently requires an understanding of its various features and tools. By familiarising yourself with the functions of call history, file management, and calendar management, you can ensure an organised and streamlined experience.
Utilising applications like Wondershare Dr.Fone and VLC for Android not only enhances your ability to access and control your data but also improves your overall usability of the device. With these tools at your disposal, you can optimise your workflow, safeguard important information, and fully enjoy the capabilities available through Android technology.
FAQs
Dr.Fone Basic:
Better Control for Your Phone
Manage, transfer, back up, restore, and mirror your device
Android Manage
- Android to iTunes/iCloud
- Android to Mac
- 1. Transfer Data from Android to Mac
- 2. Transfer Videos from Android to Mac
- 3. Transfer Files from Android to Mac
- 4. Connect Android with Mac
- 5. Transfer Photos from Android to Mac
- 6. Sync Android with Mac OS X
- Android to PC
- 1. Transfer Files Using USB Cable
- 2. Share Apps for Android to PC
- 3. Transfer Photos to Windows 10
- 4. Transfer Contacts to PC
- 5. Transfer Photos from Android
- 6. Transfer Files from Android to PC
- 7. Backup and Transfer SMS
- 8. Transfer Photos from Android to PC
- 9. Transfer Videos from Phone to Computer
- 10. Best MoboRobo Alternative to Manage and Transfer Data
- iCloud to Android
- 1. Tips to Sync Data to Android
- 2. Set Up iCloud Account on Android
- 3. Transfer iCloud Contacts
- 4. Transfer iCloud Photos to Android
- iTunes to Android
- 1. Transfer iTunes Audio Books
- 2. Sync iTunes Music with Google Play
- 3. Copy iTunes Playlists to Hard Drive
- 4. Transfer Music from iTunes
- Mac to Android
- 1. Transfer Files from Mac to Android
- 2. Send Files from Mac to Android
- 3. Transfer Music from Mac
- 4. Transfer Photos from Mac
- PC to Android
- 1. Transfer Files to Android Wi-Fi
- 2. Transfer Pictures from Computer
- 3. Transfer Files from PC to Android
- 4. Transfer data from Acer device
- Manage Tips
- ● Manage/transfer/recover data
- ● Unlock screen/activate/FRP lock
- ● Fix most iOS and Android issues
- Manage Now Manage Now Manage Now


Alice MJ
staff Editor