 Recover photos, messages, WhatsApp, and more — no backup
needed.
Recover photos, messages, WhatsApp, and more — no backup
needed.

 100% Security Verified | No Subscription Required | No Malware

 :
: 
 ChatGPT
 Perplexity
 Gemini
 Claude
 Grok
Grok
Even in 2026, where instant messaging apps dominate our digital landscape, traditional phone calls and direct text messages remain the bedrock of daily communication. Having direct access to a well-organized list of phone numbers on our Android smartphones is indispensable, whether for business networking, emergency situations, or simply staying in touch with loved ones. Our phonebook serves as a centralized hub for all our connections, making it a vital asset in our daily routine.
Despite the continuous evolution of smartphone technology, sudden data loss is a reality that catches many users off guard. Accidentally swiping the wrong button, initiating a faulty system update, or experiencing a software glitch can wipe out essential contact information in seconds. If you accidentally delete the contact numbers stored on your Android mobile device, it can understandably trigger immediate panic. But don't worry. There are multiple reliable techniques you can use to recover deleted contacts on your Android smartphone. By understanding how the device handles deleted files and applying the correct methods, you can seamlessly bring your entire directory back to life.
In this comprehensive guide, we will explore the underlying reasons why phone numbers mysteriously disappear from Android smartphones. Furthermore, we will walk you through detailed, step-by-step tutorials on how to retrieve deleted phone numbers on Android devices, equipping you with the exact strategies needed regardless of whether you have a backup file prepared.
In this article
Part 1. Are Deleted Contacts Gone Forever?
Modern Android smartphones are equipped with resilient database architectures. When you intentionally or accidentally hit the 'Delete' button on a contact entry, the device doesn't instantly shred the digital file. Instead, the Android operating system marks the storage space previously occupied by that data as 'available' for new information. Therefore, as long as you act swiftly and avoid saving massive new files to your phone's memory, you can definitively recover deleted contacts on your Android smartphone.
While user error is a primary reason for missing phone numbers, several invisible background processes can also cause your contacts list to vanish. Understanding these triggers is essential for determining the most effective recovery route.
Contacts Syncing Problems

Many Android devices rely heavily on Cloud synchronization to keep the Contacts app updated across multiple platforms. This protocol is incredibly useful; however, intermittent Wi-Fi connections, server timeouts, or background battery restrictions can interrupt the sync process. When this happens, the app fails to import or display the contacts properly, making it appear as though the numbers have been deleted. Re-establishing a stable connection and forcing a manual sync often resolves this display anomaly.
Storage Settings Misconfiguration
Android ecosystems grant users the flexibility to choose exactly where their contacts are housed—be it locally on the device's internal storage, on the SIM card, or associated with specific Google accounts. If the 'Contacts to Display' setting within your phonebook app gets toggled to an empty account or an old SIM card, your phone numbers will abruptly disappear from view. Calibrating this storage setting to display 'All Contacts' is a crucial first step when trying to locate seemingly missing numbers.
Software Issues and Outdated Apps

Like any core system module, the Contacts application requires continuous maintenance through developer updates. If you are running an outdated version of the app or a buggy OS iteration, software conflicts can trigger abrupt data loss. Keeping your applications patched guarantees compatibility and prevents random glitches from purging your crucial contact entries.
Part 2. How to Retrieve Deleted Phone Numbers on Android Smartphones?
Losing vital contact numbers on your Android smartphone is a highly solvable problem in 2026. The tech industry has developed numerous safety nets designed specifically to catch deleted data before it is permanently overwritten. Depending on your backup habits and sync configurations, you can choose the ideal technique from the comprehensive methods below to recover deleted contacts on your Android device efficiently.
Method 1: Recover deleted contacts on Android via the Recently Deleted folder
The majority of modern native Contacts applications now feature a 'Trash' or 'Recently Deleted' holding area. This functions as a temporary safety net, storing any deleted contact entry for a grace period—usually up to 30 days—before it is permanently purged. Here is how to retrieve deleted contacts on Android utilizing this built-in failsafe:
-
Step 1 Open the Contacts Application
Launch the default Contacts app located on your Android mobile device's home screen or app drawer.
-
Step 2 Access Organization Tools
Tap on the Organize or 'Fix & Manage' tab, usually located at the bottom menu or within the settings sidebar.

-
Step 3 Navigate to the Trash Bin
Scroll down the available options and select Trash (or Recently Deleted). This will display all contacts removed within the retention window.

-
Step 4 Select the Target Numbers
Carefully scroll through the list and find the specific deleted contact number you want to recover. Tap to highlight it.
-
Step 5 Finalize the Recovery
Click on the Recover button. The phone number will immediately be relocated back into your primary active contact list.

Method 2: Recover deleted contacts on Android via Google Contacts
For individuals who leverage Google Contacts as their primary synchronization tool, recovering missing data is remarkably straightforward. Google maintains a chronological log of your contact list's state, enabling you to "time travel" and undo recent accidental deletions from a computer interface.
-
Step 1 Launch Your Desktop Browser
Open a reliable web browser on your computer.
-
Step 2 Access Google Contacts Portal
Navigate directly to the official website of Google Contacts. Ensure you log into the exact Google account linked to your Android smartphone.
-
Step 3 Open Account Settings
Locate and click the Settings gear icon situated at the top right corner of the dashboard screen.

-
Step 4 Trigger the Reversal Tool
From the dropdown menu, select Undo Changes.

-
Step 5 Choose the Restoration Window
A prompt will appear allowing you to revert your contact list to a prior state (e.g., 10 mins ago, 1 hour ago, or a custom timeframe up to 30 days). Select the timeframe from before the accidental deletion occurred.
-
Step 6 Confirm and Sync
Click Undo to finalize the command. The missing contacts will be restored to your Cloud account instantly. Give your phone a few minutes with an active internet connection to sync the newly recovered phone numbers.

Method 3: Recover deleted contacts on Android via Google Backup
Users who have proactively enabled Google Drive backups have an airtight safety net at their disposal. The Android operating system routinely stores vital device data, allowing you to manually extract missing phone numbers from an archived backup package.
-
Step 1 Access Device Settings
Unlock your Android mobile device and tap to open the Settings app.
-
Step 2 Navigate to Google Services
Scroll down the settings list and tap on Google.

-
Step 3 Open All Services
Tap on the All Services tab to reveal extended account options.

-
Step 4 Select the Setup Tool
Scroll through the menu items to find and click on Set Up & Restore.
-
Step 5 Initialize Contact Restoration
From the subsequent menu, tap on Restore Contacts.
-
Step 6 Execute the Recovery
Review the list of available device backups. Identify the specific backup package created prior to your data loss, then click the Restore button next to it to deploy the phone numbers back onto your device.

Method 4: Recover deleted contacts on Android by importing a backup vCard
A standard .VCF (Virtual Contact File) or vCard is universally utilized to store and distribute contact details across platforms. If you previously exported your phonebook and kept this secure duplicate file on your SD card or internal storage, you can painlessly bypass cloud limitations and restore the missing data locally.
-
Step 1 Verify File Availability
Ensure that the backup vCard file is securely stored on your mobile device's local directory or inserted SD card.
-
Step 2 Launch the Application
Once file location is confirmed, open your Android smartphone's default Contacts app.
-
Step 3 Tap the Organize Tab
Navigate to the Organize or Management section within the app interface.
-
Step 4 Select Import Options
Scroll down and tap on the Import From File option located under the device data management section.

-
Step 5 Choose Target Destination
The system will prompt you to select a specific storage account (like Device or Google) where you want the imported vCard data injected.
-
Step 6 Locate and Import
Browse through your internal file structure to find the specific vCard backup file. Tap on it to begin the extraction process.
-
Step 7 Verify Restoration
Wait momentarily for the system notification confirming that the vCard file has been successfully imported. You can then return to your main Contacts feed to view your newly restored phone numbers.

Method 5: Recover deleted contacts on Android using Wondershare Dr.Fone
What if you find yourself completely devoid of any Cloud backups, trash bin entries, or vCard files? Do not despair. You can learn how to retrieve deleted contacts on Android without backup utilizing advanced computer-assisted techniques. Wondershare Dr.Fone. serves as an industry-leading data recovery platform designed specifically to securely dig into your phone's database and retrieve overwritten data fragments before they are lost forever. It presents a highly intuitive and risk-free interface for critical data recovery operations.
 Scan Android phones and tablets directly.
- Preview and recover only what you want.
- Supports WhatsApp, photos, videos, contacts, and more.
- Works with 6000+ Android devices.

Here is exactly how to recover deleted phone numbers on your Android smartphone using this robust software tool:
-
Step 1 Install the Desktop Application
First, access the official website to securely download Wondershare Dr.Fone. Proceed to install the application onto your Windows or Mac computer.
-
Step 2 Connect Your Device
Run the newly installed desktop software. Once the primary dashboard fully loads, use a certified USB data cable to physically connect your Android smartphone to the computer. Carefully follow the brief on-screen instructions to enable USB debugging, which ensures a secure data bridge between your devices.
-
Step 3 Launch Data Recovery
Navigate toward the left-side panel and click on Toolbox. Next, return to the main operational interface and select the powerful Data Recovery module.

-
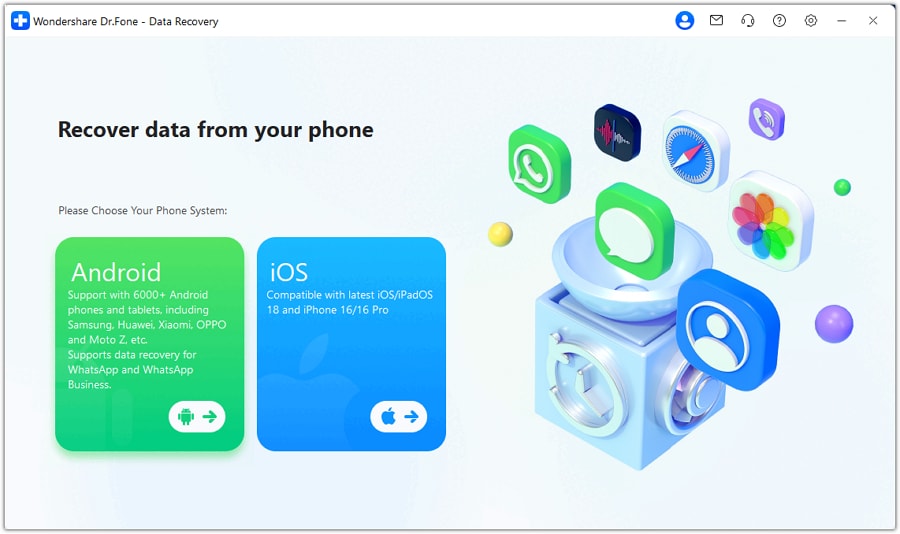
Step 4 Select the Target OS
Since the objective is to recover deleted phone numbers on an Android smartphone, confidently select Android to initialize the specialized recovery protocols.
-
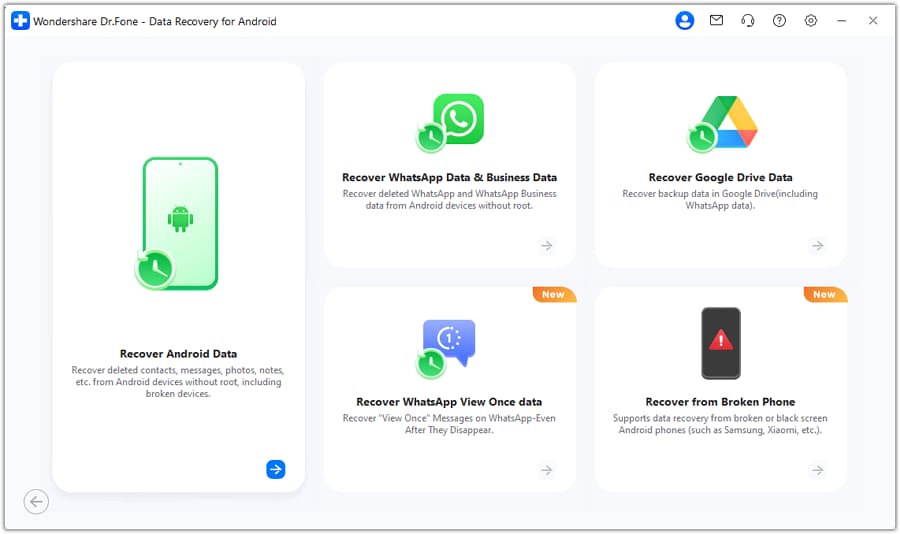
Step 5 Opt to Recover Phone Data
Select Recover Android Data from the subsequent selection screen to prompt the system to scan internal storage arrays.
-
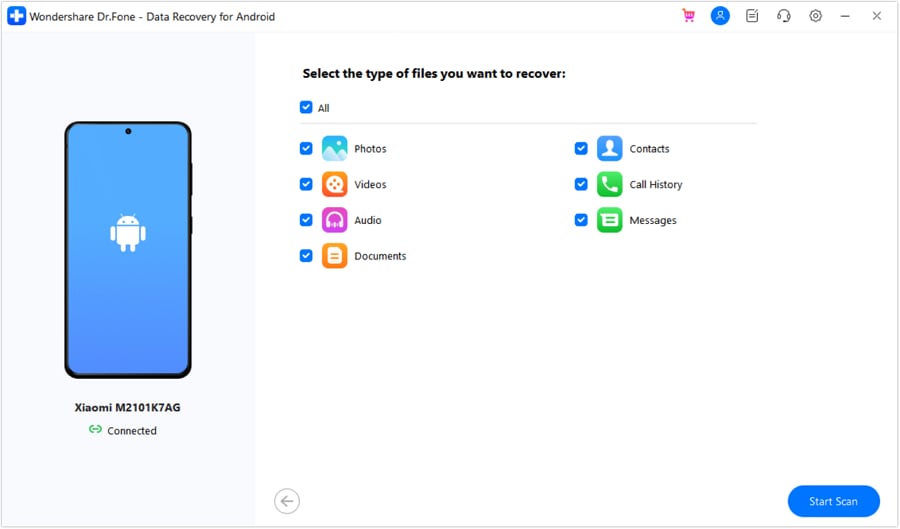
Step 6 Filter for Contacts
Wondershare Dr.Fone will dynamically display various file categories available for deep retrieval. Ensure you tick the checkbox situated next to Contacts. Once satisfied with your selection, click Start Scan.
-
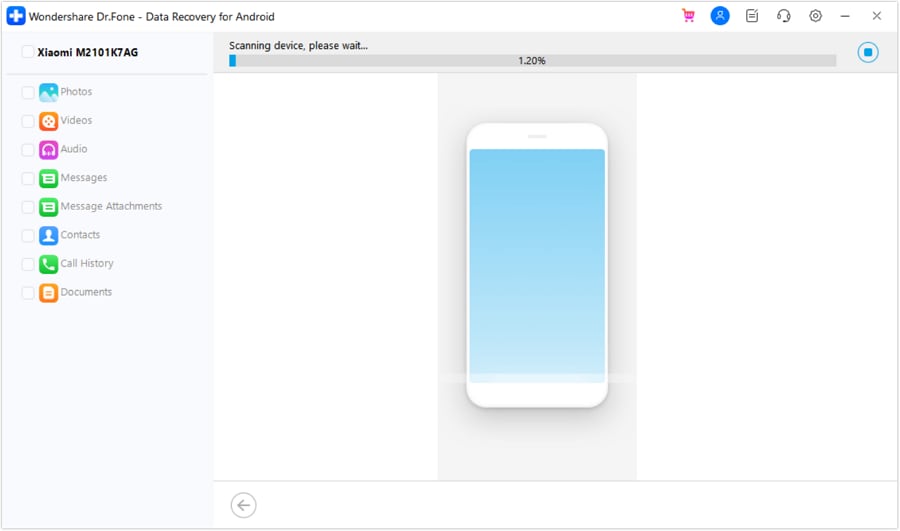
Step 7 Await the Database Scan
Wondershare Dr.Fone will now rigorously scan your mobile device's underlying SQLite database. Refrain from touching the cable or interacting with the phone during this phase to avoid connection interruptions.
-
Step 8 Preview and Select Contacts
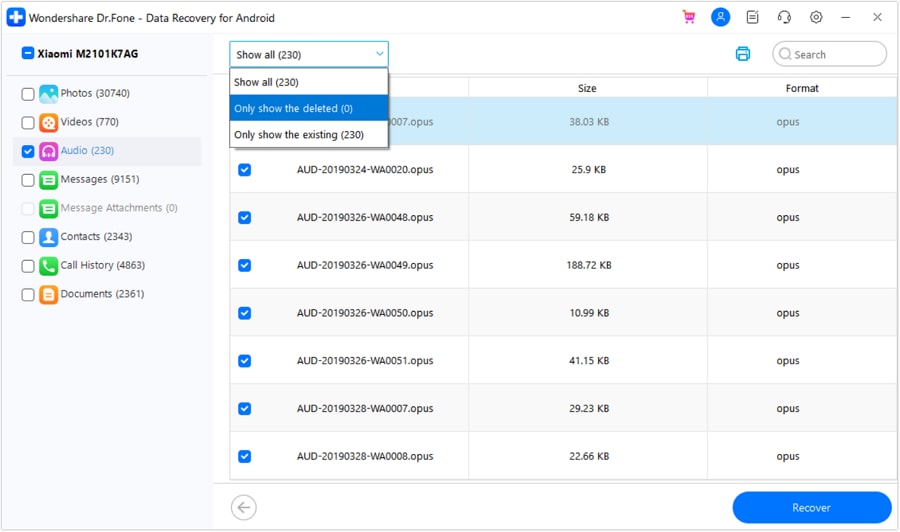
Upon finishing the scan, the software gracefully displays all extractable files on your screen. You can selectively preview names and numbers. Highlight the exact deleted contacts you wish to restore, then click Recover.
-
Step 9 Export the Data
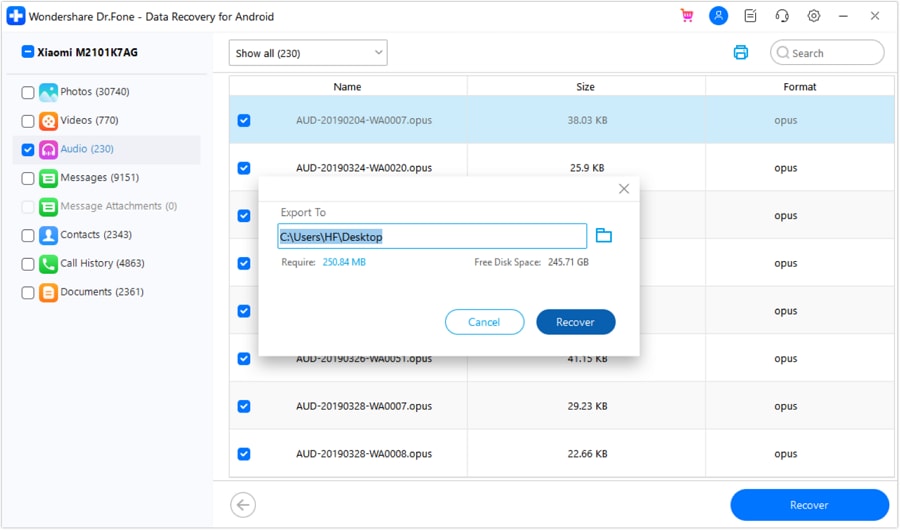
Define a secure destination folder on your desktop PC where the restored files should be kept. Hit Recover one last time to export the list.
-
Step 10 Re-import to Your Phone
Finally, navigate to your saved output folder on your PC. Transfer the newly assembled contact files securely back to your Android device, guaranteeing you regain full communicative capabilities instantly.




 safe & secure
Part 3. BONUS TIP: Back Up Your Contacts Regularly
As demonstrated, navigating a data loss crisis without prior preparation is entirely manageable. Any of the robust methods listed to recover deleted contacts on Android will undoubtedly assist in rebuilding your address book. However, the golden rule of modern device ownership is preemptive data preservation. Engaging in proactive backup habits neutralizes the stress of sudden deletion altogether. Wondershare Dr.Fone features a standalone backup tool capable of securely archiving your phonebook with minimal clicks. Here is a streamlined tutorial on securing your contacts against future disasters:
-
Step 1 Launch the Utility
Open the Wondershare Dr.Fone application on your primary computer. Await the full dashboard initialization, then proceed to tether your Android smartphone via a dependable USB cable to guarantee absolute transfer stability.
-
Step 2 Initiate the Backup Module
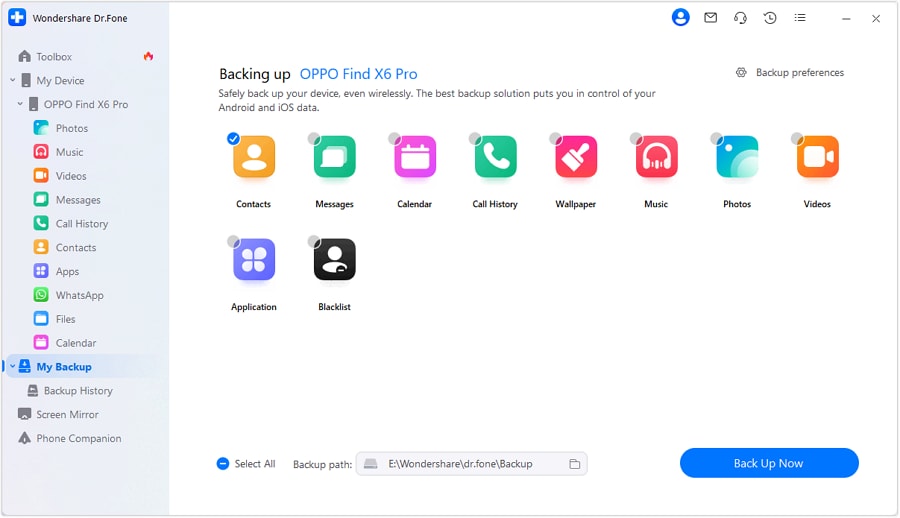
Within the left-hand navigation pane, select My Backup. Transition your focus to the main interface and actively click the Back Up Now command button.
-
Step 3 Acknowledge the SMS Backup Prompt
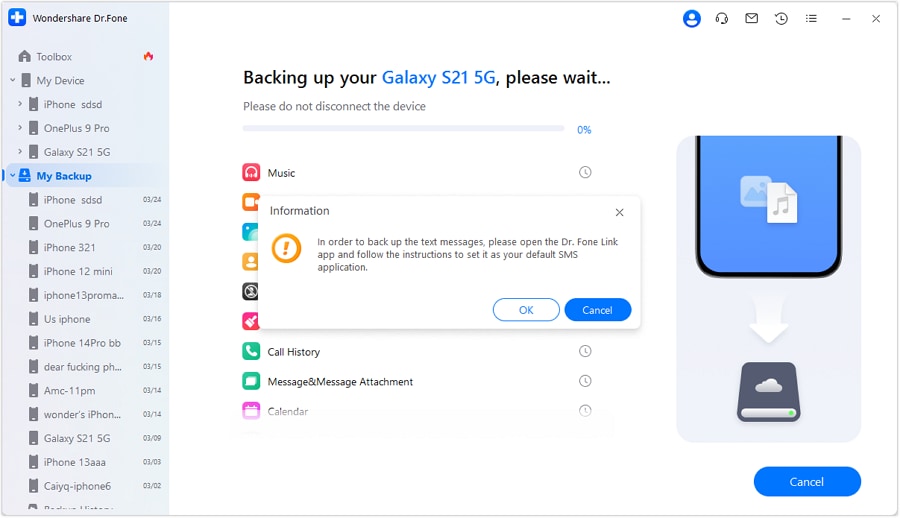
When the platform issues a prompt pertaining to SMS message archiving, follow the concise on-screen directives carefully. Click OK once confirmed to resume the core backup protocol.
-
Step 4 Allow Operations to Conclude
Wondershare Dr.Fone will systematically clone and backup your selected mobile directories. Please refrain from engaging with either your smartphone or desktop environment to prevent unintended command disruption. The archiving process is highly optimized and usually concludes within minutes.
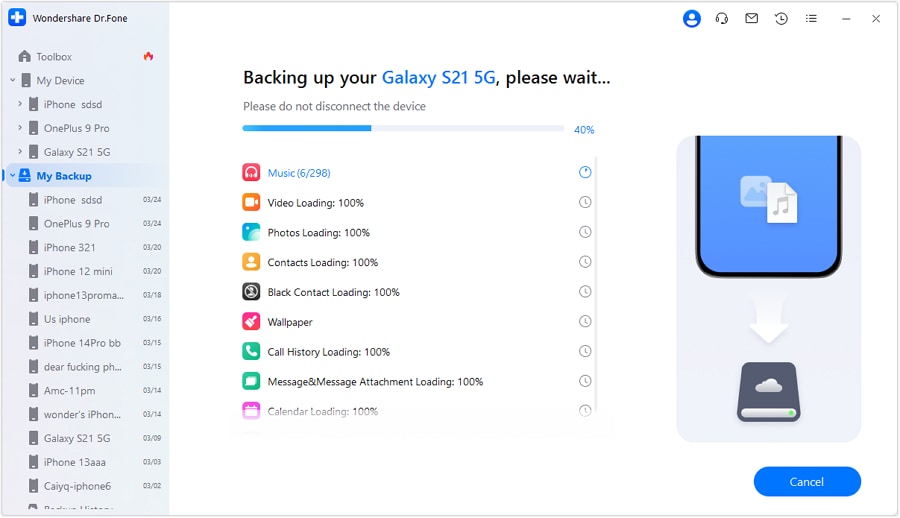
-
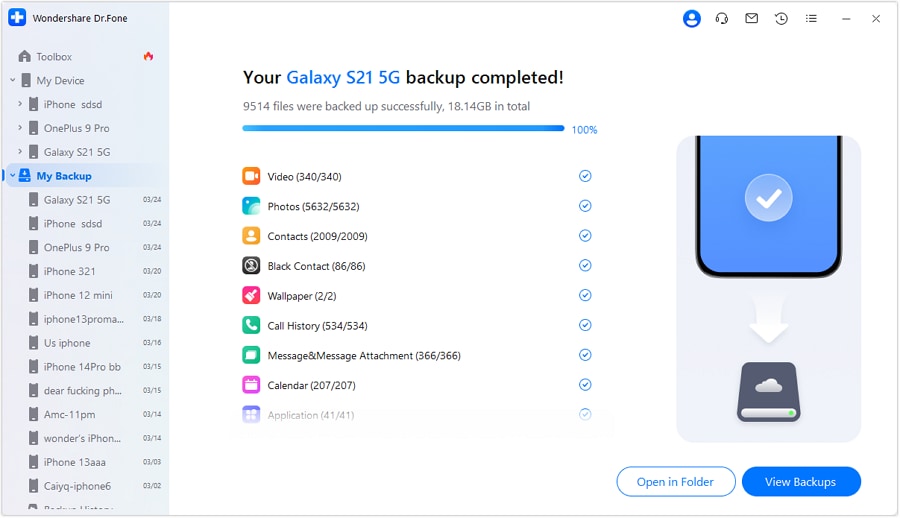
Step 5 Verify Your Secure Backup
Upon registering complete success, always verify the integrity of your new files. Click on Open in Folder or View Backups to manually inspect the secure digital duplicates created by the platform.
safe & secureConclusion
Unquestionably, a meticulously updated contact list remains the navigational compass for our digital and personal interactions. Accidentally wiping this data can understandably induce tremendous stress for anyone deeply entrenched in communication networking. However, as outlined in the extensive solutions above, determining how to retrieve deleted contacts on Android involves assessing your syncing habits and choosing the right pathway. From diving into native trash bins and leveraging Google's cloud reversions to relying on raw file backups, multiple solutions cater to varying degrees of data loss. If you require a robust, foolproof methodology that bypasses the prerequisite of cloud syncs altogether, deploying an advanced database scanning tool like Wondershare Dr.Fone offers the most reliable safety net, cementing absolute peace of mind in any recovery scenario.
FAQ
-
1. Where do deleted contacts go on an Android phone?
When you delete a contact on an Android smartphone, it is usually relocated to the Contacts app's 'Trash' or 'Recently Deleted' folder for up to 30 days. Once permanently removed from there, the file remains hidden in the phone's internal SQLite database, marked as rewritable space, until new data physically overwrites it. -
2. Can I recover deleted phone numbers without using a computer?
Yes. If the deletion occurred recently, you can natively restore the numbers by checking the Trash bin within your default Contacts application or by restoring a recent cloud backup directly from the Android Settings menu under 'Google Services'. -
3. How to retrieve deleted contacts on Android without backup?
If you lack Google sync archives or a saved vCard, you must rely on specialized third-party software like Wondershare Dr.Fone - Data Recovery (Android). This utility connects via PC to deeply scan the phone's internal memory matrix, locating and extracting contact fragments that have not yet been overwritten by new device activity. -
4. How long are deleted contacts retained in Google Contacts?
If your contacts are synchronized with your Google account, any deleted entries are safely kept in the Google Contacts Trash folder for exactly 30 days. After this duration has passed, Google's servers automatically and permanently purge the data.
 Add Wondershare Dr.Fone as a preferred source on Google



