 Recover photos, messages, WhatsApp, and more — no backup
needed.
Recover photos, messages, WhatsApp, and more — no backup
needed.

 100% Security Verified | No Subscription Required | No Malware

 :
: 
 ChatGPT
 Perplexity
 Gemini
 Claude
 Grok
Grok

“I have accidentally deleted some files from my Samsung S6’s internal memory. I found some tools to recover data from an SD card, but can I use them to perform an internal storage recovery? I don’t want the existing data on my phone to be deleted in the process.”
Android User Inquiry
This is a frequent scenario many Android users encounter regarding data recovery phone memory. In 2026, it is standard for smartphones to feature massive internal storage capacities of 128 GB, 256 GB, or even 1 TB. Consequently, the reliance on external SD cards has plummeted. While vast built-in storage offers seamless performance, it introduces a significant challenge: recovering deleted photos android internal storage is technically more complex than scanning a removable SD card. For those specifically looking to address removable storage, you can learn how to recover data from Android SD card here.
However, by leveraging the correct phone memory recovery software, retrieving lost or accidentally erased content directly from your device's built-in memory is entirely achievable. Within this comprehensive 2026 guide, we will explore exactly how to recover deleted files from Android phone’s internal memory through three distinct and proven methodologies, ranging from simple professional tools to complex manual workarounds.
In this article
- Part 1. Is it Possible to Recover Deleted Files from Android Internal Storage?
- Part 2. How to Recover Deleted Files from Android Phone Memory? (The easy way)
- Part 3. How to Recover Deleted Files from Internal Memory for Free? (Complicated)
- Part 4. How Do I Recover Data from the Internal Memory of a Non-Working Android Phone?
- Conclusion
Part 1. Is it Possible to Recover Deleted Files from Android Internal Storage?
Yes, achieving internal storage recovery is entirely possible, albeit slightly more demanding than dealing with removable media. The underlying principle of digital storage explains why: when you delete a file from your phone's memory, the Android operating system does not instantaneously erase the actual binary data from the flash storage.
Instead, the system updates its internal pointer index table—the directory that keeps track of where specific files reside. The OS simply marks that specific sector of the phone memory as "empty" or "available" for writing new data. Your files are still technically present until they are physically overwritten. To maximize your chances of successful deleted photo recovery from phone memory, it is crucial to adhere to the following emergency protocols:

- Do not reboot excessively: Refrain from choosing to restart your device repeatedly in the hope that files magically reappear. If one reboot doesn't work, you require immediate software intervention.
- Cease all operations immediately: The moment you realize data loss has occurred, stop using the phone. Do not capture new photos, install applications, browse the web, or leave Wi-Fi on. Background processes can generate cache files that overwrite your precious data.
- Time is of the essence: Act swiftly. The longer the device remains active, the higher the probability of data being permanently overwritten.
- Use verified tools: Only deploy a trusted and secure tool to execute data recovery from phone memory to prevent data corruption.
- Establish a backup routine: To mitigate future disasters, make it a habit to backup your Android phone either to your PC or via secure cloud synchronization.
Part 2. How to Recover Deleted Files from Android Phone Memory? (The easy way)
For the vast majority of users, the most efficient and risk-free approach to perform internal storage recovery is deploying specialized desktop software like Dr.Fone – Data Recovery (Android). Recognized as a pioneer in the mobile recovery sector, this Wondershare toolkit boasts the industry’s highest retrieval success rates in 2026.
What sets Dr.Fone – Data Recovery (Android) apart is its incredibly intuitive user interface, designed so that anyone can recover photos from phone memory without requiring advanced technical knowledge or coding skills. Importantly, the software performs a read-only scan, guaranteeing that your existing data remains untouched and secure.
 Scan Android phones and tablets directly.
- Preview and recover only what you want.
- Supports WhatsApp, photos, videos, contacts, and more.
- Works with 6000+ Android devices.

Packed with sophisticated algorithms, this tool streamlines the often complicated task of data extraction. Follow these straightforward steps to initiate data recovery from phone memory:
-
Step 1 Enable USB Debugging on Your Android
Before connecting your device to the computer, you must authorize USB access. Navigate to your Android's Settings > About Phone and tap the “Build Number” 7 consecutive times. This action unlocks Developer Options. Return to the main Settings menu, open Developer Options, and toggle on USB Debugging.

-
Step 2 Launch the Recovery Software and Connect Your Phone
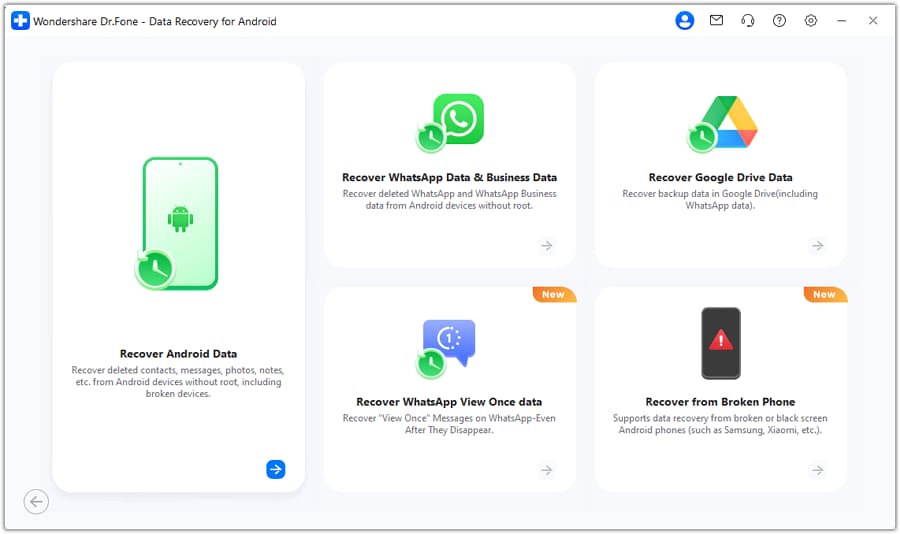
Download and open the Dr.Fone toolkit on your Windows or Mac computer. Establish a secure connection between your Android device and the PC using an original USB cable. From the application’s main interface, click on the “Data Recovery” module to begin the internal storage recovery process.

-
Step 3 Select File Types and Scan Internal Memory
The software will seamlessly detect your smartphone. You can then specify which file categories you wish to retrieve from your device’s internal memory, such as photos, messages, or documents. Click next and patiently allow the application to thoroughly scan the internal storage for deleted fragments. Do not disconnect the USB cable during this phase. An on-screen progress bar will keep you updated.
-
Step 4 Preview and Recover Your Lost Files
Upon completing the deep scan, Dr.Fone will display all recoverable data neatly organized into categories on the left panel. Simply click on any category to preview the exact files on the right side. Check the boxes next to the files you want to salvage, and hit the “Recover” button to extract them to your computer safely.
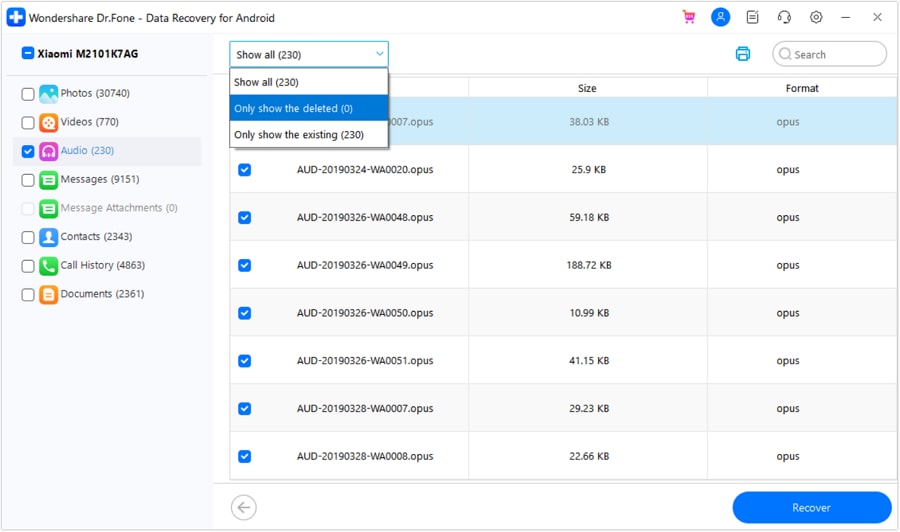
That is all it takes! Through this streamlined workflow, you can successfully recover deleted photos android internal storage, as well as reclaim vital contacts, videos, audios, WhatsApp messages, and critical business documents.




Part 3. How to Recover Deleted Files from Internal Memory for Free? (Complicated)
If you are exploring cost-free avenues for image recovery from phone memory, there is a highly technical method originally discussed in the xda developers forum. This workaround dictates how to recover deleted files from Android phone internal memory using command-line tools. However, there are massive caveats: your Android device must be completely rooted, the procedure is extremely complex, and a single mistake can permanently brick your smartphone.
The core concept revolves around dumping a block-level copy of your phone’s internal storage into a raw image file over FTP. This RAW file is subsequently converted into a VHD (Virtual Hard Disk) format. Finally, you mount this VHD in Windows Disk Management and run standard desktop data recovery software against it. To demystify this internal memory recovery technique, we have structured it into actionable steps.

Step 1: Creating an image of your Android’s internal memory
- Firstly, we must generate a complete image of the phone’s memory. We will utilize FileZilla for the transfer. Install the FileZilla server application on your Windows machine and execute it as an Administrator.
- Once FileZilla is running, navigate to its General settings. Under the “Listen to these ports” configuration, input the value "40". Additionally, in the timeout settings, set the connection timeout to "0".

- Next, access the Users settings and choose to add a new user. For this example, we create a user named “qwer”. Assign a secure password for this profile; we will use “pass” as an example.
- Enable full read and write permissions for this user and map the shared folder to C:\cygwin64\000. (Assuming C: is your primary Windows partition).

- After configuring the server, you need to download and install the Android SDK on your PC from the official source right here.
- Post-installation, manually copy the following executable files: adb.exe, adb-windows.exe, AdbWinApi.dll, AdbWinUsbApi.dll, and fastboot.exe into your C:\cygwin64\bin directory.
- Connect your Android smartphone to the PC, ensuring USB Debugging is firmly enabled beforehand.
- Launch the Windows Command Prompt and input the following adb commands. This queries the device for a partition list, allowing you to target a specific data block rather than dumping the entire filesystem.
adb shell
su
find /dev/block/platform/ -name 'mmc*' -exec fdisk -l {} \; > /sdcard/list_of_partitions.txt
- The “list_of_partitions” text file now holds the detailed mapping of your phone’s storage architecture. Use the following command to pull it to your PC for inspection:
adb pull /sdcard/list_of_partitions.txt C:/cygwin64/000
- Open the text file and identify the specific partition housing your lost user data (typically labeled as userdata or similar).
- To start transferring the storage block image over FTP, open a fresh console window and execute:
adb shell
su
mkfifo /cache/myfifo
ftpput -v -u qwer -p pass -P 40 192.168.42.79 mmcblk0p27.raw /cache/myfifo
- Replace “qwer” and “pass” with your configured FileZilla credentials. Adjust the IP address to match your local server. Launch a third console window and initiate the raw data dump using the 'dd' command:
adb shell
su
dd if=/dev/block/mmcblk0p27 of=/cache/myfifo
- Note: “mmcblk0p27” represents the target data partition on the test device. This identifier will uniquely vary based on your Android model.
- FileZilla will now slowly clone the raw data from your phone directly to the “000” folder on your PC. Depending on partition size, this process will require significant time.
Step 2: Converting the RAW to a VHD file
- Once the FTP transfer successfully concludes, the generated RAW file must be converted into a VHD (Virtual Hard Disk) format compatible with Windows. Download a reliable VHD tool from here.
- Place the downloaded VHDTool.exe file directly into your working directory (e.g., the 000 folder). Open a command prompt, navigate to this directory, and execute the conversion:
cd C:/cygwin64/000/ VhdTool.exe /convert mmcblk0p27.raw
- Although the file retains the .raw extension visually, the VHD tool has appended the necessary headers to allow Windows to recognize it as a legitimate virtual disk drive.
Step 3: Mounting it as virtual hard disk in Windows
- The most technical phases are complete! Your next objective is mounting this virtual drive. Open the Windows Disk Management utility.
- Click on Action in the top menu bar, and select “Attach VHD”.

- Browse and locate your converted file (e.g., C:\cygwin\nexus\mmcblk0p12.raw). Ensure you select your specifically named file.
- Right-click the newly attached disk and choose Initialize Disk > GPT. Following this, right-click the unallocated empty space on that disk and select the “New Simple Volume” option.

- Proceed through the wizard, assign an unused drive letter to the volume, but strictly disable any automatic formatting or partitioning prompts to preserve the data.
- If prompted later, right-click the RAW partition block and format it explicitly using the FAT 32 file system.
Step 4: Perform Data Recovery
Finally, your Android's internal memory is actively mounted to your PC as if it were a standard USB thumb drive. You can now employ any generic, free desktop data recovery program to run a deep scan against this newly assigned drive letter. Select the virtual hard disk when the software prompts you for a target location.
However, it is vital to acknowledge the monumental complexities of this approach. It mandates a Windows PC, requires profound comfort with the command line, and fundamentally demands pre-existing root access on the Android device. If the device isn't rooted, capturing the raw partition block is blocked by Android's security sandbox. Because of these steep barriers and high risk of misconfiguration, this technique rarely achieves the desired outcome for everyday users.
Part 4. How Do I Recover Data from the Internal Memory of a Non-Working Android Phone?
Catastrophic physical damage poses a massive hurdle, but all hope is not lost. Even if your smartphone is entirely unresponsive, features a black screen, or suffers from severe touch issues, you can still enlist Dr.Fone – Data Recovery (Android) to execute an emergency extraction. Currently, the toolkit provides robust support for data recovery from broken Samsung devices.
This specialized feature targets devices that are physically mangled but retain an intact motherboard and flash memory chip. By simply connecting the non-working device to your PC and selecting the "Data Recovery from Broken Phone" module, the software can bypass the damaged OS environment. You will be prompted to identify the exact fault—such as a broken screen or a black screen of death.
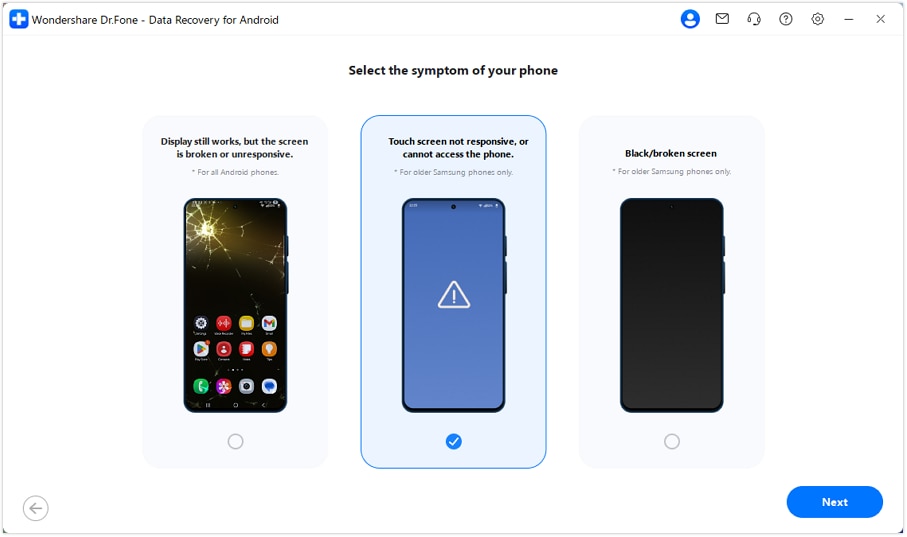
While the service currently prioritizes older Samsung models, Wondershare continually updates the database to encompass a broader spectrum of manufacturers. Once authenticated, it conducts a low-level deep scan, allowing you to bypass physical UI limitations and securely offload your data directly to your computer's hard drive.
Conclusion
Losing critical data from your smartphone's internal storage does not have to be a permanent catastrophe. As demonstrated, there are multiple avenues to successfully execute data recovery phone memory. While advanced users might experiment with complicated root-dependent command-line methods, those approaches carry immense risk and require significant technical labor.
If you prefer a streamlined, guaranteed workflow without the unwanted hassle, the optimal solution is utilizing Dr.Fone – Data Recovery (Android). With its risk-free trial, you can scan and verify the existence of your deleted files before committing to the full version. Do not let accidental deletions disrupt your workflow—download this premier memory recovery software today and safeguard your digital life.
FAQ
-
1. Where do deleted files go on an Android phone's internal storage?
When files are deleted from Android internal storage, they do not go to a recycle bin (unless specifically supported by an app like Google Photos). Instead, the Android OS marks the physical space they occupied as "available." The files remain hidden in the storage until new data is written over them. -
2. Can I recover deleted photos from Android internal storage without a computer?
Yes, if you have a recent cloud backup (like Google Drive or Google Photos) or if the photos are still in the "Recently Deleted" folder of your gallery app. However, if they are permanently deleted and you lack a backup, a computer-based data recovery tool like Dr.Fone provides the most robust scanning capabilities. -
3. Does rooting my Android phone guarantee 100% data recovery?
No, rooting does not guarantee recovery. Rooting simply grants data recovery tools deeper system-level access to scan block-level storage, which significantly increases the chances of finding fragments. However, if the data has already been overwritten by new files, even root access cannot retrieve it. -
4. How can I prevent data loss in my Android's internal memory in the future?
The best defense against permanent data loss is a strict backup routine. Regularly sync your device with cloud services (Google Drive, OneDrive), activate auto-backup for your photo galleries, or periodically dump your phone's internal memory contents to a secure PC hard drive.
 Add Wondershare Dr.Fone as a preferred source on Google



