 Recover photos, messages, WhatsApp, and more — no backup
needed.
Recover photos, messages, WhatsApp, and more — no backup
needed.

 100% Security Verified | No Subscription Required | No Malware

 :
: 
 ChatGPT
 Perplexity
 Gemini
 Claude
 Grok
Grok
Accidentally deleting crucial files from an Android phone can be an incredibly frustrating and anxiety-inducing experience. Unlike Windows or macOS environments, Android smartphones typically lack a universally accessible desktop-style recycle bin from which you can quickly and effortlessly restore items with a single click. Once a file vanishes from your gallery or file manager, it feels as though it is gone forever.
However, the situation is far from hopeless. You can still successfully undelete files from Android's internal memory by utilizing a few advanced techniques. These strategies primarily branch into two paths: either rooting the mobile device to gain unfettered administrative access to the deeply hidden removed files, or relying on specialized, advanced data recovery software engineered to bypass system restrictions.
To fully grasp your options in 2026, let's explore exactly how the Android operating system processes file deletion at the hardware level, and review the most reliable methods to recover these precious files before they are permanently overwritten.
In this article
- Part 1. What Happens When You Accidentally Delete Files from Android?
- Part 2. Can You Somehow Undelete Files from Android's Internal Memory?
- Part 3. How to Undelete Lost Files from Android Without Rooting It First
- Part 4. Tips for Preventing Your Android Files From Being Lost Forever
- Part 5. Bonus Part: What to Do If Rooting an Android Phone Goes Wrong?
Part 1. What Happens When You Accidentally Delete Files from Android?
To effectively undelete files on Android, you first need to understand how the underlying file system handles data destruction. Android handles the process of file deletion quite peculiarly. Namely, when you tap the Delete button while browsing pictures or videos in your Android phone's Gallery, or remove a massive music file from your extensive library of songs, the Android system doesn't instantly wipe the actual bytes of data from the internal flash storage. Instead, the OS simply updates its directory registry and marks the file as "missing."
Moreover, it marks the exact physical storage space the deleted file occupied as "unallocated" and ready for overwriting. Your accidentally deleted files remain physically intact and are theoretically recoverable until the system is forced to save another file in that exact cluster of space.
However, once you overwrite this newly freed space with a new file, an app update, or even a cached image from web browsing, your chances of recovering the initially deleted file become extremely low and almost nonexistent. This volatile timeline is a critical factor to keep in mind. It means you should halt all background activity and handle file recovery as soon as possible before a permanent overwrite happens.
Part 2. Can You Somehow Undelete Files from Android's Internal Memory?
Undeleting files directly from an Android device's internal memory partition is technically possible and often yields robust results. However, because Android heavily restricts access to its core system drives to protect against malware, most deep-scan methods that demonstrate how to do it require you to root your Android phone. For average users, beginners, and Android novices, immediately jumping to root your primary device is not the most prudent option.
- Allows recovery software full administrative access to NAND storage.
- Significantly higher chance of recovering fragmented or deeply buried files.
- Bypasses standard Android system-level file restrictions.
- Enables recovery apps to read the raw data cluster blocks natively.
- Instantly voids the manufacturer warranty on almost all modern devices.
- The rooting process itself can trigger data overwriting or formatting.
- Failing the rooting procedure can permanently "brick" the smartphone.
- Leaves the device vulnerable to severe security exploits and malware.
Even if custom rooting methods and one-click unlocking tools have significantly improved and become more manageable in the past decade, substantial risks still exist. For example, some devices automatically format the data partition during a bootloader unlock, completely wiping out the exact data you are trying to rescue. On the other hand, phones that do allow rooting can lead to even bigger catastrophes. If the root process fails mid-installation, you could brick your Android phone, making it unresponsive and utterly useless. Given these high stakes, many users prefer safer alternatives.
Part 3. How to Undelete Lost Files from Android Without Rooting It First
Although deeply entrenched technical methods require first rooting the phone to gain raw undelete functionality, it's not an entirely necessary step today. Advancements in recovery technology mean there are powerful, non-destructive ways to recover files you've accidentally removed. One of the most effective methods involves utilizing robust third-party software like Dr.Fone - Data Recovery (Android). But what exactly makes this tool an optimal choice?
Wondershare Dr.Fone is a specialized, industry-leading toolset designed explicitly for recovering accidentally deleted files on Android and iOS ecosystems. This sophisticated utility natively supports over 6,000 distinct Android devices from major manufacturers like Samsung, Google, Huawei, and Motorola. It's hugely successful in safely restoring your files without requiring a risky root process. In fact, many industry experts strongly recommend it as the premier way to recover your deleted photos, videos, songs, contacts, SMS, WhatsApp data, and vital documents.
 Scan Android phones and tablets directly.
- Preview and recover only what you want.
- Supports WhatsApp, photos, videos, contacts, and more.
- Works with 6000+ Android devices.

Moreover, Wondershare Dr.Fone boasts an exceptionally high recovery success rate regardless of the specific file deletion circumstances. Whether you've accidentally deleted files manually, experienced an unexpected system crash, forgot your screen unlock password, had your phone stolen, or severely damaged the device hardware via impact or submerging it in water, the application can still effortlessly recover your files when connected to a computer.
Here is exactly what you need to do to safely undelete lost files on your Android device using Wondershare Dr.Fone's Data Recovery suite:
-
Step 1 Launch Dr.Fone on Your Desktop
Start by installing and opening the Wondershare Dr.Fone application on your Windows or Mac PC. On the main dashboard interface, navigate to the Toolbox tab and click on the Data Recovery module.

-
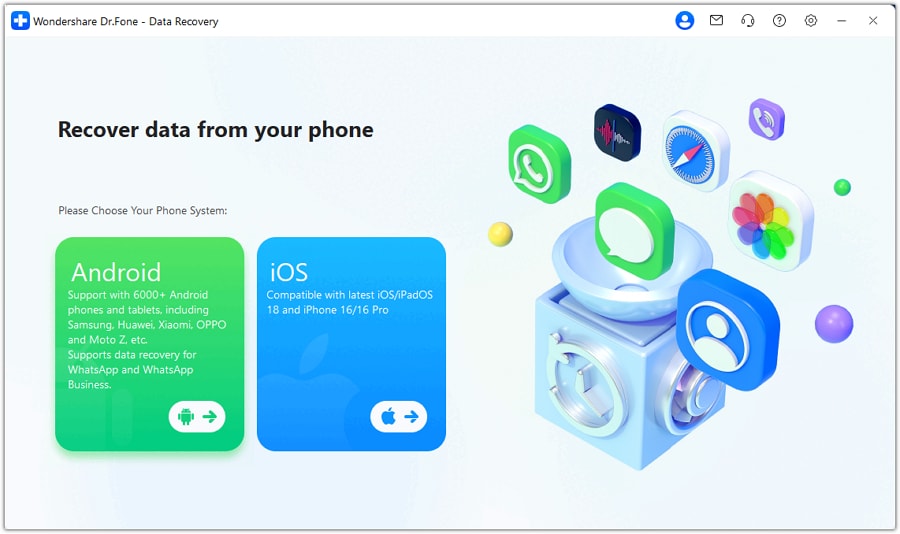
Step 2 Choose the Android Platform
When prompted to specify your device ecosystem, strictly choose Android to initiate the dedicated recovery protocols designed for an Android phone's architecture.
-
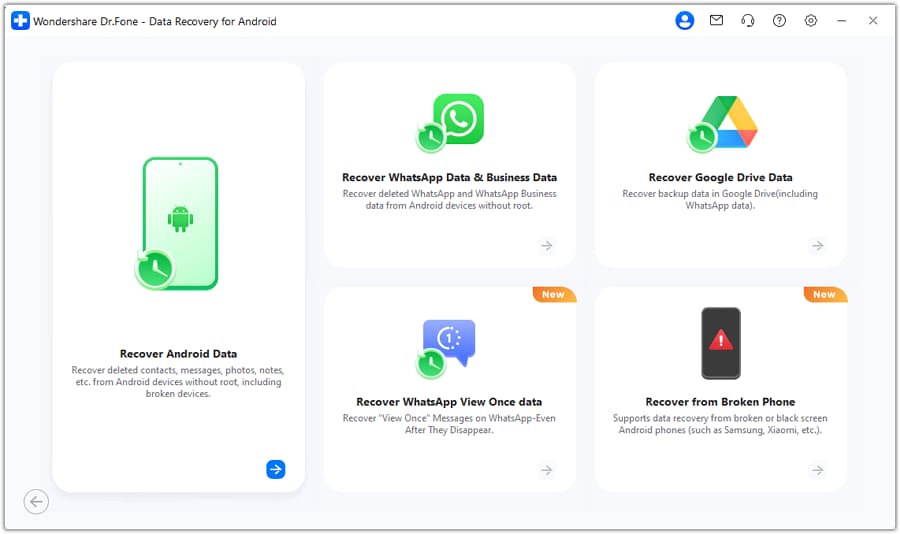
Step 3 Specify the Data Source
Select Recover Android Data at this step. It's worth noting that you can also strategically choose Recover Google Drive Data to securely recover deleted files synchronized to the cloud, or select Recover WhatsApp Data to specifically target and retrieve your messaging conversations and attached multimedia.
-
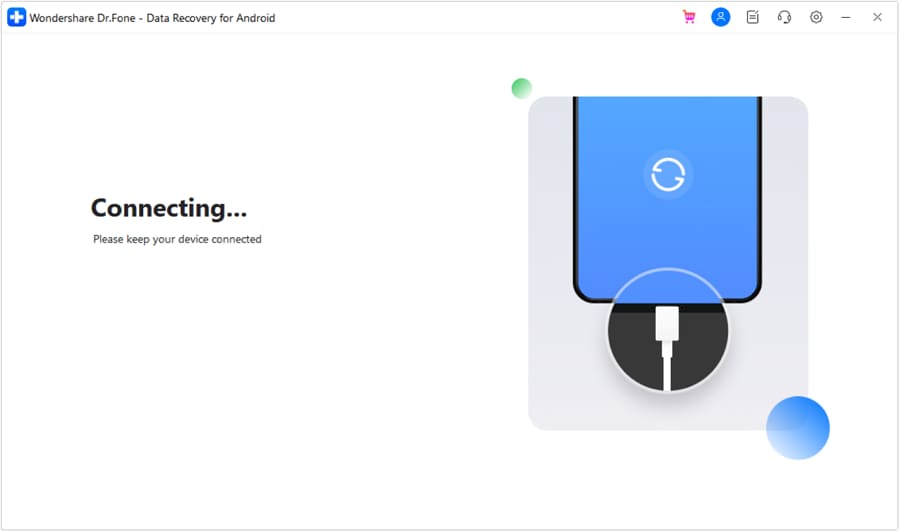
Step 4 Connect Your Android Device
Using a reliable, data-transfer capable USB cable, connect your Android smartphone to the PC. Ensure that USB Debugging is enabled in your developer options for seamless detection.
-
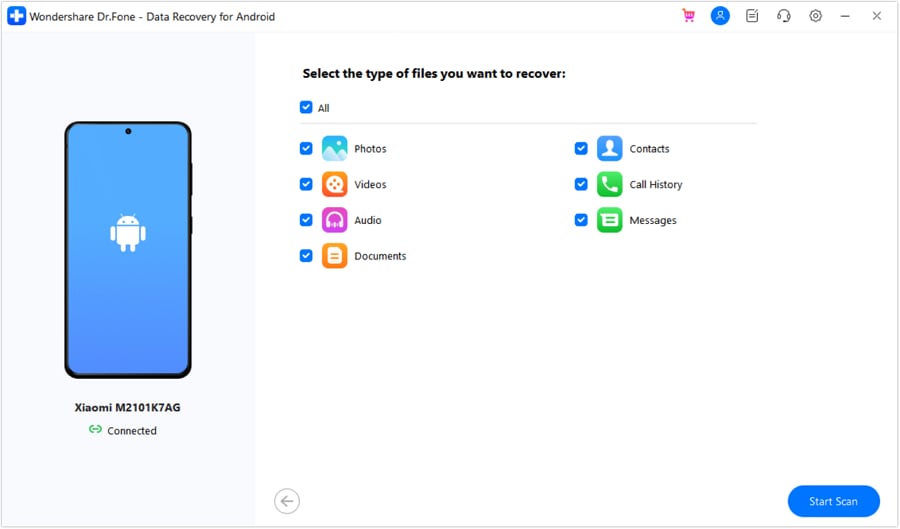
Step 5 Select Desired File Types
Once recognized, choose the specific file type categories you wish to recover (e.g., Photos, Videos, Contacts). Check exactly what Wondershare Dr.Fone should search for across your storage drives, and click the Start Scan button to commence the analysis.
-
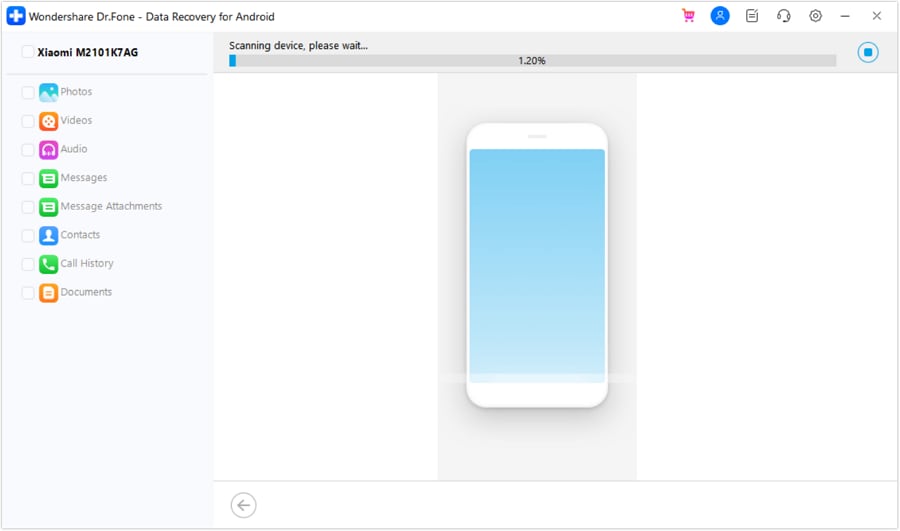
Step 6 Preview Your Found Data
The deep recovery process will begin scanning your available storage partitions. A massive benefit here is that you can actively preview the recovered files in real-time as they appear during this step.
-
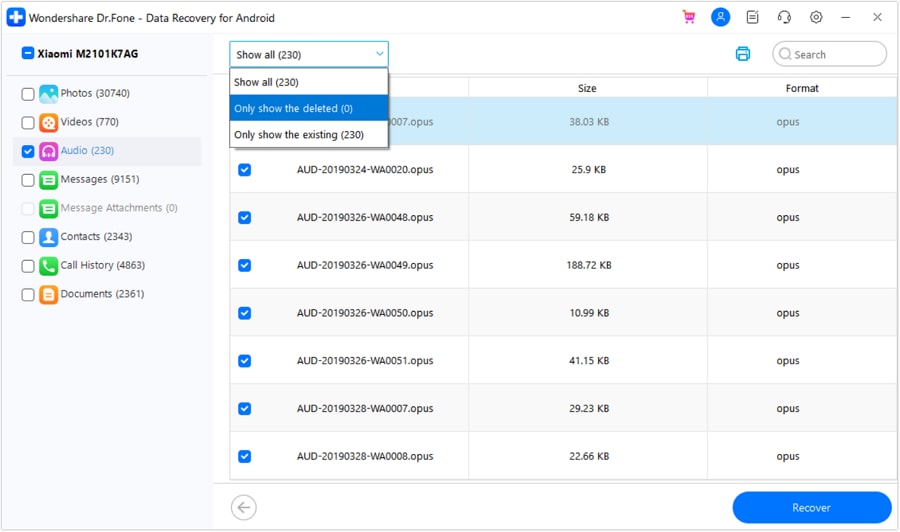
Step 7 Initiate the Recovery Selection
Once the intensive recovery scan process finally completes, thoroughly review the generated list. Select all the individual files you explicitly wish to retrieve and hit the Recover button situated at the bottom right corner.
-
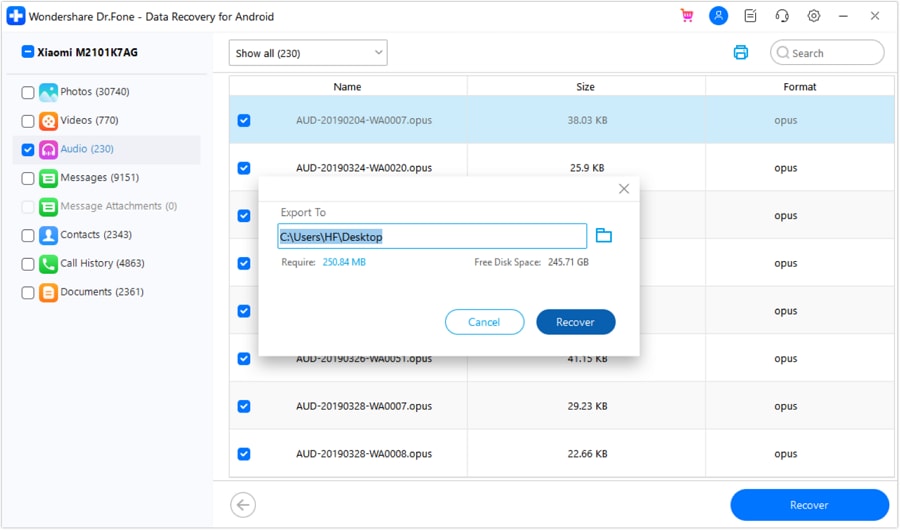
Step 8 Export and Secure Your Files
Finally, carefully choose a secure local PC folder location to which you want to export the newly recovered files, and confidently hit Recover to finalize the rescue mission.
Remarkably, even if your accidentally removed files weren't stored directly in Android's internal flash memory, the software's comprehensive scanning algorithms can help you. The application is highly versatile and quite helpful in recovering lost files from external SD cards and cloud endpoints like Google Drive, giving you total flexibility to choose from which medium to recover files during the setup phase.
Part 4. Tips for Preventing Your Android Files From Being Lost Forever
Losing Android data abruptly can be completely disastrous, especially when the lost content consists of irreplaceable pictures or videos of places you've traveled to, fond memories you cherish, or emotionally invaluable conversations with a beloved person or someone that is now deceased. However, by establishing a proactive routine, there are concrete ways to protect your data and ensure you never experience this devastating loss again.
- Perform Regular Local Backups: Whenever you hold vital, irreplicable data on your phone, it's highly advisable to manually back it up to an external USB drive, a portable SSD, or your personal PC. If you accidentally damage your phone or someone steals it, you'll sleep soundly knowing you still have your most essential files safely mirrored in an offline location.
- Leverage Backup and Sync Cloud Services: Modern smartphones provide numerous ways to automate data redundancy. Various applications from Google Workspace, Microsoft OneDrive, Dropbox, and native phone manufacturer clouds (like Samsung Cloud) allow you to seamlessly sync your essential photos, videos, songs, and documents directly to remote servers over Wi-Fi.
- Triple-Check What You're Deleting: Since native Android file recovery without third-party software is notoriously more challenging than on a traditional PC, you should always meticulously inspect the files you're bulk deleting. Take an extra few seconds to check multiple times whether they're genuinely safe to remove from your gallery.
1. Diversify Your Data Storage
It's worth noting that combining automated cloud backup and sync services with hard local backups allows you to maintain copies of files in at least three distinct locations. This dramatically reduces the risk of absolute data loss.
2. Prepare for Hardware Failure
Your files will still remain safely stored on a PC hard drive even if someone steals your primary phone or you completely lose or destroy it. Moreover, your files will remain perfectly accessible via cloud architecture even if that same PC hard drive or a physical USB stick eventually fails.
Part 5. Bonus Part: What to Do If Rooting an Android Phone Goes Wrong?
Perhaps you had heard that aggressively rooting your phone was the only way to quickly and efficiently undelete files on Android natively. You enthusiastically attempted the root process, but a crucial error occurred, and now you've "bricked" your phone—it's stuck in a boot loop and you can't do anything with it. If this nightmare scenario happens, don't panic. You can take several proven steps to actively recover your phone's standard functionality.
Method 1: Hard Reset the Device
Rooting Android phones can theoretically go wrong in several unpredictable ways. Depending on exactly which flashing method or unlocking script you used for rooting, the phone will be more or less challenging to medically recover. Often, you can fix superficial rooting errors by aggressively hard resetting the hardware.
You only have to physically hold the power button and the volume down (or up) buttons simultaneously for roughly ten to fifteen seconds. Then, you can enter the boot menu and either forcefully restart the phone or navigate to delete its system cache partition and wipe its data entirely. This initiates a factory reset, ensuring it turns on without a software conflict.
Method 2: Use the Manufacturer's PC Companion Tool
More often than not, major smartphone manufacturers provide official suite software you can legitimately install on your PC (e.g., Samsung Smart Switch). While people frequently use these to just transfer files between their phones and PCs, such comprehensive software also often includes a dedicated "Emergency Software Recovery" mode. This lets you formally wipe and reinstall the pristine operating system firmware in dire situations.
Method 3: Deploy Dr.Fone's System Repair Framework
There's absolutely nothing to worry about if hard resetting the phone fails and your device remains stubbornly bricked. Even if your phone manufacturer doesn't provide reliable PC companion software, their software lacks an emergency recovery mode, or the official method simply throws an error, you can rely on a foolproof third-party solution.
Wondershare Dr.Fone's dedicated System Repair feature is an exceptionally powerful method that will undoubtedly work to cleanly restore your phone to its factory default firmware state. The tool can quickly and efficiently unbrick your phone by forcefully reinstalling the correct, verified operating system. That way, your phone will gracefully return to its normal functioning mode, bypassing the rooting damage entirely.
Here is exactly how you can perform a complete Android System Repair to unbrick your smartphone:
- Fix Android instantly – no skills needed.
- Solve boot loop, black screen, won’t turn on, etc.
- High success rate for all system issues.
- User-friendly interface with easy-to-follow steps.
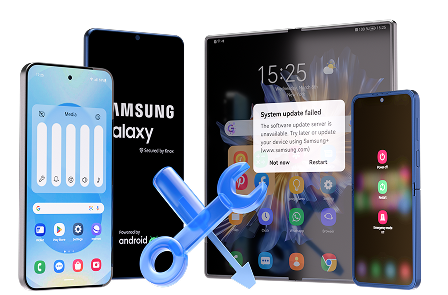
Follow these quick steps to execute the system repair successfully:
-
Step 1 Access System Repair
Launch Wondershare Dr.Fone on your computer and navigate precisely to Toolkit > System Repair > Android.
-
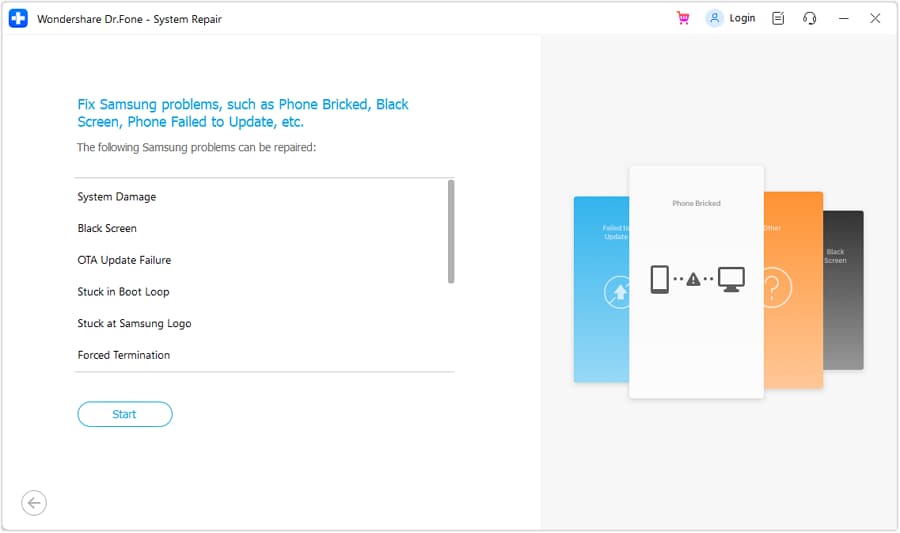
Step 2 Initiate the Fix Protocol
From the displayed list, critically assess and select the exact type of boot issue you have encountered (e.g., Black Screen, Boot Loop) and click Start.
-
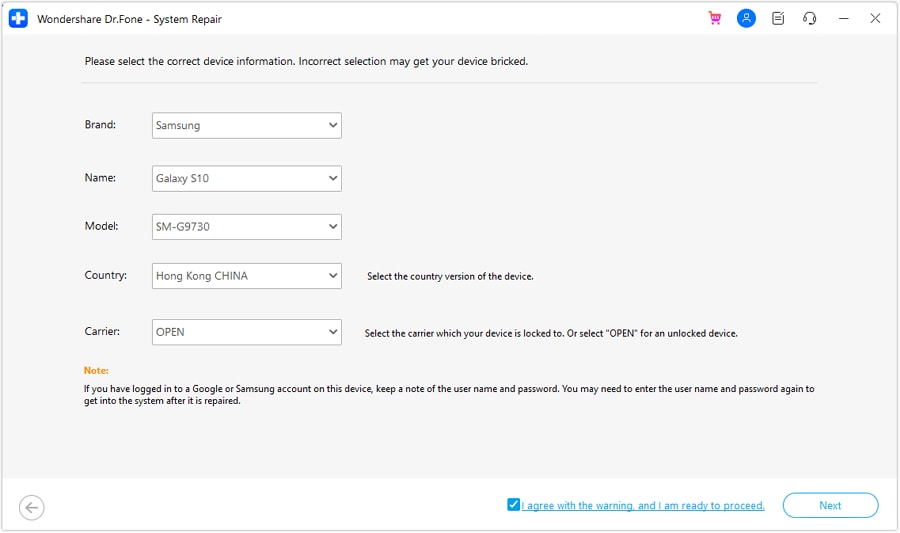
Step 3 Identify Device Specs
Carefully choose your specific Android phone's brand, name, and exact model code. This ensures Wondershare Dr.Fone downloads and installs the strictly appropriate software payload.
-
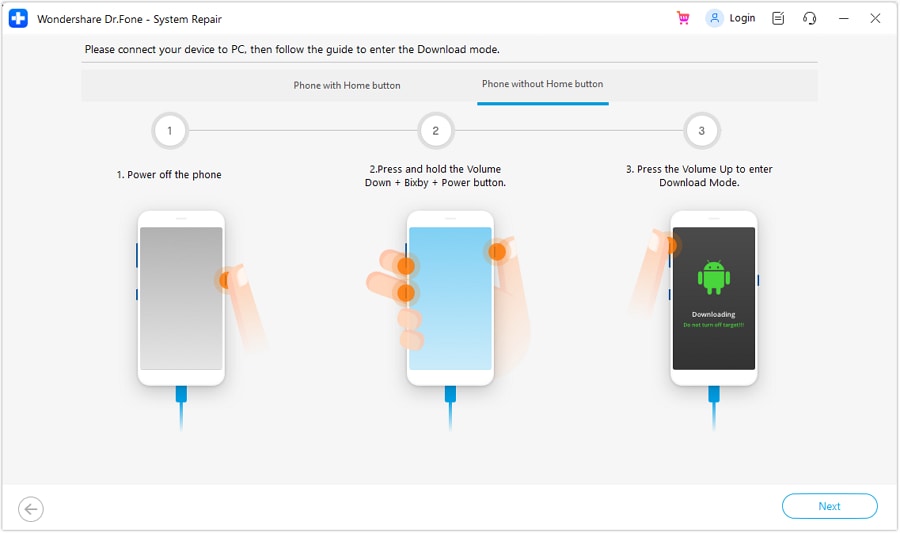
Step 4 Enter Download Mode
Connect the bricked phone to the computer utilizing a secure USB cable. Follow the interactive on-screen instructions to force the phone into Download Mode (Fastboot/Odin mode). The interface conveniently provides distinct instructions for classic Android phones with physical home buttons versus modern edge-to-edge models.
-
Step 5 Flash the Firmware
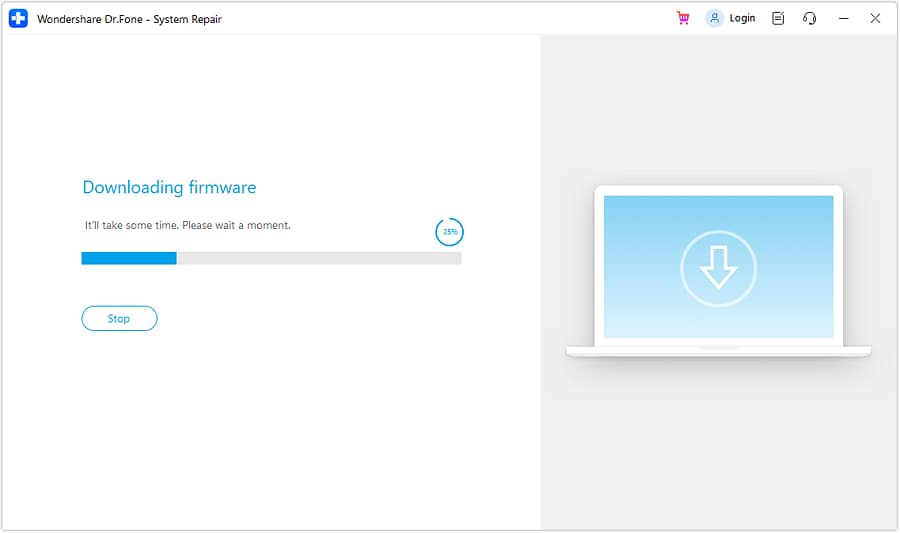
Confirm the suitable Android system firmware package is correctly identified, allow the program to completely download it, and then confidently hit Fix Now.
-
Step 6 Finalize Repair Process
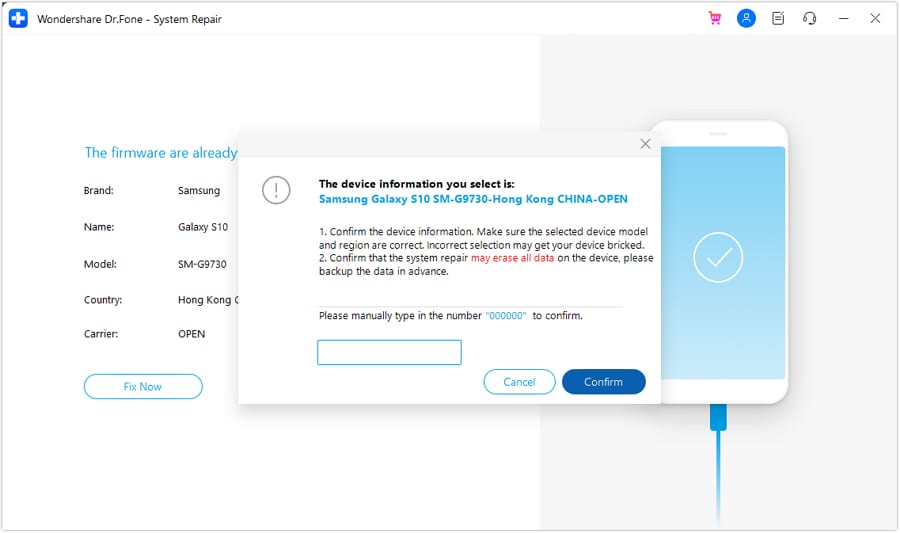
You may be prompted to enter a specific security code to manually confirm the destructive flashing action. Input it and click the Confirm button to aggressively continue the system repair process. Do not disconnect your device. Click Done only when the progress bar reaches 100% and it completes successfully.
Conclusion
Whether you've faced the misfortune of losing your phone, permanently submerging it in water, accidentally deleting critical files from the gallery, or having a malicious individual steal it, the resulting data loss can be unequivocally catastrophic for your personal and professional life. Regardless of exactly what triggered the event, realizing your data is abruptly gone and navigating the maze of recovering it can be a tremendously frustrating and challenging technical experience.
Fortunately, as technology has evolved, there are now multiple proven ways to confidently recover that lost data. While many older technical guides still stubbornly recommend forcefully rooting your phone to gain primitive access to the Android undelete system features and deep recycling bins, we've demonstrated why that is simply not the safest or most logical method—especially for average consumers and novices. Rushing into a root process can easily lead to a bricked, unresponsive, and fully voided phone.
A definitively better, far more reliable way involves utilizing a dedicated Android data recovery suite like Wondershare Dr.Fone, which we have thoroughly reviewed and shown you exactly how to operate. It bypasses systemic barriers without risking hardware stability. Moreover, the multifaceted Wondershare Dr.Fone application can even serve as an emergency lifeline to help securely recover completely bricked phones, rectifying the disastrous consequences that are a regular outcome of failed rooting attempts.




 Safe & Secure
FAQ
-
1. Is it truly possible to undelete files on an Android device without root access?
Yes, it is entirely possible to undelete files without rooting. Advanced data recovery software like Dr.Fone can scan unallocated storage sectors via standard API protocols to retrieve marked-for-deletion data, successfully avoiding the extreme system risks associated with rooting. -
2. Where do deleted files temporarily go before they are permanently erased on Android?
Unlike desktop computers, Android devices do not universally feature a traditional centralized recycle bin. When a file is deleted, its index entry is removed and the space is simply marked as "available" for immediate overwriting. Some specific manufacturer gallery apps, however, have localized 30-day "Recently Deleted" folders. -
3. Why is it advised to stop using the phone immediately after accidentally deleting files?
Continued usage generates new cached data, background updates, and newly saved media. Because deleted files are simply marked as free space, any new data written to the drive can physically overwrite those exact sectors, making the lost data permanently unrecoverable by any means. -
4. What does "bricking" mean during the rooting process, and is it reversible?
"Bricking" refers to a critical software corruption—often triggered during a failed root or bootloader unlock attempt—that renders the phone completely unresponsive and unable to boot. Fortunately, "soft bricks" are heavily reversible using System Repair software or by forcing a fresh firmware flash via download mode.
 Add Wondershare Dr.Fone as a preferred source on Google



