Recover photos, messages, WhatsApp, and more — no backup
needed.
Recover photos, messages, WhatsApp, and more — no backup
needed.

 100% Security Verified | No Subscription Required | No Malware

 :
: 
 ChatGPT
 Perplexity
 Gemini
 Claude
 Grok
Grok
In 2026, smartphones serve as highly personal digital vaults. Not all Android users are completely aware of the existence of hidden files, but these concealed elements are incredibly valuable tools to safeguard your sensitive personal content from prying eyes. Hidden files act as secret compartments on your phone that you cannot see while browsing normal file folders. They are purposely hidden away by the operating system or the user so that you do not accidentally modify, delete, or share them with unauthorized individuals.
However, an important question arises: what happens if these concealed files are accidentally deleted during a storage cleanup or a system crash? Fortunately, the reality is highly reassuring. Treating them much like any other regular piece of data, you have a solid chance to recover Android's hidden files safely. If you are wondering how to navigate these invisible directories, let us delve into a comprehensive guide detailing exactly how to find hidden files on Android and recover them effectively.
In this article
Part 1. What Are Hidden Files in Android and How to Access Them
Hidden files are fundamentally perfect for keeping sensitive information, such as private photos, confidential financial records, or important identity documents, entirely out of sight. When you actively hide them, it becomes significantly less likely that someone borrowing or monitoring your phone will stumble upon your private life.
Furthermore, hidden files also help keep the interface and directories tidy on your device. Temporary system caches or background app data that you do not need to interact with daily are typically hidden by default. By concealing these raw data structures, your file folders look much cleaner and are significantly easier to navigate.
To utilize these features properly, you will first need to learn how to find hidden folders on Android. The mechanism is usually straightforward: it requires navigating to your file management application and adjusting the visibility configurations. While the exact interface might vary slightly depending on whether you are using a Samsung, Google Pixel, or Xiaomi device, the foundational logic remains identical.
1-1. Method 1: Finding Hidden Folders Using the Native File Manager
The most direct way to interact with these concealed directories is by using your device's native File Manager. This application comes pre-installed on virtually all Android smartphones. It allows you to deeply browse, organize, and manage documents stored on your internal storage or external SD card memory.
Follow these detailed steps to use the File Manager to find your hidden files securely:
- Step 1: Locate and open your phone's native File Manager application from the app drawer.
- Step 2: Look for the settings menu, which is usually represented by a three-dot icon or a hamburger menu within the File Manager interface.

- Step 3: Scroll through the settings and toggle the "Show hidden files" option. This critical setting will immediately make any folders starting with a dot (like ".nomedia") visible in the directory hierarchy.

- Step 4: Navigate back to the main file directory. You should now be able to easily access, view, and organize the previously hidden files and folders.
1-2. Method 2: Accessing Hidden Files Through the Photo Gallery
If your primary goal is to manage hidden visual media, such as concealed photos or videos, you can do so using a highly straightforward method built directly into the phone's native Photo Gallery app.
Here is how to use the Gallery interface to access your hidden visual files:
- Step 1: Launch your Android Gallery application and tap on the menu icon to access the app settings.

- Step 2: Look closely for the option labeled "View hidden albums" or "Show private albums" and select it. Once enabled, the Gallery app will refresh to display previously hidden visual collections.

- Step 3: Finally, scroll through your albums and tap on the newly revealed folder containing your hidden photos or videos to view its unencrypted contents.
Part 2. How To Recover Deleted Hidden Files in Android Locally
Although it might feel like a complex task, recovering deleted hidden files on an Android device is actually quite similar to retrieving normal files, provided you act quickly. Modern Android operating systems feature a built-in safety mechanism known as the Recycle Bin or Trash, which functions almost identically to its counterpart on desktop computers.
When you accidentally delete a file, regardless of whether it was categorized as a standard file or a hidden one, it is commonly relocated to the Recycle Bin, Trash, or Recently Deleted folder rather than being instantly wiped from your storage drive.
Here is how to recover deleted hidden videos on Android utilizing the native gallery mechanisms:
- Step 1: Start the recovery process by opening the Gallery application on your mobile device.
- Step 2: Navigate to the albums section and tap the "Deleted items" or "Trash" folder. This dedicated section safely houses photos and videos that have been deleted but have not yet been permanently erased from your device's internal storage block. Take your time to carefully browse through these media thumbnails to locate the specific hidden files you wish to recover.

- Step 3: You can select individual videos and images one by one, or utilize the "Select all" feature to prepare multiple deleted items for mass restoration.
- Step 4: Once you have highlighted the desired media, firmly tap "Restore." Executing this action will instantly push the chosen files back to their original hidden location within the file structure. If the album itself was deleted, it will be recreated.

Please remember to act promptly when aiming to recover deleted photos. Most manufacturer skins automatically and permanently purge files from the "Deleted items" or "Trash" section after a predetermined period, which typically ranges from 30 to 60 days depending on the brand.
Part 3. Advanced Solution: How to Recover Files on Android
If your hidden files have already been permanently purged from the Recycle Bin, or if you suffered data loss due to a severe system crash or formatting error, you will need a far more comprehensive, professional data recovery solution. One of the most reliable methods is to utilize a dedicated Dr.Fone - Data Recovery (Android) application. This highly popular and robust software offers a deeply specialized data recovery architecture featuring advanced algorithms to ensure the highly effective retrieval of virtually any permanently deleted files.
 Scan Android phones and tablets directly.
- Preview and recover only what you want.
- Supports WhatsApp, photos, videos, contacts, and more.
- Works with 6000+ Android devices.

Key technical features and advantages of Wondershare Dr.Fone's sophisticated data recovery tool include:
- Multiple, highly adaptive recovery modes specifically tailored to different data loss scenarios, from simple deletions to deeply corrupted storage volumes.
- A powerful real-time preview mechanism that lets you verify recoverable data before formally proceeding with the deep recovery process.
- Granular selective recovery allowing you to precisely target specific hidden files, rather than forcing a total device rollback.
- A read-only architecture ensuring the recovery environment is secure and exceptionally safe, fully preventing secondary data loss or overwriting.
- A streamlined, incredibly intuitive user interface that drastically simplifies what would normally be a highly complex technical recovery procedure.
Here is the detailed, step-by-step procedure on how to recover Android's hidden files using Dr.Fone's dedicated data recovery toolkit:
Step 1 Launch Dr.Fone and Connect Your Device
Begin by launching the Dr.Fone software suite on your personal computer. Use a reliable USB cable to establish a secure connection with your Android smartphone. Once you have successfully connected and authorized both devices, navigate to the main dashboard, proceed to the "Toolbox" section, and formally select the "Data Recovery" module.

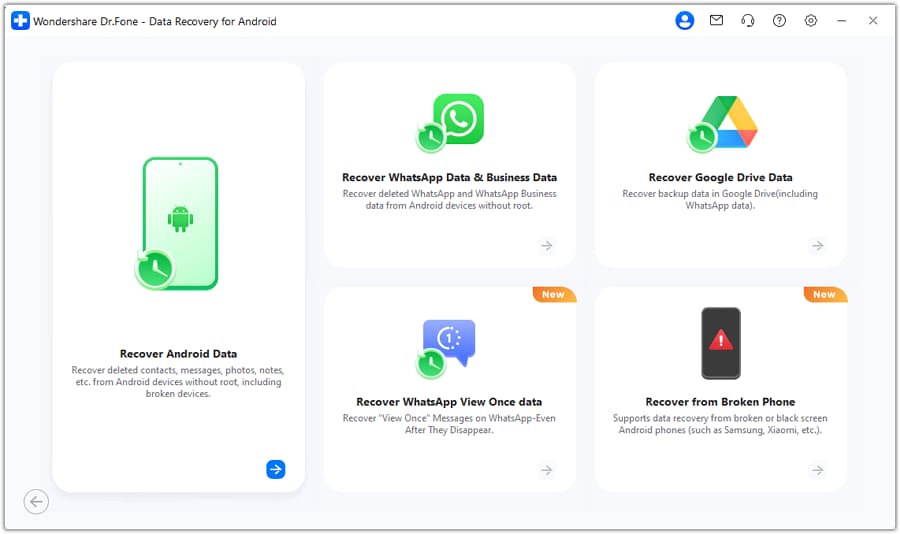
Step 2 Specify the Target Device Type
On the subsequent screen, explicitly select "Android" as your target ecosystem within the Data Recovery section. Following this, proceed by selecting the "Recover Android Data" option to initialize the core recovery parameters for your smartphone.
Step 3 Filter and Select File Types for Scanning
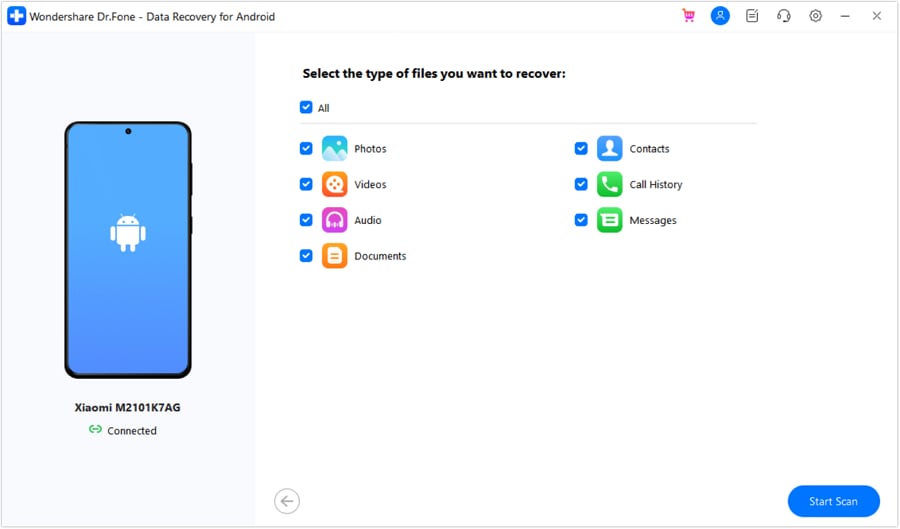
Dr.Fone will deeply analyze your device context and present you with a comprehensive list of all potentially recoverable file types. To greatly expedite the scanning process, you have the option to exclusively check specific file types, such as Photos or Videos, while actively excluding unnecessary data categories. Once properly filtered, click the "Start Scan" button.
Step 4 Safely Preview and Restore Your Hidden Files
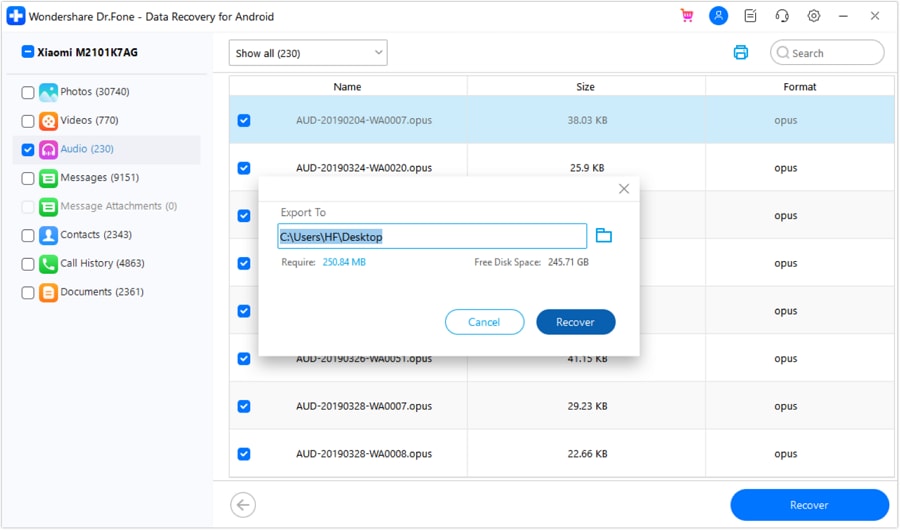
Once the intensive deep scanning process formally completes, Dr.Fone will generate a detailed preview interface showcasing all the recoverable data discovered on the device storage. Take your time to systematically review these files and strictly choose the ones you passionately wish to restore.
If your primary objective is learning how to recover deleted hidden photos in Android, simply navigate to the 'Photos' directory block when reviewing the file types. All identified media, whether originally hidden or not, will be displayed clearly here.
After rigorously finalizing your specific selections, actively click the "Recover" button at the bottom right. Dr.Fone will then securely prompt you to pick an external destination on your computer where you want to export the freshly recovered files. Carefully select a safe local file location and click "Recover" one final time to complete the full restoration process!




Conclusion
Hidden files are an incredibly useful feature natively built into Android environments, purposely designed to conceal sensitive data from the casual user's view in a standard file system. They typically serve to store critical system-related information that everyday users should be prevented from arbitrarily modifying, or they provide a trusted avenue for users to safely tuck away private photos, sensitive documents, and personal media to strictly maintain digital privacy.
However, the risk of data loss remains prevalent, and there is always a very real possibility that these securely hidden files may be lost due to accidental deletions, unannounced system wipes, or unforeseen corruption events. We have thoroughly covered exactly how to resolve this stressful matter within this comprehensive 2026 guide. Recovering hidden files essentially follows the same foundational logic as retrieving standard digital content, making the restoration task surprisingly accessible when leveraging built-in device features or professional external solutions like Dr.Fone.
FAQ
1. Do hidden files take up internal storage space on my Android device?
Yes, absolutely. Hidden files behave exactly like standard data when it comes to memory allocation. They occupy identical physical sectors on your device's internal storage or SD card; they are simply instructed by the operating system to remain invisible when accessed through a standard file explorer user interface.2. Can a standard factory reset permanently erase my hidden files?
A factory reset wipes the entire user partition of the device, effectively erasing all user data, including both visible and deeply hidden files. Once a reset occurs, you can no longer retrieve these items using the native Gallery's "Trash" bin. Advanced desktop software like Dr.Fone would be strictly required to attempt a deep memory sector scan.3. What exactly is a ".nomedia" file and how does it relate to hidden folders?
A ".nomedia" file is a blank system trigger file explicitly placed within an Android directory. When the system's media scanner detects a ".nomedia" file in a specific folder, it intentionally skips indexing that folder, effectively hiding all the photos, videos, or audio files within it from gallery apps and media players.4. How can I find hidden folders on Android if my default File Manager lacks the "Show hidden files" toggle?
If your device manufacturer has severely restricted the default native File Manager, you can easily bypass this limitation by downloading highly reputable third-party file explorers from the Google Play Store, or simply by connecting your smartphone to a Windows PC and configuring the Windows File Explorer to display hidden items while browsing the phone's internal storage.
 Add Wondershare Dr.Fone as a preferred source on Google