 Recover photos, messages, WhatsApp, and more — no backup
needed.
Recover photos, messages, WhatsApp, and more — no backup
needed.

 100% Security Verified | No Subscription Required | No Malware

 :
: 
 ChatGPT
 Perplexity
 Gemini
 Claude
 Grok
Grok
Losing essential phone numbers can disrupt both personal and professional communication. If you are suddenly wondering how to restore deleted contacts on Android, rest assured that your data is rarely gone forever. Whether they vanished after a factory reset, a botched software update, or an accidental swipe, there are multiple proven solutions.
This comprehensive 2026 guide explores the 10 most effective techniques for contact retrieval. From natively integrated Google synchronization tools to advanced third-party solutions like Dr.Fone, you will discover exactly how to recover erased contacts android devices might have lost. We have evaluated methods suitable for both scenarios: when you have a recent backup and when you need a direct deep-scan recovery.
In this article
- Part 1: Quick Comparison — Which Method Fits You Best?
- Part 2: Best Choice without Backup — Dr.Fone App
- Part 3: Top Free Methods to Recover Contacts (With Backups)
- Part 4: For Complex Cases: Dr.Fone Desktop Recovery
- Part 5: Advanced Method — SQL Database Recovery (Requires Root)
- Part 6: Last Resort — Contact Your Mobile Provider
Part 1: Quick Comparison — Which Contact Recovery Method Fits You Best?
Knowing how to recover deleted contacts android devices have lost starts with assessing your current situation. The table below provides a quick breakdown of the most reliable recovery channels based on success rates, required technical skills, and backup prerequisites.
| Recovery Method | Best Scenario | Success Rate | Backup Required? |
|---|---|---|---|
| Dr.Fone Data Recovery App | No backup available; requires scanning device's internal memory directly | Very High | No |
| Google Contacts (Trash/Web) | Retrieving recently deleted items (within a 30-day window) synced to Google | High | Yes |
| Google Account Backup | Contacts lost due to factory reset; system-wide backups were active | High | Yes |
| Samsung Cloud | Samsung Galaxy users who actively use native cloud synchronization | High | Yes |
| SIM Card Import | Recovering older phone numbers historically saved on a physical SIM | Medium | N/A |
| Mobile Provider | When all other methods fail (relies on call logs or carrier records) | Very Low | No |
Part 2: Best Choice without Backup — Dr.Fone App
If you have not synced your device to the cloud recently, you might wonder: how do you recover deleted contacts on Android without an existing backup? The highest success rate in these scenarios comes from utilizing dedicated mobile recovery applications. These apps bypass traditional file systems and directly scan your phone's internal memory for residual data fragments.
We highly recommend the Dr.Fone App for immediate, on-the-go restoration. It serves as a comprehensive mobile data retrieval suite, empowering you to rescue erased contacts, multimedia, and messages without tethering your device to a computer.
Step-by-Step: How to Recover Deleted Contacts with the Dr.Fone App
-
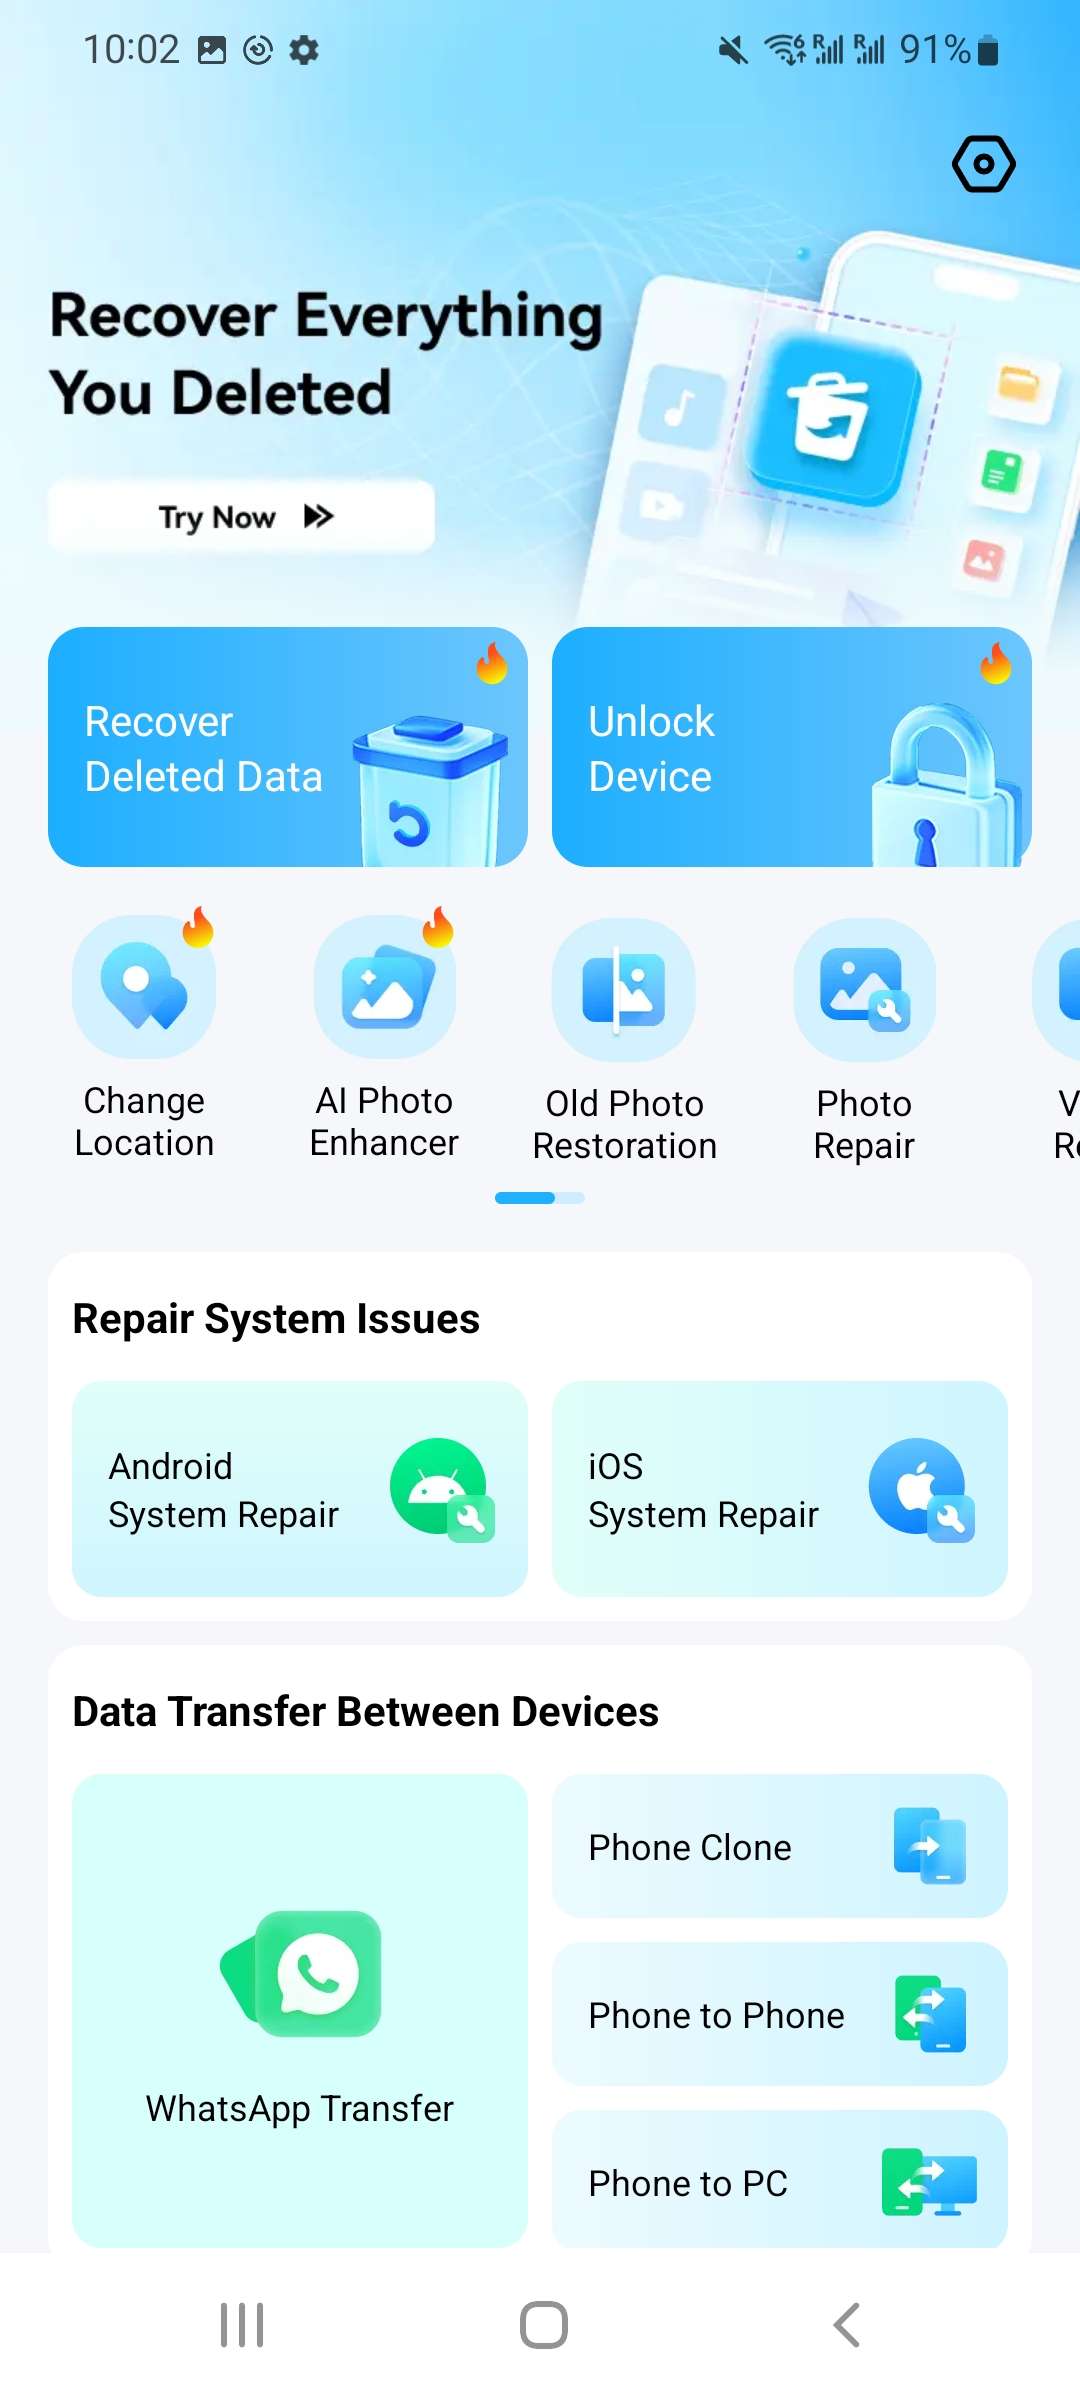
Step 1 Install the Application
Navigate to the Google Play Store on your smartphone and download the official Dr.Fone application. Launch the tool once the installation is complete.
-
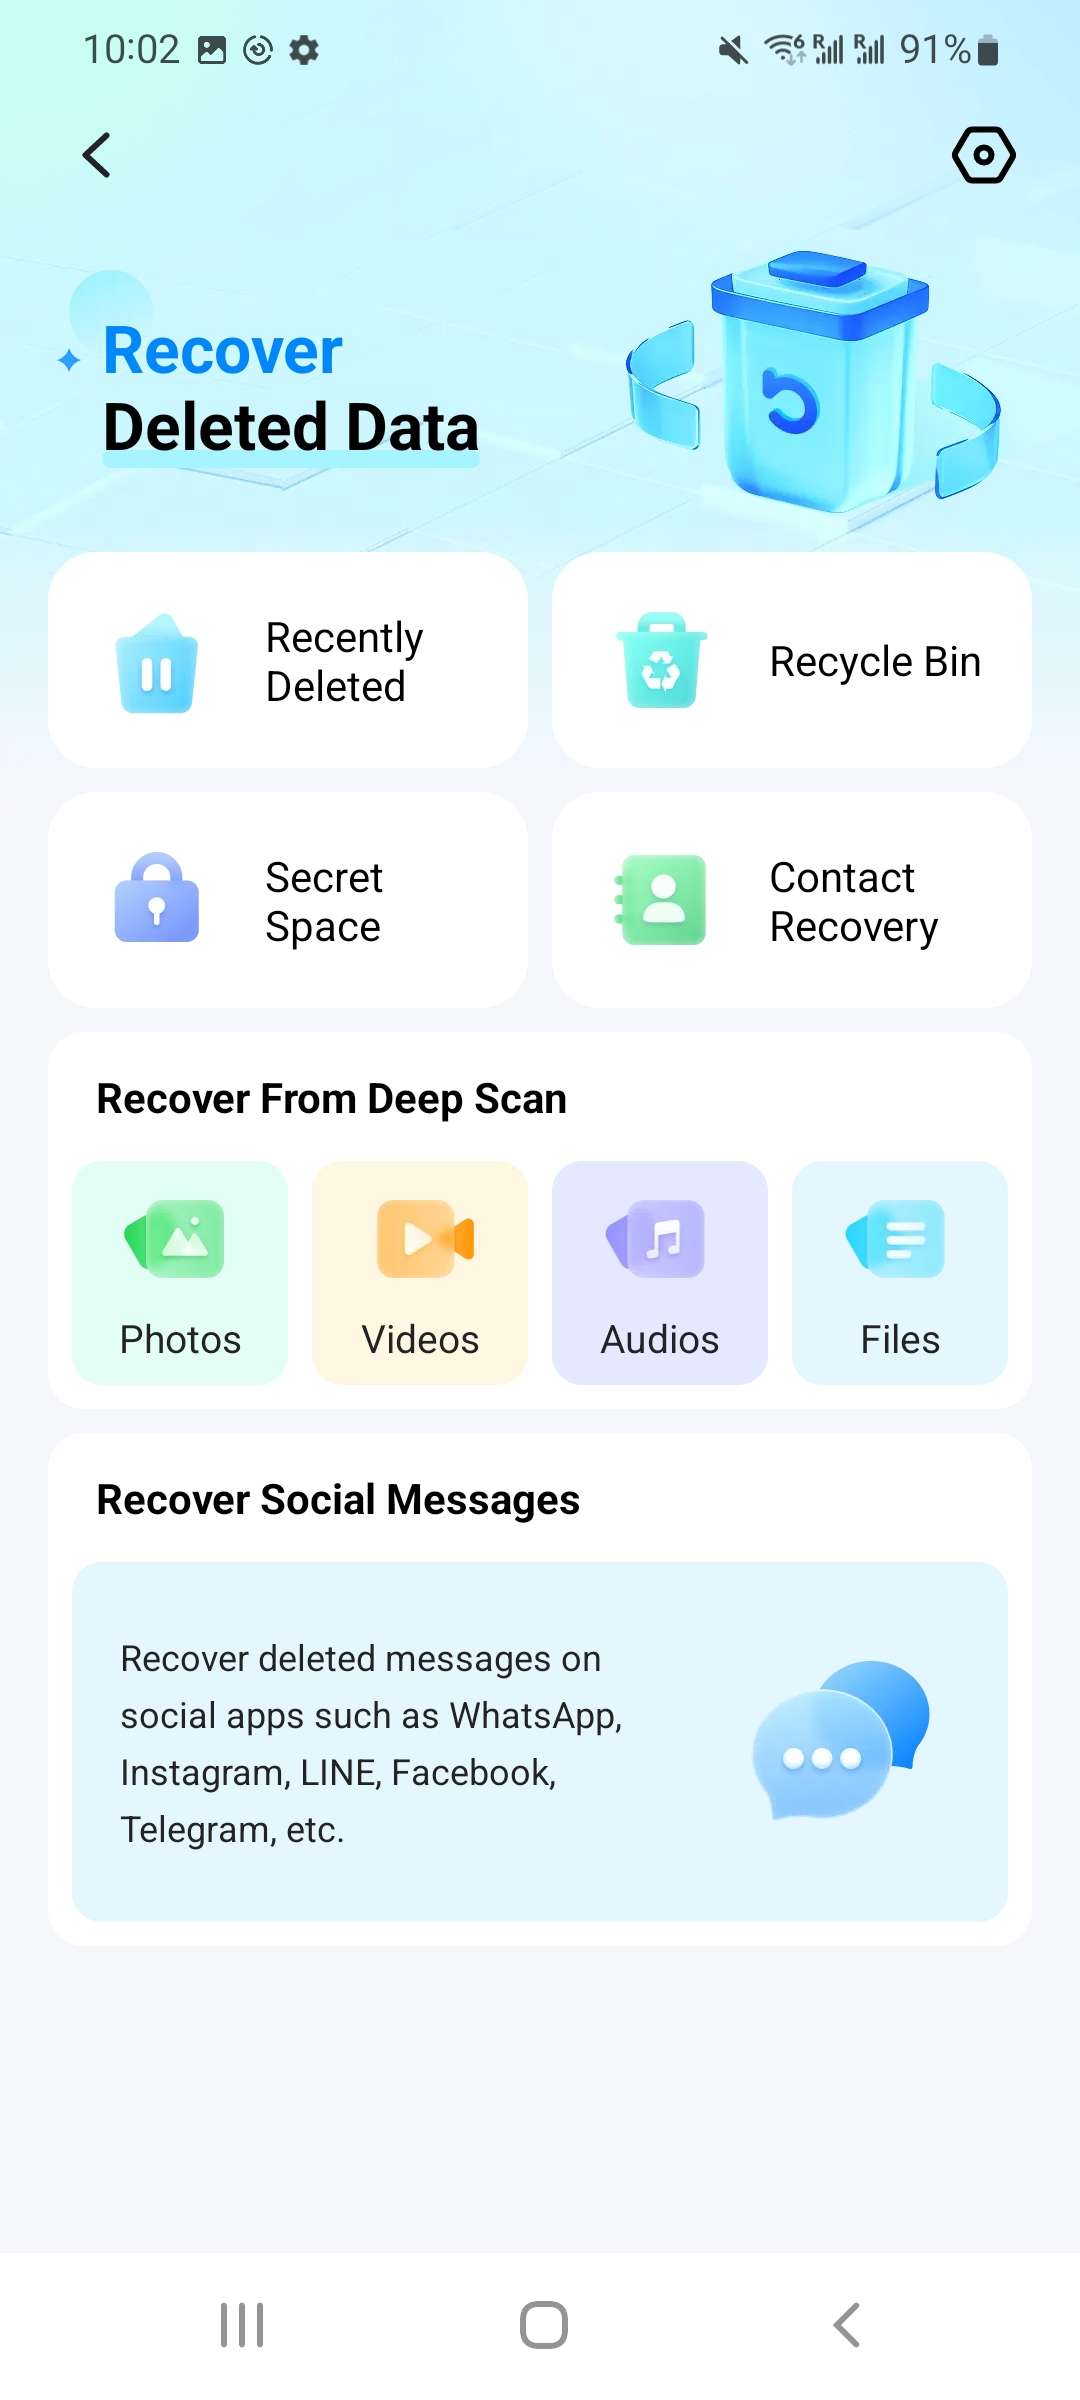
Step 2 Select the Recovery Module
Open the app's main interface and identify the "Contacts Recovery" module. Tap on it to instruct the software to target phone numbers and address book entries.
-
Step 3 Execute the Storage Scan
Allow the application to comprehensively scan your device's internal storage space. Depending on the size of your memory and the amount of deleted data, this phase may require a few minutes.
-
Step 4 Preview and Retrieve Contacts
Upon completion of the scan, Dr.Fone will present a list of recoverable contacts. Review the entries, select the specific numbers you wish to salvage, and tap the "Recover" button to save them back to your device.



Part 3: Top Free Methods to Recover Contacts (If You Have Backups)
If you prefer to exhaust free, built-in options first, you are likely in luck. Modern smartphones rely heavily on cloud syncing. The following methods demonstrate how to restore lost contacts on Android using native settings, the Google ecosystem, and manufacturer-specific cloud networks.
Method 1: First, Check if Your Contacts Are Just Hidden
Frequently, contacts are not genuinely deleted but merely concealed by a restrictive display filter within your contacts app. Checking these display settings is the most straightforward troubleshooting step.
-
Step 1 Access the Contacts App
Launch the default Contacts application on your Android smartphone.
-
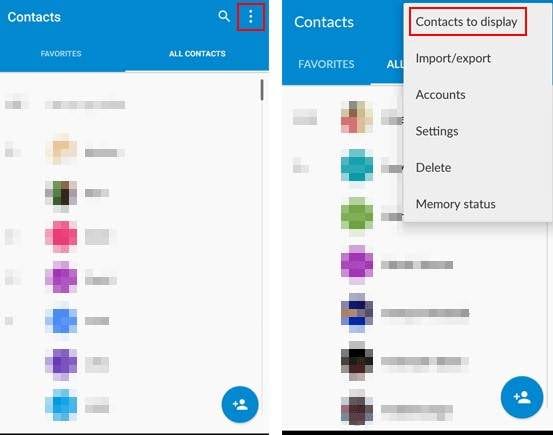
Step 2 Open the Menu
Locate the three-dot menu (or hamburger icon) positioned at the top-right corner of your interface to reveal additional settings.
-
Step 3 Modify Display Preferences
Select "Contacts to display" from the dropdown menu. This configuration dictates which accounts and contact groups are visible in your main list.
-
Step 4 Enable All Contacts
Ensure that the "All contacts" parameter is actively selected. If a different filter is active, switching to this setting will unhide any entries that were unintentionally masked.
Method 2: Use the Google Ecosystem for Recovery
If the display filter was not the culprit, your synchronized Google Account is the next logical avenue. Google provides robust safety nets for accidental data erasure.
A. Restore from the Google Contacts Trash (Within 30 Days)
For individuals pondering how to recover erased contacts android has linked to Google, the built-in Trash folder is a lifesaver. Most modern Android systems automatically back up phonebooks to Google servers. Consequently, Google safeguards deleted entries in a temporary "Bin" or "Trash" folder for exactly 30 days before permanently purging them.
-
Step 1 Launch Google Contacts
Open the dedicated Google Contacts application on your device.
-
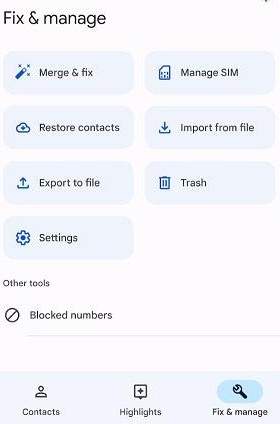
Step 2 Navigate to Management Tools
Select the "Fix & Manage" tab, typically located at the bottom of the screen, to access administrative utilities.
-
Step 3 Open the Trash Bin
Tap on "Trash" or "Bin" (nomenclature may vary slightly based on your Android iteration).
-
Step 4 Select Items for Restoration
Browse the catalog of contacts removed within the preceding month. Highlight the specific entries you need to salvage.
-
Step 5 Finalize Recovery
Hit "Recover" to instantly restore the chosen contacts to your primary address book.
B. Restore via Google Contacts Web (Online Recovery)
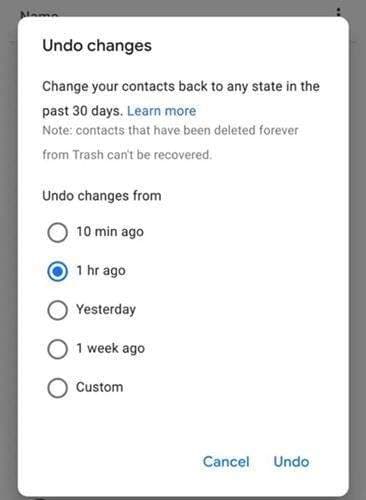
If you prefer a desktop environment or cannot access the app, the Google Contacts web portal offers an incredibly powerful "Undo Changes" feature, acting as a time machine for your digital address book.
-
Step 1 Access the Web Portal
Navigate to contacts.google.com using any desktop web browser.
-
Step 2 Authenticate Your Account
Sign in using the exact Google Account credentials linked to your affected Android smartphone.
-
Step 3 Open Settings
Click the gear-shaped settings icon situated in the upper-right corner of the dashboard.
-
Step 4 Initiate Undo Protocol
Select "Undo Changes" from the available dropdown menu.
-
Step 5 Define the Timeframe
A prompt will offer various restoration windows (e.g., 10 minutes ago, 1 hour ago, yesterday, 1 week ago, or a custom timeframe up to 30 days). Choose the option that predates the data loss.
-
Step 6 Confirm the Action
Click "Undo." The cloud will revert your contacts to the specified state, and these changes will automatically sync to your phone.
C. Restore from Google Account Backup
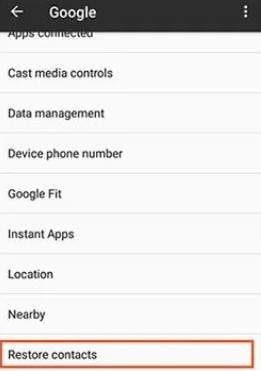
If you recently performed a factory reset or migrated to a new device, a full system backup restoration might be required. This method relies on the comprehensive device backups stored in Google Drive.
-
Step 1 Open System Settings
Navigate to the main Settings menu on your Android handset.
-
Step 2 Access Google Preferences
Scroll downward and tap on "Google" to enter your account and synchronization dashboard.
-
Step 3 Locate Restoration Options
Search for the "Set up & restore" section, then tap "Restore Contacts" to view available cloud snapshots.
-
Step 4 Retrieve Your Data
Select the relevant device backup containing your missing contacts, and tap "Restore" to inject them back into your phone.
Method 3: Check Other Backup Sources (Samsung Cloud & SIM Card)
Depending on your hardware manufacturer and historical usage habits, secondary backup locations like brand-specific clouds and physical SIM cards are highly valuable resources.
A. For Samsung Users: Retrieve from Samsung Cloud
Galaxy device owners benefit from an independent backup ecosystem. Here is how to utilize Samsung Cloud for contact retrieval:
-
Step 1 Open Device Settings
Launch the Settings app on your Samsung Galaxy smartphone.
-
Step 2 Navigate to Accounts
Select the Accounts and backup menu.
-
Step 3 Access Cloud Controls
Under the designated Samsung Cloud header, tap Restore data.
-
Step 4 Select the Target Backup
Choose the specific device backup archive you wish to draw data from.
-
Step 5 Execute the Restoration
Ensure the Contacts toggle is actively checked, then tap Restore to initiate the download.

B. For Older Contacts: Import from SIM Card
If you are attempting to locate older numbers, they might still be residing on your physical SIM card. Importing them to modern device storage is incredibly straightforward:
-
Step 1 Open the Address Book
Launch the default Contacts app.
-
Step 2 Access Management Tools
Tap the Menu icon (three horizontal lines or dots) and select Manage contacts.
-
Step 3 Locate Import Protocols
Select the Import or export contacts functionality.
-
Step 4 Target the SIM Memory
Choose the Import from SIM card option.
-
Step 5 Finalize the Import
Select a destination (e.g., your primary Google Account or internal Device storage) and confirm the transfer.
Part 4: For Complex Cases: Dr.Fone Desktop Recovery
 Scan Android phones and tablets directly.
- Preview and recover only what you want.
- Supports WhatsApp, photos, videos, contacts, and more.
- Works with 6000+ Android devices.

If mobile applications fail to detect your lost information—perhaps due to catastrophic data corruption, a severely shattered screen, or post-factory reset complications—you require robust desktop-grade intervention. Dr.Fone - Data Recovery (Android) conducts a remarkably deep forensic scan of your mobile hardware. Recognized globally as a premium deleted contacts recovery app for complex scenarios, it boasts selective preview capabilities, ensuring you only retrieve the precise data you require.
How to Restore Deleted Contacts on Android Using Dr.Fone Desktop
-
Step 1 Launch the Desktop Software
Install and open Wondershare Dr.Fone on your PC or Mac. Navigate to the left-hand "Toolbox" interface and click on "Data Recovery."
-
Step 2 Define the Operating System
When prompted by the software, distinctly select "Android" as your target device platform.
-
Step 3 Select the Recovery Feature
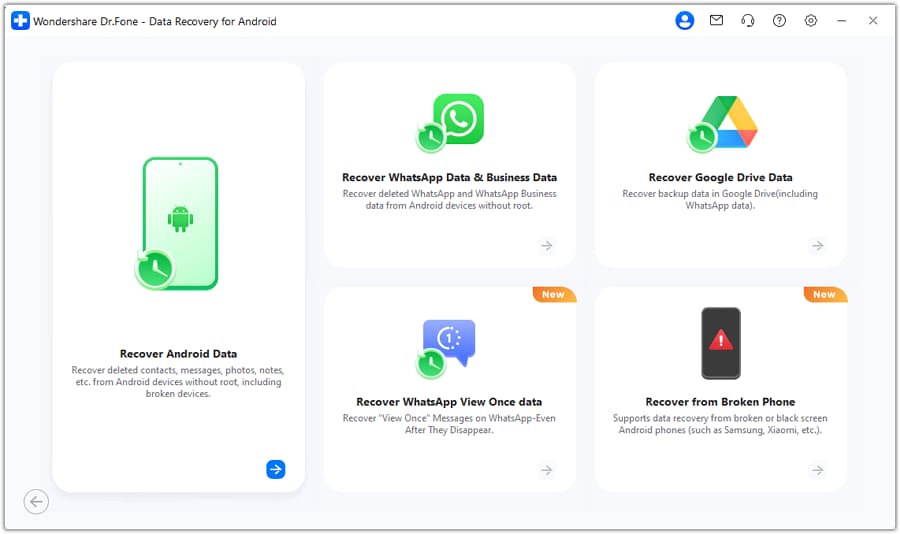
Click on "Recover Android Data" from the subsequent menu to initialize the specific retrieval protocols.
-
Step 4 Establish a USB Connection
Link your Android smartphone to your computer using a dependable, data-capable USB cable. Allow the software a moment to automatically recognize and authenticate your device.
-
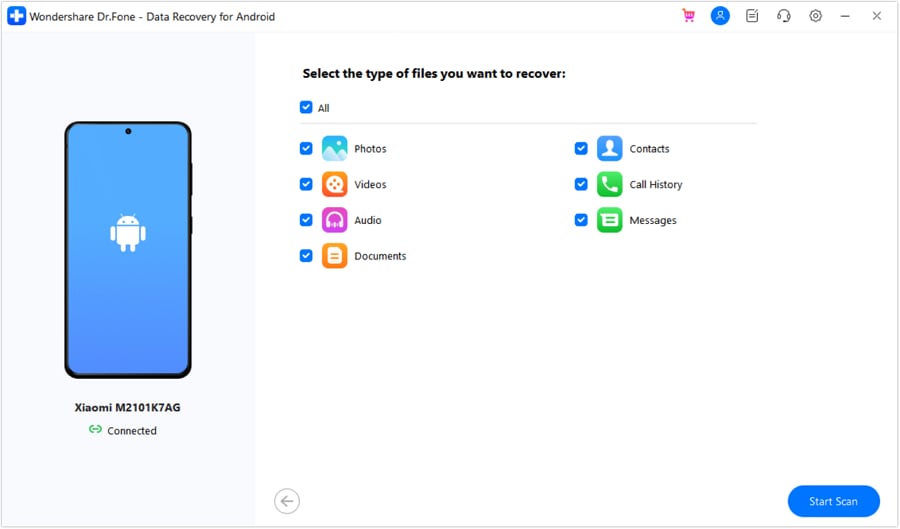
Step 5 Specify File Types
Once authenticated, the screen will present various file categories. Select "Contacts" (and any other data types you wish to scan for), then click the "Start Scan" button situated in the lower-right corner.
-
Step 6 Allow the Forensic Scan to Run
Dr.Fone will deeply inspect your smartphone's internal sectors for hidden or deleted fragments. Avoid disconnecting the device during this critical phase.
-
Step 7 Preview the Extracted Data
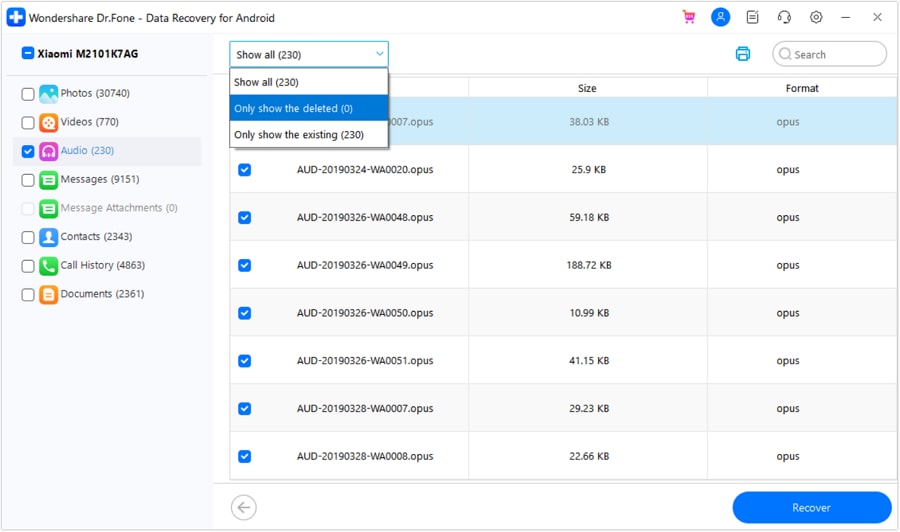
Upon completion, a detailed interface will display all recoverable elements. Utilize the intuitive filter toggles located at the top to isolate and thoroughly review your salvaged contact entries.
-
Step 8 Finalize the Restoration
Check the boxes next to the numbers you need, then click the "Recover" button at the bottom right. Specify a secure folder on your computer's hard drive to safeguard the newly exported contact lists.


Part 5: Advanced Method — SQL Database Recovery (Requires Root)
Target Audience: Highly advanced users proficient with root permissions and internal Android file directories.
Extracting erased data directly from the system's Structured Query Language (SQL) database is an incredibly technical endeavor. This pathway requires manipulating the contacts2.db core file situated deep within the Android architecture. Special software and elevated root permissions are mandatory. If you are determined to understand how to recover erased contacts android systems process internally, follow these granular steps:
-
Step 1 Secure Root Privileges
Ensure your device is fully rooted. Without root access, navigating to the system-level database directories is entirely restricted by Android's security protocols.
-
Step 2 Deploy a Capable File Explorer
Install a robust file management utility, such as "Root Explorer," which possesses the clearance to view hidden OS partitions.
-
Step 3 Locate the Database Directory
Use the explorer app to traverse to the precise system path:
/data/data/android.providers.contacts/databases. Copy this entire folder structure to your removable SD card or standard internal storage for safe handling. -
Step 4 Export to a Workstation
Link the Android phone to your PC. Transfer the isolated "Database" directory to your local computer's desktop.
-
Step 5 Prepare the SQLite Environment
Acquire and configure a database reading tool. A common method is utilizing the Mozilla Firefox browser paired with a dedicated SQLite Manager add-on extension.
-
Step 6 Access the contacts2.db File
Launch the SQLite Manager and select "Connect Database." Browse your PC to load the exported contacts2.db file.
-
Step 7 Query and Extract Data
Once the database structure populates, explore the table explicitly labeled "Data." Within this matrix, you will uncover RAW text formats of both active and recently deleted contacts, ready for manual extraction.
Part 6: Last Resort — Contact Your Mobile Provider
When local software recovery proves fruitless, reaching out to your telecommunications carrier remains a tertiary contingency. Carriers generally avoid archiving personalized address books for privacy reasons, yet they extensively log inbound and outbound network activities, which can help you manually reconstruct essential phone numbers.
- Locate Support Channels: Identify the official customer support hotline or chat portal for your provider (e.g., T-Mobile, AT&T, Vodafone).
- Request Billing Records: Inquire if they can generate detailed historical call logs or SMS transmission records associated with your billing cycle.
- Navigate Security Checks: Be prepared to answer rigorous account ownership verification questions before they dispense sensitive telecom data.
Conclusion
Losing digital connections no longer triggers immediate panic, as modern Android architecture features robust redundancies. From unmasking hidden display settings and leveraging Google's automated Trash bin, to performing an intense SQLite database extraction, multiple avenues exist to restore deleted contacts on Android safely and effectively.
For guaranteed results without requiring technical prowess or pre-existing cloud snapshots, relying on professional-grade recovery software is the smartest investment. By utilizing Dr.Fone - Data Recovery (Android), users can bypass the complexities of rooting and intuitively restore missing contacts directly from fragmented storage memory, ensuring seamless communication remains uninterrupted.
FAQ
-
1. Why can't I restore contacts from my Google account?
If you find yourself unable to initiate a Google restoration, verify the following factors:• Mismatched Accounts: Confirm you are actively logged into the precise Google profile that originally synchronized the contacts.• Expiration Date Passed: Google permanently purges items resting in the Trash folder after exactly 30 days.• Corrupt Cloud Data: The backup snapshot itself may have encountered synchronization errors, rendering it unreadable.• Capacity Limitations: Google enforces a strict ceiling of 25,000 individual contacts or 20MB of storage. Exceeding this halts further backups. -
2. Where is the Recycle Bin on my Android phone for contacts?
The native "Recycle Bin" or "Trash" is primarily integrated directly into the Contacts application rather than the global file manager.• Locating the Native Bin: Open your Contacts app, navigate to Settings or the "Fix & Manage" tab, and seek options labeled "Trash" or "Recently Deleted." This functionality is generally standard on Android 11 and newer operating systems.• If the Bin is Missing: Some customized manufacturer skins omit this feature. If your OS lacks a native bin, you must bypass the interface entirely using deep-scan recovery software like Dr.Fone - Data Recovery (Android). -
3. How do you recover deleted contacts on Android without a computer?
Restoring data without a desktop is highly achievable. The most streamlined strategy involves deploying a specialized mobile application like the Dr.Fone App directly onto your handset, allowing the software to scan local memory arrays natively. Furthermore, if your data was purged within the last month, accessing the mobile web browser and navigating to Google Contacts online provides an immediate cloud-based rollback option. -
4. Can I recover contacts directly from the phone's database for free?
Yes, but it is strictly an advanced, high-risk procedure. You must "root" your smartphone to bypass security protocols, install an advanced file explorer, and manually extract thecontacts2.dbSQL file for desktop analysis. Because improperly executing a root can permanently disable your device and nullify warranties, it is widely recommended that everyday users avoid this method in favor of automated, non-invasive software tools.
 Add Wondershare Dr.Fone as a preferred source on Google



