
How to Backup iPhone Without Passcode with 4 Easy Methods [iPhone 17 Supported]
iPhone Backup
- iPhone Data Backup
- 1. Back up iPhone in Recovery Mode
- 2. Back Up iPhone With/Without iTunes
- 3. Back up iPhone to Mac
- 4. Back up iPhone/iPad to Computer
- 5. Back up iPhone to Mac Catalina
- 6. Back up Jailbreak Apps And Restore
- 7. iPhone Backup Software
- 8. Back up iPhone/iPad Easily
- 9. Back up iPhone/iPad in DFU Mode
- 10. Back up iPhone Apps and App Data
- 11. Back up Notes on iPhone and iPad
- 12. Back up iOS to External Hard Drive
- 13. Export Notes from iPhone to PC/Mac
- 14.Back up iPhone Photos to Google Photos
- 15. Back Up Your iPhone Voicemails
- 16. Back Up to External Drive
- 17.How to Back Up to NAS
- 18.Back Up iPhone With Broken Screen
- 19.Back Up iPhone to Google Drive
- 20.Buy Used iPhones
- 21.Sell Used Phone for Cash
- 22.Sell Used iPhone for Dollar
- 23.How Much is My iPhone Worth
- iPhone Data Recovery
- 1. Recover iPhone Data Without Backup
- 2. Restore Calendar on iPhone
- 3. Recover Call History on iPhone
- 4. Recover iPhone Lost Data
- 5. Restore iPhone in Recovery Mode
- 6. Undelete iPhone Backup Files
- 7. Recover Deleted iPhone Messages
- iPhone Data Restore
- 1. Restore iPhone from iTunes Backup
- 2. Restore iPhone after Downgrade
- 3. Restore iPhone from Backup
- 4. Restore iPhone from iPad Backup
- 5. Restore iPhone from DFU Mode
- 6. Restore iPhone Deleted Text Message
- iPhone Backup Problems
- 1. Find iPhone Backup Location on Mac
- 2. iPhone Backup Password Never Set
- 3. iPhone Backup Password Forget
- 4. iCloud Backup Taking Forever
- 5. iPhone Won't Backup to iCloud
- 6. iTunes Won't Backup iPhone
- iPhone Restore Problems
- 1. iTunes Stuck on Verifying iPhone
- 2. Not Space to Restore iPhone Backup
- 3. iTunes Backup Not Restoring
- 4. iPhone Won't Restore
- WhatsApp Backup & Restore
- 1. WhatsApp from Google Drive to iOS
- 2. Restore Old WhatsApp Backup
- 3. Restore WhatsApp Chat on iPhone
- 4. Retrieve WhatsApp Chat History
- 5. See Deleted Messages on WhatsApp
- 6. Restore WhatsApp Stuck on iPhone
- 7. iPhone WhatsApp to Google Drive
- 8. Back Up WhatsApp on iPhone
- 9. Backup WhatsApp Data before Changing Number
- iPhone Backup Tips
- 1. Extract Data From iPhone
- 2. Encrypt iPhone Backup
- 3. Reset iPhone Backup Password
- 4. Extract iPhone Backup in Win 10
- 5. How Long take iPhone to Backup
- 6. Find iPhone Backup Location
- 7. iPhone Backup Password
- 8. View iPhone Backup on Computer
- 9. iPhone Backup with iTunes/iCloud
- 10.Check Last Backup on iPhone
- 11. How To Backup Foldable iPhone
- 12. Best Backup Chargers for iPhone
- 13. Speed Up Your iPhone Backups
- 14. Save Data When iPhone Disabled
- ● Manage/transfer/recover data
- ● Unlock screen/activate/FRP lock
- ● Fix most iOS and Android issues
- Free Download Free Download Free Download

Jun 30, 2026 • Filed to: Backup & Restore Solutions • Proven solutions
 TL;DR:
Backing up a locked or disabled iPhone without a passcode is achievable using third-party software like Wondershare Dr.Fone or natively via iTunes and Finder if specific trusted-device conditions are met.
● iTunes on Windows and Finder on Mac will only back up a locked iPhone if the device was previously synced with that specific computer and has not been restarted since the last connection.
● Wondershare Dr.Fone - Phone Backup (iOS) provides a manual and automatic passcode-free alternative for Windows and Mac users to save over 24 data types via USB or wireless connection, including support for the iPhone 17.
● If an iPhone was never synced to a computer, establishing trust natively requires the passcode; users permanently locked out must use a tool like Dr.Fone - Screen Unlock (iOS) via Recovery or DFU mode to reset the screen lock.
Ask AI for a summary
 ChatGPT
 Perplexity
 Gemini
 Claude
 Grok
Grok
Dr.Fone Basic:
Better Control for Your Phone
Manage, transfer, back up, restore, and mirror your device
Have you ever urgently needed to backup iPhone without passcode but found yourself locked out because you forgot it? You’re not alone—many users face situations where their iPhone becomes disabled, and they can’t access important data. While some eventually find solutions, many remain stuck searching for reliable ways to create an iPhone backup without passcode or iTunes.
Whether you're upgrading to the new iPhone 17 or simply locked out of your current device, learning how to backup iPhone without passcode is a must for avoiding data loss and keeping your digital life secure.
This article is going to tell you all about how to back up iPhone without a Passcode. We will explore everything about it. However, let's start by finding out whether it is possible!
- Part 1. Can You Back Up iPhone Without a Passcode?
- Part 2. How to Backup iPhone While Disabled Without Passcode/iTunes? [Best Method]

- Part 3. How to Backup Locked iPhone to iCloud Via iTunes [Windows]?
- Part 4. How to Backup iPhone to iCloud Via Finder [Mac]?
- Part 5. Bonus Tip: How to Unlock Disabled iPhone in One Click?
Part 1. Can You Back Up iPhone Without a Passcode?
Yes, you can! Indeed, passcodes are for the security of your device, but sometimes we get caught in bad situations. We don't remember the passcode and end up thinking we lost everything. But time has changed now. Technology has evolved and turned the tables.
Various methods are available that can help you backup iPhone without passcode. You don't need to visit phone operators or tech gurus to get the job done. These methods are easy to follow and anyone can perform them. Let's explore them together!
Part 2. How to Backup iPhone While Disabled Without Passcode/iTunes? [Best Method]
If you’ve ever wondered how to backup iPhone without passcode or iTunes, Wondershare Dr.Fone is one of the most reliable tools available today. Instead of struggling with complicated methods, this solution allows you to create a secure backup in just a single click. It supports more than 24 different data types—including photos, videos, music, contacts, messages, and even app data—so nothing important gets left behind. What makes it even more convenient is that you don’t need to rely on a USB cable. Dr.Fone provides a wireless backup option, making the process faster and more user-friendly. This is especially useful for users of the new iPhone 17, where Apple has enhanced wireless connectivity and data transfer speeds.
The best part? You don't need any tech-related skills to use this tool. Its straightforward interface makes it easy to use. Dr.Fone is available for both Windows and Mac users.
Dr.Fone - Phone Backup (iOS)
Backup iPhone While Disabled Without Passcode/iTunes
- One-click to backup the whole iOS device to your computer.
- Allow previewing and selectively export contacts from iPhone to your computer.
- No data loss on devices during the restoration.
- Works for all iOS devices. Compatible with the latest iOS version.


Now that we have explored Dr. Fone’s amazing features, let’s move forward to the steps of using it!
Steps to Backup iPhone Without Passcode/iTunes
Download and install the Dr.Fone app on your computer or laptop. Then, follow the instructions given below:
Method 1. Manually Back Up the Data
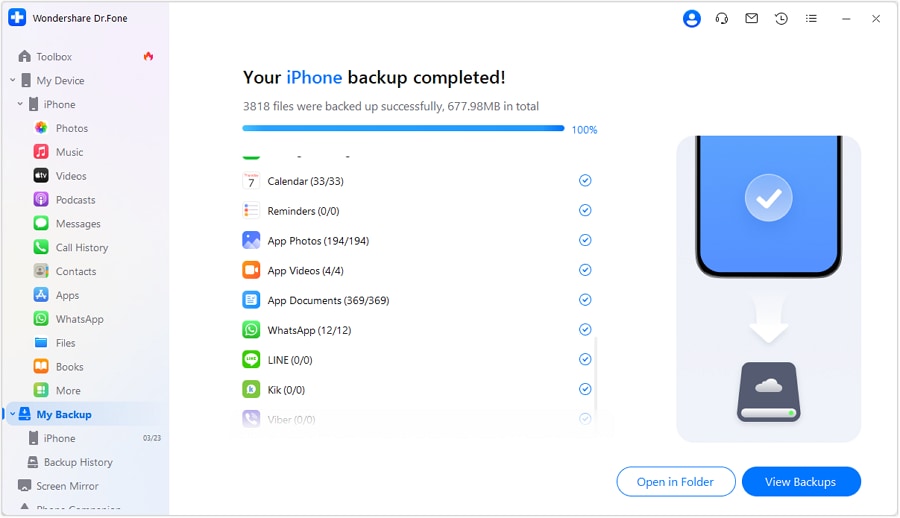
Step 1: Launch the Dr.Fone app. Click the My Backup option on the left panel. Then, click the Back Up Now button to start backing up your iDevice.

Step 2: Dr.Fone will detect the files and back them up on your device. The time may vary according to the size of your data. If you wish to cancel the process, you can click the Cancel button.

Step 3: Once the backup is completed, you will see a window displaying the backup details. You can see the files by clicking the View Backups button.
Method 2. Automatically Back Up the Data
Step 1: Launch the Dr.Fone app and navigate to My Devices> Backup preferences. It will open a new window with some options for backing up data.
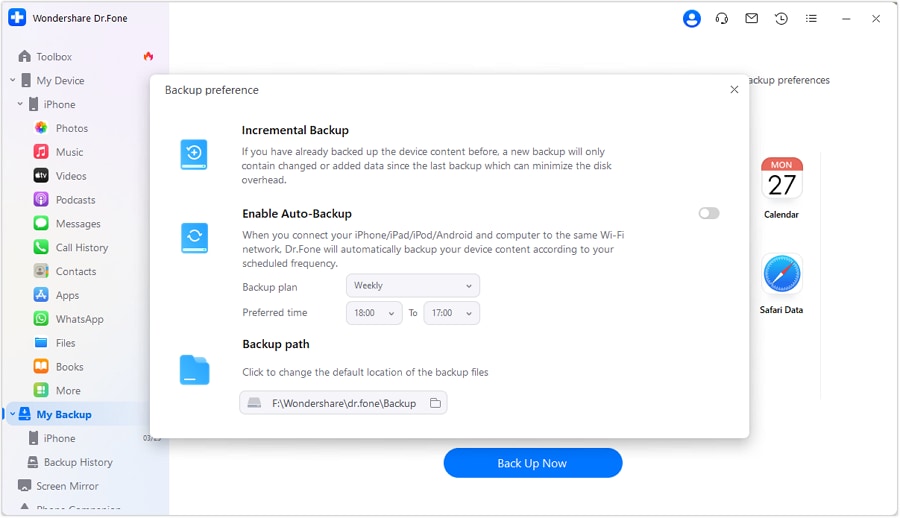
Step 2: Now. connect your iOS device to the computer via a USB cable. Then, turn on the Enable Auto-Backup toggle. Select the Backup Plan and Preferred Time, then click the Back Up Nowbutton to start the process.

Step 3: You can click Backup History to view all iOS device backup history. Click on the View button to view the contents of the backup files.

This is how to back up an iPhone while disabled using Dr.Fone. It is the most hassle-free and efficient way to do the job. However, if you want to try the manual methods, you may read the next sections of this article.
Part 3. How to Backup Locked iPhone to iCloud Via iTunes [Windows]?
Another way to back up the iPhone while locked is by using iTunes—though this method only works under specific conditions. If you’ve previously synced your iPhone with a trusted computer, iTunes may remember the device credentials, allowing you to create a new backup without re-entering the passcode. However, this option is only effective if you haven’t restarted the iPhone since your last sync.
You can follow the instructions given below to backup your iPhone to iCloud via iTunes:
Step 1: Open the iTunes software on your laptop or PC.
Step 2: Connect your locked iPhone to your computer via a USB cable. You will see it syncing with the iTunes.
Step 3: Now, click the device icon on the top left. Go to Summary, select This Computer, and then click the Back Up Now button.

After a few seconds, the backup process will be completed, and you will have a backup of your iPhone on your PC. You can restore it later. However, this method is for Windows. Let's move forward and see how to do it on Mac.
Part 4. How to Backup iPhone to iCloud Via Finder [Mac]?
The process to back up a locked iPhone without a passcode on a Mac is almost the same as on Windows. However, this method only works if you’ve previously synced and backed up your iPhone with iTunes or Finder on that computer. If so, you can follow a few simple steps to complete the backup seamlessly.
Here is how you can backup iPhone to iCloud via Finder:
Step 1: First, connect the iPhone to your Mac via a USB cable.
Step 2: Open Finder on your Mac. You will see a list of devices under Locations. Select your device and proceed.
Step 3: On the top menu of the Finder interface, you will see various options. Click General.
Step 4: Here, you will see various options. Select Back up all of the data on your iPhone to this Mac and click Back Up Now.

This is how you can back up iPhone to iCloud via Finder. Let’s suppose, you have done the backup successfully, but how will you access your locked phone? Don’t worry! We have a solution for this as well. Let’s explore it together.
Part 5. Bonus Tip: How to Unlock Disabled iPhone in One Click?
We’ve already explored how to recover files if you forget your iPhone backup password. But what happens if you can’t unlock your device at all? In cases where you’re locked out, there are still reliable ways to backup iPhone without passcode. These methods ensure that even without access to your screen, you can safeguard important data such as photos, contacts, messages, and app files before attempting a reset or recovery.
Well, it is a nightmare. Thankfully, Dr.Fone-Screen Unlock (iOS) has the solution for this as well. In this section, we will explore how you can unlock an iPhone without a passcode. You know what the best part is. This powerful tool can also unlock Touch or Face ID.
Dr.Fone - Screen Unlock (iOS)
Unlock Disabled iPhone in One Click
- Simple, click-through, process.
- Unlock screen passwords from all iPhones and iPads.
- No tech knowledge is required, everybody can handle it.
- Supports the latest iOS version fully!
Download and install the Dr.Fone app on your computer or laptop. Then follow the instructions given below:
Step 1: Launch the Dr.Fone app on your computer. Then, navigate through Toolbox>Screen Unlock>iOS to open a new window.

Step 2: Here, select the Unlock iOS Screen option, and then, on the next window, click Start to initiate the unlocking process.

Step 3: Now, you are supposed to put your iOS device into recovery mode. To do that, you can follow the instructions given on the screen.

Note: If you are unable to follow the instructions, you can “Try DFU Mode”. It will open the instructions to put your device into DFU mode.
Step 4: If the system doesn't detect the device model and system version automatically, you can select manually. After selecting them, click the Start button to proceed.

Step 5: After clicking the Start button, Dr.Fone will start downloading the firmware package of your device. Once downloaded, click the Unlock button to continue the process.

Step 6: Next, you will see a pop-up asking you to enter the confirmation code. Enter it and select the Unlock button. It will start the unlocking process.

Step 7: After a few minutes, your iPhone will be successfully unlocked. You can click the Done button to conclude the process. If you are still left with the locked device, you can try again.

So, this is how you can unlock your locked iPhone with Dr.Fone. You don't have to go through complex steps or visit phone operators to unlock it. It is easily doable at home without requiring any tech skills.
Conclusion
Understanding how to backup iPhone without passcode can be a lifesaver, especially if your device becomes disabled or you forget your unlock code. In this guide, we have covered effective methods for both Mac and Windows users, along with step-by-step instructions to simplify the process. With the release of iPhone 17 and iOS 26, Apple has introduced stronger security measures, making regular backups even more essential to avoid permanent data loss. Whether you use iTunes, Finder, or iCloud alternatives, the best practice is to back up your critical files—photos, messages, and contacts—on a routine basis.
Moreover, if you want a hassle-free way to back up your iPhone without a passcode, download Wondershare Dr.Fone. You already have seen how helpful it is to manage your iPhone's data. Plus, it offers many other useful features.
FAQs
Dr.Fone Basic:
Better Control for Your Phone
Manage, transfer, back up, restore, and mirror your device


James Davis
staff Editor